background image

2

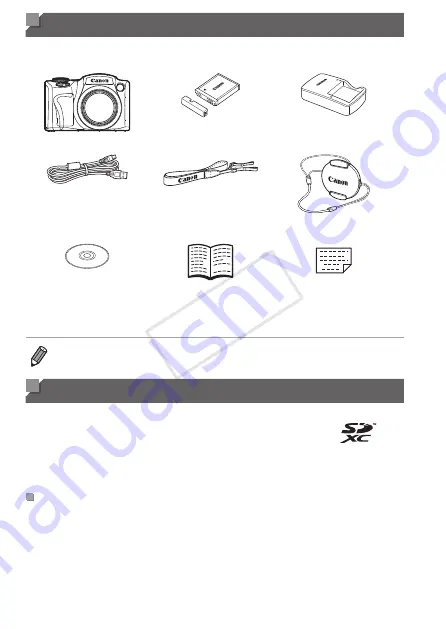
Package Contents

Before use, make sure the following items are included in the package.

If anything is missing, contact your camera dealer.

Camera

Battery Pack NB-6L

(with terminal cover)

Battery Charger

CB-2LY/CB-2LYE

Interface Cable

IFC-400PCU

Neck Strap

NS-DC11

Lens Cap

(with cord)

DIGITAL CAMERA  

Solution Disk*

(CD-ROM)

Getting Started

(this guide)

Warranty Card

* Contains software and PDF manuals (

=

  23).

• 

A memory card is not included.

• 

Any supplements or revisions to the 

Camera User Guide

 are included at the 

end of this guide.

Compatible Memory Cards

The following memory cards (sold separately) can be used, regardless of capacity.

• 

SD memory cards*

• 

SDXC memory cards*

• 

SDHC memory cards*

• 

Eye-Fi cards

* Conforms to SD specifications. However, not all memory cards have been verified to 

work with the camera.

About Eye-Fi Cards

This product is not guaranteed to support Eye-Fi card functions (including 

wireless transfer). In case of an issue with an Eye-Fi card, please check 

with the card manufacturer.

Also note that an approval is required to use Eye-Fi cards in many countries 

or regions. Without approval, use of the card is not permitted. If it is unclear 

whether the card has been approved for use in the area, please check with 

the card manufacturer.

COP

Y

Summary of Contents for Power Shot G15

Page 1: ... de mise en route Please refer to the complete user guide included on the CD ROM for more detailed information Pour plus de détails reportez vous au guide de l utilisateur complet inclus sur le CD ROM Français English COPY ...

Page 2: ...COPY ...

Page 3: ...ad this guide including the Safety Precautions section before using the camera Reading this guide will help you learn to use the camera properly Store this guide safely so that you can use it in the future English COPY ...

Page 4: ...e Compatible Memory Cards The following memory cards sold separately can be used regardless of capacity SD memory cards SDXC memory cards SDHC memory cards Eye Fi cards Conforms to SD specifications However not all memory cards have been verified to work with the camera About Eye Fi Cards This product is not guaranteed to support Eye Fi card functions including wireless transfer In case of an issu...

Page 5: ...era problems while abroad return to the area of purchase before contacting a Canon Customer Support Help Desk Although the LCD monitor is produced under extremely high precision manufacturing conditions and more than 99 99 of the pixels meet design specifications in rare cases some pixels may be defective or may appear as red or black dots This does not indicate camera damage or affect recorded im...

Page 6: ...ormation you should know Notes and tips for expert camera use xx Pages with related information in this example xx represents a page number Instructions in this guide apply to the camera under default settings For convenience all supported memory cards are simply referred to as the memory card The tabs shown above titles indicate whether the function is used for still images movies or both Still I...

Page 7: ... FUNC SET button h Flash Right button Q Self timer Down button z z Turning the control dial is one way to choose setting items switch images and perform other operations Most of these operations are also possible with the o p q r buttons In this guide icons are used to represent the corresponding camera buttons and dials on which they appear or which they resemble The following camera buttons and ...

Page 8: ...ay from infants when using the flash Store this equipment out of the reach of children and infants Strap Putting the strap around a child s neck could result in asphyxiation Use only recommended power sources Do not attempt to disassemble alter or apply heat to the product Avoid dropping or subjecting the product to severe impacts To avoid the risk of injury do not touch the interior of the produc...

Page 9: ...s the rated capacity of the electrical outlet or wiring accessories Do not use if the power cord or plug are damaged or not fully plugged into the outlet Do not allow dirt or metal objects such as pins or keys to contact the terminals or plug The battery may explode or leak resulting in electrical shock or fire This could cause injury and damage the surroundings In the event that a battery leaks a...

Page 10: ...storing the product in the following places Places subject to strong sunlight Places subject to temperatures above 40 C 104 F Humid or dusty areas These could cause leakage overheating or an explosion of the battery resulting in electrical shock fire burns or other injuries High temperatures may cause deformation of the camera or battery charger casing The slideshow transition effects may cause di...

Page 11: ...h tape or other insulators Contacting other metal materials may lead to fire or explosions Unplug the battery charger from the power outlet after charging is complete or when you are not using it Do not place anything such as cloth on top of the battery charger while it is charging Leaving the unit plugged in for a long period of time may cause it to overheat and distort resulting in fire Do not p...

Page 12: ...he strap z z Remove the lens cap from the camera and attach the lens cap cord to the strap z z Always remove the lens cap before turning the camera on z z Keep the lens cap on the lens when the camera is not in use Holding the Camera z z Place the strap around your neck z z When shooting keep your arms close to your body and hold the camera securely to prevent it from moving If you have raised the...

Page 13: ...LY Flip out the plug and plug the charger into a power outlet z z CB 2LYE Plug the power cord into the charger then plug the other end into a power outlet X X The charging lamp turns orange and charging begins X X When the charging is finished the lamp turns green 3 Remove the battery z z After unplugging the battery charger remove the battery by pushing it in and up To protect the battery and kee...

Page 14: ... 1 Check the card s write protect tab z z Recording is not possible on memory cards with a write protect tab when the tab is in the locked downward position Slide the tab up until it clicks into the unlocked position 2 Open the cover z z Slide the cover and open it Terminals Battery Lock 3 Insert the battery z z While pressing the battery lock in the direction of the arrow insert the battery as sh...

Page 15: ...e wrong way may damage the camera 5 Close the cover z z Lower the cover and hold it down as you slide it until it clicks into the closed position For guidelines on how many shots or hours of recording can be saved on one memory card see Specifications 217 in the Camera User Guide Removing the Battery and Memory Card Remove the battery z z Open the cover and press the battery lock in the direction ...

Page 16: ...on you specify this way is recorded in image properties when you shoot and it is used when you manage images by shooting date or print images showing the date You can also add a date stamp to shots if you wish see Camera User Guide 1 Turn the camera on z z Press the power button X X The Date Time screen is displayed 2 Set the date and time z z Press the q r buttons to choose an option z z Press th...

Page 17: ...e the setting The setting screen is no longer displayed z z To turn off the camera press the power button Unless you set the date time and home time zone the Date Time screen will be displayed each time you turn the camera on Specify the correct information To set daylight saving time 1 hour ahead choose in step 2 and then choose by pressing the o p buttons or turning the 5 dial COPY ...

Page 18: ...e settings z z Press the n button to close the menu Date time settings can be retained for about 3 weeks by the camera s built in date time battery backup battery after the battery pack is removed The date time battery will be charged in about 4 hours once you insert a charged battery or connect the camera to an AC adapter kit sold separately see Camera User Guide even if the camera is left off On...

Page 19: ...e o p q r buttons or turn the 5 dial to choose a language and then press the m button X X Once the display language has been set the setting screen is no longer displayed The current time is displayed if you wait too long in step 2 after pressing the m button before you press the n button In this case press the m button to dismiss the time display and repeat step 2 You can also change the display ...

Page 20: ...button X X The startup screen is displayed 2 Enter A mode z z Set the mode dial to A z z Aim the camera at the subject The camera will make a slight clicking noise as it determines the scene X X Icons representing the scene and image stabilization mode are displayed in the upper right of the screen X X Frames displayed around any detected subjects indicate that they are in focus 3 Compose the shot...

Page 21: ...r use If you prefer not to use the flash push it down with your finger into the camera Shoot z z Press the shutter button all the way down X X As the camera shoots a shutter sound is played and in low light conditions when you have raised the flash it fires automatically z z Keep the camera still until the shutter sound ends X X Your shot remains displayed on the screen for about two seconds z z E...

Page 22: ...sed time X X Black bars displayed on the top and bottom edges of the screen indicate image areas not recorded X X Frames displayed around any detected faces indicate that they are in focus z z Once recording begins you can take your finger off the movie button Finish shooting z z Press the movie button again to stop shooting The camera beeps twice as recording stops COPY ...

Page 23: ... q button or turn the 5 dial counterclockwise To view the next image press the r button or turn the 5 dial clockwise z z Press and hold the q r buttons to browse through images quickly Images appear grainy at this time z z To access Scroll Display mode turn the 5 dial rapidly In this mode turn the 5 dial to browse through images z z To return to single image display press the m button z z Movies a...

Page 24: ...Erasing the Images You can choose and erase unneeded images one by one Be careful when erasing images because they cannot be recovered 1 Choose an image to erase z z Press the q r buttons or turn the 5 dial to choose an image 2 Erase the image z z Press the a button z z After Erase is displayed press the q r buttons or turn the 5 dial to choose Erase and then press the m button X X The current ima...

Page 25: ... Auto Update Function Using the included software you can update to the latest version and download new functions via the Internet some software excluded Be sure to install the software on a computer with an Internet connection so you can use this function Internet access is required to use this function and any ISP account charges and access fees must be paid separately PDF Manuals Camera User Gu...

Page 26: ...er Mac OS X 10 7 Core 2 Duo or higher Mac OS X 10 6 Core Duo 1 83 GHz or higher RAM Still images Windows 7 64 bit 2 GB or more Windows 7 32 bit Vista 1 GB or more Windows XP 512 MB or more Movies 1 GB or more Mac OS X 10 7 2 GB or more Mac OS X 10 6 1 GB or more Interfaces USB Free Hard Disk Space 440 MB or more 550 MB or more Display 1024 x 768 resolution or higher Silverlight 4 or later max 100 ...

Page 27: ... to install the software on a computer with an Internet connection 1 Insert the CD ROM in the computer s CD ROM drive z z Insert the included CD ROM DIGITAL CAMERA Solution Disk 2 in the computer s CD ROM drive z z On a Macintosh computer after inserting the disc double click the desktop disc icon to open it and then double click the icon displayed 2 Begin the installation z z Click Easy Installat...

Page 28: ...port For details about USB connections on the computer refer to the computer user manual 4 Install the files z z Turn the camera on and follow the on screen instructions to complete the installation process X X The software will connect to the Internet to update to the latest version and download new functions Installation may take some time depending on computer performance and the Internet conne...

Page 29: ...n screen installation instructions for each Doing so will ensure that each camera will receive the correct updates and new functions via the auto update function Saving Images to a Computer Windows 7 and Mac OS X 10 6 are used here for the sake of illustration 1 Connect the camera to the computer z z Follow step 3 on 26 to connect the camera to a computer 2 Turn the camera on to access CameraWindo...

Page 30: ...mputer z z Click Import Images from Camera and then click Import Untransferred Images X X Images are now saved to the Pictures folder on the computer in separate folders named by date z z After images are saved close CameraWindow press the 1 button to turn the camera off and unplug the cable z z For instructions on viewing images on a computer refer to the Software Guide 23 COPY ...

Page 31: ...e computer until camera images are accessible Images shot in vertical orientation may be saved in horizontal orientation Image protection settings may be cleared from images saved to a computer Some problems may occur when saving images or image information depending on the operating system version the software in use or image file sizes Some functions provided by the included software may not be ...

Page 32: ...ion Disk Lens Cap with cord Also available for purchase separately Use of genuine Canon accessories is recommended This product is designed to achieve excellent performance when used with genuine Canon accessories Canon shall not be liable for any damage to this product and or accidents such as fire etc caused by the malfunction of non genuine Canon accessories e g a leakage and or explosion of a ...

Page 33: ...be determined by turning the equipment off and on the user is encouraged to try to correct the interference by one or more of the following measures Reorient or relocate the receiving antenna Increase the separation between the equipment and receiver Connect the equipment into an outlet on a circuit different from that to which the receiver is connected Consult the dealer or an experienced radio T...

Page 34: ...smitting or storing in a retrieval system any part of this guide without the permission of Canon is prohibited Canon reserves the right to change the contents of this guide at any time without prior notice Illustrations and screenshots in this guide may differ slightly from the actual equipment The above items notwithstanding Canon accepts no liability for damages due to mistaken operation of the ...

Page 35: ...t la section Précautions de sécurité avant d utiliser l appareil photo La lecture de ce guide vous aidera à apprendre à utiliser correctement l appareil photo Rangez le dans un endroit sûr pour toute référence ultérieure Français COPY ...

Page 36: ... mémoire compatibles Les cartes mémoire suivantes vendues séparément peuvent être utilisées quelle que soit leur capacité Cartes mémoire SD Cartes mémoire SDXC Cartes mémoire SDHC Cartes Eye Fi Est conforme aux spécifications SD Cependant le fonctionnement de toutes les cartes mémoire avec l appareil photo n a pas été vérifié À propos des cartes Eye Fi La compatibilité de ce produit avec les fonct...

Page 37: ...ontactez un centre d assistance Canon une fois rentré dans le pays d achat Bien que l écran LCD fasse appel à des techniques de fabrication de très haute précision et que plus de 99 99 des pixels répondent aux spécifications il peut exceptionnellement arriver que certains pixels s affichent sous la forme de points rouges ou noirs Ceci n est pas le signe d une défaillance de l appareil photo et n a...

Page 38: ...ts Informations importantes que vous devez connaître Remarques et conseils pour l utilisation avancée de l appareil photo xx Pages avec des informations connexes dans cet exemple xx représente un numéro de page Les instructions de ce guide s appliquent à l appareil photo avec les réglages par défaut Par commodité toutes les cartes mémoire prises en charge sont simplement appelées cartes mémoire Le...

Page 39: ...e Q Retardateur Bas z z Tourner la molette de sélection constitue un moyen de choisir des éléments de réglage de changer d images ou d exécuter d autres opérations La plupart de ces opérations sont également disponibles avec les touches o p q r Dans ce guide les icônes sont utilisées pour représenter les touches et les molettes de l appareil photo correspondantes sur lesquelles elles apparaissent ...

Page 40: ...ourroie dragonne placée autour du cou d un enfant la courroie dragonne présente un risque de strangulation Utilisez uniquement des sources d alimentation recommandées N essayez pas de démonter transformer ou chauffer le produit Évitez de faire tomber le produit ou de le soumettre à des chocs violents Pour éviter tout risque de blessure ne touchez pas l intérieur du produit si vous l avez laissé to...

Page 41: ...i le cordon d alimentation ou la fiche sont endommagés ou si la fiche n est pas correctement enfoncée dans la prise Évitez tout contact entre des objets métalliques épingles ou clés par exemple ou des saletés et les bornes ou la fiche La batterie pourrait exploser ou couler entraînant une décharge électrique ou un incendie Vous pourriez vous blesser et détériorer l environnement En cas de fuite du...

Page 42: ... du soleil Endroits susceptibles d atteindre des températures supérieures à 40 C 104 F Endroits humides ou poussiéreux Les conditions précitées peuvent provoquer une fuite une surchauffe ou une explosion de la batterie entraînant un risque de décharge électrique d incendie de brûlures ou d autres blessures Des températures élevées risquent également de déformer le boîtier de l appareil photo ou du...

Page 43: ...n autre isolant Tout contact avec d autres éléments métalliques peut provoquer un incendie ou une explosion Débranchez le chargeur de batterie de la prise secteur lorsque la batterie est chargée ou si vous ne l utilisez pas Veillez à ne rien poser sur le chargeur de batterie chiffon par exemple pendant la charge Le fait de laisser le chargeur de batterie branché pendant une période prolongée peut ...

Page 44: ... le cache de l objectif et attachez le cordon du cache de l objectif à la courroie z z Retirez toujours le cache de l objectif avant de mettre l appareil photo sous tension z z Conservez le cache de l objectif sur l objectif lorsque vous n utilisez pas l appareil photo Prise en main de l appareil photo z z Placez la courroie autour de votre cou z z Pendant la prise de vue gardez les bras près du c...

Page 45: ...t branchez le chargeur sur une prise secteur z z CB 2LYE branchez le cordon d alimentation sur le chargeur et l autre extrémité sur une prise secteur X X Le témoin de charge devient orange et la charge commence X X Une fois la charge terminée le témoin devient vert 3 Retirez la batterie z z Après avoir débranché le chargeur de batterie retirez la batterie en l enfonçant puis en la soulevant Afin d...

Page 46: ... la position de la languette de protection contre l écriture de la carte z z L enregistrement n est pas possible sur les cartes mémoire dont la languette de protection contre l écriture est en position verrouillée abaissée Faites glisser la languette vers le haut jusqu au déclic dans la position déverrouillée 2 Ouvrez le couvercle z z Faites glisser le couvercle et ouvrez le Bornes Verrou de la ba...

Page 47: ...ermez le couvercle z z Abaissez le couvercle et maintenez le enfoncé pendant que vous le faites glisser jusqu au déclic dans la position fermée Pour des indications sur le nombre de prises de vue ou d heures d enregistrement pouvant être sauvegardé sur une carte mémoire voir Caractéristiques 236 du Guide d utilisation de l appareil photo Retrait de la batterie et de la carte mémoire Retirez la bat...

Page 48: ...és de l image lorsque vous photographiez et sont utilisées lorsque vous gérez les images par date de prise de vue ou imprimez les images en affichant la date Vous pouvez également ajouter un cachet date aux photos si vous le souhaitez consultez le Guide d utilisation de l appareil photo 1 Mettez l appareil photo sous tension z z Appuyez sur la touche ON OFF X X L écran Date Heure s affiche 2 Régle...

Page 49: ...L écran de réglage disparaît z z Pour mettre l appareil photo hors tension appuyez sur la touche ON OFF L écran Date Heure s affichera chaque fois que vous mettrez l appareil photo sous tension tant que vous n aurez pas réglé la date l heure et le fuseau horaire de votre pays Renseignez les informations correctes Pour régler l heure d été 1 heure d avance choisissez à l étape 2 puis choisissez en ...

Page 50: ...e n pour fermer le menu Les réglages de la date heure peuvent être conservés pendant 3 semaines environ par la pile de sauvegarde de la date intégrée à l appareil photo une fois la batterie retirée La pile de sauvegarde de la date se recharge en 4 heures environ une fois que vous insérez une batterie chargée ou raccordez l appareil photo à un kit adaptateur secteur vendu séparément consultez le Gu...

Page 51: ...ur les touches o p q r ou tournez la molette 5 pour choisir une langue puis appuyez sur la touche m X X Une fois la langue d affichage définie l écran de réglage disparaît L heure actuelle s affiche si vous attendez trop longtemps à l étape 2 après avoir appuyé sur la touche m avant d appuyer sur la touche n Dans ce cas appuyez sur la touche m pour supprimer l affichage de l heure et répétez l éta...

Page 52: ...he ON OFF X X L écran de démarrage s affiche 2 Activez le mode A z z Positionnez la molette modes sur A z z Pointez l appareil photo sur le sujet Lorsque l appareil photo détermine la scène un léger clic est émis X X Les icônes représentant la scène et le mode de stabilisation de l image s affichent dans le coin supérieur droit de l écran X X Les cadres affichés autour des sujets détectés indiquen...

Page 53: ... vous préférez ne pas utiliser le flash enfoncez le du doigt dans l appareil photo Prenez la photo z z Appuyez sur le déclencheur à fond X X Au moment de la prise de vue le son du déclencheur est émis et dans de faibles conditions d éclairage si vous avez soulevé le flash il se déclenche automatiquement z z Maintenez l appareil photo immobile jusqu à ce que le son du déclencheur cesse X X Votre ph...

Page 54: ...oires affichées en haut et en bas de l écran indiquent les zones d image non enregistrées X X Les cadres affichés autour des visages détectés indiquent qu ils sont mis au point z z Dès que l enregistrement commence vous pouvez retirer le doigt de la touche vidéo Terminez la prise de vue z z Appuyez à nouveau sur la touche vidéo pour arrêter l enregistrement L appareil photo émet deux bips lorsque ...

Page 55: ... d une montre Pour afficher l image suivante appuyez sur la touche r ou tournez la molette 5 dans le sens des aiguilles d une montre z z Maintenez les touches q r enfoncées pour parcourir rapidement les images Les images apparaissent granuleuses à cette étape z z Pour accéder au mode de défilement de l affichage tournez rapidement la molette 5 Dans ce mode tournez la molette 5 pour parcourir les i...

Page 56: ... les images inutiles une par une Prenez garde lorsque vous effacez des images car elles ne peuvent pas être récupérées 1 Choisissez l image à effacer z z Appuyez sur les touches q r ou tournez la molette 5 pour choisir une image 2 Effacez l image z z Appuyez sur la touche a z z Lorsque Effacer s affiche appuyez sur les touches q r ou tournez la molette 5 pour choisir Effacer puis appuyez sur la to...

Page 57: ...Vous pouvez effectuer une mise à jour vers la dernière version des logiciels fournis et télécharger de nouvelles fonctions via Internet certains logiciels sont exclus Veillez à installer les logiciels sur un ordinateur ayant une connexion Internet pour pouvoir utiliser cette fonction L accès à Internet est nécessaire pour utiliser cette fonction et les frais d abonnement et d accès au FAI doivent ...

Page 58: ... supérieur Mac OS X 10 6 Core Duo 1 83 GHz ou supérieur RAM Photos Windows 7 64 bits 2 Go ou plus Windows 7 32 bits Vista 1 Go ou plus Windows XP 512 Mo ou plus Vidéos 1 Go ou plus Mac OS X 10 7 2 Go ou plus Mac OS X 10 6 1 Go ou plus Interfaces USB Espace libre sur le disque dur 440 Mo ou plus 550 Mo ou plus Écran Résolution de 1024 x 768 ou supérieure Silverlight 4 ou ultérieur max 100 Mo doit ê...

Page 59: ...z à installer les logiciels sur un ordinateur ayant une connexion Internet 1 Insérez le CD ROM dans le lecteur de CD ROM de l ordinateur z z Insérez le CD ROM fourni DIGITAL CAMERA Solution Disk 2 dans le lecteur de CD ROM de l ordinateur z z Sur un ordinateur Macintosh après avoir inséré le disque double cliquez sur l icône du disque sur le bureau pour l ouvrir puis double cliquez sur l icône aff...

Page 60: ...ons USB de l ordinateur reportez vous au mode d emploi de l ordinateur 4 Installez les fichiers z z Allumez l appareil photo et suivez les instructions à l écran pour exécuter le processus d installation X X Une fois la connexion à Internet établie la mise à jour vers la dernière version des logiciels est effectuée et de nouvelles fonctions sont téléchargées L installation peut prendre un certain ...

Page 61: ...ions d installation correspondantes à l écran Vous vous assurez ainsi que les mises à jour et les nouvelles fonctions appropriées à chaque appareil photo seront automatiquement installées Sauvegarde des images sur un ordinateur Windows 7 et Mac OS X 10 6 sont utilisés à titre d illustration 1 Connectez l appareil photo à l ordinateur z z Exécutez l étape 3 de 26 pour raccorder l appareil photo à l...

Page 62: ... depuis l appareil photo puis sur Importer les images non transférées X X Les images sont maintenant sauvegardées dans le dossier Images de l ordinateur dans des dossiers distincts nommés par date z z Une fois les images sauvegardées fermez CameraWindow appuyez sur la touche 1 pour mettre l appareil photo hors tension puis débranchez le câble z z Pour des instructions sur l affichage des images su...

Page 63: ... est possible que les images prises en orientation verticale soient sauvegardées en orientation horizontale Les réglages de protection des images peuvent être effacés des images sauvegardées sur un ordinateur Des problèmes peuvent surgir lorsque vous sauvegardez des images ou des informations sur les images selon la version du système d exploitation les logiciels utilisés ou les tailles de fichier...

Page 64: ...vec cordon Également disponible séparément L utilisation d accessoires Canon d origine est recommandée Cet appareil photo numérique est conçu pour offrir des performances optimales avec des accessoires Canon d origine Canon décline toute responsabilité en cas de dommage subi par ce produit et ou d accidents incendie etc causés par le dysfonctionnement d un accessoire d une marque autre que Canon f...

Page 65: ...31 MÉMO COPY ...

Page 66: ...32 MÉMO COPY ...

Page 67: ...erciales d Apple Inc À propos de la licence MPEG 4 This product is licensed under AT T patents for the MPEG 4 standard and may be used for encoding MPEG 4 compliant video and or decoding MPEG 4 compliant video that was encoded only 1 for a personal and non commercial purpose or 2 by a video provider licensed under the AT T patents to provide MPEG 4 compliant video No license is granted or implied ...

Page 68: ...CDP F493 010 CANON INC 2012 COPY ...

Reviews: