

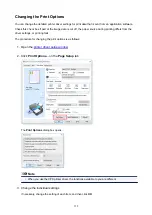


Print settings
•
Prevent paper abrasion
Use this setting only if the print surface becomes smudged.
Important
• Be sure to set this back to
OFF
after printing since it may result in lower printing speed or lower
print quality.
•
Extended copy amount
Selects the amount of image that extends off the paper when printing in borderless (full).
Slight cropping may occur at the edges since the copied image is enlarged to fill the whole page. You
can change the width to be cropped from the borders of the original image as needed.
Important
• This setting can be applied under the following conditions:
- Performing borderless copying
- Borderless is selected for Border when copying printed photos
Note
• If printouts contain margins even though you are printing in Borderless, specifying
Extended
amount: Large
for this setting may help solve the problem.
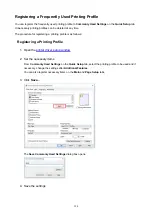
•
Auto photo fix setting
When
ON
is selected, you can select whether to print photos using the Exif information recorded in the
image files when
Default
* or
On
is selected in printing with a PictBridge (Wireless LAN) compliant
device.
* When
Default
is selected for the print setting on the PictBridge (Wireless LAN) compliant device,
select
Auto photo fix
for
Photo fix
in
PictBridge print settings
.
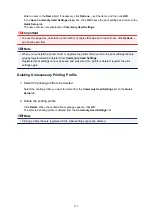
•
Adjust horizontal print position
Adjusts the print position when the left/right margins are not aligned.
You can adjust the left/right margins in increments of 0.01 inch/0.1 mm between -0.12 inch/-3 mm and
+0.12 inch/+3 mm centered on the horizontal center of the paper.
Important
• For Letter-sized or Legal-sized paper, you can adjust the left/right margins between -0.06 inch/-1.5
mm and +0.06 inch/+1.5 mm even if you specify the value over 0.06 inch/1.5 mm.
134
Summary of Contents for PIXMA TS6000 Series
Page 19: ...Basic Operation Printing Photos from a Computer Copying 19 ...
Page 30: ...Handling Paper Originals Ink Tanks etc Loading Paper Loading Originals Replacing Ink Tanks 30 ...
Page 55: ...55 ...
Page 69: ... For Mac OS Adjusting Print Head Position 69 ...
Page 86: ...86 ...
Page 88: ...Transporting Your Printer Legal Restrictions on Scanning Copying Specifications 88 ...
Page 89: ...Safety Safety Precautions Regulatory Information WEEE EU EEA 89 ...
Page 103: ...Main Components and Their Use Main Components Power Supply Using the Operation Panel 103 ...
Page 104: ...Main Components Front View Rear View Inside View Operation Panel 104 ...
Page 123: ...The Page Setup tab is displayed again 123 ...
Page 132: ...For more on setting items on the operation panel Setting Items on Operation Panel 132 ...
Page 141: ...Language selection Changes the language for the messages and menus on the touch screen 141 ...
Page 148: ...Network Connection Network Connection Tips 148 ...
Page 190: ...Note Selecting Scaled changes the printable area of the document 190 ...
Page 226: ...Displaying the Print Results before Printing 226 ...
Page 300: ...ScanGear Scanner Driver Screens Basic Mode Tab Advanced Mode Tab 300 ...
Page 386: ...Scanning Problems Scanner Does Not Work ScanGear Scanner Driver Does Not Start 386 ...
Page 398: ...Errors and Messages An Error Occurs Message Appears 398 ...
Page 431: ...1660 Cause An ink tank is not installed What to Do Install the ink tank 431 ...