


Printing Out Network Setting Information
You can print out the network settings of the printer such as its IP address and SSID.
Important
• This print out contains valuable information about your computer. Handle it with care.
1.
Make sure that the printer is turned on.
2.
Load a sheet of A4 or Letter-sized plain paper.
3. Press and hold the
RESUME/CANCEL
button, then release the button when the
POWER
lamp flashes white 6 times.
The printer starts printing the network setting information.
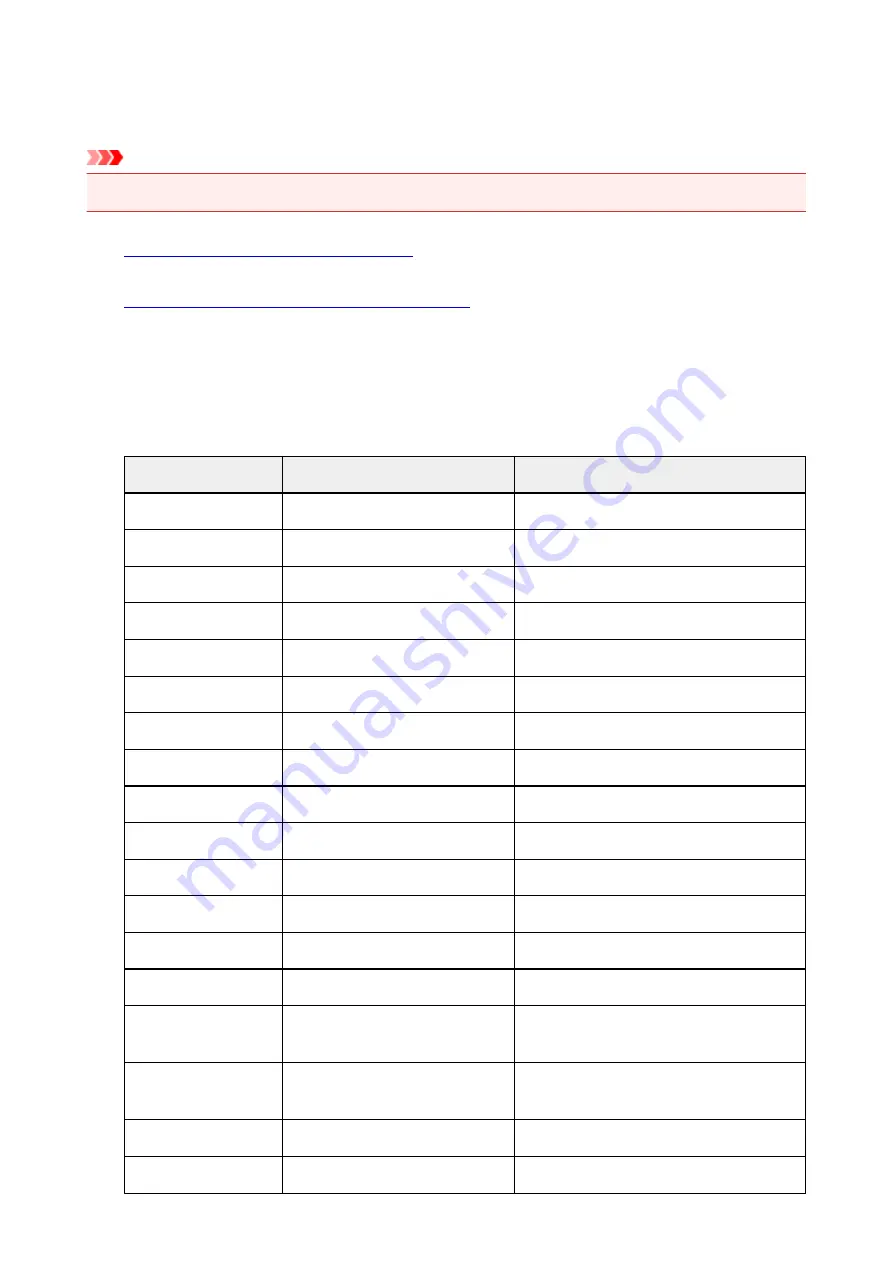
The following information on the printer's network setting is printed out.
Item
Explanations of the item
Setting
Wireless LAN
Wireless LAN
Enable/Disable
Connection
Status of the Wireless LAN
Active/Inactive
MAC Address
MAC Address
XX:XX:XX:XX:XX:XX
SSID
SSID
SSID of the wireless LAN
Communication Mode
Communication Mode
Infrastructure
Channel
Channel
XX (1 to 13)
Encryption
Method of the Encryption
none/WEP/TKIP/AES
WEP Key Length
WEP Key Length
Inactive/128/64
Authentication
Method of the Authentication
none/auto/open/shared/WPA-PSK/WPA2-PSK
Signal Strength
Signal Strength
0 to 100 [%]
TCP/IP Version
TCP/IP Version
IPv4 & IPv6/IPv4
IPv4 IP Address
Selected IP Address (IPv4)
XXX.XXX.XXX.XXX
IPv4 Default Gateway
Default Gateway (IPv4)
XXX.XXX.XXX.XXX
Subnet Mask
Subnet Mask
XXX.XXX.XXX.XXX
IPv6 IP Address *1
Selected IP Address (IPv6)
XXXX:XXXX:XXXX:XXXX
XXXX:XXXX:XXXX:XXXX
IPv6 Default Gateway *1 Default Gateway (IPv6)
XXXX:XXXX:XXXX:XXXX
XXXX:XXXX:XXXX:XXXX
Subnet Prefix Length*1
Subnet Prefix Length
XXX
IPsec*2
IPsec setting
Active
142
Summary of Contents for PIXMA IP8700 Series
Page 11: ...6942 515 6943 516 6944 517 6945 518 6946 519 6A80 520 6A81 521 6A90 522 B200 523 C000 524 ...
Page 42: ...Safety Guide Safety Precautions Regulatory and Safety Information 42 ...
Page 47: ...47 ...
Page 48: ...Main Components and Basic Operations Main Components About the Power Supply of the Printer 48 ...
Page 49: ...Main Components Front View Rear View Inside View 49 ...
Page 57: ...Managing the Printer Power 57 ...
Page 60: ...Loading Paper Loading Paper Placing a Printable Disc 60 ...
Page 75: ...75 ...
Page 81: ... B 1 38 inches 35 0 mm C 0 25 inch 6 4 mm D 0 25 inch 6 3 mm 81 ...
Page 91: ...Replacing an Ink Tank Replacing an Ink Tank Checking the Ink Status 91 ...
Page 123: ...123 ...
Page 132: ...Note The effects of the quiet mode may be less depending on the print quality settings 132 ...
Page 136: ...Information about Network Connection Useful Information about Network Connection 136 ...
Page 182: ...5 Delete Deletes the selected IP address from the list 182 ...
Page 211: ...Checking the Ink Status with the Ink Lamps 211 ...
Page 241: ...Note Selecting Scaled changes the printable area of the document 241 ...
Page 281: ...Adjusting Brightness Adjusting Intensity Adjusting Contrast 281 ...
Page 400: ...Problems with Printing Quality Print Results Not Satisfactory Ink Is Not Ejected 400 ...
Page 455: ...1200 Cause The top cover is open Action Close the top cover and wait for a while 455 ...
Page 456: ...1250 Cause The front cover is closed Action Open the front cover to resume printing 456 ...
Page 457: ...1401 Cause The print head may be damaged Action Contact the service center 457 ...
Page 458: ...1403 Cause The print head may be damaged Action Contact the service center 458 ...
Page 459: ...1405 Cause The print head may be damaged Action Contact the service center 459 ...
Page 467: ...1660 Cause The ink tank is not installed Action Install the ink tank 467 ...
Page 494: ...5B00 Cause Printer error has occurred Action Contact the service center 494 ...
Page 495: ...5B01 Cause Printer error has occurred Action Contact the service center 495 ...


