


Select more than one job for printing
Introduction
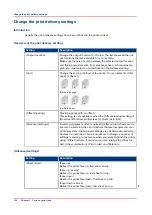
The table below describes the possibilities to select more than one job for printing.
Select more jobs
Options
Description
Select two or more jobs
manually
Touch the jobs you want to print one by one.
[Select] button - [All]
All jobs in the list of [Waiting jobs] are printed. The order in the list
of [Waiting jobs] determines the print order. However, in the list of
[Scheduled jobs] you can give priority to a job.
[Select] button - [Jobs with
available media]
All jobs for which the required media are currently available in the
paper trays, will be printed. This improves the productivity, be-
cause you must not change the required media during printing.
You may only need to add more of the currently available media
types.
[Select] button - [Jobs with
label]
A label is a name or tag that helps you to identify certain jobs on
the operator panel. When a job is sent to the printer, the person
who submits the job can add a label to that job. The label can be
any name that helps to identify certain jobs. A label is not connec-
ted to job settings. The label can be defined in the printer driver, in
a job ticket or via an automated workflow. For example, the label
‘Customer XYZ’ can be added to jobs. Then you can select and
print all the jobs for 'Customer XYZ' at once.
NOTE
Automated workflows can be defined through the Settings Editor. You can find more
information in the online help of the Settings Editor.
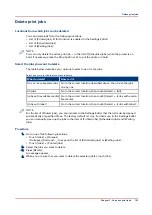
Procedure
1.
Touch [Jobs] -> [Queues].
2.
If collapsed, first touch to expand the list of [Waiting jobs].
3.
Touch the jobs you want to print one by one, or make a selection using the [Select] button.
The selected jobs are highlighted.
4.
Press [Print].
Related information
Give priority to a print job on page 112
Select more than one job for printing
Chapter 7 - Carry out print jobs
115
Summary of Contents for Oce VarioPrint 6000+ Series
Page 1: ...Operation guide Océ VarioPrint 6000 Line ...
Page 7: ...Chapter 1 Preface ...
Page 11: ...Chapter 2 Introduction ...
Page 13: ...Chapter 3 Power information ...
Page 19: ...Chapter 4 Main parts ...
Page 31: ...Chapter 5 Adapt printer settings to your needs ...
Page 49: ...Chapter 6 Media handling ...
Page 85: ...Chapter 7 Carry out print jobs ...
Page 162: ...Exchange all setups between printers 162 Chapter 7 Carry out print jobs ...
Page 163: ...Chapter 8 Remote Service ORS optional ...
Page 166: ...Remote Service 166 Chapter 8 Remote Service ORS optional ...
Page 167: ...Chapter 9 Remote Monitor optional ...
Page 169: ...Chapter 10 Optional finishers and other devices ...
Page 189: ...Chapter 11 Counters ...
Page 194: ...Find the meter readings 194 Chapter 11 Counters ...
Page 195: ...Chapter 12 Keeping the printer running ...
Page 209: ...Appendix A Miscellaneous ...
Page 212: ...Product specifications 212 Appendix A Miscellaneous ...
Page 220: ...Index 220 ...
Page 221: ......