


Presets, templates and advanced settings
Introduction
Presets and templates help you to submit jobs quickly and easily. Advanced settings help you to
fine-tune the settings of your job, and give access to all settings.
When you tap the copy tile in the home screen, a window with copy presets and advanced
settings opens. When you tap the scan tile, the templates are visible in the Smart Access. When
you tap the scan tile again, the window with the advanced settings opens. When you tap the print
tile and tap the settings of a listed job, the window with print presets and advanced settings
opens.
3
2
1
No
.
Component
Function
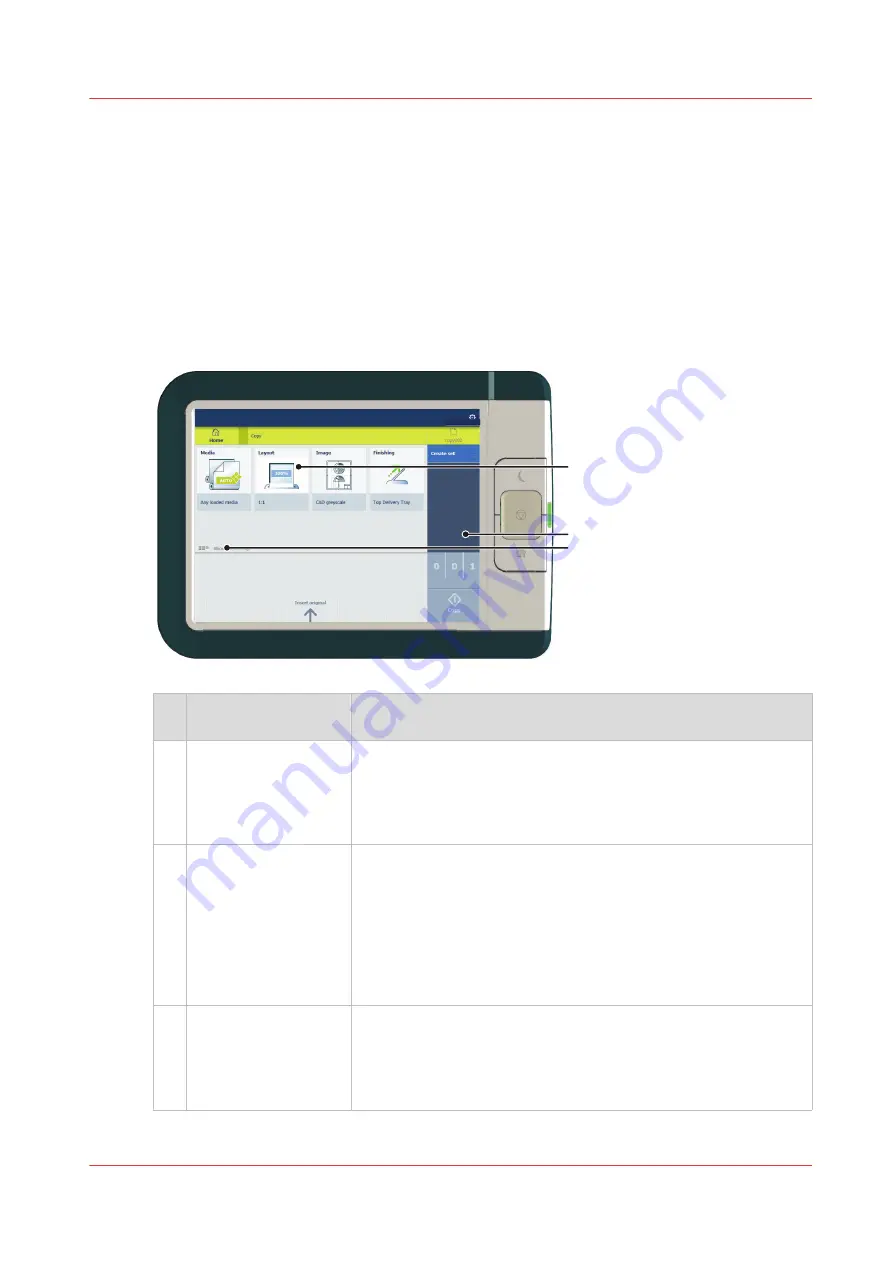
1.
[preset tiles]
The preset tiles show the default settings for your job.
• The presets are divided into categories, such as [Media], [Lay-
out] etc.
• When you tap a preset tile, it gives quick access to a short list of
other presets you can choose.
2.
[job pane]
The [job pane] helps to manage jobs.
• Information is given on your job.
• Make sets.
• Delete a job.
• Tap a tile to switch between the presets/settings window and a
window with a preview of the document (only for Smart Inbox
jobs).
• Start a job with the green button.
3.
[Show all settings]
(Advanced settings)
When you tap on [Show all settings], a list with all the advanced
settings opens. For Scan, the advanced settings are already visi-
ble.
• The advanced settings are categorized and presented as tiles.
• When you tap a tile you can fine-tune the settings.
Presets, templates and advanced settings
Chapter 2 - Get to Know the Printing System
39
Summary of Contents for Oce PlotWave 450
Page 1: ...Operation guide Océ PlotWave 450 550 ...
Page 4: ......
Page 10: ...Contents 10 ...
Page 11: ...Chapter 1 Introduction ...
Page 16: ...Available documentation 16 Chapter 1 Introduction ...
Page 17: ...Chapter 2 Get to Know the Printing System ...
Page 43: ...Chapter 3 Define your Workflow with Océ Express WebTools ...
Page 143: ...Chapter 4 Use the Printing System ...
Page 214: ...Clear the system 214 Chapter 4 Use the Printing System ...
Page 215: ...Chapter 5 Use the Folder ...
Page 226: ...Adjust the side guides of the belt 226 Chapter 5 Use the Folder ...
Page 227: ...Chapter 6 Maintain the Printing System ...
Page 245: ...Media types Chapter 6 Maintain the Printing System 245 ...
Page 267: ...Chapter 7 License Management ...
Page 273: ...Chapter 8 Account Management ...
Page 280: ...Workflow on the printer 280 Chapter 8 Account Management ...
Page 281: ...Chapter 9 Solve Problems ...
Page 308: ...Print the print density chart 308 Chapter 9 Solve Problems ...
Page 309: ...Chapter 10 Support ...
Page 317: ...Chapter 11 Contact ...
Page 329: ......


