Recommended settings for copy jobs
Introduction
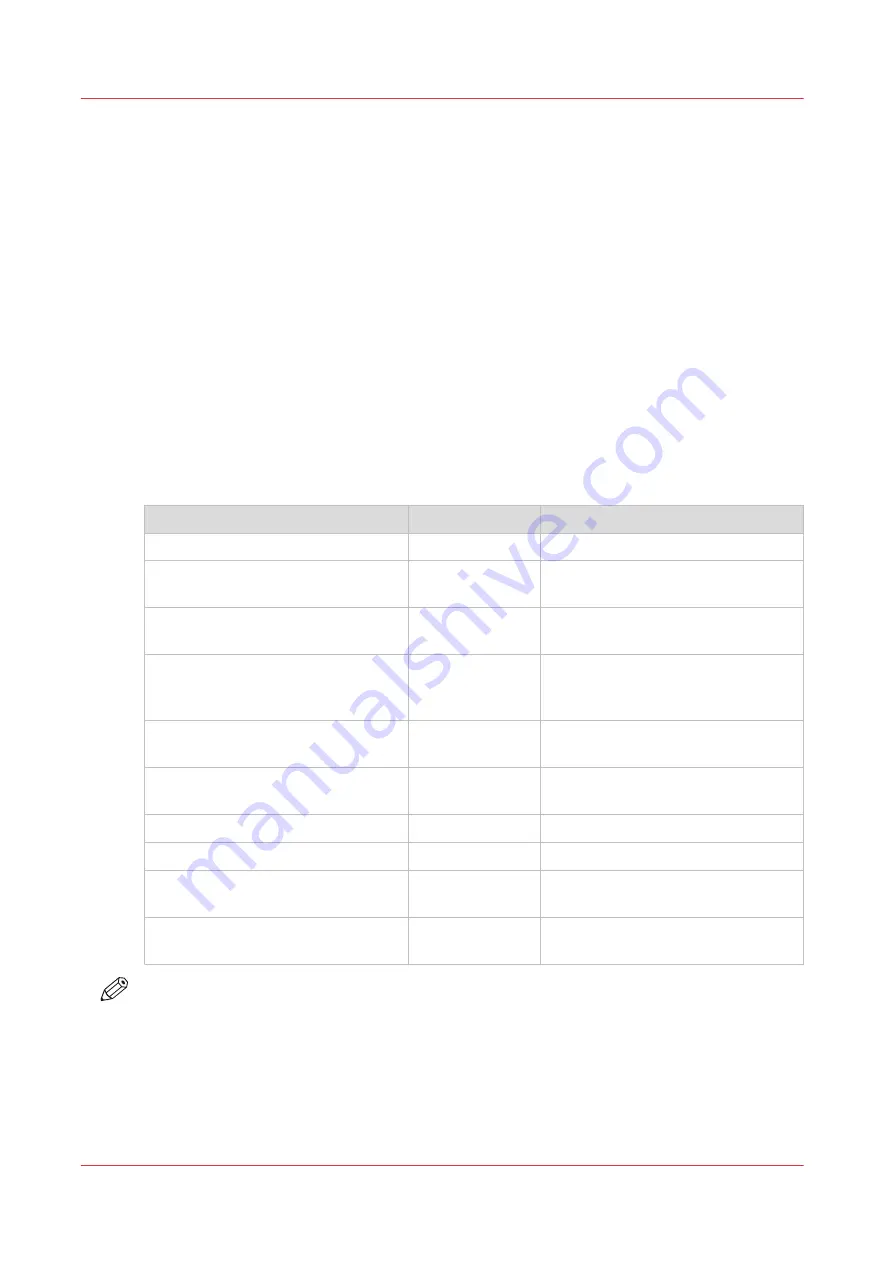
When you use a certain type of original document you can select specific presets and settings
that influence the quality and productivity of your job. Use the advised settings in the table below
to get the best results.
Workflow
1. Start by selecting the best image preset for your job. Use column two in the table below, or
for more information see
The Image preset for copy jobs on page 174
2. When you want to further optimize the settings, you can select the advanced settings, under
[Show all settings] on the user panel. When you want to influence the imaging process and
thus optimize the output quality, you can select the corresponding [Original type] for your job.
Use column three in the table below, or for more information see
.
Advised settings
Original document
Preset [Image]
Optimize under [Show all settings]
Monochrome CAD Drawings
[CAD grayscale]
Folded monochrome CAD drawing
[CAD grayscale]
Set the original type to [Folded lines/
text]
Monochrome CAD drawings with
marks from marker pens
[CAD color]
When 'color highlighting' is needed,
set [Color highlighting] to on.
Monochrome CAD drawings with
some color information that should
be emphasized
[CAD color]
When 'color highlighting' is needed,
set [Color highlighting] to on.
(Folded) Color CAD drawings, maps,
business graphics, etc.
[CAD color]
When 'color highlighting' is needed,
set [Color highlighting] to on.
CAD originals with a non uniform
background
[Diazo]
Diazo copies / "Chinese blueprints"
[Diazo]
Dark (transparent) originals
[Diazo]
Photos and high-definition color
prints
[Photo]
Blueprints with white lines on a blue
background
[CAD grayscale]
Set original type to [Blueprint]
NOTE
When setting [Color highlighting] to on, the color accents on a black an white drawing are kept
by copying the color information darker than the monochrome information. Note that [Color
highlighting] is not supported with the original type [Photo] and [Blueprint].
Recommended settings for copy jobs
182
Chapter 4 - Use the Printing System
Summary of Contents for Oce PlotWave 450
Page 1: ...Operation guide Océ PlotWave 450 550 ...
Page 4: ......
Page 10: ...Contents 10 ...
Page 11: ...Chapter 1 Introduction ...
Page 16: ...Available documentation 16 Chapter 1 Introduction ...
Page 17: ...Chapter 2 Get to Know the Printing System ...
Page 43: ...Chapter 3 Define your Workflow with Océ Express WebTools ...
Page 143: ...Chapter 4 Use the Printing System ...
Page 214: ...Clear the system 214 Chapter 4 Use the Printing System ...
Page 215: ...Chapter 5 Use the Folder ...
Page 226: ...Adjust the side guides of the belt 226 Chapter 5 Use the Folder ...
Page 227: ...Chapter 6 Maintain the Printing System ...
Page 245: ...Media types Chapter 6 Maintain the Printing System 245 ...
Page 267: ...Chapter 7 License Management ...
Page 273: ...Chapter 8 Account Management ...
Page 280: ...Workflow on the printer 280 Chapter 8 Account Management ...
Page 281: ...Chapter 9 Solve Problems ...
Page 308: ...Print the print density chart 308 Chapter 9 Solve Problems ...
Page 309: ...Chapter 10 Support ...
Page 317: ...Chapter 11 Contact ...
Page 329: ......


