


Adjusting Cropping Frames in the Image Stitch Window
"Cropping" is the act of selecting the area you want to keep in an image and discarding the rest when
scanning it.
In the
Image Stitch
window, you can specify a cropping frame on the image displayed in the Preview area.
Note
• Refer to "Adjusting Cropping Frames (ScanGear)" for your model from Home of the
Online Manual
for
how to adjust cropping frames with ScanGear (scanner driver).
Initial Cropping Frame
No cropping frame is specified. When you select the
Adjust cropping frames
checkbox, an active
cropping frame is automatically specified around the image in the Preview area. You can drag the
cropping frame to specify the area.
When you perform a scan, the image in the area specified with the cropping frame will be scanned.
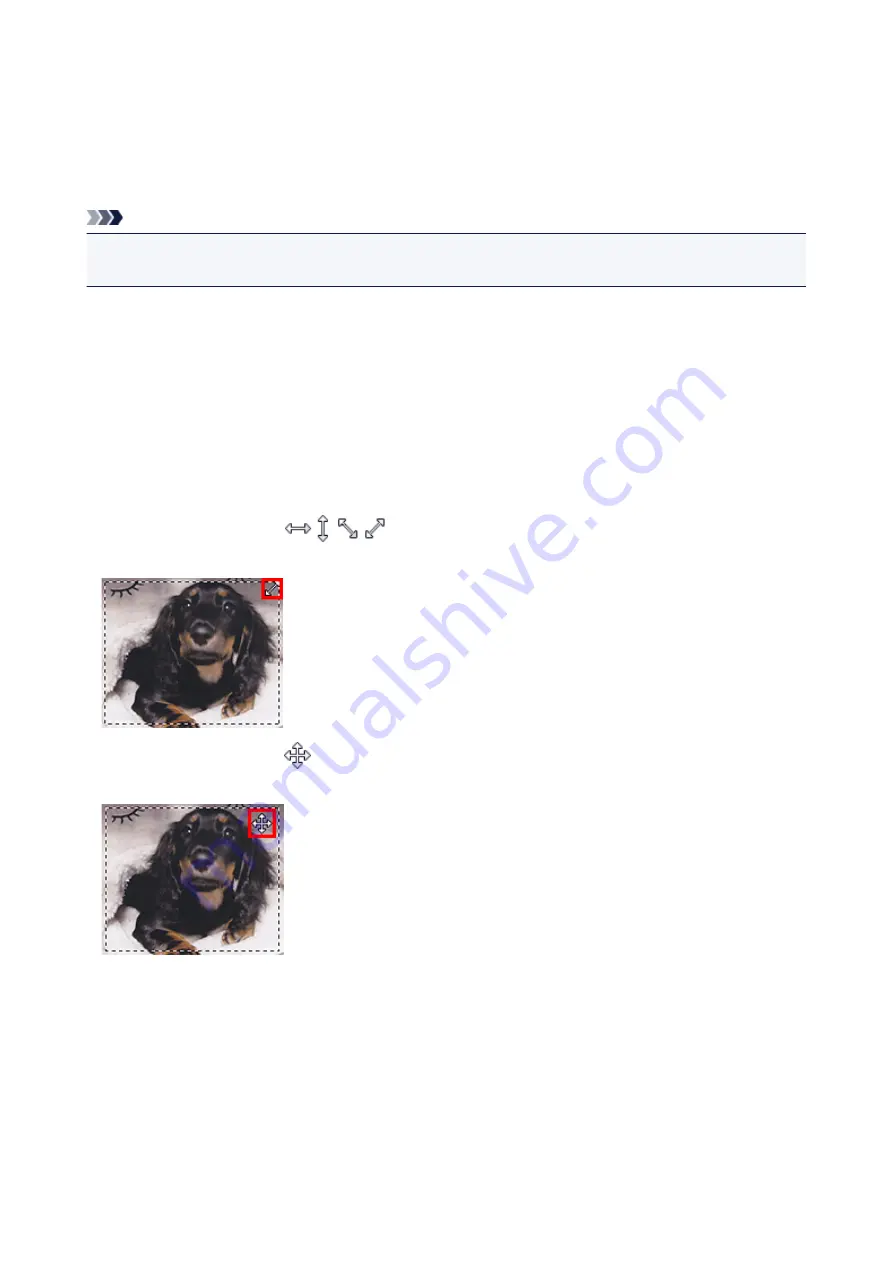
Adjusting a Cropping Frame
The cursor will change into
(Arrow) when it is positioned over a cropping frame. Click and
drag the mouse to expand or contract the cropping frame.
The cursor will change into
(Crosshair Arrow) when it is positioned within a cropping frame. Click and
drag the mouse to move the entire cropping frame.
Deleting Cropping Frames
To delete the cropping frame, deselect the
Adjust cropping frames
checkbox.
577
Summary of Contents for MX470
Page 16: ...6940 905 6941 906 6942 907 6943 908 6944 909 6945 910 6946 911 9500 912 B200 913 B201 914 ...
Page 47: ...Safety Guide Safety Precautions Regulatory and Safety Information 47 ...
Page 56: ...Main Components Front View Rear View Inside View Operation Panel 56 ...
Page 61: ...61 ...
Page 72: ...Loading Paper Originals Loading Paper Loading Originals 72 ...
Page 88: ...Printing Area Printing Area Other Sizes than Letter Legal Envelopes Letter Legal Envelopes 88 ...
Page 98: ...98 ...
Page 103: ...Replacing a FINE Cartridge Replacing a FINE Cartridge Checking the Ink Status 103 ...
Page 151: ...Note The effects of the quiet mode may be less depending on the print quality settings 151 ...
Page 172: ...Information about Network Connection Useful Information about Network Connection 172 ...
Page 218: ...5 Delete Deletes the selected IP address from the list 218 ...
Page 277: ...Note Selecting Scaled changes the printable area of the document 277 ...
Page 310: ...Note During Grayscale Printing inks other than black ink may be used as well 310 ...
Page 315: ...Adjusting Brightness Adjusting Intensity Adjusting Contrast 315 ...
Page 495: ...Related Topic Scanning Items Larger than the Platen Image Stitch 495 ...
Page 516: ...516 ...
Page 569: ...569 ...
Page 595: ...595 ...
Page 602: ... Scan resolution Select the resolution for scanning Ex 602 ...
Page 749: ...Problems with Printing Quality Print Results Not Satisfactory Ink Is Not Ejected 749 ...
Page 840: ...1202 Cause The paper output cover is open Action Close the paper output cover 840 ...
Page 879: ...5B02 Cause Printer error has occurred Action Contact the service center 879 ...
Page 880: ...5B03 Cause Printer error has occurred Action Contact the service center 880 ...
Page 881: ...5B04 Cause Printer error has occurred Action Contact the service center 881 ...
Page 882: ...5B05 Cause Printer error has occurred Action Contact the service center 882 ...
Page 883: ...5B12 Cause Printer error has occurred Action Contact the service center 883 ...
Page 884: ...5B13 Cause Printer error has occurred Action Contact the service center 884 ...
Page 885: ...5B14 Cause Printer error has occurred Action Contact the service center 885 ...
Page 886: ...5B15 Cause Printer error has occurred Action Contact the service center 886 ...


