background image

82

C

o

nt

ents

Preparation/

Setup

Pr

int U

sing a 

C

omput

er

Appendix

Index

P

rint/Sa

ve

Input/Edit

Names of 

Components

M

aint
enanc

e/

Print

er S
ettings

Tr

ouble

-

shooting

 Printing by Specifying a Print Range

You can specify a specifi c page or range to print. The default setting for the print range is set to 
"All pages."

Setting

Details

All pages 

(Default Setting)

Prints all pages.

Cursor page

Prints only the currently displayed page.

Specifi ed page

Prints the range specifi ed by "Start page" and "End page."

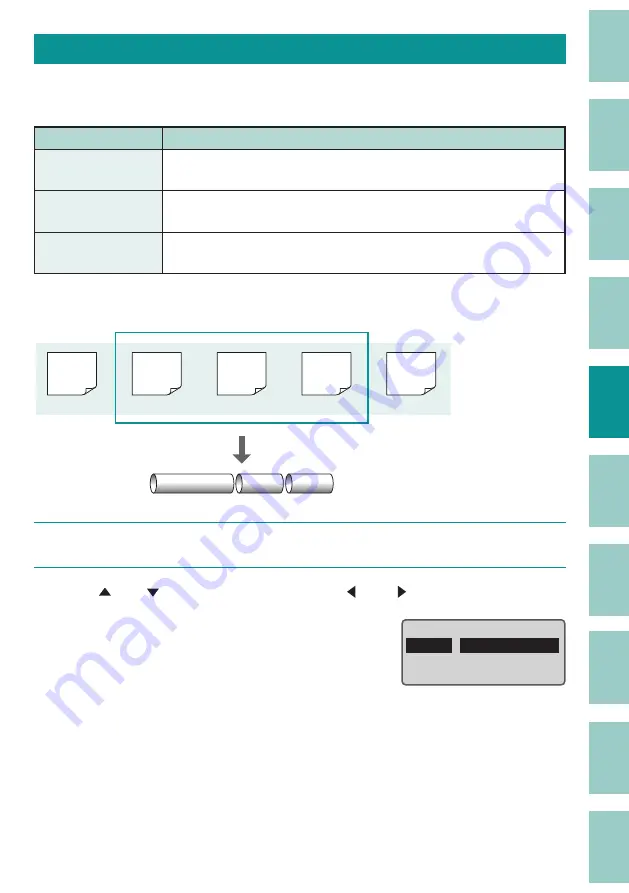
[Example]  Print pages 2 to 4 of the following data.

Pump Room 

C1 

C2 

200V

(Page 1)

Pump
Room

(Page 2)

C1

(Page 3)

C2

(Page 4)

C3

(Page 5)

1  

Display the data to be printed, and press the [Print] key.

2  

Use [   ] or [   ] to select "Range", and use [    ] or [    ] to select "Specifi ed."

Print       /Preview

ɻɻ

Range 


Start page 
End page :


1

:


1

Specified

Summary of Contents for MK5000

Page 1: ...INETECH NISCA INC 2022 4Y1 8639 020 Precautions for safe use are described in the Basic Operation Guide Please read it carefully before using this product Please note that the contents of this manual...

Page 2: ...Setting of the Tube Warmer 34 2 Input Edit Basic Input Operations 36 Before Input 36 Entering Text 38 Entering Symbols 39 Deleting Characters 40 Deleting All Characters That Have Been Entered 41 Edit...

Page 3: ...e MK Desktop Utility and Printer driver 111 Connecting Multiple MK5000 Printers 117 Uninstalling the MK Desktop Utility and Printer Driver 119 Connecting to a Computer 122 Starting Up Exiting the Prog...

Page 4: ...attery 193 Changing the Display Settings 195 Turning Off Sounds 198 Speeding Up the Time until Printing Starts 199 Change the Rewind Movement Settings 200 Changing the Function Assignment of the Conne...

Page 5: ...injury or improper use of the product be sure to read these indications NOTE Instructions including notes for operation and additional explanations About the Text Copying this manual or any part of th...

Page 6: ...Canon Inc Microsoft and Windows are trademarks or registered trademarks of Microsoft Corporation in the United States and or other countries The Bluetooth word mark and logos are registered trademarks...

Page 7: ...ce Printer Settings Trouble shooting Names of Components External View Top View 1 2 3 4 5 1 Keyboard 2 Cover 3 Power key 4 AC adapter connector 5 USB connector Type B Bottom View 1 2 3 1 Battery cover...

Page 8: ...iew 2 3 4 5 6 7 8 10 11 9 1 12 13 14 1 Connector for tube warmer 2 Attachment Media cassette mount 3 Media feed port When the attachment installed 4 Display 5 Ribbon cassette mount 6 Transport roller...

Page 9: ...paration Setup Print Using a Computer Appendix Index Print Save Input Edit Names of Components Maintenance Printer Settings Trouble shooting Tube Attachment 3 1 2 1 Size switch lever 2 Tube retainer l...

Page 10: ...y Specifies the page orientation portrait landscape and text direction portrait landscape P 45 3 Seg Len key Specifies the length of one tube or one label character alignment and margins P 54 4 Frame...

Page 11: ...ition P 40 20 Enter key Confirm the input of unconfirmed characters or selected items Pressing this key after finalizing text input will insert a page break at the cursor position P 65 21 Arrow keys M...

Page 12: ...so all alphabetic characters are entered in uppercase No indication Normal inactive 2 Insert Overwrite mode Indicates which of the two input modes is selected P 37 Insert mode No indication Overwrite...

Page 13: ...ing symbols P 12 The AC adapter is being used Power remaining Out of power When the battery is being used the remaining battery charge is indicated by this symbol If the battery is not sufficiently ch...

Page 14: ...the number of times the current page will be printed repeatedly P 84 11 Character Space Displays the character space setting for the current page P 47 12 Lines Displays the number of lines setting for...

Page 15: ...ff 15 Turning the Printer On 15 Turning the Printer Off 17 Installing the Ribbon Cassette 18 Loading the Print Media 21 Loading a Tube or Plate 21 Loading a Label Tape Cassette 25 Replacing the Print...

Page 16: ...y Connecting the AC Adapter CAUTION Be sure to use the supplied genuine AC adapter and power cord 1 Connect the power cord to the AC adapter and plug the AC adapter into the printer 2 Insert the power...

Page 17: ...rd Model Batteries Part No BK 3MCCA for North America BK 3MCCE for Asia Do not use any other type of battery Failure to do so may result in fire malfunction or injury 1 Prepare 6 eneloop AA Standard M...

Page 18: ...adapter as they will be drained otherwise If the batteries are installed and the AC adapter is connected to the product do not disconnect the AC adapter during printing The product will not be able to...

Page 19: ...on display Character input display If the power is turned on without a ribbon cassette loaded the ribbon cassette information display will not be displayed Startup display Ribbon cassette information...

Page 20: ...a upon startup When set to No the program will start without deleting the data being edited 1 Press the Settings key 2 Use or to select Other and then press the Enter key Settings Others Print adjust...

Page 21: ...et CAUTION When disconnecting the AC adapter from the printer be sure to remove the power plug from the power outlet first IMPORTANT Do not disconnect the power plug until the power has been completel...

Page 22: ...ANT When printing on a plates use a black 40m ribbon cassette Other ribbon cassettes black 150m white 85m will not print correctly For more information on the ribbon cassette that can be used refer to...

Page 23: ...Maintenance Printer Settings Trouble shooting 3 Remove the new ribbon cassette packing material IMPORTANT Do not touch the IC chip on the ribbon cassette Doing so may render the ribbon cassette inform...

Page 24: ...nt Save Input Edit Names of Components Maintenance Printer Settings Trouble shooting 5 Install the ribbon cassette into the printer Push the cassette in until it clicks into the place IMPORTANT If the...

Page 25: ...o do not use tubes or plates that have oil or other stains that cannot be wiped off NOTE Please purchase commercially available tubes and plates for use For more information on the sizes that can be u...

Page 26: ...ates Use the plate cleaner gray by attaching it to the optional plate and flat tube attachment 2 Open the cover 3 Install the attachment into the printer Align the attachment with the slot on the prin...

Page 27: ...n the figure and push it in until it hits transport roller 2 Transport roller 2 NOTE If it is difficult to pass the tube or plate through the attachment set the tube or plate in place while pressing t...

Page 28: ...nt Save Input Edit Names of Components Maintenance Printer Settings Trouble shooting from getting stuck inside the printer use a tube or plate of sufficient length If the tube or plate is not set corr...

Page 29: ...egulation NOTE The procedure for removing set print media from the printer please refer to Replacing the Print Media P 27 1 Check the condition of the cassette If the release paper has a high spot or...

Page 30: ...pendix Index Print Save Input Edit Names of Components Maintenance Printer Settings Trouble shooting 3 Install the cassette into the printer Align the cassette with the slot on the printer and push it...

Page 31: ...To replace the print media installed in the printer with a different one follow the procedure below NOTE For information on the print media that can be used with this product refer to Print Media P 2...

Page 32: ...edia 1 Turn on the power P 15 2 Press the Remove key The following screen will be displayed 3 Select Yes with or and press the Enter key The print media will be rotated backwards Unload print media Ye...

Page 33: ...be warmer When using the attachment or media cassette While pulling the lever to the right lift it upward to remove it When using the tube warmer Grasp the tube warmer while pushing its two stoppers a...

Page 34: ...be or Plate P 21 When using a media cassette refer to Loading a Label Tape Cassette P 25 IMPORTANT When the print media feed is reversed the ribbon in the ribbon cassette may become slack If the ribbo...

Page 35: ...ctly on other types of tubes Type Tube clear tube Size 1 5 to 6 5 mm internal diameter If the tube gets too warm the device may not print on it correctly Print as soon as possible after loading the tu...

Page 36: ...are the tube warmer 2 Open the cover 3 Set the tube warmer in place Insert the connector of the tube warmer into the connector for the tube warmer on the printer and push down on it vertically until i...

Page 37: ...switched between Auto automatic WAI or RDY ON and OFF OFF These options can be cycled through in that order be pressing the Warmer key P 7 IMPORTANT When the tube warmer is not set the tube warmer co...

Page 38: ...t the tube warmer temperature to High 1 Turn on the printer P 15 2 Press the Settings key 3 Use or to select Warmer and then press the Enter key Settings Connect Warmer Character Edit 4 Use or to sele...

Page 39: ...n 45 Specify the Character Spacing 47 Specifying the Number of Lines 48 Numbering 49 Underline 6 9 52 Adding a Line between Lines 53 Setting the Cut Length 54 About Cut Length 54 Specify the Cut Lengt...

Page 40: ...0002 C1 0003 200V Page 1 Pump Room Page 2 C1 Page 3 Press Enter key Press Enter key 200V Pump Room C1 Also if you press the Page key you can check the page number of the currently displayed page and...

Page 41: ...ine below Shift Go to the top of the page Shift Go to the end of the page Shift Go to the top of the previous page Shift Go to the top of the next page Insert Mode and Overwrite Mode You can switch be...

Page 42: ...1 1 Input Res7 1 Enter Shift R E S 7 and 1 in this order When entering capital letters hold down Shift and press the desired key If you make a mistake use the Back Space key to delete the character an...

Page 43: ...key 2 Use the arrow keys to select from the list of symbols The symbol screen is divided into two groups To switch between groups press Shift or For symbols that can be entered see List of Symbols P 2...

Page 44: ...to delete a character using the Back Space key or using the Del key Deleting with the Back Space key Example Change 27V to 2V 1 Move the cursor to V 9 2 Press the Back Space key The character to the l...

Page 45: ...to their default values Format Settings in this product refers to the following function settings Function name Default setting Function name Default setting Character Size 3 mm full width All line ce...

Page 46: ...width 3 mm full width 200V 200V 2 6 mm half width 2 6 mm full width 200V 200V 1 3 mm full width 2 mm half width 2 mm full width 200V 200V 200V Example Set the character size to 3 mm half width 1 Disp...

Page 47: ...the print media No error message will be displayed even if the print data extends beyond the width top and bottom of the print media Refer to the following to set the character size and frame Maximum...

Page 48: ...ame key 3 Use the arrow keys to select from the list of frames Frame None 4 Press the Enter key The display returns to the character input display The frame shapes setting can be checked on the displa...

Page 49: ...Text direction horizontal 12V 24V Pump Room C1 Vert Vert char Orientation vertical Text direction vertical C 1 2 4 V 1 2 V Pump Room Vert Hor char Orientation vertical Text direction horizontal B1 C1...

Page 50: ...characters do not fit within the page To cancel the changes select No If you want to set the orientation to Vert Hor char set the orientation before entering text It is not possible to specify Vert Ho...

Page 51: ...Display the page where you want to change the character spacing 2 Press the Char Space key 3 Use or to select Wide will appear next to character space that cannot be selected Character Space Narrow M...

Page 52: ...y The number of lines setting can be checked on the display Use the arrow keys to move between the lines NOTE The number of lines can be set for each page When the character size is set to 1 3 mm full...

Page 53: ...F Pump Room 09 Pump Room 0A Pump Room 0B Upper case letter A to Z Pump Room A Pump Room B Pump Room C Lower case letter a to z Pump Room a Pump Room b Pump Room c Example Set the numbering from 1 to 1...

Page 54: ...ct None Padding character 1RQH HUR 6SDFH 8 Press the Enter key The display returns to the character input display The sequentially numbered control character N will be entered after Pump Room When pri...

Page 55: ...padding characters Pump Room 8 Pump Room 9 Pump Room 10 Zero A leading 0 will be entered as a padding character Pump Room 08 Pump Room 09 Pump Room 10 Space A leading space will be entered as a paddin...

Page 56: ...lect Print Settings and press the Enter key Settings Page Settings Print Settings Delete All 3 Use or to select Underline 6 9 and press the Enter key Print Settings Plate Full cut Underline 6 9 Center...

Page 57: ...s Page Settings Print Settings Delete All 3 Use or to select Center Line and then press the Enter key Print Settings Plate Full cut Underline 6 9 Center Line 4 Use or to select On and then press the E...

Page 58: ...tomatic Default Setting Automatically sets and prints the optimal cut length based on the number of characters entered the size of the characters and the spacing between the characters The alignment i...

Page 59: ...Margin Margin Cut Length Left Aligns text to the left end in the direction of the start of the text Margins can be set in the range of 2 to 5 mm Margin 2 5 mm Pump Room Cut Length Right Aligns text to...

Page 60: ...gth Cut Length Alignment Plate Print Area 3 Use or to select Specify enter 40 0 Cut Length and then press the Enter key The value can be set by entering numbers or using arrow keys Cut length can be e...

Page 61: ...All line centering settings are applied to all pages Approximately 60 mm from the print start position there may be a slight difference between the specified cut length and the print result Depending...

Page 62: ...etting The margins specified in the alignment are set P 55 Expansion When Centered is selected The text is centered A 123 Cut length a 2 Cut length a 2 Cut length a When Left alignment is selected the...

Page 63: ...elect Specify enter 4 0 Cut Length and then press the Enter key The value can be set by entering numbers or using arrow keys The display returns to the character input display Cut Length Automatic Spe...

Page 64: ...ey to return to the character input display When Expansion is selected the print media is automatically changed to Plate You cannot select any other print media except plate Plate Print Area 1RUPDO SD...

Page 65: ...he center of the page The default setting is Off Setting Details Print Image Off Default Setting Align multi line text at the beginning and center them on the page A 123 R11 On Multi line text is cent...

Page 66: ...utomatic Specify 19 0 15 7 to 150 0 6 Press the Seg Len key 7 Use or to select All centering Cut Length Alignment Plate Print Area All centeriQJ 8 Use or to select On and then press the Enter key Pres...

Page 67: ...Print Area All centering Batch Setting 3 Use or to select Specify enter the cut length and then press the Enter key The value can be set by entering numbers or using arrow keys When you press the Ente...

Page 68: ...t Centered Left 2 2 to 5 Right 2 2 to 5 6 Use or to select the settings and then press the Enter key Press the Enter key to return to the character input display after the data has been checked and ch...

Page 69: ...ge 200V 200V Page 1 Page 1 Page 2 1 Move the cursor to the end of the line 9 2 Press the Enter key A page break will be performed and a new page will be created You can check the page number of the cu...

Page 70: ...t page and paste it after the second page 200V C1 200V 200V Pump Room C1 Copy and past Page 1 Page 2 Page 3 Page 1 Page 2 Page 3 Page 4 Pump Room 1 Display the page to be copied the first page 2 Press...

Page 71: ...key 6 Use or to select Paste and press the Enter key A confirmation screen for the paste location will appear Page Edit Copy Cut Paste 7 Use or to enter 2 page and use or to select After Paste data w...

Page 72: ...ou have entered text and paste it before or after another page Example Cut the second page and paste it after the third page 200V 200V C1 C1 Page 1 Page 2 Page 3 Page 1 Page 2 Page 3 Pump Room Pump Ro...

Page 73: ...turned to the character input display Cut data of page 2 Yes No 5 Press the Edit key 6 Use or to select Paste and press the Enter key A confirmation screen for the paste location will appear Page Edit...

Page 74: ...ages 200V 200V C1 C1 Page 1 Page 2 Page 3 Page 1 Page 2 Page 3 Page 4 Pump Room Pump Room 1 Display the page at the position where you want to insert a blank page page 2 2 Press the Edit key 3 Use or...

Page 75: ...lso be deleted Example Deleting the second page 200V 200V C1 C1 Pump Room Pump Room Page 1 Page 2 Page 3 Page 1 Page 2 1 Display the page you want to delete page 2 2 Press the Edit key 3 Use or to sel...

Page 76: ...ou can divide the data which is entered two lines in one page into two pages Example Page division of page 3 1 Display the page to be divided page 3 2 Press the Edit key 3 Use or to select Division an...

Page 77: ...data will be created for two pages Example Divide data that contains a page of one line input with All You cannot divide a page with three line input Pages with numbering cannot be divided When you di...

Page 78: ...nes on one page Example Combine pages 3 to 6 1 Display the page you wish to make into a combined one page 3 2 Press the Edit key 3 Use or to select Combining and press the Enter key The page combining...

Page 79: ...pages NOTE Pages with numbering or pages with two or three line input cannot be combined When you combine pages the settings such as character size and cut length will be changed It is recommended to...

Page 80: ...ent of Printing Results 85 Fine Adjustment of Print Position and Cut Length 85 Changing the Print Density 90 Changing the Print Speed 91 Cutter Settings 92 Changing the Set Cut 92 Adjusting the Cut De...

Page 81: ...enter 2 Use the numeric keys or the arrow keys to enter the data If you make a mistake press the Back Space key to delete the entry You can specify the number of prints from 1 to 10 This operation wil...

Page 82: ...he tube size is 1 5 mm When the print media is set to Clear Tube NOTE For setting a tube of a size that is not on the selection list refer to Tube Size Selection Recommended P 80 6 Use the arrow keys...

Page 83: ...ot be ejected straight and may be cut in a bent shape Do not pull the tube or label tape forcibly during printing Doing so may result in printing failure or malfunction NOTE To cancel printing press t...

Page 84: ...settings Tube Size Selection Recommended Print Media Print Setting Type Size mm Size selection Tube Clear tube Shrink tube 1 5 to 2 0 1 5mm 2 1 to 2 5 2 5mm 2 6 to 3 5 3mm 3 6 to 4 5 4mm 4 6 to 5 5 5m...

Page 85: ...ight to left Print Preview Sets to print 1 Tube Range All 3 0 200V Pump While pressing or the display will stop If you hold down the image will be displayed in fast forward Press to display the next p...

Page 86: ...et to All pages Setting Details All pages Default Setting Prints all pages Cursor page Prints only the currently displayed page Specified page Prints the range specified by Start page and End page Exa...

Page 87: ...tart page and enter 2 Use the numeric keys or the arrow keys to enter the data Print Preview Range Start page End page 2 Specified 2 4 Use or to select End page and enter 4 Use the numeric keys or the...

Page 88: ...Pump Room C1 Pump Room Pump Room Pump Room 1 Display the page to be printed in Continuous Print 2 Press the Cont Print key 3 Use or to select Set count and enter 3 the number of times for Continuous...

Page 89: ...get the result you expected even after setting the cut length and margins fine tune the print position and cut length For this product the following adjustments can be set for each type of print media...

Page 90: ...0 mm to the right 1 Press the Adjust key 2 Use or to select Top position and press the Enter key GMXVWPHQWV Top position VerticalPosition Length 3 Use or to select Tube and press the Enter key Top adj...

Page 91: ...mm 1 Press the Adjust key 2 Use or to select VerticalPosition and press the Enter key GMXVWPHQWV Top position VerticalPosition Length 3 Use or to select Tube and press the Enter key Vertical adjust S...

Page 92: ...Top position VerticalPosition Length 3 Use or to select Tube and press the Enter key Length adjust ShrinkTube Label Tube 0 0 0 0 0 0 4 Use to enter 2 0mm and press the Enter key Use negative directio...

Page 93: ...mponents Maintenance Printer Settings Trouble shooting each print media refer to Specifications P 226 If the problem is not corrected by using the length adjust set the half cut to None and cut with s...

Page 94: ...he default setting is 3 Example Adjust the print density of the tube so that it is the darkest 1 Press the Adjust key 2 Use or to select Print density and press the Enter key Adjustments Full Cut Dept...

Page 95: ...text is blurred 1 Press the Setting key 2 Use or to select Setting and press the Enter key Settings Others Print adjust Setting 3 Use or to select Print Speed and then press the Enter key Setting Prin...

Page 96: ...e default setting is Half Cut On If you do not want to use a half cut you can print the cut line solid dotted line Half cut Cut line settings Details Print Preview On Default Setting After printing cu...

Page 97: ...Dotted without a half cut 1 Press the Set Cut key 2 Use or to select Half Cut and press the Enter key 6HW XW Half cut Full cut Plate Full cut 3 Use or to select Off and press the Enter key Off On Hal...

Page 98: ...ull cut A1 Pump Room A1 Pump Room Each set Cuts match the number of prints 1st group 2nd group Full cut Full cut A1 Pump Room A1 Pump Room Example Full cut for all pages printed 1 Press the Set Cut ke...

Page 99: ...eview Off Default Setting Not cut the end of printing Not cut A1 Pump Room On Cuts at the end of printing Full cut A1 Pump Room Example When a plate is printed the end of the printing is cut with a fu...

Page 100: ...f Cut The cut depth for half cut can be set for each print media The default setting is set to Normal NOTE If cutting is difficult depending on the material of the print media adjust the motion of the...

Page 101: ...w 1 to 5 Each time you press the cut is deepened by one step Each time you press the cut will become shallower by one step Half Cut Depth Deep 1 5 Press the Shift Canc keys The display returns to the...

Page 102: ...t key 2 Use or to select Full Cut Depth and press the Enter key Adjustments Half Cut Depth Half Cut Motion Full Cut Depth 3 Use or to select Tube and press the Enter key Normal Normal Normal ShrinkTub...

Page 103: ...est point If the situation is not improved even after using Forced full cut replace the cutter P 189 1 Press the Settings key 2 Use or to select Others and press the Enter key Settings Others Print ad...

Page 104: ...motion of the half cut can be set for each print media The default setting is set to Normal Example The half cut of the label tape is not cut properly so the cut is made stronger 1 Press the Adjust ke...

Page 105: ...properly when using a full cut so make the cut stronger 1 Press the Adjust key 2 Use or to select Full Cut Motion and press the Enter key Adjustments Half Cut Motion Full Cut Depth Full Cut Motion 3 U...

Page 106: ...reated as a File in the device In addition the product comes with 10 pre made folders and each folder can hold up to 99 files Folder 1 Folder 10 File1 File 99 Page 1 Page 2 Page 3 200V C1 Pump Room Ex...

Page 107: ...1 IMPORTANT Do not turn off the power while the file is being saved If the power is turned off while saving a file the data may be destroyed NOTE For more information on character input refer to Basi...

Page 108: ...aced with the loaded data and format setting Add Text only Adds the loaded data to the last page of the data currently being edited The format setting of the last page currently being edited will be a...

Page 109: ...o select A 1 and then press the Enter key An X will be displayed next to the name of files that cannot be Add loaded due to the size of the data Select File A 1 A 2 A 3 7 Select Yes with or and press...

Page 110: ...e in the folder Folder contents Deletes all the files in the folder All files Deletes all files in all folders Example Delete the file named A 1 in Folder 1 1 Press the File key 2 Use or to select Del...

Page 111: ...s of Components Maintenance Printer Settings Trouble shooting 5 Use or to select A 1 and press the Enter key Select File A 1 A 2 A 3 6 Select Yes with or and press the Enter key The Deleting message w...

Page 112: ...rs Folder 1 to Folder 10 Example Rename Folder 1 to Pump 1 Press the File key 2 Use or to select Save and press the Enter key File Save Load Delete 3 Use or to select Folder 1 and press the Space key...

Page 113: ...uble shooting 6 Press the Shift Canc keys The display returns to the character input display NOTE For more information on character input refer to Basic Input Operations P 36 To return the changed fol...

Page 114: ...ting a New File 130 Opening a File 131 Load Additional Data 135 Saving a File 136 Input and Edit 137 Entering Text 137 Configure the Format Setting 138 Numbering 142 Print 144 Printing 144 Compound Pa...

Page 115: ...more information on the MK Desktop Utility operating environment and printer driver refer to System Requirements for Software P 228 Log on as a user with administrative privileges Close any virus det...

Page 116: ...lation type and then click Installation When installing either the MK Desktop Utility or the printer driver select Custom When you click Installation the screen for starting the installation of the MK...

Page 117: ...folder If you want to install the software in the displayed folder click Next If you want to change the destination folder click Change and specify the folder to be installed 8 Click Install The insta...

Page 118: ...shooting 10 Click Next 1 1 Read the license agreement carefully and then select I accept the terms of the license agreement and click Next The license agreement for the printer driver is displayed 12...

Page 119: ...dit Names of Components Maintenance Printer Settings Trouble shooting 13 Click OK 14 Select Yes I want to restart my computer now and click Finish 15 After restarting the computer connect the printer...

Page 120: ...t Bluetooth DistributedPrint PC Connect Waiting for data 19 Open the printer folder and confirm that the printer icon is displayed For Windows 11 Select Start All apps Windows Tools Control Panel Hard...

Page 121: ...and computer are connected with a USB cable unplug the connected USB cable Up to three MK5000 printers can be connected If there are multiple printers connected via USB the print data can be evenly d...

Page 122: ...Please connect USB cable 7 Connect the printer to the PC with the USB cable 8 Open the printer folder and confirm that the icon for Canon MK5000 Copy 1 or Canon MK5000 Copy 2 is displayed For Windows...

Page 123: ...e 1 Disconnect the USB cable After confirming that no printing is in progress turn off the printer and then disconnect the interface cable 2 Click Start Windows System Tools Control Panel Programs and...

Page 124: ...hooting 5 Click Yes 6 Click Finish The uninstallation of MK Desktop Utility is completed 7 Select Canon MK5000 Printer Driver from the list and then click Uninstall A confirmation message will appear...

Page 125: ...it Names of Components Maintenance Printer Settings Trouble shooting 10 Select Yes I want to restart my computer now and click Finish The uninstallation of the printer driver is completed The uninstal...

Page 126: ...t PC connect and press the Enter key The message Waiting for data is displayed and the printer is ready to print from a computer Connect PC connect Bluetooth DistributedPrint PC Connect Waiting for da...

Page 127: ...ing way For Windows 11 Start menu All apps MK Desktop Utility MK Desktop Utility For Windows 10 Start menu MK Desktop Utility MK Desktop Utility For Windows 8 1 1 Move the mouse pointer on the Start s...

Page 128: ...puter Appendix Index Print Save Input Edit Names of Components Maintenance Printer Settings Trouble shooting Exit the MK Desktop Utility 1 Click the Close button in the upper right corner of the main...

Page 129: ...126 2 Toolbar For more information refer to Toolbar P 129 There is a Data Toolbar a Send Toolbar and an Edit Toolbar 3 Format Setting Area Displays the formatting information for the selected page Fo...

Page 130: ...a separate file which you will specify the name of P 136 Compound Page Print Settings Prints multiple pages on one tube or one label P 151 Select printer Select the printer to be used Send data and Sa...

Page 131: ...page to the clipboard Page Paste Pastes the contents of the clipboard to the front of the specified page Page Insert Inserts a blank page before the cursor page Page Delete Deletes the cursor page Fo...

Page 132: ...e Printer Settings Trouble shooting Remote menu Print data in the Printer Prints the data held in the printer s character input display P 164 Save file Save the data held in the printer s character in...

Page 133: ...nter P 166 Print Print the data currently being edited P 144 Edit Toolbar Undo Invalidates the last operation Redo Re enables the operation that was invalidated by Undo Cut Cuts the specified text Cop...

Page 134: ...w from the File menu A new file will be created NOTE For more information on entering and editing data refer to Input and Edit P 137 The MK Desktop Utility can only launch one window at a time The for...

Page 135: ...formation refer to Opening a File Created with this Software P 131 Conventional Application File md4 md3 md2 MTD For more information refer to Opening a File Created with a Conventional Application P...

Page 136: ...n File md4 md3 md2 MTD for the file type 3 Select a file in the conventional application file md4 md3 md2 MTD and click Open The specified file will open and be displayed in the data list When the fil...

Page 137: ...loaded into the data list under the following conditions Continuous Invalid data Line 1st 2nd 3rd 1st page 2nd page 3rd page Row 1 Text data of 1st line Row 2 Text data of 2nd line Row 3 Text data of...

Page 138: ...Selection dialog box will appear 4 Set the format and then click OK For details on format setting refer to Configure the Format Setting P 138 NOTE When 1 Line is selected for Lines the data in the fir...

Page 139: ...Printer Settings Trouble shooting Load Additional Data The contents of the specified file can be additionally loaded at the end of the data list being edited 1 Select Add from the File menu 2 Select...

Page 140: ...the File menu The file will be saved NOTE When saving a new file the Save As dialog box will appear For details on how to set this up refer to Saving a file as a new name P 136 below Saving a file as...

Page 141: ...r click on another position NOTE You may not be able to enter text depending on the format setting such as when a set length is specified For more information on format setting refer to Configure the...

Page 142: ...cified varies depending on the print media set the Print Media before format setting Step 3 3 Select the page to change the format in the data list To select multiple pages do one of the following Whe...

Page 143: ...ction Vert char Hor char are specified in the Orientation settings The default setting is Hor Hor char Vert Hor char is only enabled when no text is entered For print image refer to Specifying the Ori...

Page 144: ...lt setting is Off For print image refer to Align Multiple Lines of Text to the Center P 61 Character Size Sets the character size The default setting is 3 mm Norm Character Space Sets the space betwee...

Page 145: ...ext alignment is set to anything other than Centered When the number of lines is set to 1 Line When the orientation is set to Vert Hor char with All line centering set to On When the compound page pri...

Page 146: ...Set range Decimal 0 to 9999 Hexadecimal 0 to FFFF Upper case letter A to Z Lower case letter a to z Example Create a page for Pump Room 1 to Pump Room 10 1 Enter Pump Room Move the cursor to the posi...

Page 147: ...s Setting Details None No padding characters Zero A leading 0 will be entered as a padding character Space A leading space will be entered as a padding character If all the digits of the numbering are...

Page 148: ...P 122 Confirm that Waiting for data appears on the printer s display PC Connect Waiting for data 2 Click Select printer on the File menu IMPORTANT If the message is displayed the printer driver insta...

Page 149: ...um set length is 8 mm If there are pages of 8 mm or less in the data list and the print media is changed to one other than label plate a message to change the set length to 8 mm will be displayed When...

Page 150: ...a row Click on the start point to select it then click on the end point while holding down Shift on your keyboard When you are done release Shift To select multiple non contiguous pages Hold down Ctrl...

Page 151: ...Specify the number of tubes or labels to be printed in the range of 1 to 10 9 Specify the transfer mode Select either Overwrite internal memory or Add to internal memory as the transfer mode The data...

Page 152: ...to print the page you selected in step 6 Example 200V ABC Page 1 ABC 0001 200V Page 1 0001 200V Print 200V Add to internal memory Select this option when you want to add the data you entered in step...

Page 153: ...the numbering N and sent to the printer as a single page of data Example 0001 Pump Room N Pump Room Page 1 With a check mark Send all pages to the printer Example Pump Room 1 to Pump Room 100 Page 1 t...

Page 154: ...urned on and the computer is connected to the printer with a USB cable The printer is selected correctly P 144 If the message Could not receive data from printer appears the printer has not switched t...

Page 155: ...P 122 Confirm that Waiting for data appears on the printer s display PC Connect Waiting for data 2 Click Select printer on the File menu IMPORTANT If the message is displayed the printer driver instal...

Page 156: ...iew area display NOTE Except for labels plates the minimum set length is 8 mm If there are pages of 8 mm or less in the data list and the print media is changed to one other than label plate a message...

Page 157: ...nu To select pages do one of the following When selecting multiple pages in a row Click on the start point to select it then click on the end point while holding down Shift on your keyboard When you a...

Page 158: ...ire compound page with a frame There are 5 frame shapes available with the default setting of None Set Length Allows you to specify the length of the compound page The default setting is Automatic Whe...

Page 159: ...t setting is Arial The font installed in your environment can be selected NOTE When the print media is a label or a plate if the set length is less than 8 0 mm and the plate printing area is Normal Ru...

Page 160: ...enance Printer Settings Trouble shooting 9 Click OK When you click OK the settings are reflected in the preview area of the display 10 Click Print Or select Print from the File menu IMPORTANT If the m...

Page 161: ...range of 1 to 10 When you click OK printing of the compound page will start NOTE The transfer mode and saving cannot be set If the message Unable to open printer appears confirm the following The prin...

Page 162: ...d Page Print settings are disabled P 151 When two or more printers are online When the data list is more than 40 pages Example Printing 100 pages of data on three printers with distributed print Pages...

Page 163: ...ze When you change the print media and media size the settings will be reflected in the preview area display NOTE Except for labels plates the minimum set length is 8 mm When you change the print medi...

Page 164: ...n in the Edit menu To select pages do one of the following When selecting multiple pages in a row Click on the start point to select it then click on the end point while holding down Shift on your key...

Page 165: ...pages is less than 40 distributed print is not possible Print such data with one printer When this screen is displayed select a printer and click OK If there is a printer that is offline a message abo...

Page 166: ...and printed Specify individually Manually specify the page range of the print data and print it Select the printer to be used for printing from the drop down list and specify the page range for each...

Page 167: ...the range of 1 to 10 Click OK to start distributed printing NOTE If an error occurs in distributed printing a message will be displayed Check the status of the printer and deal with the error If ther...

Page 168: ...a 1 Connect the printer to the PC with a USB cable and switch the printer to PC connection mode P 122 Confirm that Waiting for data appears on the printer s display PC Connect Waiting for data 2 Click...

Page 169: ...the data stored in the character input display release the PC connection status Make sure that Receiving is not shown on the printer s display and then press the Canc key Except for labels plates the...

Page 170: ...t data to your computer refer to Saving a File P 136 1 Connect the printer to the PC with a USB cable and switch the printer to PC connection mode P 122 Confirm that Waiting for data appears on the pr...

Page 171: ...e pages in a row Click on the start point to select it then click on the end point while holding down the Shift key on your keyboard Release the Shift key when you are done To select multiple non cont...

Page 172: ...Add to internal memory as the transfer mode The data just sent to the printer will be retained on the printer s character input display even after printing or saving is completed Select Sending withou...

Page 173: ...ta will be added after the last page of the data in the printer Example ABC Page 1 ABC ABC Page 1 0002 200V 200V Page 2 ABC 0001 Save 200V 200V Sending without compressing numbering data Without a che...

Page 174: ...data on the character input display will be retained even after the saving is completed NOTE If the message Unable to open printer appears confirm the following The printer is turned on and the compu...

Page 175: ...the printer at the same time as printing refer to Printing P 144 1 Connect the printer to the PC with a USB cable and switch the printer to PC connection mode P 122 Confirm that Waiting for data appea...

Page 176: ...e saved to the specified folder in the printer NOTE If the message Unable to open printer appears confirm the following The printer is turned on and the computer is connected to the printer with a USB...

Page 177: ...g Backup Data to Computer Saves a backup of the data store in the printer to your computer 1 Connect the printer to the PC with a USB cable and switch the printer to PC connection mode P 122 Confirm t...

Page 178: ...he backup file will be saved in the MK Desktop Utility Printer data File mk5 The default settings for the save location are as follows C Users User Name Documents IMPORTANT Until you see the message D...

Page 179: ...with the backup data 1 Connect the printer to the PC with a USB cable and switch the printer to PC connection mode P 122 Confirm that Waiting for data appears on the printer s display PC Connect Wait...

Page 180: ...en the overwrite confirmation message is displayed click Yes IMPORTANT Until you see the message Then the data recovery has been completed make sure of the following points Otherwise the data may get...

Page 181: ...show or hide the status monitor The default setting is Use the Status Monitor 1 Select Start Windows System Tools Control Panel Hardware and Sound Devices and Printers For Windows 11 Select Start All...

Page 182: ...Settings Trouble shooting IMPORTANT When printing from the MK Desktop Utility do not change the print settings in the Page Setup and Graphics sheets Any changes to the settings will not be reflected...

Page 183: ...mate remaining amount of ink ribbon There may be a slight difference from the actual remaining amount If the remaining amount is not read correctly the remaining amount is not displayed The printer st...

Page 184: ...r more information refer to End of ribbon P 219 Start of Media Not Detect For more information refer to Start of media not detect Remove media between print head and cutter P 219 No ribbon cassette Fo...

Page 185: ...the Cleaners 188 Replacing the Cutter 189 Changing the Printer Settings 193 Changing the Auto Power Off Settings Adapter Battery 193 Changing the Display Settings 195 Turning Off Sounds 198 Speeding...

Page 186: ...ve the batteries from the printer Doing so may result in fire or electric shock Do not use alcohol thinner or other flammable solvents to clean the unit Doing so may result in fire or electric shock 1...

Page 187: ...eaning be sure to turn off the power and unplug the power supply Also remove the batteries from the printer Doing so may result in fire or electric shock Do not use alcohol thinner or other flammable...

Page 188: ...ter and wrung out tightly Use a lint free cloth Allow the water to dry completely before proceeding to the next step IMPORTANT Do not touch the ink ribbon connector print head or connector for tube wa...

Page 189: ...Do not use alcohol thinner or other flammable solvents to clean the unit Doing so may result in fire or electric shock 1 Open the cover and remove the ribbon cassette and attachment or label tape cas...

Page 190: ...r 6 Wipe off any dirt on the transport roller 1 2 and 3 with a cloth moistened with water and wrung out tightly Transport roller 3 is cleaned by pushing the jam recovery lever in the direction of the...

Page 191: ...s from the printer Doing so may result in fire or electric shock Do not use alcohol thinner or other flammable solvents to clean the unit Doing so may result in fire or electric shock 1 Turn off the p...

Page 192: ...equipped with a cleaner or plate cleaner to remove dirt from the surface of the print media Remove the cleaner or plate cleaner as shown in the figure and then remove the dirt from the sponge If the...

Page 193: ...e may pop out and cause injury Never perform any operation that is not described in this manual Do not leave replaced parts unattended If they come into contact with the hands of children they may cau...

Page 194: ...int Save Input Edit Names of Components Maintenance Printer Settings Trouble shooting 1 Turn off the power P 17 2 Open the cover 3 Remove the cutter 4 Insert the new cutter Paying attention to its ori...

Page 195: ...a Computer Appendix Index Print Save Input Edit Names of Components Maintenance Printer Settings Trouble shooting 5 Remove the blade receiver 6 Insert the new blade receiver 7 Close the cover 8 Turn...

Page 196: ...ecommend that you record the Mounted Cutter Count in the Cutter Operation Record in the Basic Operation Guide included with the product each time you change cutters Mounted Cutter Count 50000 times 10...

Page 197: ...power off setting can be set for each power source used and the default setting for both is 30 min 1 Press the Settings key 2 Use or to select Others and press the Enter key Settings Others Print adju...

Page 198: ...Canc keys The display returns to the character input display IMPORTANT In the following cases the automatic power off function will not work When an error has occurred When the cover is open The time...

Page 199: ...is set to 5 1 Press the Settings key 2 Use or to select Setting and then press the Enter key Settings Others Print adjust Setting 3 Select Display contrast with or and press the Enter key Setting Pri...

Page 200: ...atteries 1 Press the Settings key 2 Use or to select Setting and then press the Enter key Settings Others Print adjust Setting 3 Use or to select Backlight ADPTR or Backlight BAT and press the Enter k...

Page 201: ...t Others and press the Enter key Settings Others Print adjust Setting 3 Use or to select AutoBacklightOff and press the Enter key Others AutoOff adapter AutoOff battery AutoBacklightOff 4 Use or to se...

Page 202: ...nd warning sounds The default setting for the sound is On 1 Press the Settings key 2 Use or to select Setting and then press the Enter key Settings Others Print adjust Setting 3 Use or to select Sound...

Page 203: ...nd press the Enter key Settings Others Print adjust Setting 3 Use or to select Print priority and then press the Enter key Others AutoBacklightOff Print priority Init DeleteCheck 4 Use or to select Fi...

Page 204: ...material of the print media the part of the print media sandwiched between the transport rollers may be deformed causing a Feed error If the Feed error occurs repeatedly try to set the rewind movement...

Page 205: ...ss the Shift Canc keys The display returns to the character input display IMPORTANT When a plate is printed with the Plate Full cut set to No default setting the top of the plate will stop at the cutt...

Page 206: ...etting is PC or Bluetooth Example Setting it up so that pressing the Connect key enters PC connection mode 1 Press the Settings key 2 Use or to select Connect and press the Enter key Settings Connect...

Page 207: ...ata being created and files stored in the device will be erased Check your data carefully before initializing Be sure to save any important data to a computer or other device before initializing P 173...

Page 208: ...er you need to install a dedicated application that is compatible with this printer on your tablet device For details please contact the place of purchase Connecting a Tablet Device to the Printer 1 P...

Page 209: ...roubleshooting If a Tube or Label Tape Becomes Jammed 206 What to Do in Case of Trouble 211 A Message is Coming Up 217 Updating the Firmware 222 Checking the Firmware Version 222 Running the Firmware...

Page 210: ...a Feed error Media is jammed in the feeding path NOTE If the print media is jammed inside the printer but the message is not displayed press and hold the Canc key for 2 seconds or more to stop printin...

Page 211: ...print media in the printer 5 When using tube or plate As shown in the figure pull the tube or plate out while pressing the jam recovery lever in the direction of the arrow If the tube or plate cannot...

Page 212: ...f the ribbon is loose it may not operate properly 8 Replace the ribbon cassette and close the cover Insert the ribbon cassette straight in and press firmly until it clicks into place When the cover is...

Page 213: ...remove the print media If the tube or label tape is in a position where it cannot be removed by hand use the feed function However if you continue to feed with the feed function it may damage the prin...

Page 214: ...nents Maintenance Printer Settings Trouble shooting 4 Use Forward or Reverse to feed the print media to the desired position As long as you keep pressing or it will be fed forward or backward continuo...

Page 215: ...eplace the batteries or use the included AC adapter PR TP001 Are batteries other than the specified ones being used Use the specified batteries P 13 The display does not change to the AC adapter symbo...

Page 216: ...the deformed part of the print media and reinsert it Is the tube or plate dirty Wipe off any dirt or dust with a dry cloth Also do not use tubes or plates that have oil or other stains that cannot be...

Page 217: ...he print head dirty Clean the print head We recommend cleaning the print head about once a month P 187 Is the cleaner of the attachment or optional tube warmer dirty Clean the cleaner We recommend cle...

Page 218: ...e a dry cloth to wipe off any dirt on the print media Out of ribbon There is a sticky stain on the tube that looks like the glue from plastic tape Use a clean tube White vertical lines appear when pri...

Page 219: ...ff the deformed part and reload the print media Is there glue on the media delivery port of the label tape Check to see if glue is sticking to the media delivery port of the label tape P 25 If glue is...

Page 220: ...re any load on the tube or plate transport Place the printer and the print media on the same table or at the same vertical position so that no load is applied to the transport When using a tube reel l...

Page 221: ...or copy the page and prepare the data to be pasted Exceeding Memory Capacity No more characters can be entered There is insufficient memory to input text P 226 Save the text data you have created dele...

Page 222: ...Change or delete the three line page Numbering data setting exists The page you are trying to divide or combine has numbering Delete the numbering P 49 No character data You need to have already enter...

Page 223: ...edia and make sure that the print media is not stuck between the print head and the cutter For information on removing print media from between the print head and cutter refer to If a Tube or Label Ta...

Page 224: ...ount can t be displayed Information could not be read from the IC chip in the ribbon cassette Or a ribbon cassette that has already been used up has been loaded Press any key and follow the instructio...

Page 225: ...C adapter Wrong cut length Adjust the length When Yes is selected the cut length is automatically changed according to the print media If you select No the cut length will not be changed Change the cu...

Page 226: ...Version Please check the firmware version of this product before updating it 1 Press the Settings key 2 Use or to select Others and press the Enter key Settings Others Print adjust Setting 3 Use or t...

Page 227: ...n case the firmware update is not executed correctly etc P 173 Use the AC adapter when updating the firmware Multiple printers cannot be updated at the same time Only one printer should be connected a...

Page 228: ...is complete the printer will automatically turn off IMPORTANT Don t do any of the following while updating the firmware Turn off the power Unplug the USB cable Operate any component of the printer Se...

Page 229: ...Chapter 7 Appendix Specifications 226 Printer 226 Print Media 228 System Requirements for Software 228 Consumable Supplies and Options 229 List of Function 231 List of Symbols 233 Index 234...

Page 230: ...r 1 5 mm to 6 5 mm 45 tube segments min for 7 mm to 10 mm Middle speed mode 25 mm sec 35 tube segments min Low speed mode 18 5 mm sec 30 tube segments min Cut length Tube 8 mm to 150 mm Label tape Pla...

Page 231: ...ber BK 3MCCA for North America BK 3MCCE for Asia 6 pieces Interface USB2 0 Full Speed Bluetooth Specification Version 5 0 Bluetooth Low Energy Technology Operating environment Temperature 15 to 32 5 d...

Page 232: ...less width 0 4 mm to 0 6 mm thickness Plate 1 2 0 5 mm thickness 8 0 mm to 10 0 mm width 1 Please purchase commercially available tubes and plates for use Also some commercially available tubes and p...

Page 233: ...ase contact your place of purchase NOTE Please purchase commercially available tubes and plates for use For more information refer to Print Media P 228 Consumable Supplies Ribbon cassette Label tape c...

Page 234: ...mer This device is used to warm up tubes that have become stiff due to cold The tube warmer allows for clean printing even in low temperature environments Plate and flat tube attachment It is used for...

Page 235: ...eyConfig Warmer Warmer Control Warmer Temp Character Edit Numbering Num key Symbol Symbol 1 key or Symbol 2 key Page Edit Insert Edit key Delete Copy Cut Paste Division Combining Page Settings 1 Chara...

Page 236: ...settings File Save File key Load Delete Print adjust Top position Adjust key Vertical Position Length Half Cut Depth Half Cut Motion Full Cut Depth Full Cut Motion Print density Settings Print speed D...

Page 237: ...233 Contents Preparation Setup Print Using a Computer Appendix Index Print Save Input Edit Names of Components Maintenance Printer Settings Trouble shooting List of Symbols Symbol 1 Symbol 2...

Page 238: ...er name 108 Character input display 15 Character size 10 42 Character space 10 47 Char Size key 6 Char Space key 6 Cleaner 5 21 229 Cleaning Replacing the cleaners 188 Cleaning the print head 187 Clea...

Page 239: ...software 111 Internal memory 226 J Jam recovery lever 4 27 186 207 K Keyboard 3 6 L Label tape cassette 25 229 Length adjust 88 Lines 10 48 List of function 231 List of message Printer display 217 Lis...

Page 240: ...te 3 Remaining ribbon 9 179 Remove key 7 Replacing the cutter 189 Rewind movement 200 Ribbon cassette 229 Ribbon cassette information display 15 S Save file 102 Seg Len key 6 Set Cut key 7 Set Lines k...

Reviews: