


Positioning Originals (Scanning from Computer)
Learn how to place items on the platen of your scanner or printer. Place items correctly according to the
type of item to be scanned. Otherwise, items may not be scanned correctly.
Important
• Do not place objects on the document cover. When you open the document cover, the objects may fall
into your scanner or printer, resulting in malfunction.
• Close the document cover when scanning.
Placing Items
Place items as described below to scan by detecting the item type or size automatically.
Important
• When scanning by specifying the paper size in IJ Scan Utility or ScanGear (scanner driver), align an
upper corner of the item with the corner at the arrow (alignment mark) of the platen.
• Photos that have been cut to various shapes and items smaller than 1.2 inches (3 cm) square cannot
be cropped accurately when scanning.
• Reflective disc labels may not be scanned as expected.
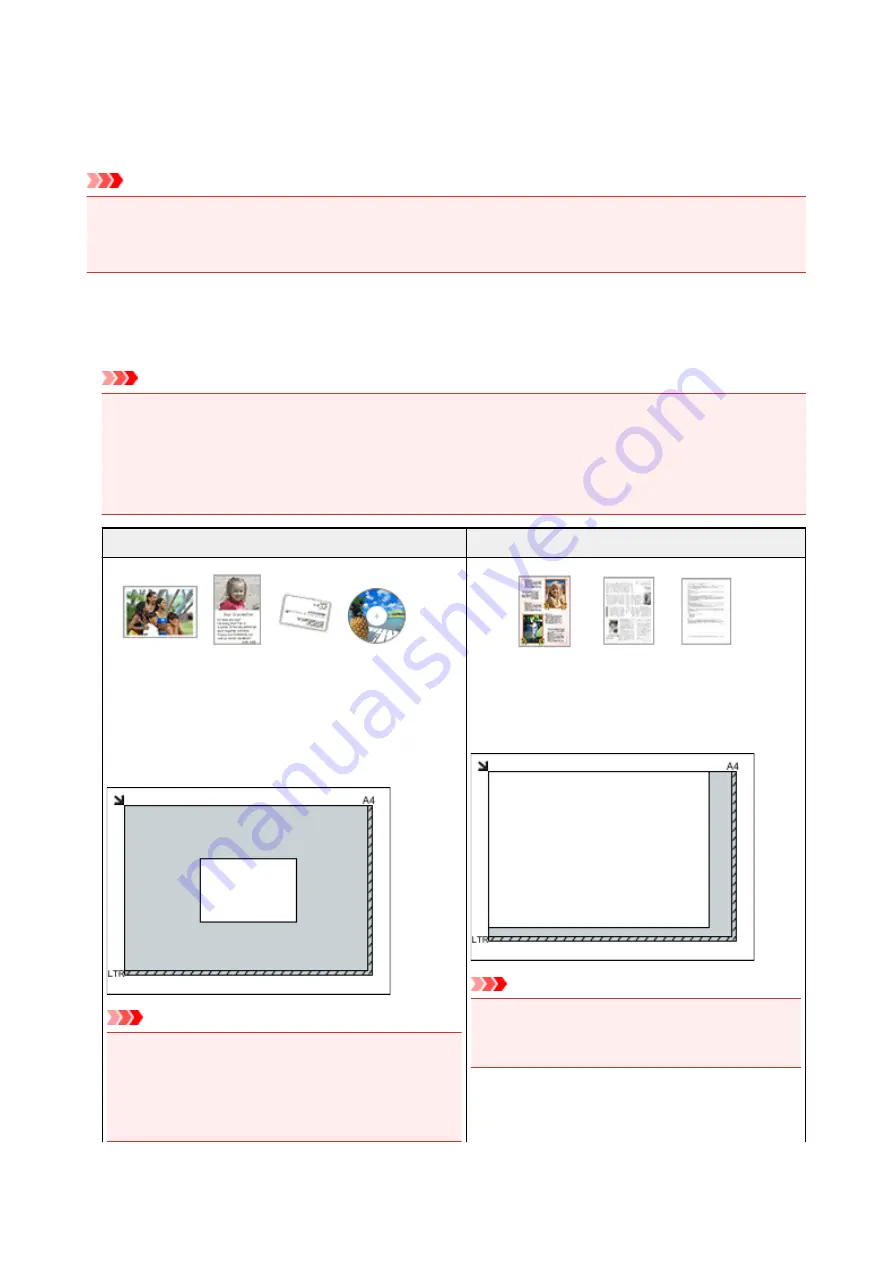
For Photos, Postcards, Business Cards, or BD/DVD/CD
For Magazines, Newspapers, or Documents
Placing a Single Item:
Place the item face-down on the platen, with 0.4 inch (1
cm) or more space between the edges (diagonally striped
area) of the platen and the item. Portions placed on the
diagonally striped area cannot be scanned.
Important
• Large items (such as A4 size photos) that cannot be
placed away from the edges/arrow (alignment mark) of
the platen may be saved as PDF files. To save in a
format other than PDF, scan by specifying the data
format.
Place the item face-down on the platen and align an
upper corner of the item with the corner at the arrow
(alignment mark) of the platen. Portions placed on the
diagonally striped area cannot be scanned.
Important
• Refer to "Loading Originals" for your model from
Home of the
Online Manual
for details on the
portions in which items cannot be scanned.
858
Summary of Contents for MG7700 series
Page 19: ...C000 1169 19 ...
Page 57: ... Appears in a new window 57 ...
Page 171: ...171 ...
Page 205: ...Replacing Ink Replacing Ink Checking Ink Status 205 ...
Page 250: ...250 ...
Page 254: ...Safety Safety Precautions Regulatory Information 254 ...
Page 259: ...Main Components and Their Use Main Components Power Supply Using the Operation Panel 259 ...
Page 260: ...Main Components Front View Rear View Inside View Operation Panel 260 ...
Page 277: ...This opens another list of items Drag it in the same manner and tap a setting 277 ...
Page 286: ...Note The effects of the quiet mode may be less depending on the print quality settings 286 ...
Page 303: ...Language selection Changes the language for the messages and menus on the touch screen 303 ...
Page 314: ...Network Connection Network Connection Tips 314 ...
Page 363: ...5 Delete Deletes the selected IP address from the list 363 ...
Page 400: ...400 ...
Page 414: ...414 ...
Page 420: ...B 1 38 inches 35 0 mm C 0 25 inch 6 4 mm D 0 25 inch 6 3 mm 420 ...
Page 449: ...Note Selecting Scaled changes the printable area of the document 449 ...
Page 482: ...Adjusting Color Balance Adjusting Brightness Adjusting Intensity Adjusting Contrast 482 ...
Page 484: ...Related Topic Adjusting Tone 484 ...
Page 491: ...Adjusting Intensity Adjusting Contrast 491 ...
Page 572: ...Printing Using Canon Application Software My Image Garden Guide Easy PhotoPrint Guide 572 ...
Page 602: ...Troubleshooting Cannot Print Scan from NFC Compliant Device 602 ...
Page 761: ...761 ...
Page 779: ...779 ...
Page 818: ...Adjusting Cropping Frames ScanGear 818 ...
Page 846: ...Scanning starts then the scanned image appears in the application 846 ...
Page 853: ...Scanning Tips Resolution Data Formats Color Matching 853 ...
Page 892: ...If icon is displayed Go to check 4 Cannot Find Machine During Wireless LAN Setup Check 4 892 ...
Page 1077: ...1660 Cause A ink tank is not installed What to Do Install the ink tank 1077 ...


