


019A-078
See "
" or "
" also.
IMPORTANT
About replacement drum cartridges
For optimum print quality, using Canon genuine drum cartridges is recommended.
Model Name
Supported Canon Genuine Drum Cartridge
LBP7010C/LBP7018C
Canon Drum Cartridge 029
Be careful of counterfeit drum cartridges.
Please be aware that there are counterfeit Canon drum cartridges in the marketplace.
Use of counterfeit drum cartridges may result in poor print quality or machine performance.
Canon is not responsible for any malfunction, accident or damage caused by the use of counterfeit drum cartridges.
For more information, see
http://www.canon.com/counterfeit
.
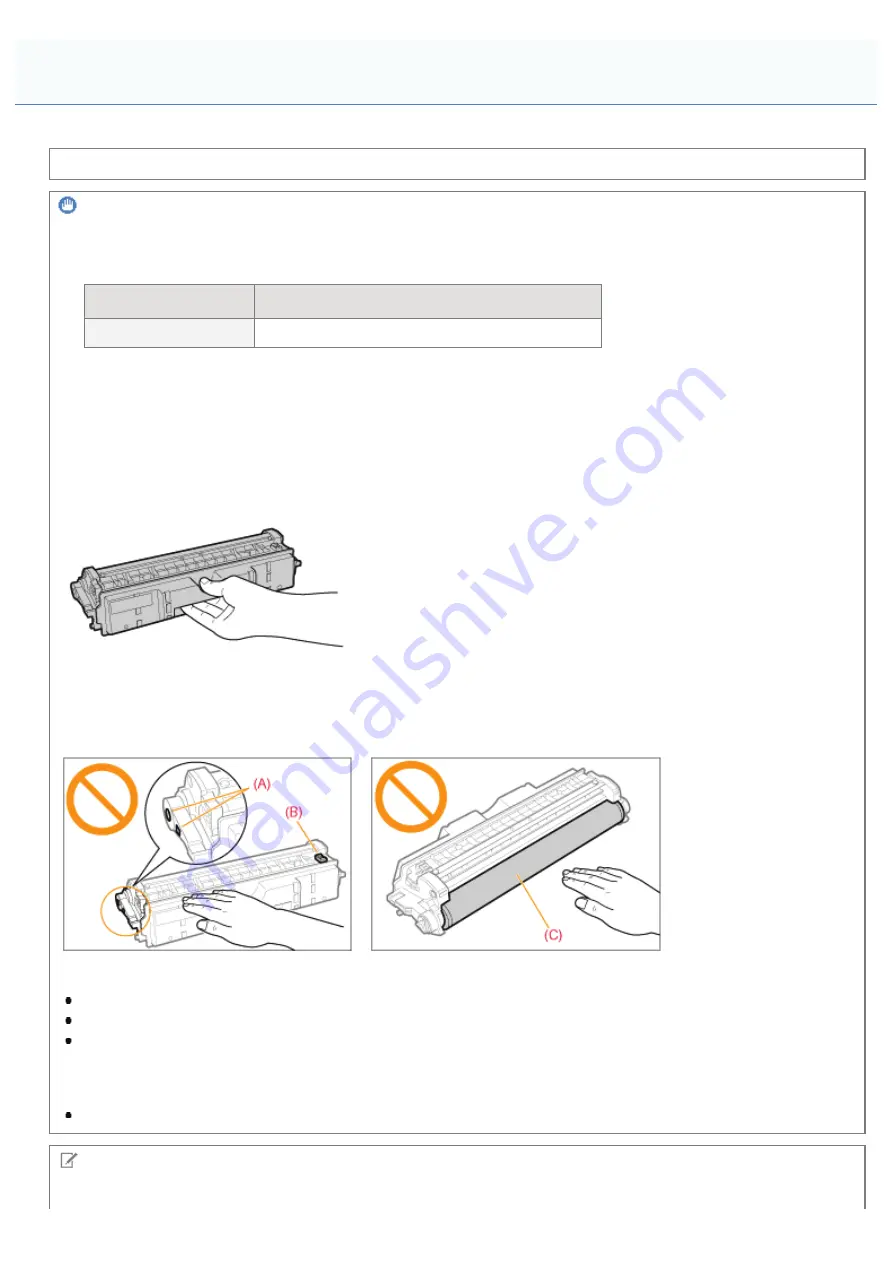
Hold the drum cartridge properly.
When handling the drum cartridge, hold it properly as shown in the figure. Do not place it vertically or upside-down.
Do not touch the electrical contacts (A), the drum cartridge memory (B), and the development
roller (C).
If you touch the electrical contacts (A) or the drum cartridge memory (B), this may result in damage to the printer.
Also, print quality may deteriorate if you touch or damage the photosensitive drum (C). Do not touch with your hands.
Other precautions
Do not expose drum cartridges to direct sunlight or strong light.
Do not attempt to disassemble or modify drum cartridges.
Condensation (water droplets on the inside or outside) may form on the drum cartridge when it is brought into an
environment with a sudden change in temperature or humidity.
When moving a new drum cartridge to a location with change in temperature, leave the cartridge in the protective
bag at the new location for two or more hours to allow it to adjust to the new temperature.
Do not leave the top cover or front cover open for a long time.
NOTE
About the packing materials
Attention (Drum Cartridge)
㻣㻟㻌㻛㻌㻟㻠㻟
Summary of Contents for LBP7010C
Page 1: ...㻝㻌㻛㻌㻟㻠㻟 ...
Page 19: ...7 Click Exit When the following screen appears you can remove the CD ROM 㻝㻥㻌㻛㻌㻟㻠㻟 ...
Page 85: ...NOTE Calibration time It takes approximately 57 seconds 㻤㻡㻌㻛㻌㻟㻠㻟 ...
Page 92: ...㻥㻞㻌㻛㻌㻟㻠㻟 ...
Page 135: ...17 Click Exit When the following screen appears you can remove the CD ROM 㻝㻟㻡㻌㻛㻌㻟㻠㻟 ...
Page 137: ...If the User Account Control dialog box appears Click Yes or Continue 㻝㻟㻣㻌㻛㻌㻟㻠㻟 ...
Page 156: ...㻝㻡㻢㻌㻛㻌㻟㻠㻟 ...
Page 177: ...3 Click OK For details on the basic printing procedure see Basic Printing Procedure 㻝㻣㻣㻌㻛㻌㻟㻠㻟 ...
Page 181: ...For details on the basic printing procedure see Basic Printing Procedure 㻝㻤㻝㻌㻛㻌㻟㻠㻟 ...
Page 183: ...3 Click OK For details on the basic printing procedure see Basic Printing Procedure 㻝㻤㻟㻌㻛㻌㻟㻠㻟 ...
Page 186: ...3 Click OK Then the Page Setup sheet reappears 㻝㻤㻢㻌㻛㻌㻟㻠㻟 ...
Page 197: ...4 Click OK For details on the basic printing procedure see Basic Printing Procedure 㻝㻥㻣㻌㻛㻌㻟㻠㻟 ...
Page 201: ...3 Click OK For details on the basic printing procedure see Basic Printing Procedure 㻞㻜㻝㻌㻛㻌㻟㻠㻟 ...
Page 203: ...4 Click OK For details on the basic printing procedure see Basic Printing Procedure 㻞㻜㻟㻌㻛㻌㻟㻠㻟 ...
Page 207: ...4 Click OK For details on the basic printing procedure see Basic Printing Procedure 㻞㻜㻣㻌㻛㻌㻟㻠㻟 ...
Page 211: ... Low 㻞㻝㻝㻌㻛㻌㻟㻠㻟 ...
Page 221: ...4 Confirm the settings then click OK ĺ The printer folder reappears 㻞㻞㻝㻌㻛㻌㻟㻠㻟 ...
Page 273: ...4 Click OK 㻞㻣㻟㻌㻛㻌㻟㻠㻟 ...
Page 282: ...For details on the procedure for loading paper see Loading Paper 㻞㻤㻞㻌㻛㻌㻟㻠㻟 ...
Page 316: ...If you specify Special Settings C4 printing speed drops 㻟㻝㻢㻌㻛㻌㻟㻠㻟 ...
Page 341: ...㻟㻠㻝㻌㻛㻌㻟㻠㻟 ...


