


019A-015
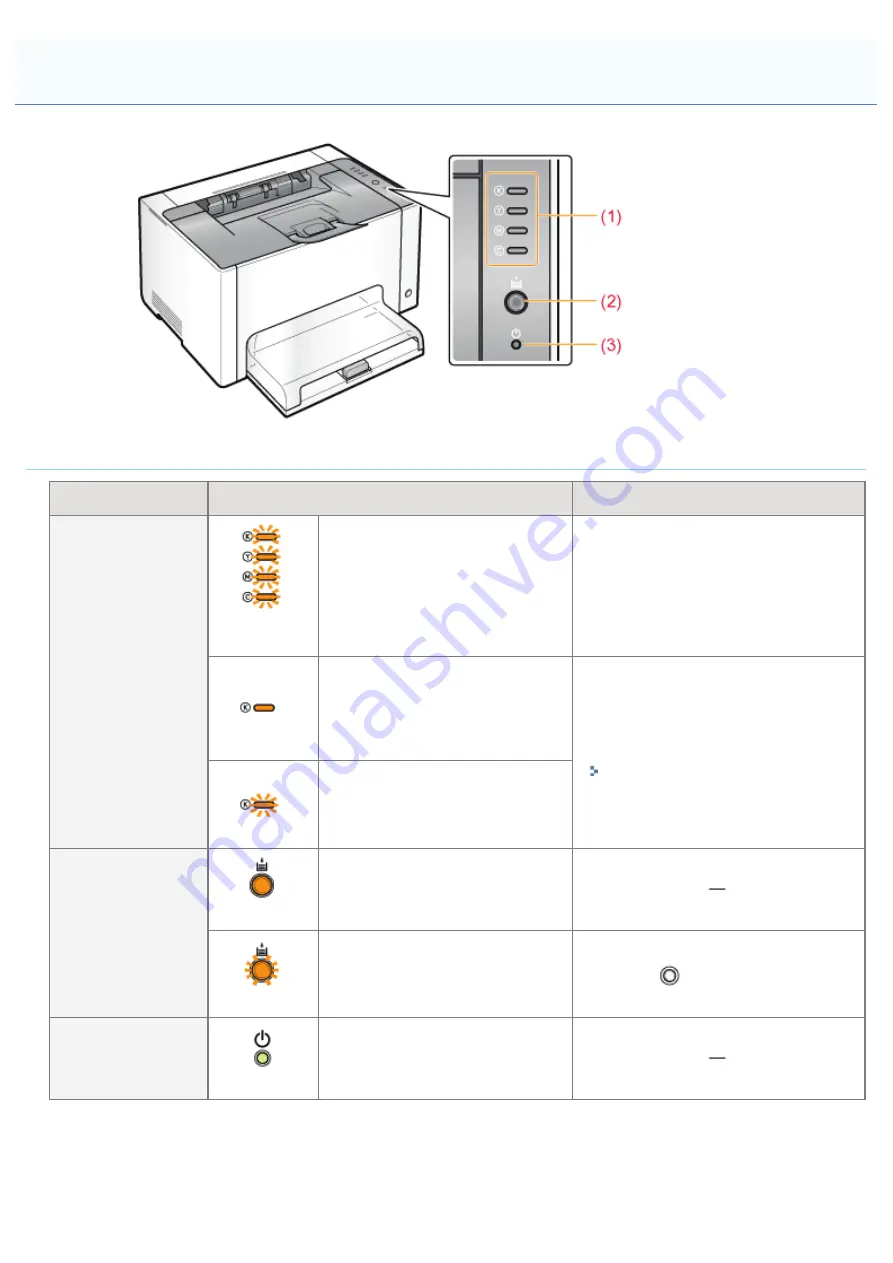
Indicators
Name
Status
Solution
(1) Toner Indicator
(Blinking the
all colors)
The toner cartridges are being
moved.
Wait until the toner cartridges stop
moving.
(Example: Black)
(On)
An error is occurring for the toner
cartridges.
(Such as when the toner
cartridges have reached the end
of their life)
Solve the problem following the
message displayed in the Printer Status
Window.
*1
"A Message Appears in the Printer
Status Window"
(Example: Black)
(Blinking)
The toner cartridges are in the
replacement position.
(2) Paper Indicator
(On)
The printer is in the toner cartridge
replacement mode
*2
.
(Blinking)
Paper needs to be checked.
(Such as when paper runs out and
when paper cannot be fed
properly)
Reload the paper properly, and then
press the [
] (Paper) key on the
printer.
*3
(3) Power Indicator
(On)
The printer is turned ON.
*1
For details on the procedure for displaying the Printer Status Window, see "
."
*2
It is a state where you can move the toner cartridges to the replacement position manually. For details, see "
Toner Cartridges by Using Paper Key on the Printer
*3
For details on the procedure for loading paper, see "
Control Panel
㻠㻡㻌㻛㻌㻟㻠㻟
Summary of Contents for LBP7010C
Page 1: ...㻝㻌㻛㻌㻟㻠㻟 ...
Page 19: ...7 Click Exit When the following screen appears you can remove the CD ROM 㻝㻥㻌㻛㻌㻟㻠㻟 ...
Page 85: ...NOTE Calibration time It takes approximately 57 seconds 㻤㻡㻌㻛㻌㻟㻠㻟 ...
Page 92: ...㻥㻞㻌㻛㻌㻟㻠㻟 ...
Page 135: ...17 Click Exit When the following screen appears you can remove the CD ROM 㻝㻟㻡㻌㻛㻌㻟㻠㻟 ...
Page 137: ...If the User Account Control dialog box appears Click Yes or Continue 㻝㻟㻣㻌㻛㻌㻟㻠㻟 ...
Page 156: ...㻝㻡㻢㻌㻛㻌㻟㻠㻟 ...
Page 177: ...3 Click OK For details on the basic printing procedure see Basic Printing Procedure 㻝㻣㻣㻌㻛㻌㻟㻠㻟 ...
Page 181: ...For details on the basic printing procedure see Basic Printing Procedure 㻝㻤㻝㻌㻛㻌㻟㻠㻟 ...
Page 183: ...3 Click OK For details on the basic printing procedure see Basic Printing Procedure 㻝㻤㻟㻌㻛㻌㻟㻠㻟 ...
Page 186: ...3 Click OK Then the Page Setup sheet reappears 㻝㻤㻢㻌㻛㻌㻟㻠㻟 ...
Page 197: ...4 Click OK For details on the basic printing procedure see Basic Printing Procedure 㻝㻥㻣㻌㻛㻌㻟㻠㻟 ...
Page 201: ...3 Click OK For details on the basic printing procedure see Basic Printing Procedure 㻞㻜㻝㻌㻛㻌㻟㻠㻟 ...
Page 203: ...4 Click OK For details on the basic printing procedure see Basic Printing Procedure 㻞㻜㻟㻌㻛㻌㻟㻠㻟 ...
Page 207: ...4 Click OK For details on the basic printing procedure see Basic Printing Procedure 㻞㻜㻣㻌㻛㻌㻟㻠㻟 ...
Page 211: ... Low 㻞㻝㻝㻌㻛㻌㻟㻠㻟 ...
Page 221: ...4 Confirm the settings then click OK ĺ The printer folder reappears 㻞㻞㻝㻌㻛㻌㻟㻠㻟 ...
Page 273: ...4 Click OK 㻞㻣㻟㻌㻛㻌㻟㻠㻟 ...
Page 282: ...For details on the procedure for loading paper see Loading Paper 㻞㻤㻞㻌㻛㻌㻟㻠㻟 ...
Page 316: ...If you specify Special Settings C4 printing speed drops 㻟㻝㻢㻌㻛㻌㻟㻠㻟 ...
Page 341: ...㻟㻠㻝㻌㻛㻌㻟㻠㻟 ...


