07K5-02U
NOTE
When loading custom size paper
Because the procedure for loading custom size paper is different from that for loading standard size paper, see "
Loading Standard Size Paper
For details on the paper that you can load in the paper drawer, see "
."
Load paper in Drawer 2 (optional) in the same manner as you load paper in Drawer 1.
Before loading paper, see "
1
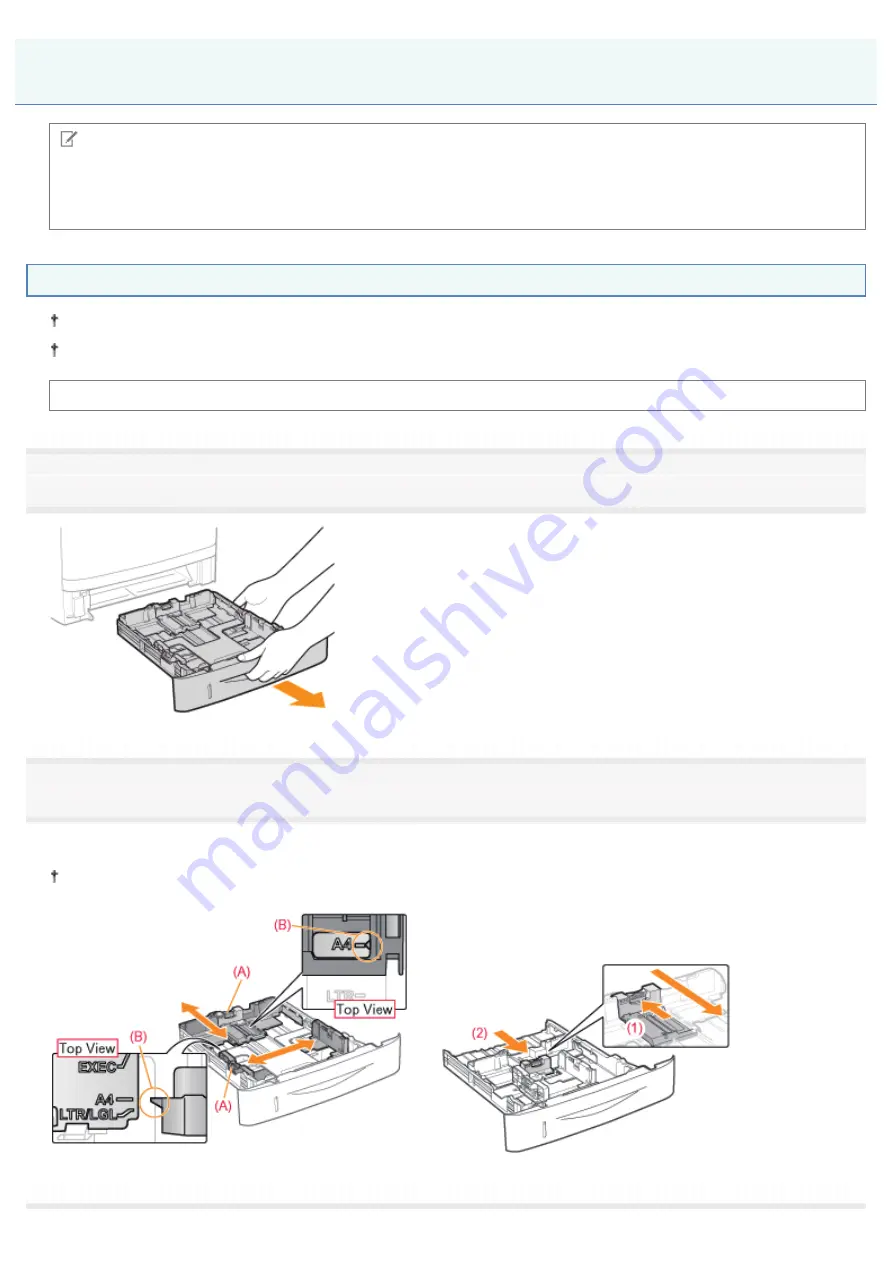
Pull out the paper drawer.
2
Slide the paper guides to the position of the size of the paper to be loaded.
While holding the lock release lever (A), adjust the guides.
Align the position of (B) with the size mark of the paper to be loaded.
When loading A6 paper
Slide the paper guide at the rear center toward you.
Loading Paper in the Paper Drawer
㻝㻠㻝㻌㻛㻌㻠㻡㻞
Summary of Contents for LBP6310dn
Page 1: ...㻝㻌㻛㻌㻠㻡㻞 ...
Page 20: ...7 Click Exit When the following screen appears you can remove the CD ROM 㻞㻜㻌㻛㻌㻠㻡㻞 ...
Page 45: ...This printer supports Raw only It does not support LPR 㻠㻡㻌㻛㻌㻠㻡㻞 ...
Page 50: ...Paper Feeder Unit PF 44 㻡㻜㻌㻛㻌㻠㻡㻞 ...
Page 122: ...See You Cannot Install the Printer Driver and install the printer driver again 㻝㻞㻞㻌㻛㻌㻠㻡㻞 ...
Page 131: ...㻝㻟㻝㻌㻛㻌㻠㻡㻞 ...
Page 146: ... Registering a Custom Paper Size 㻝㻠㻢㻌㻛㻌㻠㻡㻞 ...
Page 157: ...㻝㻡㻣㻌㻛㻌㻠㻡㻞 ...
Page 185: ...3 Click OK For details on the basic printing procedure see Basic Printing Procedure 㻝㻤㻡㻌㻛㻌㻠㻡㻞 ...
Page 189: ...For details on the basic printing procedure see Basic Printing Procedure 㻝㻤㻥㻌㻛㻌㻠㻡㻞 ...
Page 192: ...5 Click OK For details on the basic printing procedure see Basic Printing Procedure 㻝㻥㻞㻌㻛㻌㻠㻡㻞 ...
Page 194: ...Click OK For details on the basic printing procedure see Basic Printing Procedure 㻝㻥㻠㻌㻛㻌㻠㻡㻞 ...
Page 197: ...3 Click OK Then the Page Setup sheet reappears 㻝㻥㻣㻌㻛㻌㻠㻡㻞 ...
Page 206: ...4 Click OK For details on the basic printing procedure see Basic Printing Procedure 㻞㻜㻢㻌㻛㻌㻠㻡㻞 ...
Page 210: ...3 Click OK For details on the basic printing procedure see Basic Printing Procedure 㻞㻝㻜㻌㻛㻌㻠㻡㻞 ...
Page 212: ...4 Click OK For details on the basic printing procedure see Basic Printing Procedure 㻞㻝㻞㻌㻛㻌㻠㻡㻞 ...
Page 218: ...4 Click OK For details on the basic printing procedure see Basic Printing Procedure 㻞㻝㻤㻌㻛㻌㻠㻡㻞 ...
Page 220: ...4 Click OK For details on the basic printing procedure see Basic Printing Procedure 㻞㻞㻜㻌㻛㻌㻠㻡㻞 ...
Page 228: ... 3 Click Yes 4 Click OK ĺ The setting screen of the printer driver reappears 㻞㻞㻤㻌㻛㻌㻠㻡㻞 ...
Page 263: ...6 Click Reset After completing the reset the settings are effective 㻞㻢㻟㻌㻛㻌㻠㻡㻞 ...
Page 269: ...5 Clicking Yes initializes the network settings 㻞㻢㻥㻌㻛㻌㻠㻡㻞 ...
Page 271: ...9 Enter exit then press the ENTER key on your keyboard ĺ Command Prompt closes 㻞㻣㻝㻌㻛㻌㻠㻡㻞 ...
Page 282: ...Click Finish 8 Click Close 9 Click Apply 10 Click OK 㻞㻤㻞㻌㻛㻌㻠㻡㻞 ...
Page 320: ...㻟㻞㻜㻌㻛㻌㻠㻡㻞 ...
Page 336: ... Printing Cannot Be Performed via the Print Server 㻟㻟㻢㻌㻛㻌㻠㻡㻞 ...
Page 345: ...㻟㻠㻡㻌㻛㻌㻠㻡㻞 ...
Page 350: ...9 Click OK 㻟㻡㻜㻌㻛㻌㻠㻡㻞 ...
Page 354: ...㻟㻡㻠㻌㻛㻌㻠㻡㻞 ...
Page 359: ...5 Click OK 㻟㻡㻥㻌㻛㻌㻠㻡㻞 ...
Page 362: ...To check the obtained security access logs Checking the Security Access Logs 㻟㻢㻞㻌㻛㻌㻠㻡㻞 ...
Page 399: ...㻟㻥㻥㻌㻛㻌㻠㻡㻞 ...
Page 443: ...07K5 098 Basic Operations Various Information for Windows Appendix 㻠㻠㻟㻌㻛㻌㻠㻡㻞 ...


