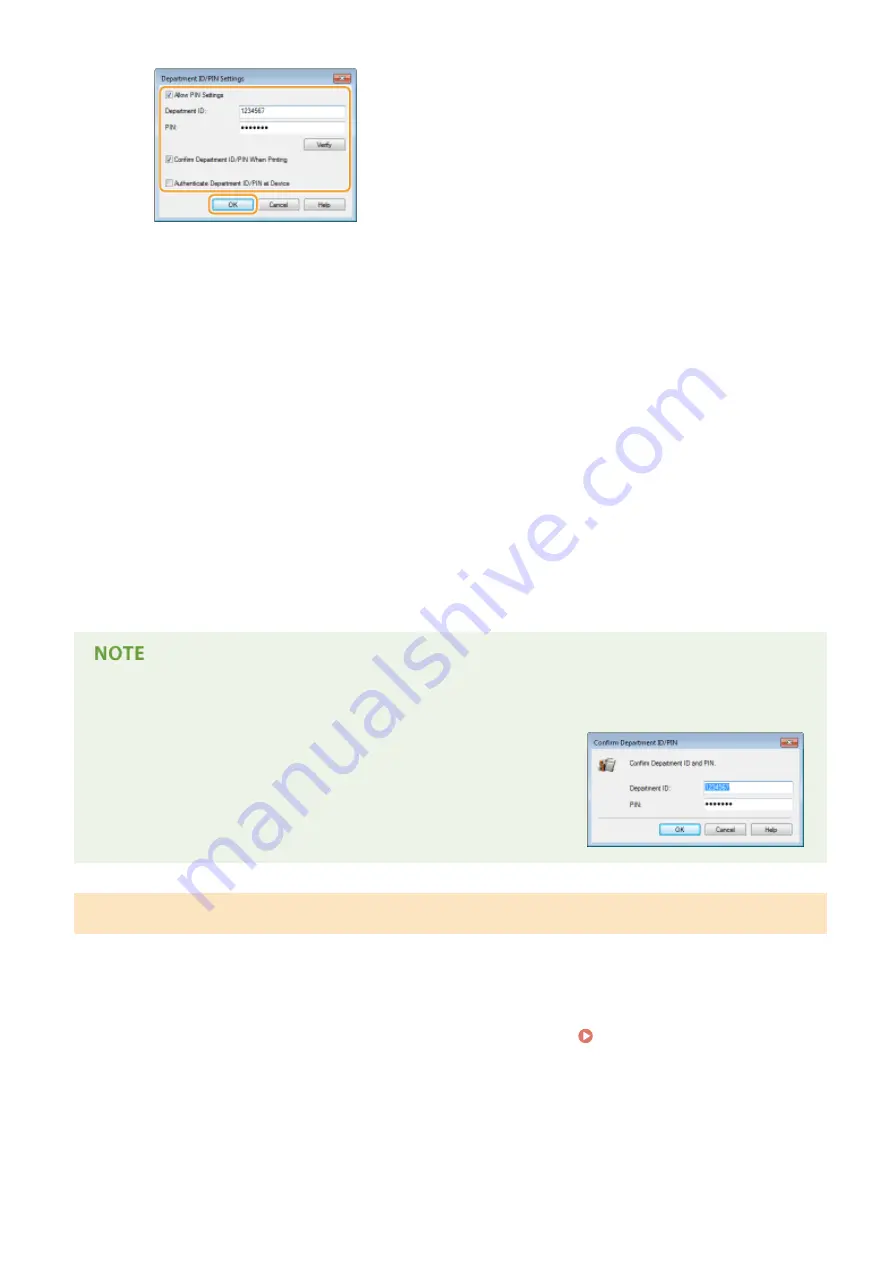
[Allow PIN Setting]
Select the check box to enable the PIN setting.
[Department ID]
Enter a number of up to seven digits for the Department ID.
[PIN]
Enter a number of up to seven digits for the PIN if it is set for the Department ID.
[Verify]
Click to verify that the correct ID and PIN are entered. This function is not available if the machine and
the computer are connected via a USB or WSD (Web Services on Devices) port.
[Confirm Department ID/PIN When Printing]
Select the check box to display the [Confirm Department ID/PIN] pop-up screen each time you print
from a computer.
[Authenticate Department ID/PIN at Device]
Select the check box if the machine and the computer are connected via a USB or WSD port.
3
Click [OK].
Logging on to the machine
●
When you try to print from a computer when Department ID
Management is enabled, the following pop-up screen is displayed
(unless the [Confirm Department ID/PIN When Printing] check box is
cleared):
Blocking Jobs When Department ID Is Unknown
The factory default settings are such that even when Department ID Management is enabled, you can print from a
computer without entering an ID and PIN. If you want to change this so that printing is not possible unless an ID and
PIN are entered, use the following procedure.
1
Start the Remote UI and log on in Management Mode. Starting Remote UI(P. 333)
2
Click [Settings/Registration].
Security
261
Summary of Contents for LBP351 Series
Page 1: ...LBP352x LBP351x User s Guide USRMA 0699 00 2016 05 en Copyright CANON INC 2016 ...
Page 7: ...Notice 629 Office Locations 633 VI ...
Page 84: ...Printing a Document 77 ...
Page 99: ...LINKS Basic Printing Operations P 78 Printing a Document 92 ...
Page 111: ...LINKS Basic Printing Operations P 78 Printing a Document 104 ...
Page 142: ...LINKS Using the Encrypted Print P 136 Installing an SD Card P 583 Printing a Document 135 ...
Page 163: ...LINKS Printing without Opening a File Direct Print P 146 Printing a Document 156 ...
Page 175: ...Can Be Used Conveniently with a Mobile Device 168 ...
Page 248: ...LINKS Entering Sleep Mode P 68 Network 241 ...
Page 288: ...Printing a Document Stored in the Machine Stored Job Print P 137 Security 281 ...
Page 294: ... Functions of the Keys Operation Panel P 24 Security 287 ...
Page 332: ...Using TLS for Encrypted Communications P 294 Configuring IPSec Settings P 298 Security 325 ...
Page 342: ...Using Remote UI 335 ...
Page 357: ...LINKS Remote UI Screens P 336 Using Remote UI 350 ...
Page 381: ...Paper Source 0X7U 058 See Select Feeder Menu P 453 Setting Menu List 374 ...
Page 469: ...Troubleshooting 462 ...
Page 533: ...8 Close the top cover Maintenance 526 ...
Page 551: ...LINKS Utility Menu P 445 Job Menu P 449 Maintenance 544 ...
Page 562: ...Third Party Software 0X7U 08U Appendix 555 ...
Page 607: ...Manual Display Settings 0X7U 08W Appendix 600 ...
Page 632: ...Scalable Fonts PCL Appendix 625 ...
Page 633: ...Appendix 626 ...
Page 634: ...Appendix 627 ...
Page 635: ...OCR Code Scalable Fonts PCL Bitmapped Fonts PCL Appendix 628 ...


