background image

Installing the L Series Scanner for Direct Scanning & Copying


Page 1 of 14 


Canon


Items Needed at the Installation Site: 


Standard Tool Kit 

L Series Scanners L24 & L36 Service Manual (available from the Colortrac 
Support Website) 

http://www.lseries.colortrac.com


User name: 

canon


Password: 

scann1ng    

(note the ‘i’ is a number 1)


imagePROGRAF iPF670 or iPF770 Service Manual (for 
printer installation) 

Blank USB2 Flash drive, preformatted FAT 32; 

must be able to store at least 

25Mb of data. This Flash drive can be used to update the scanner firmware.


Please Note: Install the imagePROGRAF printer first and verify proper printer operation using roll media before proceeding to install the scanner.


Scanner Unboxing & Initial Preparation:


1.


Unbox the scanner, locate the following items in the scanner’s box and put each item aside for now: 

Scanner Power Supply 

Ethernet cable 

Document Return Guides:  
L24 model has 1 guide 
L36 model has 3 guides 

Calibration/Stitch Target/sheet 

2 Scanner Mounting brackets and 2 Thumb screws  
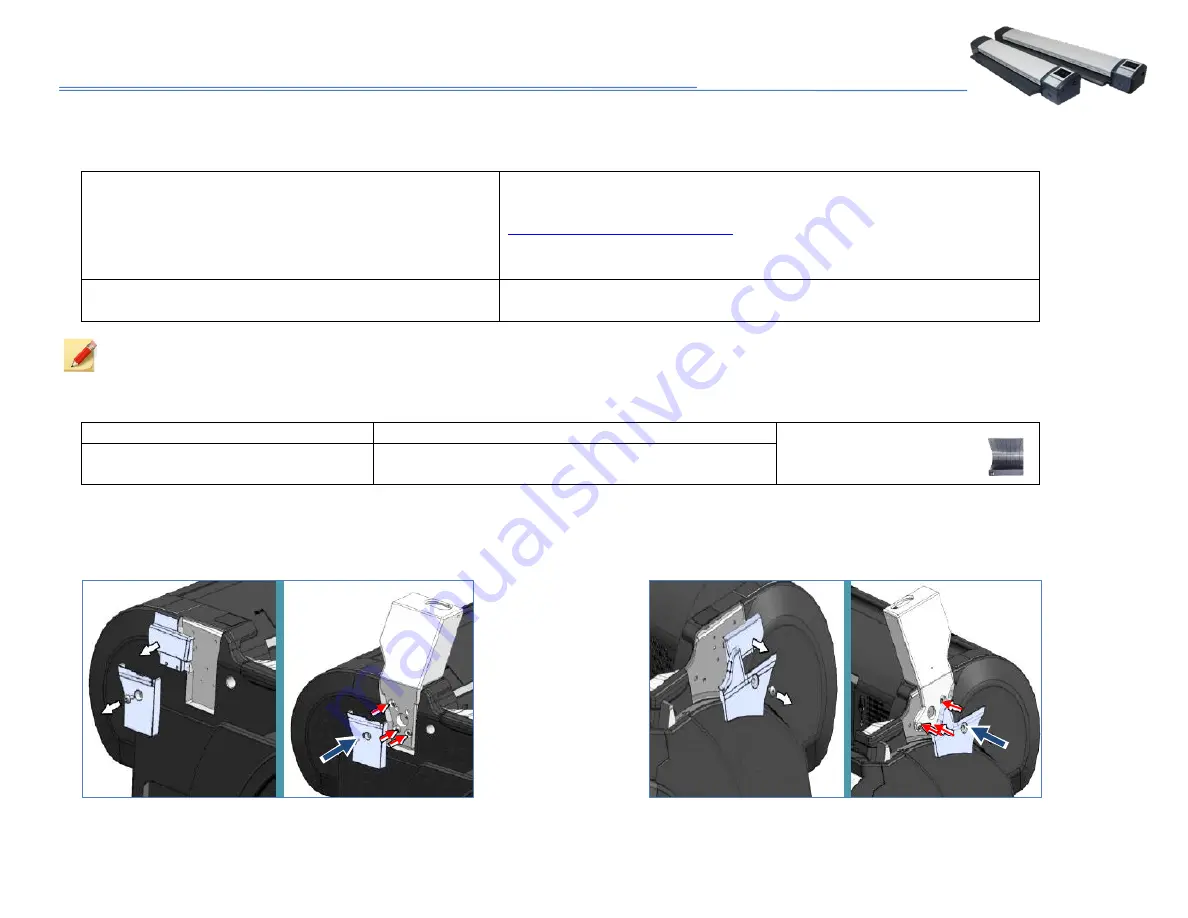
2.


Attach both Scanner Mounting brackets on the imagePROGRAF printer by:  
3.1. Removing the 4 printer covers shown below 
3.2. Fit and mount both left and right brackets as shown below using the supplied screws. The screw locations are shown with 3 small red arrows. 
3.3. Replace both left and right lower covers 

only,

 as shown with 1 large, dark blue arrow. 


Left Side bracket 

Right Side Bracket 


Summary of Contents for L Series

Page 1: ...fy proper printer operation using roll media before proceeding to install the scanner Scanner Unboxing Initial Preparation 1 Unbox the scanner locate the following items in the scanner s box and put each item aside for now Scanner Power Supply Ethernet cable Document Return Guides L24 model has 1 guide L36 model has 3 guides Calibration Stitch Target sheet 2 Scanner Mounting brackets and 2 Thumb s...

Page 2: ...t and place the scanner onto the scanner mounting brackets as shown below 4 Place the scanner s feet in the holes on the top mounting brackets and secure the feet with the screws provided Thumb screw Scanner mounting bracket hole ...

Page 3: ...er Supply into the rear of the scanner Then plug the AC plug of the Power Supply into an AC Outlet 6 Turn Scanner ON Updating the Scanner s Firmware Version 7 Verify the Current Scanner Firmware Version by pressing the scanner s buttons according to the sequence shown below ...

Page 4: ...e next steps 9 Preparing the Flash Drive and Download the Latest Firmware 10 1 Download the latest Firmware in a zip format to a PC Remember this will need to be saved onto a USB2 FAT 32 preformatted Flash drive that is completely empty 10 2 With the Flash drive inserted into the PC open the LFW0 zip file 10 3 Extract the files as shown below onto the Flash drive as most files need to be in a fold...

Page 5: ... folder are on the Flash drive as show below 11 Install the Firmware by inserting the Flash drive containing the firmware into the front USB port of the scanner 11 1 Use the following Keypad button sequence to install and update the Firmware ...

Page 6: ... Target black section inserted first face up so the Target is taken instantly If the sheet is not straight lower the scanner s platen and remove the Target then close the platen The scanner will cycle then insert the Target again 12 3 Use the following Keypad button sequence to execute the Light Level adjustment Important Press these 2 buttons together to access the Engineering Menu ...

Page 7: ...lack section inserted first face up so the Target is taken instantly If the sheet is not straight lower the scanner s platen and remove the Target then close the platen The scanner will cycle then insert the Target again 13 2 Use the following Keypad button sequence to execute the scanner Calibration Important From the User Menu ...

Page 8: ...tantly If the sheet is not straight lower the scanner s platen and remove the Target then close the platen The scanner will cycle then insert the Target again 14 2 Use the following Keypad button sequence to execute the scanner Auto stitch Adjustment 14 3 Install the Document Return Guides s One for the L24 scanner three for the L36 scanner Important Press these 2 buttons together to access the En...

Page 9: ...t be sequential such as 192 168 001 001 and 192 168 001 002 15 Enter a Scanner Static IP Address 16 Enter a Printer Static IP Address Refer to the imagePROGRAF iPF670 or imagePROGRAF iPF770 Service manual for instructions on how to enter the printer s Static IP Address 17 Turn off both the iPF Printer and L Series Scanner to recycle the power Important From the User Menu ...

Page 10: ...4 17 Confirm proper scanner and printer operation by copying and scanning an original When confirming proper scanner printer operation be sure to print on roll fed media only Printing on Cut Sheets is not supported ...

Page 11: ...llowing illustrations require a Gigabit 1000 Base T only 2 All network PC workstations IP Address schemes must use a Class C 255 255 255 0 3 Scanner PC and IP Addresses must follow sequentially For example 192 168 1 1 192 168 1 2 192 168 1 3 192 168 1 1 L Scan App Only 1 per subnet Scan to a shared network folder that can be accessed by other users 1 2 3 ...

Page 12: ... Network Configurations Continued L series Scanner or iPF670 770 Printer Only 1 per subnet Additional L series scanners or iPF670 770 printers should be on a separate subnet Router 192 168 001 XXX 255 255 255 000 192 168 002 XXX 255 255 255 000 ...

Page 13: ...inued Additional Network Configurations Continued L Scan App Multiple L Scan Apps per subnet are not supported L series Scanner or iPF670 770 Printer Multiple L series scanners or iPF670 770 printers per subnet are not supported ...

Page 14: ...Page 14 of 14 Appendix Continued Additional Network Configurations Continued L series Scanner or iPF670 770 Printer Multiple iPF670 770 printers per subnet are not supported End of this procedure ...

Reviews: