background image

50

Pr

ef

ac

e

Co

py

ing 

Fu

n

ct

io

n

Fa

cs

im

ile


Fu

n

ct

io

n

Sending


Fu

n

ct

io

n

M

ail Bo

Fu

n

ct

io

n

A

d

di

tional


Fu

n

ct

io

n

s

O

th

er

 Useful


Fe

at

u

re

s

   Mode Memory

Press to store or recall copy modes.

5

   Merge Documents (see p. 44)

Press to print multiple documents as one document. You can also 

use this mode with the 2-Sided Printing and Cover/Sheet Insertion 

modes.

8

   Original Settings

Press to return to the Print screen. All settings are also cancelled.

6

   Store Pr. Settings

Press to register print settings for a document.

5

   Erase Doc. After Print (see p. 44)

Press to automatically erase the document after printing.

7

   2-Sided Printing (see p. 44)

Press to print on both sides of the paper.

4

   Initial Settings

Press to cancel all settings. The machine returns to the Standard 

Scanning mode.

9

   Special Features

Press to select a Special Features mode.

10

   Pg/Copy Set Numbering

Press to include page and copy set numbering on prints.

10

   Margin

Press to create margins along the sides of a print.

7

Mail Box Function Overview

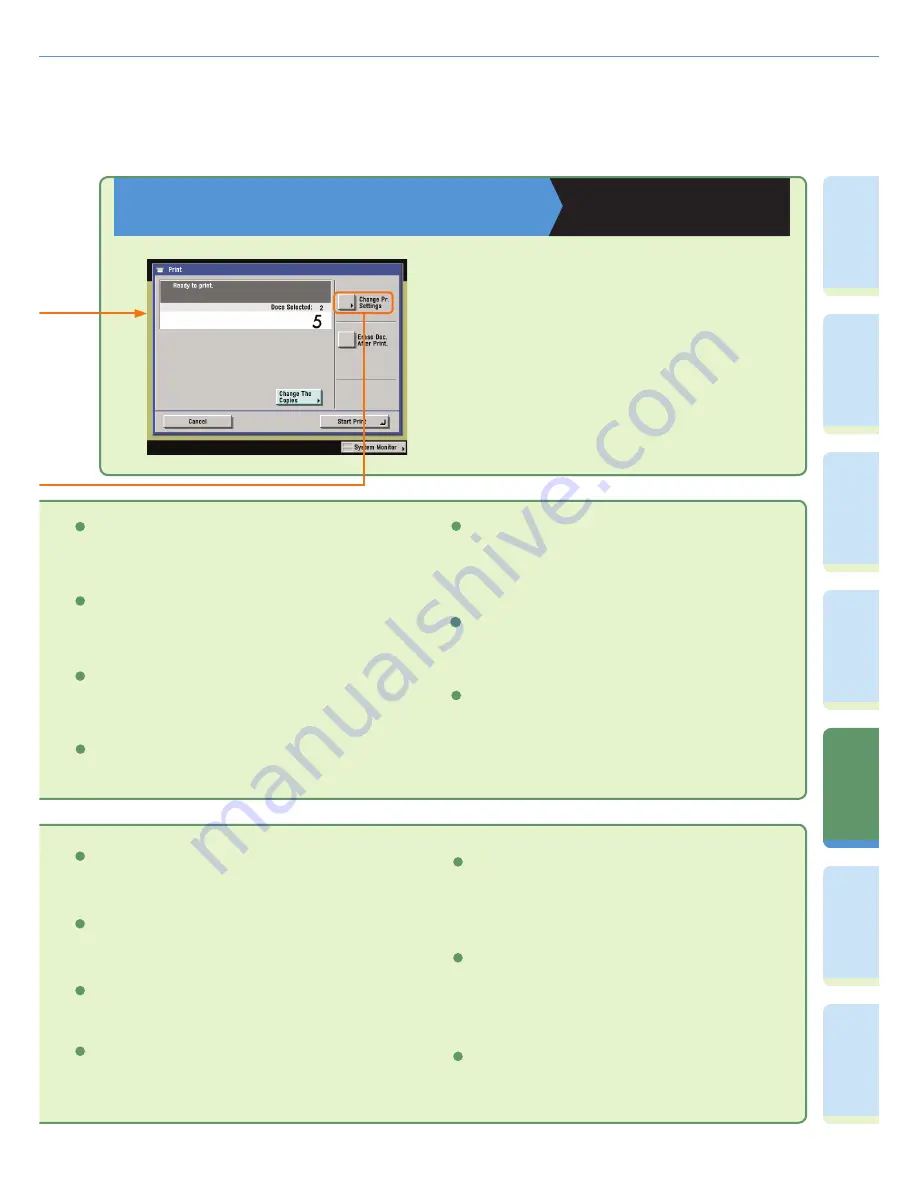
Print Screen

Copying and Mail Box Guide 

Chapter 2

On the Print screen, you can set to make a sample 
print, print sets, or automatically erase a document 
after it is printed. Press [Change Pr. Settings] to 
display the Change Print Settings screen. Use the 
Change Print Settings screen when you want to 
change the layout of prints.

   Watermark/Print Date

Press to include the watermark and date on prints.

9

   Secure Watermark

Press to embed hidden text in the background of prints.

4

   Tab Paper Creation

Press to print onto the tabs of tab paper.

6

   Shift

Press to print with the entire original image shifted to the centre or 

corner.

8

Summary of Contents for iR5075

Page 1: ...Can Do with This Machine Address Book Send Basic Features Screen 27 What You Can Do with This Machine Scan Settings Screen 29 What You Can Do with This Machine Send Settings Screen 31 Sending Facsimil...

Page 2: ...s Useful Copying Mail Box Features Memory Mode Sending and Receiving Documents in an Inbox Changing the Settings to Suit Your Needs Read this manual to learn how to send scanned documents to e mail fa...

Page 3: ...Fax Other Guides MEAP SMS Administrator Guide Read this manual to learn how to access the machine from a web browser to install and manage MEAP applications Network Quick Start Guide Related Guides Ne...

Page 4: ...ng Function Enables you to save costs with features such as printing a single sided document on both sides of the paper or printing two pages of a document on each sheet of paper Also with the Collate...

Page 5: ...Size Originals Together P 11 To Copy Facing Pages in a Book P 11 To Copy Multiple Originals onto One Sheet of Paper P 12 To Make a Booklet P 12 To Erase the Dark Border when Copying a Book P 13 To Add...

Page 6: ...ttings To Confirm or Edit the Job Status System Monitor Screen Press System Monitor to display the screen on the left enabling you to confirm the job status and cancel print jobs You can also see the...

Page 7: ...functions Start Key Press to start an operation Stop Key Press to stop a job in progress such as a scan job or copy job Numeric Keys Press to enter numeric values Log In Out Key Press when setting or...

Page 8: ...enter the Dept ID and Password press Log In Out on the touch panel Press Copy to switch to the Copy function If Department ID Management or the SSO or SDL login service is set it is necessary to enter...

Page 9: ...y Basic Features screen 1 2 3 4 5 6 7 8 9 0 Log In Out Start Copying When copying is complete remove your originals If the following screen is displayed follow the instructions on the screen and press...

Page 10: ...or reducing A3 to A4 size Simply select the desired paper size from the displayed keys to automatically set the optimal zoom ratio To Staple Sets of Output Together Copying and Mail Box Guide Chapter...

Page 11: ...Copy onto Irregular Sized Paper Copying and Mail Box Guide Chapter 1 To copy onto non standard size paper simply set the size and type such as Plain Heavy of the paper and load it into the stack bypa...

Page 12: ...tions refer to operation steps 1 1 Special Features screen 1 2 Original Copy To Copy Facing Pages in a Book Copying and Mail Box Guide Chapter 4 It is common for the paper size to become too large whe...

Page 13: ...anging a variety of originals on one sheet of paper for easy viewing and for saving paper and space when storing printouts 4 3 2 1 4 3 1 2 1 2 1 To Make a Booklet Copying and Mail Box Guide Chapter 4...

Page 14: ...om of the document You can also specify the width of the margin 1 2 3 Special Features screen 2 2 Original Left Margin Right Margin Top Margin Bottom Margin Special Features screen 1 2 To Erase the Da...

Page 15: ...a cover You can also add a back cover sheet insertions and chapter pages 1 Original 5 Copy 3 4 Printed Front Cover 2 6 7 To Recall Commonly Used Settings Copying and Mail Box Guide Chapter 5 Commonly...

Page 16: ...een 2 2 To Scan Batches of Originals Copying and Mail Box Guide Chapter 4 This enables you to scan originals that are too many to be placed at once by dividing them into multiple batches Copies can be...

Page 17: ...Machine Special Features Screen To Add Page Numbers to Copies Copying and Mail Box Guide Chapter 4 This enables you to add page numbers to copies you print 1 Original Copy To Add a Watermark to Copie...

Page 18: ...kground Copying and Mail Box Guide Chapter 4 This mode enables you to embed hidden text such as CONFIDENTIAL in the background of copies prints The embedded text appears when the copies are copied The...

Page 19: ...have finished scanning all of your originals press Conf Combine All Blocks To use the Cover Sheet Insertion mode for the combined document press Cover Sheet Insertion Select the batches of originals i...

Page 20: ...d modes 3 Copy Ratio see p 9 Press to reduce or enlarge the copy size 2 1 1 Press to return the copy ratio to 100 1 Transparency Interleaving Press to insert a sheet between each transparency when cop...

Page 21: ...control the copy exposure Press A to select or cancel the automatic exposure control 9 Original Type drop down list Press to change the original type when the originals include photos etc 10 Special F...

Page 22: ...laced in the Platen glass Specifying the Fax Number Using a One touch Button You can also specify the fax destination using a one touch button if you have registered a fax destination in a one touch b...

Page 23: ...complete remove your originals You can set to display a preview of the fax before sending You can also confirm the number of pages which will be sent on the preview screen Press You can also specify...

Page 24: ...ouch Buttons Sending and Facsimile Guide Chapter 9 Send Basic Features screen You can select the initial display of the Send Basic Features screen in TX Settings under Common Settings in Communication...

Page 25: ...end faxes from your computer The display may differ according to the OS operating system you are using and the fax driver For more information see the Fax Driver Guide Press Forwarding Settings from S...

Page 26: ...ary to enter an ID and password If an optional card reader is attached insert a control card For more information see Chapter 2 Basic Operations in the Reference Guide When placing originals on the pl...

Page 27: ...s OK Start Sending When sending is complete remove your originals If the following screen is displayed follow the instructions on the screen press once for each original When scanning of the originals...

Page 28: ...s For more information see the references to the corresponding guides To Register Commonly Used Destinations Sending and Facsimile Guide Chapter 2 Selecting from the Address Book Send Basic Features s...

Page 29: ...which enables you to send documents clearly by preventing security problems such as impersonation and unauthorized alteration of documents You can add the following two types of digital signatures De...

Page 30: ...orrectly try selecting the original type from the Image Quality drop down list Photos can be scanned clearly If a shimmering wavy pattern the Moir effect appears on your originals use the Sharpness se...

Page 31: ...ion to 300 x 300 dpi or 600 x 600 dpi 2 3 1 To Send Fine Text and Images Clearly Sending and Facsimile Guide Chapter 3 You can send fine text in documents more clearly by changing from a 200 x 200 dpi...

Page 32: ...to send a document and the settings to use when sending and set to send notification when sending is complete The following is an explanation of the useful functions you can utilize when sending a doc...

Page 33: ...Chapter 5 Use the Job Done Notice feature to notify yourself if you want to confirm that a job is complete When sending is complete you will be notified via e mail 2 1 2 To Edit a Destination from a C...

Page 34: ...ribed here see the Sending and Facsimile Guide Setting the Scan Settings Sending and Facsimile Guide Chapters 3 and 4 Details Press to check or change the destination information selected from the des...

Page 35: ...r file server destination When PDF is selected you can also specify the OCR Text Searchable Encrypt and or Add Digital Signatures modes 12 6 15 Press to select a stored scan mode and resolution The sc...

Page 36: ...eeds Favorites Button see p 15 in the Easy Operation Guide To Suit Your Needs Register in Communications Settings from the Additional Functions screen Register in Address Book Settings from the Additi...

Page 37: ...ding 6 Press to send notification of job completion to the specified e mail address 5 Edit Press to edit a destination from the address book 4 Erase Press to erase a registered one touch button 6 Regi...

Page 38: ...erations is shown For more information see the corresponding section Stored documents are displayed with See p 42 Stored documents are displayed with See p 42 Mail Box Select the Printer Driver Select...

Page 39: ...art Scanning When scanning is complete remove your originals Press The stored data will be automatically deleted after 3 days default setting This setting can be deactivated or changed to any time per...

Page 40: ...oxes can be sent as well as printed Documents scanned and stored from the Scan screen of the Mail Box function documents stored in User Inboxes from the Copy Basic Features screen or the Send Basic Fe...

Page 41: ...r more information on the features you can set from the Print screen and Change Pr Settings screen see p 49 and p 50 Press Start Print Specify Documents to Send Start Sending You can select the file f...

Page 42: ...Features to access the Special Features screen The numbers in the illustrations refer to operation steps To Add a Name to a Document and Save It Copying and Mail Box Guide Chapter 2 Scan screen When...

Page 43: ...Inbox A document which was scanned from the Mail Box function s Scan screen or the Send Basic Features screen and stored in a User Inbox If you store print settings on the Change Pr Settings screen th...

Page 44: ...Features screen The numbers in the illustrations refer to operation steps To Print a Sample Print Copying and Mail Box Guide Chapter 2 Change Pr Settings screen When setting Sample Print to print a sa...

Page 45: ...nt document data does not remain in the machine by automatically deleting it after it is printed To Print Multiple Documents Together Copying and Mail Box Guide Chapter 3 When distributing materials t...

Page 46: ...reen Copying and Mail Box Guide Chapter 2 Clear Selection Press to cancel your selection and select another document Changes to Select All Max 100 doc if you have not selected any documents Print Pres...

Page 47: ...t Press to check information about the document Press to send a received document Press to cancel your selection and select another document Changes to Select All Max 32 doc if you have not selected a...

Page 48: ...ct screen Document Size Select Press to select the size of the original document to scan 1 Copy Ratio Press to reduce or enlarge the copy size 2 1 1 Press to return the copy ratio to 100 3 Different S...

Page 49: ...g the touch panel display 5 Scan Exposure Press to manually control the scan exposure Press A to select or cancel the automatic exposure control 6 Original Type drop down list Press to manually select...

Page 50: ...ess to select the paper size 2 Cover Job Separator Press to add covers sheet insertions or chapter pages between specified pages Displayed as Cover Sheet Insertion when only one document is selected 1...

Page 51: ...s The machine returns to the Standard Scanning mode 9 Special Features Press to select a Special Features mode 10 Pg Copy Set Numbering Press to include page and copy set numbering on prints 10 Margin...

Page 52: ...ettings all from your PC s Web browser For more information see the Remote UI Guide Enter the IP address of the machine into the Web browser on your computer to access the Remote UI The IP address in...

Page 53: ...Remote UI are stored in the Address Book of the machine For more information see the Remote UI Guide Press to display the screen for registering destinations Enter the destination in E Mail Address e...

Page 54: ...o one sheet of paper or one page onto multiple sheets of paper Page Layout Enables you to select the size of a document you have created in an application Page Size Enables you to set the printer driv...

Page 55: ...it possible to print with the correct orientation without making settings on the printer Rotate Print Data 180 Degrees Enables you to set whether to suppress outputting of blank pages Use Skip Blank...

Page 56: ...age and other pages This is useful when you want to add a cover etc Enables you to set a different paper type for the first page second page last page and other pages Select by When you are printing t...

Page 57: ...gs according to its content When you select an item a comment is displayed below the list To specify more detailed settings click Details which is on the right Enables you to specify the graphics mode...

Page 58: ...o enter the Sleep mode Press to make fine adjustments to the zoom adjust the contrast or perform cleaning for the machine Press to set the print conditions for printing a Send TX Report and Activity R...

Page 59: ...rinting trouble When the exposure of a copy or print is different to the original When a print is dirty Communications trouble When you cannot send When you cannot receive When communications are slow...

Page 60: ...Inc 30 2 Shimomaruko 3 chome Ohta ku Tokyo 146 8501 Japan Europe Africa and Middle East Canon Europa N V P O Box 2262 1180 EG Amstelveen Netherlands Canon Middle East FZ LLC P O Box 27616 Dubai United...

Reviews: