Chapter 2
2-43
the following:
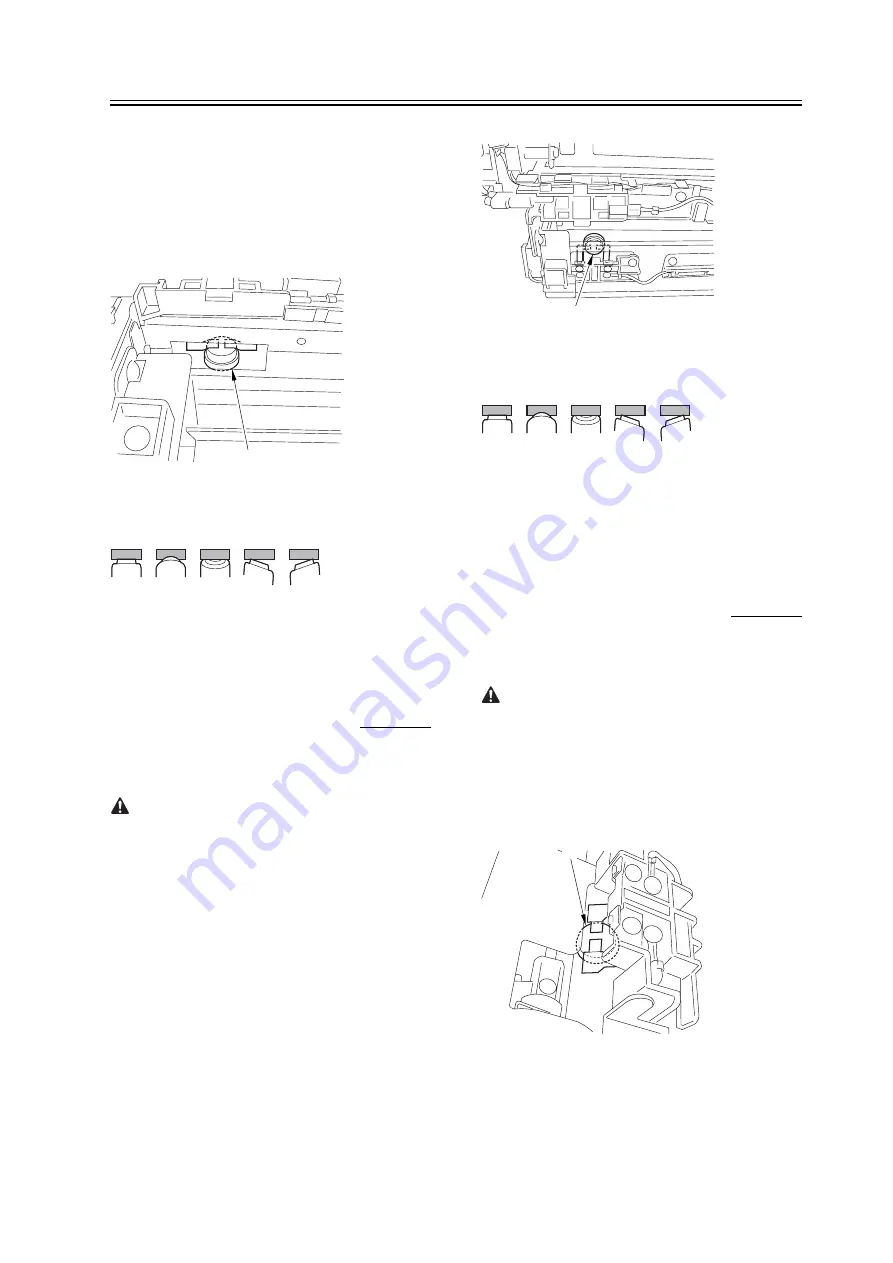
The surface of the thermal switch [1] must be parallel
to the fixing roller. (Check to be sure by shining the
thermal switch with a pen light.) Otherwise, re-mount
it.
F-2-78
F-2-79
2.6.9
Points to Note When
Mounting the Shift
Thermal Switch
0004-5058
iR C6800C / iR C6800CN / iR 5800C / iR 5800CN
After mounting the thermal switch (before
mounting the inlet guide), check to make sure o the
following:
The surface of the thermal switch [1] must be parallel
to the pressure roller. (Be sure to check it by shining
the thermal switch by a pen light.) if not, re-mount it.
F-2-80
F-2-81
2.6.10
Points to Note When
Mounting the Outside
Heating Roller Thermal
Switch
0004-5060
iR C6800C / iR C6800CN / iR 5800C / iR 5800CN
After mounting the thermal switch, check to be
sure of the following:
The surface of the thermal switch [1] must be parallel
to the outside heating roller. (Be sure to shine the
thermal witch switch a pen light.) If not, re-mount it.
F-2-82
[1]
OK
NG
NG
NG
NG
[1]
OK
NG
NG
NG
NG
[1]
Summary of Contents for iR C6800 Series
Page 1: ...Jan 20 2005 Portable Manual iR C6800 Series ...
Page 2: ......
Page 6: ......
Page 12: ......
Page 13: ...Chapter 1 Maintenance and Inspection ...
Page 14: ......
Page 16: ......
Page 20: ...Chapter 1 1 4 Under high humidity and high temperature condition 85 000 images ...
Page 51: ...Chapter 2 Standards and Adjustments ...
Page 52: ......
Page 79: ...F 2 27 1 ...
Page 99: ...F 2 88 F 2 89 1 OK NG NG ...
Page 110: ......
Page 111: ...Chapter 3 Error Code ...
Page 112: ......
Page 114: ......
Page 172: ......
Page 173: ...Chapter 4 User Mode Items ...
Page 174: ......
Page 176: ......
Page 188: ...LIPS emulation 12 items utility printer initialize yes no Item Description ...
Page 190: ......
Page 191: ...Chapter 5 Service Mode ...
Page 192: ......
Page 380: ......
Page 381: ...Chapter 6 Outline of Components ...
Page 382: ......
Page 384: ......
Page 387: ...F 6 1 SL7 CL3 CL2 SL6 SL8 SL9 SL2 SL1 SL4 SL3 SL5 CL1 SL10 SL11 SL12 ...
Page 397: ...F 6 5 FM2 FM10 FM11 FM12 FM6 FM3 FM4 FM8 FM9 FM5 FM7 FM1 ...
Page 407: ...F 6 9 PS65 PS38 PS39 PS46 PS44 PS45 PS52 PS53 PS58 PS59 PS37 ...
Page 417: ...F 6 13 13 2 5 3 14 15 16 9 6 12 7 1 11 4 25 24 21 23 19 20 31 29 28 27 26 22 18 17 32 30 10 8 ...
Page 418: ......
Page 419: ...Chapter 7 System Construction ...
Page 420: ......
Page 422: ......
Page 443: ...Chapter 8 Upgrading ...
Page 444: ......
Page 446: ......
Page 455: ...Jan 20 2005 ...
Page 456: ......


