background image

5

Prin

ting 

Func

tion

Pr

efac

e

Cop

ying 

Func

tion

U

seful 

Func

tions and 

Settings

O

ther U

seful 

Func

tions

Control Panel

6

Control Panel

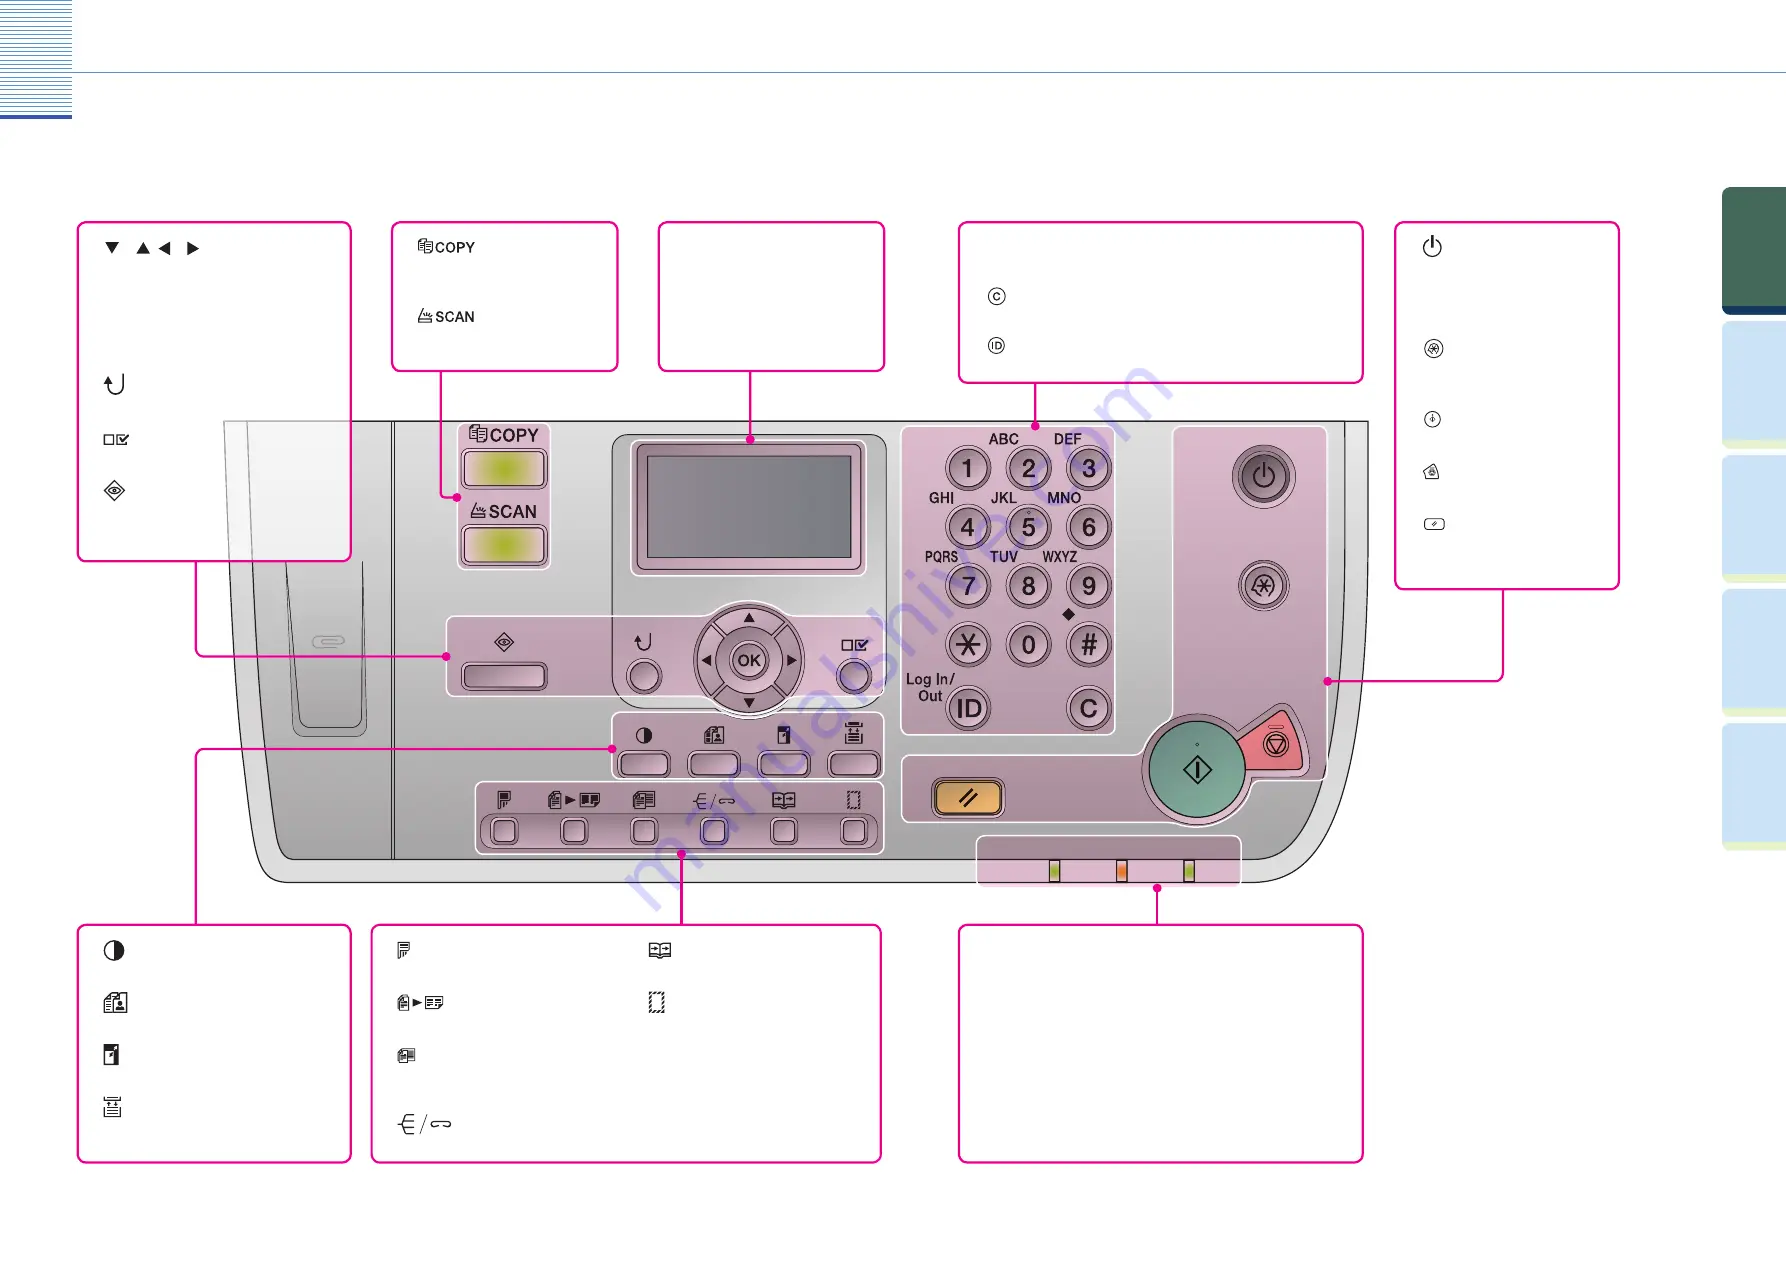
The control panel consists of the LCD display, physical keys for copying, numeric keys, Additional Functions key, and indicators. The 
following is an explanation of the keys used in this manual. For more information, see Chapter 1, “Before You Start Using This Machine,” 
in the 

Reference Guide

.

LCD Display

Displays messages and prompts 
during operation. Displays 
selection, text, and numbers when 
adjusting the settings.

 Key

Switches the Standby mode to 
COPY mode.

 Key

Switches the Standby mode to 
SCAN mode.

 (Density) Key

Press to adjust copy density.

 (Image Quality) Key

Press to select image quality for a copy.

 (Copy Ratio) Key

Press to enlarge or reduce copy ratio.

 (Paper Select) Key

Press to select paper (drawers or stack 
bypass).

 (2-Sided) Key

Press to set the 2-Sided mode.

 (Image Combination) Key

Press to set the Image Combination mode.

 (Diff erent Size Originals) Key

Press to set the Diff erent Size Originals 
mode.

 (Finishing) Key

Press to set the Finishing mode.

 (2-Page Separation) Key

Press to set the 2-Page Separation mode.

 (Frame Erase) Key

Press to set the Frame Erase mode.

Numeric Keys

Use to enter alphanumeric characters.


 (Clear) Key

Press to clear entered alphanumeric characters.


 (ID) Key

Press when setting or enabling Department ID Management.


 Control Panel Power Switch 

(Sub Power Supply)

Press to turn the control panel ON 
or OFF. When turned OFF, the 
machine is in the Sleep mode.


 (Additional Functions) Key

Press to select or cancel modes in 
Additional Functions.


 (Start) Key

Press to start copying or scanning.

   (Stop) Key

Press to stop copying or scanning.


 (Reset) Key

Press to return the machine to the 
Standby display.

   or   ,   or   Keys

Press to decrease or increase the value for 
various settings. Also press to view the 
previous or next item in the menu.

[OK] Key

Press to accept a set function or mode.

 (Back) Key

Press to go back one menu level.

 (View Settings) Key

Press to confi rm settings.

 (System Monitor) Key

Press to cancel a job or check the status of 
printing, copying, scanning, or report output.

 Processing/Data Indicator

Flashes when the machine is in operation. Lights when the machine 
has waiting jobs.

 Error Indicator

Flashes or lights when an error has occurred.

 Main Power Indicator

Lights when main power is ON.

Summary of Contents for IR 2420

Page 1: ...Copying Function Making a Copy 7 Basic Copying Functions 9 Optional Copying Functions 13 Useful Functions and Settings Useful Functions and Settings 19 Printing from a Computer 15 Specifying Print Se...

Page 2: ...the printer settings How the Manuals Are Divided The manuals for the machine are divided as follows Please read them as necessary to make full use of the machine Manuals included with optional equipm...

Page 3: ...resents the ultimate in digital multitasking machines The imageRUNNER 2422 2420 brings you all the elements you will ever need in a digital multitasking machine Making a Copy P 7 Basic Copying Functio...

Page 4: ...Finishing mode 2 Page Separation Key Press to set the 2 Page Separation mode Frame Erase Key Press to set the Frame Erase mode Numeric Keys Use to enter alphanumeric characters Clear Key Press to clea...

Page 5: ...platen glass Place your originals Close the feeder platen cover after placing your originals on the platen glass For more information on the basic copying functions see p 9 to p 12 For more informati...

Page 6: ...OK Zoom 400 MAX 200 A5 A3 141 A4 A3 Copy Ratio Off On 2 Page Separation 1 1 Copy Original Original Copy Original Copy You can adjust image quality to the level best suited to the quality of your text...

Page 7: ...te mode is set the sheets are output in alternating directions Use or to select a Finishing mode you want to use Finishing The Rotate mode is not available if the optional Funisher U2 is attached Orig...

Page 8: ...rection for loading paper Off On Differ Size Originals 1 4 3 2 1 4 3 2 1 4 3 2 1 4 3 2 1 1 1 Offset Collate Original Copy 1 Copy 2 Copy 3 Staple 4 3 2 1 1 1 1 1 1 1 Original Copy 1 Copy 2 Copy 3 Use o...

Page 9: ...using Open the Print Dialog Box In the application click the File menu select Print The procedure for displaying the Print dialog box may vary depending on the application you are using For help see t...

Page 10: ...top binding for prints when you have selected 1 sided Printing or 2 sided Printing for the Print Style Finishing Enables you to specify detailed finishing settings Print Style Enables you to set 1 si...

Page 11: ...ontrast Invert Screen Colors Auto Clear Setting Common Settings You can reverse the light and dark areas on the LCD display Auto Clear Setting Initial Function Contrast Invert Screen Colors Auto Clear...

Page 12: ...tack bypass Displayed only if the optional Inner 2 Way Tray E2 or Finisher U2 is attached Paper Feed Switch Register Paper Type Tray Designation Stand Stack Bypass Paper Feed Switch Common Settings Yo...

Page 13: ...You can set the sharpness of the copied image If you want to copy text and lines clearly increase the sharpness level If you want to copy a halftone original such as a picture decrease the sharpness...

Page 14: ...Page Layout Printer Settings You can make the following settings Binding Margin Finishing 2 Sided Print Quality Page Layout Finishing Printer Settings You can make the following settings If the Finis...

Page 15: ...fter the specified period of idle time has elapsed since entering the Sleep mode Auto Shutdown Time can be set from 1 to 8 hours in one hour increments and can also be set to Off Clean Transcription R...

Page 16: ...e O Special Mode P Special Mode S Adjustment Cleaning Enables you to reduce the time to wait for the next job Rotate Collate Adjustment Special Mode O Special Mode P Special Mode S Rotate Collate Adj...

Page 17: ...ser ID Management System Manager Set Device Info Settings Dept ID Management User ID Management System Settings You can set whether or not to use User ID Management Network Settings Device Info Settin...

Page 18: ...chine into the Web browser on your computer to access the Remote UI The IP address in the above screen shot is for illustrative purposes only Ask your system administrator for the IP address of your m...

Page 19: ...our originals on the platen glass To set the scan settings such as data compression or gamma values press Additional Functions and select Remote Scan Compress or Remote Scan Gamma For more information...

Page 20: ...uently Toner When toner has run out Reference 6 Replacing the Toner Staples When there is a staple jam Reference 7 Clearing Staple Jams When staples have run out Reference 6 Replacing the Staple Cartr...

Page 21: ...etails on your regional dealer CANON LATIN AMERICA INC 703 Waterford Way Suite 400 Miami Florida 33126 U S A CANON AUSTRALIA PTY LTD 1 Thomas Holt Drive North Ryde Sydney N S W 2113 Australia CANON CH...

Reviews: