Chapter 1
1-20
1.6 Basic Operation
1.6.1 Operation Panel
0012-6277
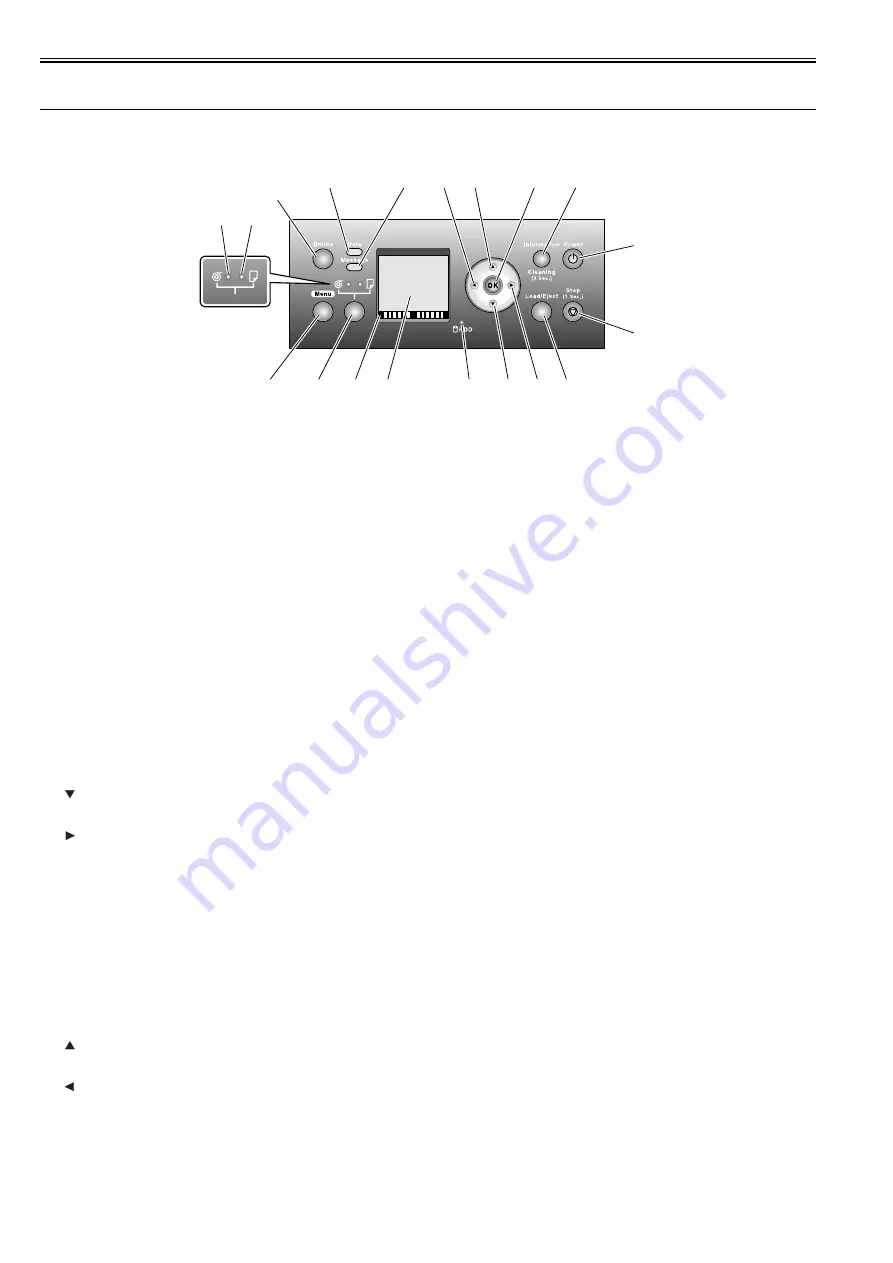
This section explains the functions of the buttons and the meanings of the LEDs on the operation panel.
F-1-20
[1] Message lamp
On: Indicates that a warning message is on display.
Blinking: Indicates that an error message is on display.
Off: The printer is normal or is turned off.
[2] Data lamp
Blinking: Indicates that a print job is being received or processed if the printer is printing, or that a print job has paused or firmware data is being if the printer is
not printing.
Off: No print job is available.
[3] Online button
Toggles the printer mode between online and offline.
On: Online mode.
Blinking: Emerging from sleep mode.
Off: Offline mode.
[4] Cut sheet lamp (green)
On: Either the paper tray or paper tray front loading port is selected as a paper source.
Off: Roll media are selected as a paper source.
[5] Roll media lamp (green)
On: Roll media are selected as a paper source.
Off: Either the paper tray or paper tray front loading port is selected as a paper source.
[6] Menu button
Displays the printer main menu.
[7] Paper source button
Selects a paper source. Each time this button is pressed, the paper source toggles between roll media (roll media source) and cut sheet (paper tray or paper tray
front loading port), with the paper source selector lamp illuminating.
[8] Color labels
Represent ink tank colors in association with the remaining ink levels shown in the display.
[9] Display
Displays the printer menu, status or messages.
[10] HDD lamp (Green)
On: Indicates the printer is accessing the hard disk.
Off: Indicates the printer is not accessing the hard disk.
[11] button
Press this button when the printer is in offline mode to manually feed roll media.
Press this button when the printer is in menu mode to view the next item or setting.
[12] button
Press this button when the printer is in menu mode to view the menu at the lower level.
If [NEXT -->] on display, the guidance screen can be moved forward.
[13] Load/Eject button
Guidance offers a visual clue to loading (replacing)/removing paper. Press this button when no paper is loaded to view instructions on how to load (replace) paper
in the display; press the button when paper is loaded to view instructions on how to remove the paper.
[14] Stop button
Press for longer than 1 second to cancel the job or ink drying process in progress.
If cut sheet loading guidance or the like is on display, hold this button for longer than 1 second to stop the guidance.
[15] Power button
Turns the printer on and off.
[16] Information button
Displays the printer submenu. Each time this button is pressed, information about the inks and paper is displayed.
Hold this button depressed for 3 seconds to execute printhead cleaning ([Head Cleaning A]).
[17] OK button
Press to set or set or execute a menu choice when the printer is in menu mode.
Press this button in any other situation to transition to the next screen as directed by a message appearing in the display.
[18] button
Press this button when the printer is in offline mode to manually feed roll media in the direction opposite to that of ejection.
Press this button when the printer is in menu mode to view the last item or setting.
[19] button
Press this button when the printer is in menu mode to view the menu at the upper level.
The button is also used from one position to the next when entering a numeric value.
If [<-- STOP] is on display, the guidance screen can be paused.
If [<-- BACK] on display, the guidance screen can be moved backward.
[16]
[17]
[18]
[19]
[1]
[2]
[3]
[4]
[5]
[11] [12] [13]
[10]
[6]
[7]
[8]
[9]
[14]
[15]
Summary of Contents for iPF825
Page 2: ......
Page 6: ......
Page 11: ...Chapter 1 PRODUCT DESCRIPTION...
Page 12: ......
Page 14: ......
Page 67: ...Chapter 2 TECHNICAL REFERENCE...
Page 68: ......
Page 78: ...Chapter 2 2 8 Printing Modes...
Page 79: ...Chapter 2 2 9...
Page 121: ...Chapter 3 INSTALLATION...
Page 122: ......
Page 124: ......
Page 138: ...Chapter 3 3 14...
Page 139: ...Chapter 4 DISASSEMBLY REASSEMBLY...
Page 140: ......
Page 142: ......
Page 200: ......
Page 201: ...Chapter 5 MAINTENANCE...
Page 202: ......
Page 204: ......
Page 208: ...Chapter 5 5 4 5 Close upper cover 1 F 5 6 1...
Page 209: ...Chapter 5 5 5...
Page 210: ......
Page 211: ...Chapter 6 TROUBLESHOOTING...
Page 212: ......
Page 214: ......
Page 241: ...Chapter 7 SERVICE MODE...
Page 242: ......
Page 244: ......
Page 265: ...Chapter 7 7 21...
Page 266: ......
Page 267: ...Chapter 8 ERROR CODE...
Page 268: ......
Page 270: ......
Page 305: ...Appendix...
Page 306: ......
Page 314: ......
Page 315: ...Feb 27 2017...
Page 316: ......


