


Chapter 2
2-1
2.1 Making Pre-Checks
2.1.1 Checking Installation Environment
0019-0625
imageRUNNER C1022 / imageRUNNER C1022i / Color imageRUNNER C1030 / Color imageRUNNER C1030iF
The followings are the condition for installation environment.
It is better to see the planned location of installation before carrying the machine in the user site.
1) Installation environment must be with in the following range. Avoid the close location to the faucet, water heater, humidifier or refrigerator.
Assured range of operation/image: temperature 10.0 to 30.0 deg C, humidity 20 to 80%
2) Avoid fire, dusty place and the location where ammonia gas is generated. Also, if the machine receives direct sunlight at installation location, it is recommended
to put curtains on the window.
3) The ozone amount that is generated during operation with this machine does not cause a hazard to human health; however, its odor may be recognized if the
machine is used for many hours in the poor ventilated location. Thus, provide adequate ventilation to keep the operation environment comfortable.
4) Make sure that the foot of the host machine does not float, and also, the machine is leveled.
5) Install the machine in well-ventilated location; however, do not install this machine near the air inlet of a room.
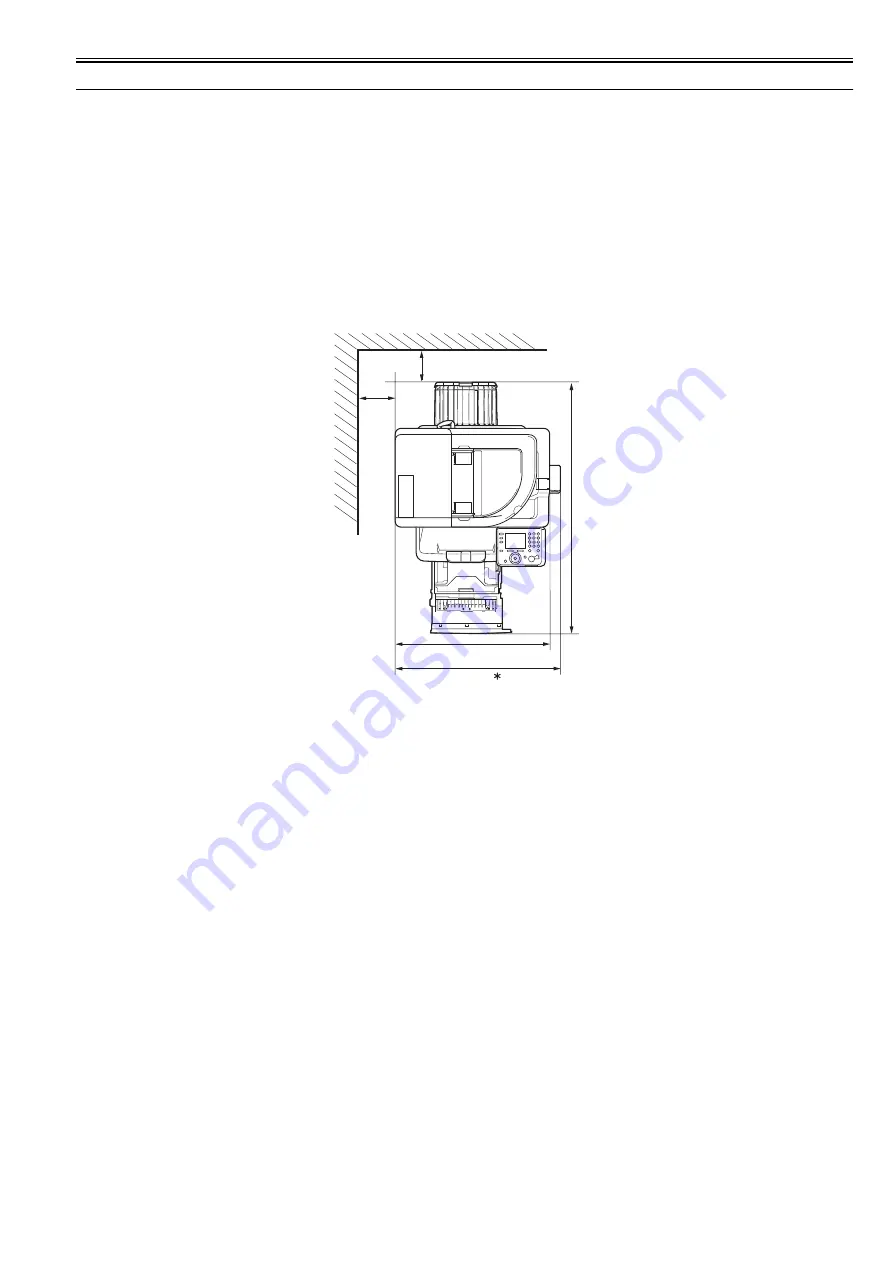
6) Allocate enough space for service operation of this machine.
F-2-1
* When the optional Card Reader is attached.
2.1.2 Points to Note Before Installation
0019-0627
imageRUNNER C1022 / imageRUNNER C1022i / Color imageRUNNER C1030 / Color imageRUNNER C1030iF
Make sure to note the followings before installing the machine.
1) If moving the machine from the cold place to a warm place abruptly, dew condensation is generated inside machine and it may cause various image failures.
Thus unpack and place the machine in warm place for 2 hours or more to accustom the machine to room temperature before installation.
(Condensation: condensation commonly occurs when a vapor is cooled to a liquid. For example, when metals are moved from a cool place to a warm place,
vapors around metals are cooled into a liquid and attaches to metals.)
2) Since this machine weighs approx. 44kg make sure to lift it with 2 people or more and also lift it in a horizontal position.
100mm or more
100mm or more
1,140mm
546mm
634mm
Summary of Contents for imageRUNNERC1022
Page 2: ......
Page 6: ......
Page 19: ...Chapter 1 Introduction ...
Page 20: ......
Page 93: ...Chapter 2 Installation ...
Page 94: ......
Page 96: ......
Page 111: ...Chapter 3 Basic Operation ...
Page 112: ......
Page 114: ......
Page 119: ...Chapter 4 Main Controller ...
Page 120: ......
Page 122: ......
Page 135: ...Chapter 5 Original Exposure System ...
Page 136: ......
Page 138: ......
Page 151: ...Chapter 6 Original Feeding System ...
Page 152: ......
Page 154: ......
Page 170: ......
Page 171: ...Chapter 7 Laser Exposure ...
Page 172: ......
Page 174: ......
Page 184: ......
Page 185: ...Chapter 8 Image Formation ...
Page 186: ......
Page 188: ......
Page 222: ......
Page 223: ...Chapter 9 Pickup and Feed System ...
Page 224: ......
Page 259: ...Chapter 10 Fixing System ...
Page 260: ......
Page 262: ......
Page 268: ...Chapter 10 10 6 ...
Page 279: ...Chapter 11 External and Controls ...
Page 280: ......
Page 311: ...Chapter 12 e Maintenance imageWARE Remote ...
Page 312: ......
Page 314: ......
Page 323: ...Chapter 12 12 9 F 12 27 ...
Page 349: ...Chapter 13 Maintenance and Inspection ...
Page 350: ......
Page 352: ......
Page 354: ......
Page 355: ...Chapter 14 Measurement and Adjustments ...
Page 356: ......
Page 358: ......
Page 361: ...Chapter 15 Correcting Faulty Images ...
Page 362: ......
Page 364: ......
Page 385: ...Chapter 16 Error Code ...
Page 386: ......
Page 388: ......
Page 399: ...Chapter 16 16 11 ...
Page 400: ......
Page 401: ...Chapter 17 Special Management Mode ...
Page 402: ......
Page 404: ......
Page 411: ...Chapter 17 17 7 ...
Page 412: ......
Page 413: ...Chapter 18 Service Mode ...
Page 414: ......
Page 492: ......
Page 493: ...Chapter 19 Upgrading ...
Page 494: ......
Page 496: ......
Page 500: ...Chapter 19 19 4 3 Click Next F 19 4 4 Select a USB connected device and click Next F 19 5 ...
Page 501: ...Chapter 19 19 5 5 Click Start F 19 6 6 Click Yes F 19 7 Download will be started F 19 8 ...
Page 504: ...Chapter 19 19 8 4 Select a USB connected device and click Next F 19 12 5 Click Start F 19 13 ...
Page 506: ...Chapter 19 19 10 ...
Page 507: ...Chapter 20 Service Tools ...
Page 508: ......
Page 510: ......
Page 514: ......
Page 515: ...Appendix ...
Page 516: ......
Page 532: ......
Page 533: ...Oct 29 2010 ...
Page 534: ......


