


Chapter 11
11-15
F-11-27
11.5.6 Delivery Tray Cover
11.5.6.1 Before Removing the Delivery Tray Cover
0019-5964
imageRUNNER C1022 / imageRUNNER C1022i / Color imageRUNNER
C1030 / Color imageRUNNER C1030iF
1) Remove the ETB unit.
Reference [Removing the ETB Unit]
2) Remove the fixing assembly.
Reference [Removing the Fix-
ing Assembly]
3) Remove the rear cover unit.
Reference [Removing the Rear
Cover Unit]
4) Remove the left cover.
Reference [Removing the Left Cov-
er]
5) Remove the right cover.
Reference [Removing the Right
Cover]
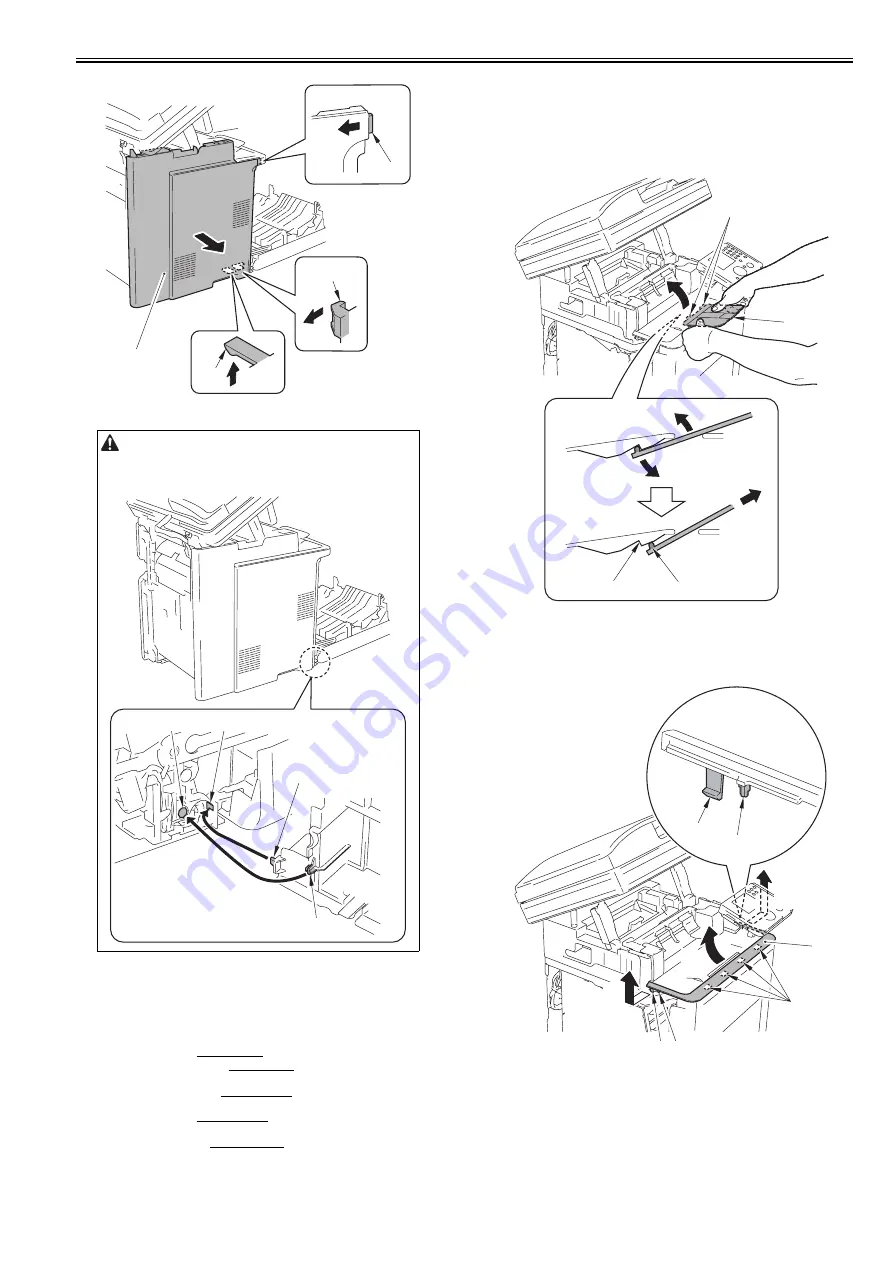
11.5.6.2 Removing the Delivery Tray Cover
0019-5965
imageRUNNER C1022 / imageRUNNER C1022i / Color imageRUNNER
C1030 / Color imageRUNNER C1030iF
1) Pull the delivery tray [1] out.
2) Move the delivery tray [1] in the direction of the arrow and release the 2
projections [2] from the 2 claws [3] of the delivery tray cover to remove.
F-11-28
3) Remove the 2 claws [2] and the 2 bosses [3] at both sides of front upper
cover 2 to remove them in the direction of the arrow [A].
4) Move front upper cover 2 [1] in the direction of the arrow [B] and release
the 4 claws [4] to remove.
F-11-29
5) Open the delivery cover [1].
Point to Note at Installation
Be sure to install the left cover by fitting the boss [1] and the projection [2]
of the left cover with the harness guide hole [3] and the groove [4] of the host
machine.
[2]
[1]
[3]
[4]
[3]
[4]
[1]
[2]
[2]
[1]
[3]
[2]
[2] [3]
[4]
[A]
[A]
[B]
[1]
[3]
[2]
Summary of Contents for imageRUNNERC1022
Page 2: ......
Page 6: ......
Page 19: ...Chapter 1 Introduction ...
Page 20: ......
Page 93: ...Chapter 2 Installation ...
Page 94: ......
Page 96: ......
Page 111: ...Chapter 3 Basic Operation ...
Page 112: ......
Page 114: ......
Page 119: ...Chapter 4 Main Controller ...
Page 120: ......
Page 122: ......
Page 135: ...Chapter 5 Original Exposure System ...
Page 136: ......
Page 138: ......
Page 151: ...Chapter 6 Original Feeding System ...
Page 152: ......
Page 154: ......
Page 170: ......
Page 171: ...Chapter 7 Laser Exposure ...
Page 172: ......
Page 174: ......
Page 184: ......
Page 185: ...Chapter 8 Image Formation ...
Page 186: ......
Page 188: ......
Page 222: ......
Page 223: ...Chapter 9 Pickup and Feed System ...
Page 224: ......
Page 259: ...Chapter 10 Fixing System ...
Page 260: ......
Page 262: ......
Page 268: ...Chapter 10 10 6 ...
Page 279: ...Chapter 11 External and Controls ...
Page 280: ......
Page 311: ...Chapter 12 e Maintenance imageWARE Remote ...
Page 312: ......
Page 314: ......
Page 323: ...Chapter 12 12 9 F 12 27 ...
Page 349: ...Chapter 13 Maintenance and Inspection ...
Page 350: ......
Page 352: ......
Page 354: ......
Page 355: ...Chapter 14 Measurement and Adjustments ...
Page 356: ......
Page 358: ......
Page 361: ...Chapter 15 Correcting Faulty Images ...
Page 362: ......
Page 364: ......
Page 385: ...Chapter 16 Error Code ...
Page 386: ......
Page 388: ......
Page 399: ...Chapter 16 16 11 ...
Page 400: ......
Page 401: ...Chapter 17 Special Management Mode ...
Page 402: ......
Page 404: ......
Page 411: ...Chapter 17 17 7 ...
Page 412: ......
Page 413: ...Chapter 18 Service Mode ...
Page 414: ......
Page 492: ......
Page 493: ...Chapter 19 Upgrading ...
Page 494: ......
Page 496: ......
Page 500: ...Chapter 19 19 4 3 Click Next F 19 4 4 Select a USB connected device and click Next F 19 5 ...
Page 501: ...Chapter 19 19 5 5 Click Start F 19 6 6 Click Yes F 19 7 Download will be started F 19 8 ...
Page 504: ...Chapter 19 19 8 4 Select a USB connected device and click Next F 19 12 5 Click Start F 19 13 ...
Page 506: ...Chapter 19 19 10 ...
Page 507: ...Chapter 20 Service Tools ...
Page 508: ......
Page 510: ......
Page 514: ......
Page 515: ...Appendix ...
Page 516: ......
Page 532: ......
Page 533: ...Oct 29 2010 ...
Page 534: ......


