background image


Lo

ad

in

g P
ap

er i

n t

he M
ult

i-P

ur

po

se T

ra

y

10

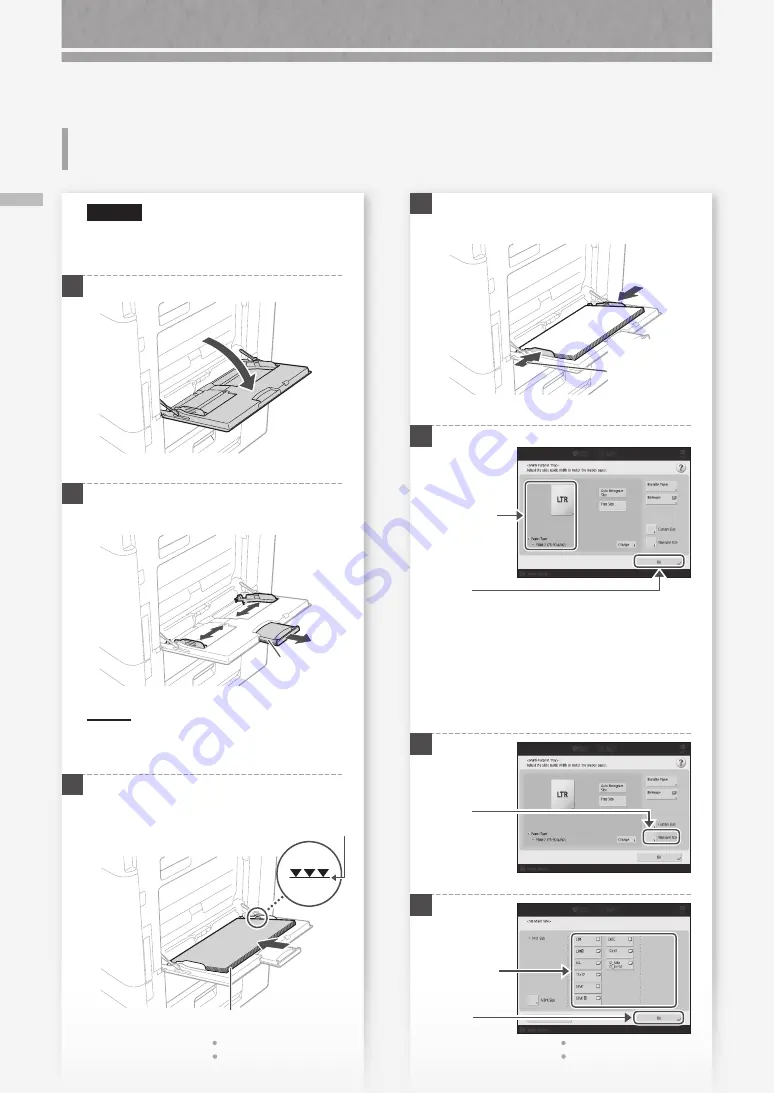
How to Load Paper

CAUTION!

When using coated paper or paper that does 
not feed well, load one sheet at a time.

1


2

  Adjust the paper guides so that they are slightly 

wider than the paper to be loaded.

Tray extension

POINT

Pull out the tray extension when loading large-
sized paper.

3

  Fan the paper stack well, align the edges on a 

flat surface, and then load it.

Make sure that this line is not exceeded.

The print side face down


4

  Adjust the paper guides to match the size of 

the loaded paper.

Align the paper 

guides to the 

paper size 

markings.

5

If the paper size/type setting does not 

match the paper you have loaded

In the screen for this step 5, change the setting 
manually. 

1


2


1.

 Check the 

paper size/

type.

2.

 Press

Press

2.

 Press

1.

 Select the 

paper size.


Loading Paper in the Multi-

Purpose Tray

Summary of Contents for imageRUNNER ADVANCE DX C5870i

Page 1: ...FAQ Guide...

Page 2: ......

Page 3: ...ease read Important Safety Instructions before operating this product P 42 After you finish reading this guide store it in a safe place for future reference The information in this document is subject...

Page 4: ...and Send 27 Stopping Scanning Faxing 27 Scanned Documents Cannot Be E Mailed 28 If You Cannot Send Forward Faxes 29 If You Cannot Receive Faxes 30 The Machine Does Not Operate P 6 Scan Fax Cannot Be...

Page 5: ...ting Results Are Not Satisfactory P 17 Loading Paper or Paper Settings Cannot Be Done Successfully Illustrated Index P 38 Appendix P 42 You Can Consult the User s Guide 51 If You Notice a Search Numbe...

Page 6: ...N check the power plug Main power indicator Note that the power plug or outlet may be different in shape depending on the region Check 3 Is sleep mode activated Tap the touch panel display to cancel S...

Page 7: ...g to be printed 2 Check that the main power indicator has turned off 3 Press the power switch again Download the printer driver again N OT E For more information P 32 Solution 1 Solution 2 The Machine...

Page 8: ...3 First fan the paper stack well and then load it The print side face up Paper Envelope Make sure that this line is not exceeded Paper Orientation Paper Paper Drawer LTR LTRR 4 Place the paper drawer...

Page 9: ...User s Guide To load tab paper You need an optional tab paper attachment Search 108A 029 Loading Tab Paper User s Guide How to use the search number P 51 1 Select the paper type 1 2 Press Preferences...

Page 10: ...paper 3 Fan the paper stack well align the edges on a flat surface and then load it Make sure that this line is not exceeded The print side face down 4 Adjust the paper guides to match the size of the...

Page 11: ...umber P 51 Printing on the back side of printed paper 1 Load paper in the multi purpose tray the print side face down 2 In the Paper Type selection screen press 2nd Side of 2 Sided Page CAUTION For th...

Page 12: ...wer 2 Paper drawer 2 is taken as example Multi Purpose Tray Paper Drawer Co Ltd Logo Paper C o L t d Multi Purpose Tray ABC Co Ltd Co Ltd C o L t d A B C Co Ltd Co Ltd Can be loaded only in paper draw...

Page 13: ...the side with the glued areas For the paper drawer load envelopes the front side face up and for the multi purpose tray load them the front side face down For the loading orientation see the table bel...

Page 14: ...lopes only in the multi purpose tray Search 0YAS 02F Specifying Paper Size and Type in the Multi purpose Tray User s Guide How to use the search number P 51 Press Select the type of envelopes Preparat...

Page 15: ...ment B to the left paper guide Envelope Feeder Attachment B CAUTION When loading ISO C5 it is not necessary to attach the Envelope Feeder Attachment B Proceed to step 3 3 Attach the Envelope Feeder At...

Page 16: ...er 2 Load the envelopes The front side of the envelopes face up 3 Insert the paper drawer into the machine 4 5 Press Preferences Paper Settings Paper Settings Press 6 1 Select the paper source 2 Press...

Page 17: ...lti purpose tray Solution The paper may have absorbed moisture Replace it with paper that has not absorbed moisture Perform gradation adjustment 1 Press 2 Press Adjustment Maintenance Adjust Image Qua...

Page 18: ...er or an alcohol solution etc as they will strip away the stain proof coating a b 3 Open the cover 2 1 Solution 4 Open the inner cover 5 Wipe the original scanning area and feeder white plate Wipe the...

Page 19: ...e the stick to the right to take it out Solution 4 Insert the cleaning stick into the hole with the pad on its tip facing down Pad 5 Insert the cleaning stick in until it hits the bottom of the hole a...

Page 20: ...on the Home screen 2 Press Yes Set a lower background density If bleed through is observed with the original setting a lower background density can improve the problem giving a neat copy 1 Press 2 Se...

Page 21: ...m locations Use these buttons and bar to operate the video POINT The screen disappears once all the jammed paper is removed and all the machine s covers and drawers are closed correctly If you do not...

Page 22: ...remove the jammed paper torn scraps of paper may remain in the main unit or optional devices If paper tears check that there are no scraps of paper inside and try to remove all of the scraps Do not tr...

Page 23: ...r available paper see the following Search AVPP TBM Available Paper User s Guide How to use the search number P 51 Solution 1 Remove the excess amount of paper Make sure that the paper stack does not...

Page 24: ...e setting For paper drawer P 8 For multi purpose tray P 10 For optional paper sources User s Guide Make sure that the original size and output paper size are correct 1 Check the original size and poss...

Page 25: ...orrect printing side The print side face up Multi Purpose Tray The print side face down N OT E For optional paper sources User s Guide 2 If the check result indicates that the paper is not loaded corr...

Page 26: ...eferences screen of the driver set Orientation for the direction selected in step 1 3 While viewing the preview image make settings in the order of Page Layout Page Order 1 sided 2 sided Booklet Print...

Page 27: ...the registered information Example Address book POINT To check the connection after changing the registered information press Check Connection N OT E For more information P 28 To change registered inf...

Page 28: ...r For the setting procedures see the User s Guide To specify the port number for SMTP TX POP RX 1 Press 2 Press Function Settings Send E Mail I Fax Settings Specify Port Number for SMTP TX POP RX 3 Sp...

Page 29: ...the machine cannot be connected to the destination fax number no fax dial tone is heard There may be a problem with the destination or your telephone carrier Contact the destination If you cannot forw...

Page 30: ...r code Search 0YRY 0JW Countermeasures for Each Error Code User s Guide How to use the search number P 51 Solution 1 Solution 2 If you are using an optical line or IP telephone line Communication erro...

Page 31: ...a copy job waiting to be output 4 Press 2 Select Copy from the drop down list 3 Select the copy job you want to cancel 1 Press 5 Press Yes For Windows OS 1 In the computer screen double click the pri...

Page 32: ...n see the Driver Installation Guide The Guide can be downloaded from or viewed on the same page of the Canon website as for the printer driver Latest OS support information See the Canon website https...

Page 33: ...display Replace the consumable in question by referring to the screen 1 POINT Depending on the condition of the consumable a screen like the one shown under step 2 may appear first 2 Prepare the consu...

Page 34: ...uide How to use the search number P 51 Staple Cartridge Y1 This can be used with the following options Booklet Finisher AB CAUTION Avoid storing toner cartridges vertically Store toner cartridges in a...

Page 35: ...follow the procedure below to contact the service representative 1 Make a note of the code number displayed on the screen POINT Multiple code numbers may be displayed 2 Turn the machine OFF and discon...

Page 36: ...ne 1 Press The machine enters the limited functions mode When the problem is resolved the Call service representative message disappears in the screen at the bottom left Search 0YAS 0K0 A Message Sayi...

Page 37: ...If the Contact your service representative Message Is Displayed 37...

Page 38: ...is described The illustrations assume that the machine is equipped with a Cassette Feeding Unit AQ Cassette Feeding Unit AQ Main Unit Paper size label P 8 Attach the paper size label so that it align...

Page 39: ...Main Unit 39 Power switch P 7 Multi purpose tray P 10 Paper guides Paper drawer 2 P 8 Paper drawer 1 P 8 Paper guides Envelope Feeder Attachment A P 15 Tray extension Paper guides...

Page 40: ...ons 2 Settings Registration P 9 Press to specify settings or make a registration 3 Menu Customize the screen such as by rearranging buttons or creating shortcut keys 4 Energy Saver P 6 Press to put th...

Page 41: ...ys a log for settings specified in Copy Scan and Send 8 Counter Device Information Press to display the copy and print count totals on the touch panel display 9 Stop P 27 Press to stop the current ope...

Page 42: ...rom a cool or dry location to a hot or humid location Using the machine under these conditions may result in paper jams poor print quality or damage to the machine Let the machine adjust to the ambien...

Page 43: ...onnecting power Do not connect the power cord to an uninterruptible power source Doing so may result in malfunction of or damage to the machine at power failure If you plug this machine into an AC pow...

Page 44: ...th cold water and immediately consult a physician If toner escapes from the toner cartridge make sure not to ingest the toner or allow it to directly touch your skin If toner touches your skin wash it...

Page 45: ...s and Certificates of Title Copyrighted Works Works of Art without Permission of Copyright Owner Disclaimers The information in this document is subject to change without notice CANON INC MAKES NO WAR...

Page 46: ...Also the customer will be advised of his her right to file a complaint with the FCC if he she believes it is necessary WARNING The Telephone Consumer Protection Act of 1991 makes it unlawful for any...

Page 47: ...olved in the event that the PRODUCT including the SOFTWARE is shipped transferred or exported into any country 2 Rights holders of the SOFTWARE retain in all respects the title ownership and intellect...

Page 48: ...ating firmware delivering purchased MEAP application software and activation of optional Product features Certain related data files also may be downloaded e g End User License Agreements conditions o...

Page 49: ...rial numbers have been defaced removed or altered ANY SOFTWARE THAT IS DISTRIBUTED WITH THE PRODUCT AND HAS AN ASSOCIATED END USER AGREEMENT IS LICENSED WARRANTED AND PROVIDED ACCORDING TO THE TERMS O...

Page 50: ...50...

Page 51: ...de describes all functions of the machine Search by Contents Search by Search Opening the User s Guide Display the online manual website https oip manual canon The wanted page appears in no time at al...

Page 52: ...52...

Page 53: ...a ol Lea Instrucciones de seguridad importantes antes de utilizar este producto P 92 Al acabar de leer esta gu a gu rdelo en un lugar seguro para consultas futuras La informaci n de este documento pue...

Page 54: ...mpleando Leer y enviar 77 Detenci n del escaneado env o por fax 77 No se pueden enviar por correo electr nico los documentos escaneados 78 Si no puede enviar reenviar faxes 79 Si no puede recibir faxe...

Page 55: ...produce transparencia 70 Los resultados de impresi n no son satisfactorios P 67 No se puede cargar papel o configurar las opciones de papel correctamente ndice ilustrado P 88 Ap ndice P 92 Podr consu...

Page 56: ...chufe Indicador Alimentaci n principal I ON Tenga en cuenta que el enchufe o la toma de corriente pueden tener una forma diferente en funci n de la regi n Compruebe 3 Est activado el modo de reposo Pu...

Page 57: ...ebe que el indicador de alimentaci n principal se ha apagado 3 Vuelva a pulsar el interruptor de alimentaci n Vuelva a descargar el controlador de impresora NOTA Para obtener m s informaci n P 82 Solu...

Page 58: ...ada 3 En primer lugar airee perfectamente la pila de papel y c rguela La cara de impresi n hacia arriba Papel Sobres Aseg rese de que no se supere esta l nea Orientaci n del papel Papel Papel casete L...

Page 59: ...separador Necesitar un accesorio del papel de separadores opcional Buscar 108A 029 Carga de papel separador Gu a de usuario C moutilizareln merodeb squeda P 99 1 Seleccione el tipo de papel 1 2 Pulse...

Page 60: ...3 Airee perfectamente la pila de papel alinee los bordes sobre una superficie plana y c rguela Aseg rese de que no se supere esta l nea La cara de impresi n hacia abajo 4 Ajuste las gu as del papel c...

Page 61: ...P 99 Impresi n en el reverso de papel impreso 1 Cargue papel en la bandeja multiuso con la cara de impresi n hacia abajo 2 En la pantalla de selecci n Tipo de papel pulse 2 cara hoja a doble cara ATE...

Page 62: ...Casete 2 Se utiliza como ejemplo el casete 2 Bandeja multiuso Casete Co Ltd Logotipo Papel C o L t d Bandeja multiuso ABC Co Ltd Co Ltd C o L t d A B C Co Ltd Co Ltd Se puede cargar nicamente en el c...

Page 63: ...el lado del pegamento En el casete cargue los sobres con el anverso hacia arriba y en la bandeja multiuso c rguelos con el anverso hacia abajo Para ver la orientaci n en que se deben cargar consulte...

Page 64: ...ma o personalizado nicamente en la bandeja multiuso Buscar 0YAS 02F Especificar el tama o y el tipo de papel en la bandeja multiuso Gu a de usuario C moutilizareln merodeb squeda P 99 Pulse Seleccione...

Page 65: ...izquierda Alimentador de sobres B ATENCI N Cuando cargue ISO C5 no ser necesario acoplar el Alimentador de sobres B Contin e con el paso 3 3 Instale el Alimentador de sobres A Inst lelo aline ndolo co...

Page 66: ...Cargue los sobres Los sobres con el anverso hacia arriba 3 Introduzca el casete en el equipo 4 5 Pulse Preferencias Opciones de papel Opciones de papel Pulse 6 1 Seleccione el origen del papel 2 Pulse...

Page 67: ...a gu a exactamente Bandeja multiuso Soluci n El papel podr a haber absorbido humedad Sustit yalo por papel que no haya absorbido humedad Lleve a cabo un ajuste de la gradaci n 1 Pulse 2 Pulse Ajuste M...

Page 68: ...lcohol etc ya que estos podr an eliminar el revestimiento resistente contra las manchas a b 3 Abra la tapa 2 1 Soluci n 4 Abra la tapa interior 5 Limpie el rea de lectura de originales y la placa blan...

Page 69: ...extraerlo Soluci n 4 Introduzca el palillo de limpieza en el orificio con la almohadilla de la punta mirando hacia abajo Almohadilla 5 Introduzca el palillo de limpieza hasta que toque la parte infer...

Page 70: ...la pantalla Inicio 2 Pulse S Establezca una densidad de fondo inferior Si se observara que el t ner se transparenta en el reverso del original la configuraci n de una densidad de fondo inferior podr a...

Page 71: ...os de papel Utilice estos botones y la barra para controlar el v deo NOTA La pantalla desaparecer cuando se retire todo el papel atascado y se cierren correctamente todas las tapas y los casetes del e...

Page 72: ...a fuerza el papel podr a romperse y alg n trozo podr a quedarse en la unidad principal o en los dispositivos opcionales Si el papel se rasgara compruebe que no existan trozos de papel en el interior y...

Page 73: ...papel disponible Buscar AVPP TBM Papel disponible Gu a de usuario C moutilizareln merodeb squeda P 99 Soluci n 1 Retire la cantidad sobrante de papel Aseg rese de que la pila de papel no exceda la l...

Page 74: ...casete P 58 Para la bandeja multiuso P 60 Para or genes de papel opcionales Gu a de usuario Aseg resedequeeltama odeloriginalyel tama odelpapeldeimpresi nsoncorrectos 1 Compruebe el tama o del origin...

Page 75: ...ia arriba Bandeja multiuso La cara de impresi n hacia abajo NOTA Para or genes de papel opcionales Gu a de usuario 2 Si el resultado de la comprobaci n indica que el papel no est bien cargado vuelva a...

Page 76: ...controlador establezca Orientaci n en la direcci n seleccionada en el paso 1 3 Mientras ve la imagen de vista preliminar configure las siguientes opciones en este orden Formato de p gina Orden de p gi...

Page 77: ...bie la informaci n registrada Ejemplo Libreta de direcciones NOTA Para comprobar la conexi n tras cambiar la informaci n registrada pulse Compruebe conexi n NOTA Para obtener m s informaci n P 78 Para...

Page 78: ...mientos de configuraci n consulte la Gu a de usuario Para especificar el n mero de puerto para TX SMTP RX POP 1 Pulse 2 Pulse Opciones de funciones Env o Opciones de e mail I fax Especifique n mero de...

Page 79: ...ipo no puede conectarse al n mero de fax de destino no se oye ning n tono de marcaci n de fax Es posible que haya alg n problema con el destino o la compa a telef nica P ngase en contacto con el desti...

Page 80: ...c digos de error Gu a de usuario C moutilizareln merodeb squeda P 99 Soluci n 1 Soluci n 2 Si utiliza una l nea de fibra ptica o de telefon a a trav s de IP Podr an producirse errores de comunicaci n...

Page 81: ...un trabajo de copia a la espera de realizarse 4 Pulse 2 Seleccione Copia en la lista desplegable 3 Seleccione el trabajo de copia que desee cancelar 1 Pulse 5 Pulse S Para el SO Windows 1 En la pantal...

Page 82: ...nsulte la Gu a de instalaci n del controlador Dicha gu a puede descargarse de la misma p gina del sitio web de Canon que el controlador de impresora o bien consultarse all Informaci n m s reciente de...

Page 83: ...esti n consultando la pantalla 1 NOTA En funci n del estado del consumible podr a aparecer primero una pantalla como la que se muestra en el paso 2 2 Prepare el consumible Compruebe el n mero de art c...

Page 84: ...io C moutilizareln merodeb squeda P 99 Cartucho de Grapas Y1 Podr utilizarse con las siguientes opciones Unidad de Acabado de Cuadernillos AB ATENCI N Evite almacenar los cartuchos de t ner verticalme...

Page 85: ...o el siguiente procedimiento para ponerse en contacto con el servicio al cliente 1 Apunte el n mero de c digo que aparece en la pantalla NOTA Podr an aparecer varios n meros de c digo 2 Apague el equi...

Page 86: ...nes limitadas Hasta que se resuelva el problema aparecer en pantalla el mensaje Llame a un representante del servicio t cnico en la esquina inferior izquierda de la pantalla Buscar 0YAS 0K0 Aparece un...

Page 87: ...87 Si aparece el mensaje P ngase en contacto con su servicio al cliente...

Page 88: ...el equipo est equipado con una Unidad de Alimentaci n por Casete AQ Unidad de Alimentaci n por Casete AQ Unidad principal Etiqueta de tama o de papel P 58 Acople la etiqueta de tama o de papel de mod...

Page 89: ...idad principal 89 Extensi n de la bandeja Gu as del papel Interruptor de alimentaci n P 57 Bandeja multiuso P 60 Gu as del papel Casete 2 P 58 Casete 1 P 58 Gu as del papel Alimentador de sobres A P 6...

Page 90: ...ar opciones o realizar un registro 3 Men Personalice la pantalla por ejemplo reorganizando los botones o creando teclas de acceso directo 4 Ahorro de energ a P 56 Pulse poner el equipo en el modo de r...

Page 91: ...ro de las opciones especificadas en Copiar Leer y Enviar 8 Informaci n de dispositivo contador Pulse para ver los recuentos totales de copia e impresi n en la pantalla t ctil 9 Detener P 77 Pulse para...

Page 92: ...iales para la salud No obstante podr an percibirse con mayor facilidad durante el uso prolongado del equipo o durante los ciclos de producci n largos especialmente en habitaciones poco ventiladas Para...

Page 93: ...o incendios Retire totalmente el enchufe de la toma de corriente de CA durante las tormentas el ctricas De lo contrario podr an producirse descargas el ctricas incendios o da os en el equipo Aseg res...

Page 94: ...odular con una longitud inferior a 3 metros Utilice un cable USB con una longitud inferior a 3 metros S mbolos relacionados con la seguridad Interruptor de alimentaci n Posici n ON encendido Interrupt...

Page 95: ...tas visite www anatel gov br Regulatory information for users in Canada English This device contains licence exempt transmitter s receiver s that comply with Innovation Science and Economic Developmen...

Page 96: ...de su compa a telef nica La l nea deber ser una l nea de voz normal o equivalente Utilice una l nea por unidad Si estuviera instalada la tarjeta de fax de 2 l nea S per G3 podr emplear una l nea m lt...

Page 97: ...conforme aux sp cifications techniques applicables d Innovation Sciences et D veloppement conomique Canada Avant d installer cet appareil l utilisateur doit s assurer qu il est permis de le connecter...

Page 98: ...e producto de Canon el PRODUCTO incluye m dulos de software de terceros El uso y la distribuci n de dichos m dulos de software incluyendo cualquier actualizaci n de los mismos colectivamente el SOFTWA...

Page 99: ...das las funciones del equipo B squeda por Contenido Buscar por B squeda Apertura de la Gu a de usuario Visualice el sitio web del manual en l nea https oip manual canon La p gina deseada aparece r ens...

Page 100: ...NY 11747 U S A CANON CANADA INC 8000 Mississauga Road Brampton ON L6Y 5Z7 Canada CANON EUROPA N V Bovenkerkerweg 59 1185 XB Amstelveen The Netherlands See http www canon europe com for details on your...

Reviews: