background image


Car

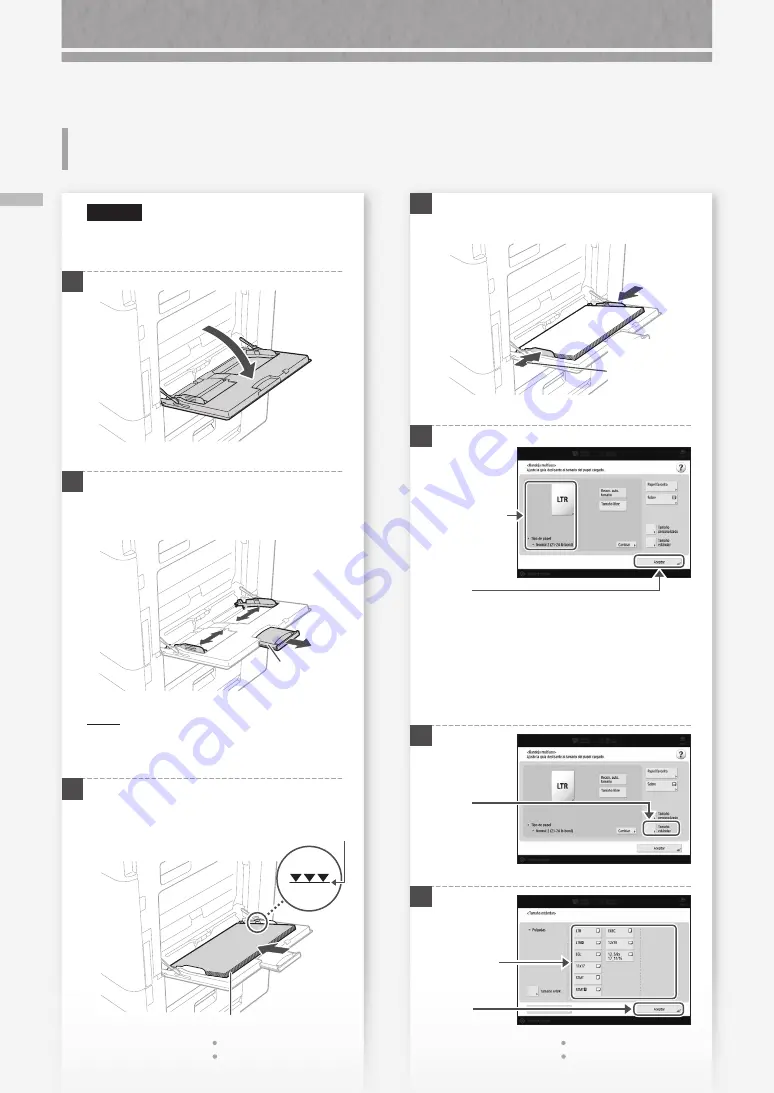
ga de papel en la bandeja multiuso

60

Cómo cargar papel

ATENCIÓN

Cuando utilice papel tratado o papel que no se 
alimente bien, cargue las hojas de una en una.

1


2

  Ajuste las guías del papel de modo que queden 

ligeramente más anchas que el papel que se va 
a cargar.

Extensión de 

la bandeja

NOTA

Extraiga la extensión de la bandeja cuando cargue 
papel de tamaño grande.

3

  Airee perfectamente la pila de papel, alinee los 

bordes sobre una superficie plana y cárguela.

Asegúrese de que no se supere esta línea.

La cara de impresión hacia abajo


4

  Ajuste las guías del papel conforme al tamaño 

del papel cargado.

Alinee las guías 

del papel con 

las marcas de 

tamaño de papel.

5


Si el tamaño/tipo del papel no coincide 

con el papel que ha cargado

En la pantalla de este paso 5, cambie la 
configuración manualmente. 

1


2


1.

 Compruebe 

el tamaño/

tipo del 

papel.

2.

 Pulse

Pulse

2.

 Pulse

1.

 Seleccione 

el tamaño 

de papel.


Carga de papel en la bandeja 

multiuso

Summary of Contents for imageRUNNER ADVANCE DX 6860i

Page 1: ...FAQ Guide ...

Page 2: ......

Page 3: ...lease read Important Safety Instructions before operating this product P 42 After you finish reading this guide store it in a safe place for future reference The information in this document is subject to change without notice https oip manual canon 3 ...

Page 4: ...n and Send 27 Stopping Scanning Faxing 27 Scanned Documents Cannot Be E Mailed 28 If You Cannot Send Forward Faxes 29 If You Cannot Receive Faxes 30 The Machine Does Not Operate P 6 Scan Fax Cannot Be Performed Successfully Loading Paper in the Paper Drawer 8 When You Have Loaded a Different Type of Paper than the Preset One 9 Loading Paper in the Multi Purpose Tray 10 Loading Paper with Printed L...

Page 5: ...ed on the Expected Side of Paper 25 Printing Cannot Be Performed with the Expected Size 25 In Two Sided Printing the Print Direction Differs between the Front and Back Sides of the Paper 26 Canceling Copy Print Jobs 31 Installing the Printer Driver 32 Replacement Parts 33 An Error Screen is Displayed 35 Illustrated Index 38 Appendix 42 Do You Want to Know More 51 You Can Consult the User s Guide 5...

Page 6: ...ON check the power plug Main power indicator Note that the power plug or outlet may be different in shape depending on the region Check 3 Is sleep mode activated Tap the touch panel display to cancel Sleep mode Check 2 Is the machine correctly connected to the computer Check the network connection Search 0YRY 006 Setting up the Network Environment User s Guide How to use the search number P 51 Che...

Page 7: ...ng to be printed 2 Check that the main power indicator has turned off 3 Press the power switch again Download the printer driver again N OT E For more information P 32 Solution 1 Solution 2 The Machine Does Not Respond to the Computer The Authentication Screen Logon Screen Is Displayed and You Cannot Go Further Log on to the machine using a registered user ID To continue the operation when the aut...

Page 8: ... 3 First fan the paper stack well and then load it The print side face up Paper Envelope Make sure that this line is not exceeded Paper Orientation Paper Paper Drawer LTR LTRR 4 Place the paper drawer back into the machine CAUTION Be careful not to get your fingers caught between the paper drawer and the machine POINT When you have changed the paper size replace the paper size label with an approp...

Page 9: ...r User s Guide To load tab paper You need an optional tab paper attachment Search 108A 029 Loading Tab Paper User s Guide How to use the search number P 51 1 Select the paper type 1 2 Press Preferences Paper Settings Paper Settings 3 POINT Any paper source other than and is optional For more information User s Guide 4 POINT If the displayed paper size is different from the loaded paper size adjust...

Page 10: ... paper 3 Fan the paper stack well align the edges on a flat surface and then load it Make sure that this line is not exceeded The print side face down 4 Adjust the paper guides to match the size of the loaded paper Align the paper guides to the paper size markings 5 If the paper size type setting does not match the paper you have loaded In the screen for this step 5 change the setting manually 1 2...

Page 11: ...number P 51 Printing on the back side of printed paper 1 Load paper in the multi purpose tray the print side face down 2 In the Paper Type selection screen press 2nd Side of 2 Sided Page CAUTION For this operation paper can only be loaded in the multi purpose tray POINT You can use only paper printed with this machine 1 Select the paper type 2 Press Search AVPP TBM Available Paper How to use the s...

Page 12: ...awer 2 Paper drawer 2 is taken as example Multi Purpose Tray Paper Drawer Co Ltd Logo Paper C o L t d Multi Purpose Tray ABC Co Ltd Co Ltd C o L t d A B C Co Ltd Co Ltd Can be loaded only in paper drawer 2 C o L t d A B C Co Ltd Co Ltd Can be loaded only in paper drawer 2 Co Ltd ABC Co Ltd N OT E When copying to paper with printed logos User s Guide N OT E Basic Paper Loading Operations For paper ...

Page 13: ... the side with the glued areas For the paper drawer load envelopes the front side face up and for the multi purpose tray load them the front side face down For the loading orientation see the table below Paper Drawer 1 Paper Drawer 2 Multi Purpose Tray Yougatanaga 3 Paper Drawer 1 Envelope Paper Drawer 2 Multi Purpose Tray Nagagata 3 Nagagata 4 Nagagata 40 Kakugata 2 Monarch COM10 No 10 DL ISO C5 ...

Page 14: ...elopes only in the multi purpose tray Search 0YAS 02F Specifying Paper Size and Type in the Multi purpose Tray User s Guide How to use the search number P 51 Press Select the type of envelopes Preparation before Loading Envelopes 1 Take five or so pieces of envelopes fan them well to eliminate curls and level the stack flat Press the stack along the four side edges 2 To prevent the sealing edge of...

Page 15: ...hment B to the left paper guide Envelope Feeder Attachment B CAUTION When loading ISO C5 it is not necessary to attach the Envelope Feeder Attachment B Proceed to step 3 3 Attach the Envelope Feeder Attachment A Install by aligning to the hole Search AVPP TBM Available Paper How to use the search number P 51 For available paper see the following 4 Adjust the position of the paper guides Attaching ...

Page 16: ...per 2 Load the envelopes The front side of the envelopes face up 3 Insert the paper drawer into the machine 4 5 Press Preferences Paper Settings Paper Settings Press 6 1 Select the paper source 2 Press 3 Select the envelope type 4 Press ...

Page 17: ...ulti purpose tray Solution The paper may have absorbed moisture Replace it with paper that has not absorbed moisture Perform gradation adjustment 1 Press 2 Press Adjustment Maintenance Adjust Image Quality Auto Adjust Gradation Follow the instructions in the screen to perform gradation adjustment For more information see the User s Guide Search 0YRY 0HL Adjusting Gradation User s Guide How to use ...

Page 18: ...ner or an alcohol solution etc as they will strip away the stain proof coating a b 3 Open the cover 2 1 Solution 4 Open the inner cover 5 Wipe the original scanning area and feeder white plate Wipe the thin and long glass area and white plate 6 Close the cover and inner cover 7 Close the feeder 8 Insert the power plug into the power outlet and turn the power ON N OT E If black streaks still appear...

Page 19: ...e cleaning stick Slide the stick to the right to take it out Solution 4 Insert the cleaning stick into the hole with the pad on its tip facing down Pad 5 Insert the cleaning stick in until it hits the bottom of the hole and gently move it back and forth 6 Put the cleaning stick back in the original location and close the front cover 7 Insert the power plug into the power outlet and turn the power ...

Page 20: ...u on the Home screen 2 Press Yes Set a lower background density If bleed through is observed with the original setting a lower background density can improve the problem giving a neat copy 1 Press 2 Select the function 3 Press Options Solution 1 Solution 2 4 Press Example Fax 5 Press POINT To make a manual adjustment press Adjust and adjust the background density with and press OK 6 Press OK Print...

Page 21: ...am locations Use these buttons and bar to operate the video POINT The screen disappears once all the jammed paper is removed and all the machine s covers and drawers are closed correctly If you do not understand the remedy by referring to the screen See the User s Guide to make sure of the remedy Search 0YRY 0JX Clearing Paper Jams User s Guide How to use the search number P 51 If Paper Jams Occur...

Page 22: ... remove the jammed paper torn scraps of paper may remain in the main unit or optional devices If paper tears check that there are no scraps of paper inside and try to remove all of the scraps Do not try to pull out the jammed paper forcibly Solution 3 Solution 4 Adjust the paper guides Adjust the guide exactly Multi purpose tray Check the paper feed If paper jams occur due to overlapping of sheets...

Page 23: ...or available paper see the following Search AVPP TBM Available Paper User s Guide How to use the search number P 51 Solution 1 Remove the excess amount of paper Make sure that the paper stack does not exceed the load limit line Load paper of the same size and same type in the same paper source You cannot load paper of different sizes or different types in one paper source Check the paper type sett...

Page 24: ...he setting For paper drawer P 8 For multi purpose tray P 10 For optional paper sources User s Guide Make sure that the original size and output paper size are correct 1 Check the original size and possible output sizes on the Printing Preferences screen of the printer driver 2 Load paper of the size matching the original size setting POINT To print on paper of a size different from that of the ori...

Page 25: ...correct printing side The print side face up Multi Purpose Tray The print side face down N OT E For optional paper sources User s Guide 2 If the check result indicates that the paper is not loaded correctly reload the paper correctly Solution Make sure that the paper size setting matches the size of the loaded paper 1 Replace the loaded paper with paper of the size you want to print POINT If you w...

Page 26: ...references screen of the driver set Orientation for the direction selected in step 1 3 While viewing the preview image make settings in the order of Page Layout Page Order 1 sided 2 sided Booklet Printing Binding Location POINT Page Order is only displayed when you set Page Layout to 2 on 1 or other option for printing multiple pages on one physical 2 3 Orientation Portrait Landscape Binding Locat...

Page 27: ... the registered information Example Address book POINT To check the connection after changing the registered information press Check Connection N OT E For more information P 28 To change registered information Solution To stop the paper feed 1 Press 2 Press Yes POINT You can also stop the paper feed by pressing To cancel the sending of scanned data 2 Press 3 Select the document you want to cancel ...

Page 28: ...er For the setting procedures see the User s Guide To specify the port number for SMTP TX POP RX 1 Press 2 Press Function Settings Send E Mail I Fax Settings Specify Port Number for SMTP TX POP RX 3 Specify the port number 4 Press OK Search 0YAS 017 Search 0YRY 00X Setting E mail I Fax Communication User s Guide Making DNS Settings User s Guide How to use the search number P 51 Solution 2 To chang...

Page 29: ... the machine cannot be connected to the destination fax number no fax dial tone is heard There may be a problem with the destination or your telephone carrier Contact the destination If you cannot forward faxes Check the information of the forwarding destination registered to the address book one touch buttons If anything is wrong with the information correct it 1 Press 2 Press Dest Fwd Settings R...

Page 30: ...or code Search 0YRY 0JW Countermeasures for Each Error Code User s Guide How to use the search number P 51 Solution 1 Solution 2 If you are using an optical line or IP telephone line Communication errors may occur depending on the line quality For more information contact your telephone carrier Reduce the fax transmission speed Reducing the fax transmission speed may result in a communication erro...

Page 31: ...l a copy job waiting to be output 4 Press 2 Select Copy from the drop down list 3 Select the copy job you want to cancel 1 Press 5 Press Yes For Windows OS 1 In the computer screen double click the printer icon 2 Select the file you want to cancel 3 Click 4 Select Cancel 5 Click Yes For macOS 1 In the computer screen click the printer icon on the Dock 2 Select the file you want to cancel 3 Click D...

Page 32: ...on see the Driver Installation Guide The Guide can be downloaded from or viewed on the same page of the Canon website as for the printer driver Latest OS support information See the Canon website https global canon en support If a printer driver for this machine is already installed on your computer Depending on your system environment it is necessary to uninstall the old driver and install the ne...

Page 33: ... display Replace the consumable in question by referring to the screen 1 POINT Depending on the condition of the consumable a screen like the one shown under step 2 may appear first 2 Prepare the consumable Check the item number This is an item number identifying a Canon genuine consumables For high quality printouts we recommend that you use Canon genuine consumables N OT E List of Consumables P ...

Page 34: ...th the following options Booklet Finisher AB CAUTION Avoid storing toner cartridges vertically Store toner cartridges in a cool place not exposed to direct sunlight A preferable environment is one where temperature is not higher than 30 C and humidity is not higher than 80 Be careful of counterfeit toners Please be aware that there are counterfeit Canon toners in the marketplace Use of counterfeit...

Page 35: ... follow the procedure below to contact the service representative 1 Make a note of the code number displayed on the screen POINT Multiple code numbers may be displayed 2 Turn the machine OFF and disconnect the power plug from the power outlet 3 Contact the service representative CAUTION For any inquiries have the following information ready Product name Dealer where you purchased the machine Detai...

Page 36: ...ine 1 Press The machine enters the limited functions mode When the problem is resolved the Call service representative message disappears in the screen at the bottom left Search 0YAS 0K0 A Message Saying to Contact a Local Authorized Canon Dealer Is Displayed User s Guide How to use the search number P 51 POINT When you select a restricted function in the limited functions mode the following scree...

Page 37: ...If the Contact your service representative Message Is Displayed 37 ...

Page 38: ...t is described The illustrations assume that the machine is equipped with a Cassette Feeding Unit AQ Cassette Feeding Unit AQ Main Unit Paper size label P 8 Attach the paper size label so that it aligns with the cassette number indicator horizontally Separate by approx 1 4 5 mm Cassette number indicator 1 4 ...

Page 39: ...Main Unit 39 Power switch P 7 Multi purpose tray P 10 Paper guides P 15 Paper drawer 2 P 8 Paper drawer 1 P 8 Paper guides P 15 Envelope Feeder Attachment A P 15 Tray extension Paper guides ...

Page 40: ...ions 2 Settings Registration P 9 Press to specify settings or make a registration 3 Menu Customize the screen such as by rearranging buttons or creating shortcut keys 4 Energy Saver P 6 Press to put the machine into sleep mode 5 Log in Log out Press this to log in out when a login service has been set When logged in the user name of the currently logged in user is displayed 6 Home P 20 Press to di...

Page 41: ...s a log for settings specified in Copy Scan and Send 8 Counter Device Information Press to display the copy and print count totals on the touch panel display 9 Stop P 27 Press to stop the current operation 10 Main Power indicator P 6 Lights when the power is turned ON 11 Error indicator Flashes or lights if there is an error in the machine When the Error indicator maintains a steady red light cont...

Page 42: ...from a cool or dry location to a hot or humid location Using the machine under these conditions may result in paper jams poor print quality or damage to the machine Let the machine adjust to the ambient temperature and humidity for at least 2 hours before use Avoid installing the machine near computers or other precision electronic equipment Electrical interference and vibrations generated by the ...

Page 43: ... emergency IMPORTANT When connecting power Do not connect the power cord to an uninterruptible power source Doing so may result in malfunction of or damage to the machine at power failure If you plug this machine into an AC power outlet with multiple sockets do not use the remaining sockets to connect other devices Do not connect the power cord to the auxiliary AC power outlet on a computer Other ...

Page 44: ...ly consult a physician If toner escapes from the toner cartridge make sure not to ingest the toner or allow it to directly touch your skin If toner touches your skin wash it away with soap and water If your skin still feels irritated after washing it or you ingest toner consult a physician immediately When pulling out the waste toner container be careful not to let it fall This may result in injur...

Page 45: ...ON THEREOF WARRANTIES AS TO MARKETABILITY MERCHANTABILITY FITNESS FOR A PARTICULAR PURPOSE OF USE OR NON INFRINGEMENT CANON INC SHALL NOT BE LIABLE FOR ANY DIRECT INCIDENTAL OR CONSEQUENTIAL DAMAGES OF ANY NATURE OR LOSSES OR EXPENSES RESULTING FROM THE USE OF THIS MATERIAL The following applies in California USA only The battery included with your product contains Perchlorate Material and may req...

Page 46: ... on the first page of the transmission the date and time it is sent and an identification of the business or other entity or other individual sending the message and the telephone number of the sending machine or such business other entity or individual The telephone number provided may not be a 900 number or any other number for which charges exceed local or long distance transmission charges NOT...

Page 47: ... intellectual property rights in and to the SOFTWARE Except as expressly provided herein no license or right expressed or implied is hereby conveyed or granted by rights holders of the SOFTWARE to you for any intellectual property of rights holders of the SOFTWARE 3 You may use the SOFTWARE solely for use with the PRODUCT 4 You may not assign sublicense market distribute or transfer the SOFTWARE t...

Page 48: ...ill not download the firmware software or data files for purposes other than mentioned above You can read more about CDS Service in Canon published materials available from your dealer or on the web sites of Canon USA www usa canon com or Canon Canada www canon ca These materials include a Technology White Paper for the CDS Service Your instruction to Canon USA Canon Canada or your dealer to use C...

Page 49: ...s have been defaced removed or altered ANY SOFTWARE THAT IS DISTRIBUTED WITH THE PRODUCT AND HAS AN ASSOCIATED END USER AGREEMENT IS LICENSED WARRANTED AND PROVIDED ACCORDING TO THE TERMS OF THAT AGREEMENT INCLUDING ANY LIMITATIONS AND DISCLAIMERS THEREIN SUCH SOFTWARE IS SOLD WITHOUT WARRANTY OF ANY KIND BY CANON PLEASE CONTACT CANON IMMEDIATELY IF YOU HAVE NOT RECEIVED A COPY OF THE SOFTWARE SUP...

Page 50: ...50 ...

Page 51: ...d page appears in no time at all You can search through the User s Guide by the search number Search number Example Search ABCD 123 Setting the network environment User s Guide How to use the search number P 47 You can display a QR code on the touch panel display for viewing the FAQ page on the Web Press Tutorial FAQ FAQ Easy access via QR code Solutions to various problems Check the FAQ Page on t...

Page 52: ...52 ...

Page 53: ...pañol Lea Instrucciones de seguridad importantes antes de utilizar este producto P 92 Al acabar de leer esta guía guárdelo en un lugar seguro para consultas futuras La información de este documento puede ser modificada sin previo aviso https oip manual canon 53 ...

Page 54: ...empleando Leer y enviar 77 Detención del escaneado envío por fax 77 No se pueden enviar por correo electrónico los documentos escaneados 78 Si no puede enviar reenviar faxes 79 Si no puede recibir faxes 80 El equipo no funciona P 56 No se puede escanear enviar por fax correctamente Carga de papel en el casete 58 Si ha cargado un tipo de papel distinto del preestablecido 59 Carga de papel en la ban...

Page 55: ...cara prevista del papel 75 No se puede imprimir con el tamaño previsto 75 En la impresión de doble cara la dirección de impresión difiere entre el anverso y el reverso del papel 76 Cancelación de trabajos de copia impresión 81 Instalación del controlador de impresora 82 Piezas de repuesto 83 Aparece una pantalla de error 85 Índice ilustrado 88 Apéndice 92 Quiere saber más 99 Podrá consultar la Guí...

Page 56: ...chufe Indicador Alimentación principal I ON Tenga en cuenta que el enchufe o la toma de corriente pueden tener una forma diferente en función de la región Compruebe 3 Está activado el modo de reposo Pulse la pantalla táctil para cancelar el modo de reposo Compruebe 2 Está bien conectado el equipo al ordenador Revise la conexión de red Buscar 0YRY 006 Configuración del entorno de red Guía de usuari...

Page 57: ...uebe que el indicador de alimentación principal se ha apagado 3 Vuelva a pulsar el interruptor de alimentación Vuelva a descargar el controlador de impresora NOTA Para obtener más información P 82 Solución 1 Solución 2 El equipo no responde al ordenador Aparece la pantalla de autenticación pantalla de inicio de sesión y no se puede avanzar más Inicie una sesión en el equipo con un ID de un usuario...

Page 58: ...iada 3 En primer lugar airee perfectamente la pila de papel y cárguela La cara de impresión hacia arriba Papel Sobres Asegúrese de que no se supere esta línea Orientación del papel Papel Papel casete LTR LTRR 4 Vuelva a colocar el casete en el equipo ATENCIÓN Tenga cuidado de no pillarse los dedos entre el casete y el equipo NOTA Cuando cambie el tamaño de papel sustituya la etiqueta de tamaño de ...

Page 59: ...separador Necesitará un accesorio del papel de separadores opcional Buscar 108A 029 Carga de papel separador Guía de usuario Cómoutilizarelnúmerodebúsqueda P 99 1 Seleccione el tipo de papel 1 2 Pulse Preferencias Opciones de papel Opciones de papel 3 NOTA Cualquier origen del papel distinto de y es opcional Para obtener más información Guía de usuario 4 NOTA Si el tamaño de papel mostrado fuera d...

Page 60: ...e 3 Airee perfectamente la pila de papel alinee los bordes sobre una superficie plana y cárguela Asegúrese de que no se supere esta línea La cara de impresión hacia abajo 4 Ajuste las guías del papel conforme al tamaño del papel cargado Alinee las guías del papel con las marcas de tamaño de papel 5 Si el tamaño tipo del papel no coincide con el papel que ha cargado En la pantalla de este paso 5 ca...

Page 61: ...P 99 Impresión en el reverso de papel impreso 1 Cargue papel en la bandeja multiuso con la cara de impresión hacia abajo 2 En la pantalla de selección Tipo de papel pulse 2 ª cara hoja a doble cara ATENCIÓN Para esta operación solo se puede cargar papel en la bandeja multiuso NOTA Solo podrá utilizar papel que se haya imprimido con este equipo 1 Seleccione el tipo de papel 2 Pulse Buscar AVPP TBM ...

Page 62: ... Casete 2 Se utiliza como ejemplo el casete 2 Bandeja multiuso Casete Co Ltd Logotipo Papel C o L t d Bandeja multiuso ABC Co Ltd Co Ltd C o L t d A B C Co Ltd Co Ltd Se puede cargar únicamente en el casete 2 C o L t d A B C Co Ltd Co Ltd Se puede cargar únicamente en el casete 2 Co Ltd ABC Co Ltd NOTA Cuando copie en papel con logotipos impresos Guía de usuario NOTA Operaciones básicas de carga d...

Page 63: ...s el lado del pegamento En el casete cargue los sobres con el anverso hacia arriba y en la bandeja multiuso cárguelos con el anverso hacia abajo Para ver la orientación en que se deben cargar consulte la tabla siguiente Casete 1 Casete 2 Bandeja multiuso Yougatanaga 3 Casete 1 Sobres Casete 2 Bandeja multiuso Nagagata 3 Nagagata 4 Nagagata 40 Kakugata 2 Monarch COM10 No 10 DL ISO C5 Buscar AVPP TB...

Page 64: ...amaño personalizado únicamente en la bandeja multiuso Buscar 0YAS 02F Especificar el tamaño y el tipo de papel en la bandeja multiuso Guía de usuario Cómoutilizarelnúmerodebúsqueda P 99 Pulse Seleccione el tipo de sobres Preparativos para cargar los sobres 1 Coja un taco de unos cinco sobres airéelo para eliminar las dobleces y aplánelo bien Presione los cuatro bordes del taco 2 Para evitar que el...

Page 65: ...izquierda Alimentador de sobres B ATENCIÓN Cuando cargue ISO C5 no será necesario acoplar el Alimentador de sobres B Continúe con el paso 3 3 Instale el Alimentador de sobres A Instálelo alineándolo con el orificio Buscar AVPP TBM Papel disponible Cómo utilizar el número de búsqueda P 99 Consulte aquí el papel disponible 4 Ajuste la posición de las guías del papel Acoplamiento al casete 2 1 Saque ...

Page 66: ... Cargue los sobres Los sobres con el anverso hacia arriba 3 Introduzca el casete en el equipo 4 5 Pulse Preferencias Opciones de papel Opciones de papel Pulse 6 1 Seleccione el origen del papel 2 Pulse 3 Seleccione el Tipo de sobre 4 Pulse ...

Page 67: ...la guía exactamente Bandeja multiuso Solución El papel podría haber absorbido humedad Sustitúyalo por papel que no haya absorbido humedad Lleve a cabo un ajuste de la gradación 1 Pulse 2 Pulse Ajuste Mantenimiento Ajustar calidad de imagen Ajuste auto de gradación Siga las instrucciones de la pantalla para realizar el ajuste de la gradación Para obtener más información consulte la Guía de usuario ...

Page 68: ...alcohol etc ya que estos podrían eliminar el revestimiento resistente contra las manchas a b 3 Abra la tapa 2 1 Solución 4 Abra la tapa interior 5 Limpie el área de lectura de originales y la placa blanca del alimentador Limpie el área de cristal estrecha y alargada y la placa blanca 6 Cierre la tapa y la tapa interior 7 Cierre el alimentador 8 Conecte el enchufe a la toma de corriente y encienda ...

Page 69: ... palillo a la derecha para extraerlo Solución 4 Introduzca el palillo de limpieza en el orificio con la almohadilla de la punta mirando hacia abajo Almohadilla 5 Introduzca el palillo de limpieza hasta que toque la parte inferior del orificio y muévalo con cuidado hacia atrás y hacia adelante 6 Vuelva a colocar el palillo de limpieza en la ubicación original y cierre la tapa delantera 7 Conecte el...

Page 70: ...la pantalla Inicio 2 Pulse Sí Establezca una densidad de fondo inferior Si se observara que el tóner se transparenta en el reverso del original la configuración de una densidad de fondo inferior podría mejorar el problema y proporcionar una copia limpia 1 Pulse 2 Seleccione la función 3 Pulse Opciones Solución 1 Solución 2 4 Pulse Ejemplo Fax 5 Pulse NOTA Para efectuar un ajuste manual pulse Ajust...

Page 71: ...cos de papel Utilice estos botones y la barra para controlar el vídeo NOTA La pantalla desaparecerá cuando se retire todo el papel atascado y se cierren correctamente todas las tapas y los casetes del equipo Si no entiende el remedio consultando la pantalla Consulte la Guía de usuario para confirmar los detalles de la solución Buscar 0YRY 0JX Eliminar atascos de papel Guía de usuario Cómoutilizare...

Page 72: ...la fuerza el papel podría romperse y algún trozo podría quedarse en la unidad principal o en los dispositivos opcionales Si el papel se rasgara compruebe que no existan trozos de papel en el interior y procure retirar todos trozos no intente extraer el papel atascado a la fuerza Solución 3 Solución 4 Ajuste las guías del papel Ajuste la guía exactamente Bandeja multiuso Compruebe la alimentación d...

Page 73: ...el papel disponible Buscar AVPP TBM Papel disponible Guía de usuario Cómoutilizarelnúmerodebúsqueda P 99 Solución 1 Retire la cantidad sobrante de papel Asegúrese de que la pila de papel no exceda la línea de límite de carga Cargue papel del mismo tamaño y del mismo tipo en el mismo origen de papel No podrá cargar papel de distintos tamaños o distintos tipos en un origen de papel Compruebe la conf...

Page 74: ... la bandeja multiuso P 60 Para orígenes de papel opcionales Guía de usuario Asegúresedequeeltamañodeloriginalyel tamañodelpapeldeimpresiónsoncorrectos 1 Compruebe el tamaño del original y los posibles tamaños de impresión en la pantalla Preferencias de impresión del controlador de impresora 2 Cargue papel del mismo tamaño que la configuración de tamaño del original NOTA Para imprimir en papel de u...

Page 75: ...ia arriba Bandeja multiuso La cara de impresión hacia abajo NOTA Para orígenes de papel opcionales Guía de usuario 2 Si el resultado de la comprobación indica que el papel no está bien cargado vuelva a cargarlo correctamente Solución Asegúrese de que el tamaño del papel configurado coincide con el tamaño del papel cargado 1 Sustituya el papel cargado por papel del tamaño que desee imprimir NOTA Si...

Page 76: ... controlador establezca Orientación en la dirección seleccionada en el paso 1 3 Mientras ve la imagen de vista preliminar configure las siguientes opciones en este orden Formato de página Orden de páginas Una cara Doble cara Impresión en cuadernillo Ubicación de la encuadernación NOTA Orden de páginas solo aparece cuando se establece Formato de página en 2 en 1 o en otra opción para imprimir varia...

Page 77: ... la información registrada Ejemplo Libreta de direcciones NOTA Para comprobar la conexión tras cambiar la información registrada pulse Compruebe conexión NOTA Para obtener más información P 78 Para cambiar la información registrada Solución Para detener la alimentación de papel 1 Pulse 2 Pulse Sí NOTA También podrá detener la alimentación de papel pulsando Para cancelar el envío de datos escaneado...

Page 78: ...imientos de configuración consulte la Guía de usuario Para especificar el número de puerto para TX SMTP RX POP 1 Pulse 2 Pulse Opciones de funciones Envío Opciones de e mail I fax Especifique número de puerto para TX SMTP RX POP 3 Especifique el número de puerto 4 Pulse Aceptar Buscar 0YAS 017 Buscar 0YRY 00X Configurar la comunicación de correo electrónico I Fax Guía de usuario Configurar opcione...

Page 79: ...quipo no puede conectarse al número de fax de destino no se oye ningún tono de marcación de fax Es posible que haya algún problema con el destino o la compañía telefónica Póngase en contacto con el destino Si no puede reenviar faxes Compruebe la información del destino de reenvío registrada en la libreta de direcciones botones de acceso directo Si la información es incorrecta corríjala 1 Pulse 2 P...

Page 80: ... códigos de error Guía de usuario Cómoutilizarelnúmerodebúsqueda P 99 Solución 1 Solución 2 Si utiliza una línea de fibra óptica o de telefonía a través de IP Podrían producirse errores de comunicación en función de la calidad de la línea Para obtener más información póngase en contacto con su compañía telefónica Reduzca la velocidad de transmisión del fax Reducir la velocidad de transmisión de fa...

Page 81: ...un trabajo de copia a la espera de realizarse 4 Pulse 2 Seleccione Copia en la lista desplegable 3 Seleccione el trabajo de copia que desee cancelar 1 Pulse 5 Pulse Sí Para el SO Windows 1 En la pantalla del ordenador haga doble clic en el icono de la impresora 2 Seleccione el archivo que desee cancelar 3 Haga clic 4 Seleccione Cancelar 5 Haga clic en Sí Para macOS 1 En la pantalla del ordenador h...

Page 82: ...onsulte la Guía de instalación del controlador Dicha guía puede descargarse de la misma página del sitio web de Canon que el controlador de impresora o bien consultarse allí Información más reciente de asistencia del SO Consulte el sitio web de Canon https global canon en support Si ya hay un controlador de impresora para este equipo instalado en su ordenador En función de su entorno de sistema po...

Page 83: ...cuestión consultando la pantalla 1 NOTA En función del estado del consumible podría aparecer primero una pantalla como la que se muestra en el paso 2 2 Prepare el consumible Compruebe el número de artículo Se trata de un número de artículo que identifica un consumible original de Canon Para conseguir una alta calidad de impresión se recomienda utilizar consumibles originales de Canon NOTA Lista de...

Page 84: ...iones Unidad de Acabado de Cuadernillos AB ATENCIÓN Evite almacenar los cartuchos de tóner verticalmente Guarde los cartuchos de tóner en un lugar fresco no expuesto a la luz solar directa Es preferible un entorno donde la temperatura no supere los 30 C y la humedad no pase del 80 Tenga cuidado con el tóner falsificado Le informamos que existe tóner Canon falsificado en el mercado El uso de tóner ...

Page 85: ...o el siguiente procedimiento para ponerse en contacto con el servicio al cliente 1 Apunte el número de código que aparece en la pantalla NOTA Podrían aparecer varios números de código 2 Apague el equipo y desconecte el enchufe de la toma de corriente 3 Póngase en contacto con el representante del servicio técnico ATENCIÓN Para cualquier solicitud o pregunta tenga preparada la siguiente información...

Page 86: ...iones limitadas Hasta que se resuelva el problema aparecerá en pantalla el mensaje Llame a un representante del servicio técnico en la esquina inferior izquierda de la pantalla Buscar 0YAS 0K0 Aparece un mensaje que le pide que se ponga en contacto con su distribuidor autorizado de Canon Guía de usuario Cómoutilizarelnúmerodebúsqueda P 99 NOTA Cuando seleccione una función restringida en el modo d...

Page 87: ...87 Si aparece el mensaje Póngase en contacto con su servicio al cliente ...

Page 88: ...ue el equipo está equipado con una Unidad de Alimentación por Casete AQ Unidad de Alimentación por Casete AQ Unidad principal Etiqueta de tamaño de papel P 58 Acople la etiqueta de tamaño de papel de modo que quede alineada con el indicador de número de casete horizontalmente Deje una separación de 1 4 5 mm aproximadamente Indicador de número del casete 1 4 ...

Page 89: ... principal 89 Extensión de la bandeja Guías del papel Interruptor de alimentación P 57 Bandeja multiuso P 60 Guías del papel P 65 Casete 2 P 58 Casete 1 P 58 Guías del papel P 65 Alimentador de sobres A P 65 ...

Page 90: ...ar opciones o realizar un registro 3 Menú Personalice la pantalla por ejemplo reorganizando los botones o creando teclas de acceso directo 4 Ahorro de energía P 56 Pulse poner el equipo en el modo de reposo 5 Iniciar sesión Finalizar sesión Pulse para iniciar cerrar una sesión si se hubiera configurado un servicio de inicio de sesión Cuando se haya iniciado una sesión se mostrará el nombre de usua...

Page 91: ...opciones especificadas en Copiar Leer y Enviar 8 Información de dispositivo contador Pulse para ver los recuentos totales de copia e impresión en la pantalla táctil 9 Detener P 77 Pulse para detener la operación actual 10 Indicador Alimentación principal P 56 Se ilumina si la alimentación está encendida 11 Indicador Error Parpadea o se ilumina si hay un error en el equipo Si el indicador Error est...

Page 92: ...diciales para la salud No obstante podrían percibirse con mayor facilidad durante el uso prolongado del equipo o durante los ciclos de producción largos especialmente en habitaciones poco ventiladas Para mantener un entorno de trabajo confortable se recomienda que la habitación en la que vaya a utilizarse el equipo esté adecuadamente ventilada Evite asimismo lugares en los que las personas pudiera...

Page 93: ...po Asegúrese de que la alimentación del equipo es segura y el voltaje estable Mantenga el cable de la alimentación apartado de fuentes de calor de lo contrario podría derretirse la funda del cable y ocasionar un incendio o descargas eléctricas Evite las siguientes situaciones Si se aplica un esfuerzo excesivo a la parte de conexión del cable de alimentación esto podría dañar el cable de alimentaci...

Page 94: ...funcionamiento en la aspiradora o tener como resultado una explosión de polvo debido a las descargas estáticas ATENCIÓN Mantenga el tóner y otros consumibles fuera del alcance de los niños pequeños En caso de ingestión acuda inmediatamente al médico Si el tóner entrara en contacto con la ropa o con la piel lávelo inmediatamente con agua No utilice agua caliente ya que esto podría hacer que el tóne...

Page 95: ... que se especifique expresamente en el manual Si efectuara tales cambios o modificaciones podría verse obligado a dejar de utilizar el equipo CANON U S A INC One Canon Park Melville NY 11747 U S A Nº de teléfono 1 800 OK CANON Wireless LAN Regulatory Information Regulatory information for users in Brazil Este equipamento possui um módulo de radiação restrita homologado na Anatel sob o número 04082...

Page 96: ...dimensiones y el peso específicos B Información sobre pedidos 1 Deberá utilizarse una línea telefónica sencilla tonos o pulsos Si estuviera instalada la tarjeta de fax de 2 ª línea Súper G3 podrá emplearse una línea telefónica múltiple tonos o pulsos 2 Solicite una toma telefónica de pared RJ11 C USOC que deberá ser instalada por la compañía telefónica Si no dispone de una toma de pared RJ11 C el ...

Page 97: ...ntation doit être de 115 volts et 15 ampères Pour faciliter l installation le jack CA11A doit être assez proche de la prise de courant Remarques Le présent produit est conforme aux spécifications techniques applicables d Innovation Sciences et Développement économique Canada Avant d installer cet appareil l utilisateur doit s assurer qu il est permis de le connecter à l équipement de la compagnie ...

Page 98: ...los derechos del SOFTWARE conservan en todos los aspectos la titularidad la propiedad y los derechos de la propiedad intelectual inherentes y relativos al SOFTWARE Salvo que aquí se indique expresamente mediante el presente documento los titulares de los derechos del SOFTWARE no le transfieren ni otorgan ninguna licencia o derecho ni expresos ni implícitos relativos a la propiedad intelectual del ...

Page 99: ... en la Guía de usuario con el nú mero de búsqueda Número de búsqueda ejemplo Buscar ABCD 123 Configuración del entorno de red Guía de usuario Cómoutilizarelnúmerodebúsqueda P 47 Consulte la página de preguntas frecuentes en la web Acceso sencillo mediante un código QR Puede mostrar un código QR en la pantalla del panel táctil para ver la página de preguntas frecuentes en la web Pulse Tutorial Preg...

Page 100: ... NY 11747 U S A CANON CANADA INC 8000 Mississauga Road Brampton ON L6Y 5Z7 Canada CANON EUROPA N V Bovenkerkerweg 59 1185 XB Amstelveen The Netherlands See http www canon europe com for details on your regional dealer CANON AUSTRALIA PTY LTD Building A The Park Estate 5 Talavera Road Macquarie Park NSW 2113 Australia CANON SINGAPORE PTE LTD 1 Fusionopolis Place 15 10 Galaxis Singapore 138522 ...

Reviews: