


1
Before You Start Using This Machine
Parts and Their Functions
1-13
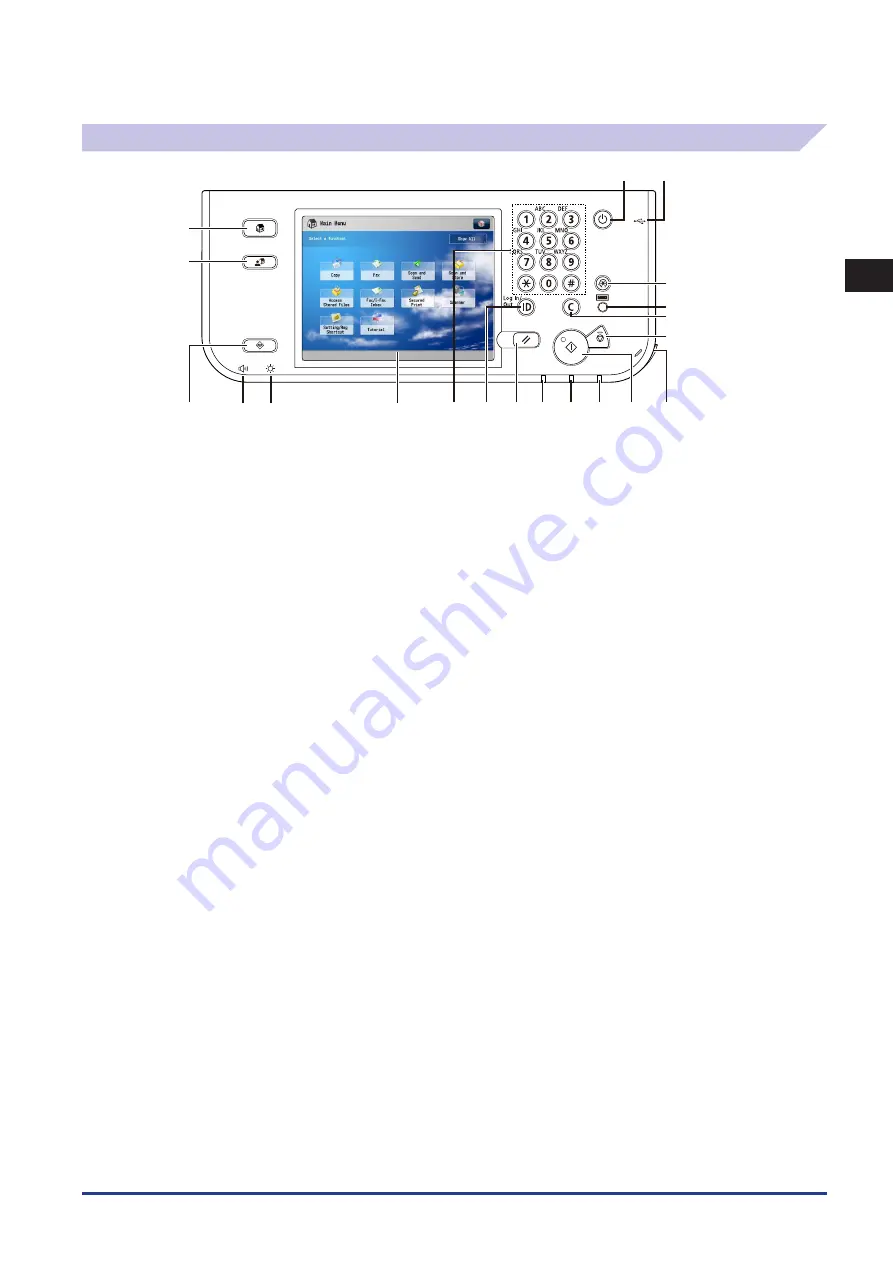
Control Panel Parts and Functions
1
2
5
3
4
6
20
19
9
10
11
12
16
15
17
13
14
18
7
8
①
Control Panel Power Switch (Sub Power Supply)
Press to set or cancel the Sleep mode.
②
USB Port
Use to connect memory media to the machine via USB.
③
Settings/Registration key
Press to specify settings/registration.
④
Counter Check key
Press to display the copy and print count totals on the touch panel display.
⑤
Clear key
Press to clear entered values or characters.
⑥
Stop key
Press to stop a job in progress, such as a scan, copy, or fax (scanning only)
job.
⑦
Edit Pen
Use when operating the touch panel display, such as to enter characters. If
you lose the edit pen, contact your local authorized Canon dealer. Do not
use an object with a sharp end on the control panel, such as a pencil or
ballpoint pen, in place of the edit pen.
⑧
Start key
Press to start an operation.
⑨
Main Power Indicator
Lights when the main power is turned ON.
⑩
Error Indicator
Flashes or lights if there is an error in the machine. When the Error
indicator flashes, follow the instructions that appear on the touch panel
display. When the Error indicator maintains a steady red light, contact your
local authorized Canon dealer.
⑪
Processing/Data Indicator
Flashes or blinks green when the machine is performing operations, and
maintains a steady green light when fax data is stored in memory.
⑫
Reset key
Press to restore the standard settings of the machine.
⑬
ID (Log In/Out) key
Press when setting or enabling Department ID Management.
⑭
Numeric keys
Press to enter numerical values.
⑮
Touch Panel Display
The settings screen for each function is shown on this display.
⑯
Brightness Adjustment Dial
Use to adjust the brightness of the touch panel display.
⑰
Volume Settings Key
Press to display the screen for adjusting settings such as the transmission
volume and fax sending/receiving alarm volume.
⑱
Status Monitor/Cancel key
Press to check the status of jobs or to cancel print jobs. Also, press to check
status of the machine, such as checking the amount of paper remaining.
⑲
Quick Menu key
Press to retrieve favorite functions stored in Quick Menu. Also, if you are
using authentication, Quick Menu set for each individual user can be
displayed. (See e-manual > Quick Menu.)
⑳
Main Menu key
Press to return to the Main Menu screen such as when you want to switch
functions.
Summary of Contents for IMAGERUNNER ADVANCE C5051
Page 2: ......
Page 3: ...imageRUNNER ADVANCE C5051 C5051i C5045 C5045i C5035 C5035i C5030 C5030i Getting Started...
Page 64: ...2 Flow of Settings Operations Required to Use the Machine 2 14...
Page 90: ...4 Before Connecting to a Network Checking Your Network Environment 4 12...
Page 108: ...5 Settings Common to the Network Protocols Communication Environment Setup 5 18...
Page 174: ...8 Using an SMB CIFS Network Setting Up a Computer as a File Server 8 16...
Page 178: ...9 Using an AppleTalk Network Macintosh Protocol Settings 9 4...
Page 196: ...11 Before Using the Fax Function Remote Fax Settings 11 12...
Page 206: ...12 Before Printing from Computers Other Software Programmes 12 10...
Page 216: ...14 Before Using the Remote Scan Function Settings Required Prior to Remote Scanning 14 6...
Page 251: ......


