


19
Easy Operation Guide
Specifying the Printer Driver Settings
Easy Operation Guide
20
Co
py
Pr
ef
ac
e
O
th
er
Pr
in
t
Sc
an
Se
nd
/F
ax
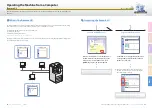
This section describes the instructions on how to specify printer driver settings, such as the finishing style and
print quality.
Specifying the Printer Driver Settings
†
The screen shots and the descriptions are for the Windows printer driver. For instructions on how to configure the settings
on the Macintosh printer driver, see the Mac Printer Driver Guide or the help on the printer driver.
‡
The printer driver screens shown below may differ from the ones displayed on your computer, depending on the machine
and optional equipment, type and version of printer driver, or operating system you are using.
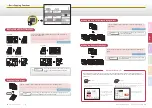
1
Print Style
Enables you to select the print style such as 1-sided or 2-sided Printing.
2
Binding Location
Enables you to select the binding location such as Long Edge (Left) or Short Edge
(Top).
3
Finishing
Enables you to select the finishing style such as Collate or Group.
1
Profile
Enables you to set the printer driver simply by selecting it from the list. Printer
driver settings for different purposes are registered.
2
Page Size
Enables you to select the size of the document you have created in an application.
3
Output Size
Enables you to select the size of the paper to print on.
4
Page Layout
Enables you to print multiple pages onto one sheet of paper, or in other multiple
layouts.
Selecting the Finishing Style
Configuring the Page Settings
On the [Page Setup] sheet, you can specify the page settings.
On the [Finishing] sheet, you can specify the finishing style.
1
2
3
4
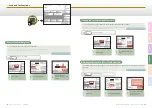
1
Objective
Enables you to print a document with the print settings that best suit the content
of the document. When you select an item, a comment is displayed below the list.
2
Manual Grayscale Settings
Enables you to manually specify the settings such as brightness or contrast for
your grayscale prints.
1
Select by
Enables you to select the paper supply method from Paper Source or Paper Type.
2
Paper Selection
Enables you to select either you use the same paper source or type for all pages or
use a different paper source or type for the specified pages. This setting is useful,
for example, when you want to print the covers of your document on a different
kind of paper.
3
Paper Source/Paper Type
*
Enables you to select a desired paper source or type when making prints.
* When you select [Paper Type] on <Select by>, [Paper Type] is displayed instead of
[Paper Source], allowing you to select the paper type to print your document on.
Selecting the Paper Source
Selecting the Print Output Quality
On the [Paper Source] sheet, you can specify the paper source and type.
On the [Quality] sheet, you can specify the print output quality to match the purpose of the printing.
1
2
3
[Help] Button
Click [Help] on each sheet to display the further information
about the print settings.
1
2
1
3
2
Windows Printer Driver Guide
On each sheet, click [OK] to return to the
[Print] window after you have specified the
settings.
Windows Printer Driver Guide
Windows Printer Driver Guide
Windows Printer Driver Guide