background image

Specifying Copy Settings

3-5

Customizing Settings

3

Image Direction Priority

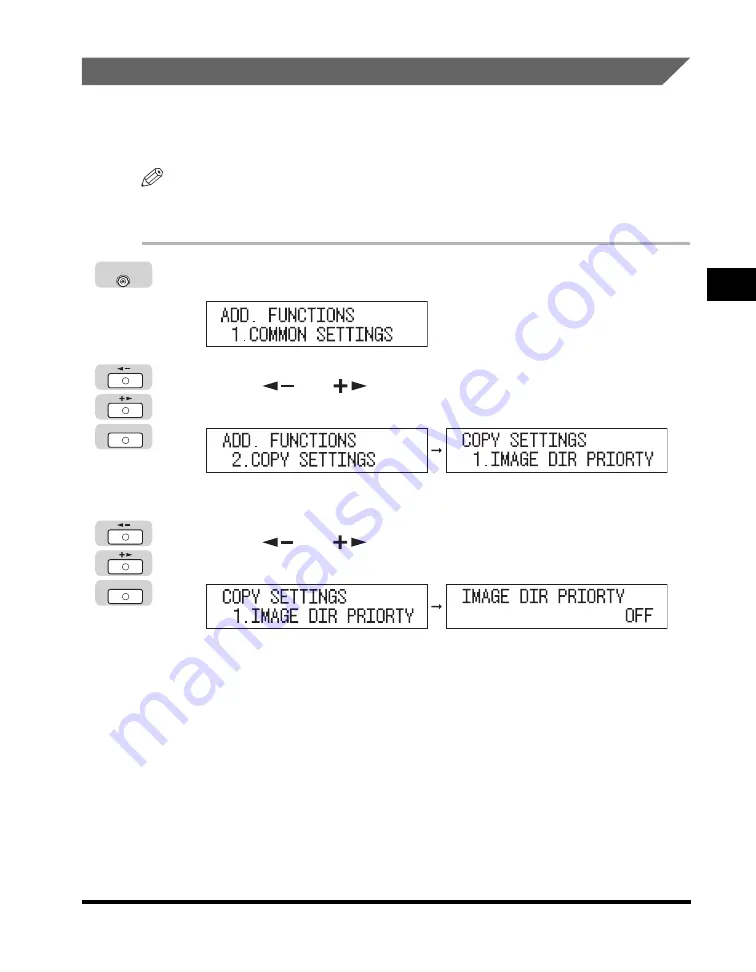
If <IMAGE DIR PRIORTY> is set to ‘ON’, the machine always copies an image in 
the same orientation as the original image. This is because the images on originals 
may be copied upside down, depending on the copy mode set.

NOTE

The default setting is ‘OFF’. 

If <IMAGE DIR PRIORTY> is set to ‘ON’, the copy speed is slower than normal.

1

Press [Additional Functions]. 

2

Press [

] or [

] until <COPY SETTINGS> appears 


press [OK]. 

The <COPY SETTINGS> menu appears.

3

Press [

] or [

] until <IMAGE DIR PRIORTY> appears 


press [OK]. 

The <IMAGE DIR PRIORTY> menu appears.

Additional 

Functions

OK

OK

Summary of Contents for IMAGERUNNER 2020

Page 1: ...Copying Guide Copying Guide Please read this guide before operating this equipment After you finish reading this guide store it in a safe place for future reference ENG ...

Page 2: ...imageRUNNER 2020 2016 Copying Guide ...

Page 3: ... Connection and Installing the CD ROM Software Network Quick Start Guide Remote User Interface Instructions Remote UI Guide CD ROM Network Connectivity and Setup Instructions Network Guide CD ROM PCL UFR II Printer Instructions PCL UFR II Printer Guide CD ROM UFR II Printer Instructions UFR II Printer Guide CD ROM PCL Printer Driver Installation and Instructions PCL Driver Guide CD ROM UFR II Prin...

Page 4: ...x Includes the available combination of copy modes and index Chapter 1 Chapter 2 Chapter 3 Chapter 4 Considerable effort has been made to ensure that this manual is free of inaccuracies and omissions However as we are constantly improving our products if you need an exact specification please contact Canon ...

Page 5: ...ions 1 4 Standby Display 1 9 Placing Originals 1 10 Orientation 1 11 Platen Glass 1 12 Feeder DADF P1 1 15 Canceling a Copy Job 1 18 Using the Stop Key 1 18 Using the System Monitor Screen 1 19 Reserved Copying 1 21 Reserving Copy Jobs 1 21 Copy Quantity 1 23 Specifying the Required Number of Copies 1 23 Changing the Copy Quantity 1 23 Paper Selection 1 24 Auto Paper Selection 1 24 Manual Paper Se...

Page 6: ... 1 to 2 Sided 2 20 2 to 2 Sided 2 23 2 to 1 Sided 2 26 Book to 2 Sided 2 28 Chapter 3 Customizing Settings Copy Settings Table 3 2 Specifying Copy Settings 3 4 Image Direction Priority 3 5 Auto Orientation 3 6 Standard Image Quality 3 7 Standard Density 3 9 Standard Zoom Ratio 3 11 Standard Copy Quantity 3 13 Auto Collate 3 14 Standard Two Sided Copying 3 16 Standard Frame Erase 3 17 Standard Two ...

Page 7: ...vi Chapter 4 Appendix Combination of Copy Modes Chart 4 2 Index 4 3 ...

Page 8: ...erations that may lead to injury to persons or damage to property if not performed correctly To use the machine safely always pay attention to these cautions IMPORTANT Indicates operational requirements and restrictions Be sure to read these items carefully to operate the machine correctly and avoid damage to the machine NOTE Indicates a clarification of an operation or contains additional explana...

Page 9: ...rations used in this manual are those displayed when the imageRUNNER 2016 has the following optional equipment attached to it the Fax Panel A1 Feeder DADF P1 Super G3 FAX Board Finisher U1 Additional Finisher Tray C1 and Cassette Feeding Module J1 ...

Page 10: ...rm or by any means electronic or mechanical including photocopying and recording or by any information storage or retrieval system without the prior written permission of Canon Inc Disclaimers The information in this document is subject to change without notice CANON INC MAKES NO WARRANTY OF ANY KIND WITH REGARD TO THIS MATERIAL EITHER EXPRESS OR IMPLIED EXCEPT AS PROVIDED HEREIN INCLUDING WITHOUT...

Page 11: ...y 1 18 Using the System Monitor Screen 1 19 Reserved Copying 1 21 Reserving Copy Jobs 1 21 Copy Quantity 1 23 Specifying the Required Number of Copies 1 23 Changing the Copy Quantity 1 23 Paper Selection 1 24 Auto Paper Selection 1 24 Manual Paper Selection 1 26 Density and Image Quality Adjustments 1 28 Automatic Density Adjustment 1 28 Manual Density Adjustment 1 29 Original Type Selection 1 31 ...

Page 12: ...types of originals The modes available are Original Frame Erase Book Frame Erase and Hole Punch Erase Two Page Separation This mode enables you to copy facing pages in a book or bound original to fit onto separate pages 2 on 1 Combination This mode enables you to automatically reduce two originals to fit onto one side of a selected paper size Sleep Mode This machine incorporates an energy saver fe...

Page 13: ...ated into sets arranged in page order and shifted to the front and back alternately If you select the Staple mode copies are automatically collated into sets arranged in page order stapled and output into the tray Flexible Document Handling To make a copy of an original you can place your document into the Feeder DADF P1 when attached or place it directly onto the platen glass You should use the f...

Page 14: ...platen glass clean Do not touch the feeder or platen cover while copying Rocking the feeder or cover can distort the image being copied 1 Press the appropriate keys in accordance with the messages displayed on the LCD display If there are no messages displayed this operation is unnecessary If the message INSERT CONTROL CARD appears Insert a control card into the optional Card Reader E1 The Standby...

Page 15: ... in the Reference Guide 2 Press COPY 3 Place your originals NOTE For instructions on placing your originals see Placing Originals on p 1 10 4 Specify the desired copy modes NOTE For more information about these settings see pages from 1 23 in this chapter or Chapter 2 Special Copying Features OK 2 3 ABC DEF JKL GHI MNO TUV PQRS WXYZ 4 5 5 6 7 8 9 0 1 SYMBOLS Tone 0 9 OK 2 3 ABC DEF JKL GHI MNO TUV...

Page 16: ...2016 or if the machine cannot detect the size of the original specify the size of the original after pressing Start Press or to select the paper size press Start If there is a current job the machine scans the original and waits to print it Printing starts when the current job is complete If the message MEMORY FULL appears on the LCD display do one of the following Divide your originals into sever...

Page 17: ...es may be output even after you press Stop If you want to start copying the next original while a previous original is printing Place your originals press Start NOTE For instructions on reserving a copy job see Reserving Copy Jobs on p 1 21 8 When copying is complete remove your originals 9 If the optional Card Reader E1 is attached remove the control card NOTE For instructions on using the option...

Page 18: ...tions 1 8 Basic Copying Features 1 10 If Department ID Management is set press Log In Out NOTE For Instructions on using Department ID Management see Chapter 6 System Manager Settings in the Reference Guide Log In Out ID ...

Page 19: ...Standby Display 1 9 Basic Copying Features 1 Standby Display The Standby display differs depending on which mode is selected Copy Mode ...

Page 20: ...aten glass when copying bound originals such as books and magazines heavy or lightweight originals and transparencies Feeder DADF P1 Place the originals into the feeder when you want to copy several originals at the same time and press Start The machine automatically feeds the originals to the scanning area and scans them If you are copying in the Two Sided mode two sided originals can also be aut...

Page 21: ...of your original with the back edge of the platen glass by the arrow in the top left corner or with the back edge of the feeder Platen Glass Place the original face down Place the original face down Vertical Placement Horizontal Placement ABC ABC Vertical Placement Place the original face up Horizontal Placement Place the original face up Feeder ...

Page 22: ... COLLATE is set to COLLATE or STAPLE the Collate Offset Collate with the optional finisher attached or Staple mode is automatically set when you place the originals into the feeder See Auto Collate on p 3 14 To get the same output orientation as when the original is placed on the platen glass place the original upside down and face up However when using the Staple mode the machine rotates the outp...

Page 23: ...platen cover high enough so that the open close sensor underneath is fully released Otherwise the machine may not correctly detect the size of the originals Only the imageRUNNER 2020 can detect the size of an original placed on the platen glass 2 Place your originals face down The surface of the original that you want to copy must be placed face down Align the top edge of your original with the ba...

Page 24: ...original horizontally on the platen glass and align it with the LTRR or STMTR marks 3 Gently close the feeder platen cover CAUTION Close the feeder platen cover gently to avoid catching your hands as this may result in personal injury Do not press down hard on the feeder platen cover when using the platen glass to make copies of thick books Doing so may damage the platen glass and result in person...

Page 25: ...should use the feeder when you want to copy several originals at the same time Place the originals into the feeder and press Start The machine automatically feeds the originals to the scanning area and scans them If you are copying in the Two Sided mode two sided originals can also be automatically turned over and scanned as two sided documents You can place the following originals into the feeder...

Page 26: ...the original may fold or become creased and make feeding impossible Limit repeated feeding to a maximum of 30 times this number varies depending on the type and quality of the original If the feeder rollers are dirty from scanning originals written in pencil clean the feeder See Chapter 7 Routine Maintenance in the Reference Guide Always smooth out any folds in your originals before placing them i...

Page 27: ... When scanning is complete remove the originals from the original output area to avoid paper jams NOTE The scanned originals are output to the original output area in the order that they are fed into the feeder When you are enlarging an LTR original onto 11 17 or LGL paper place the original horizontally You can place different size originals together into the feeder if you set the Different Size ...

Page 28: ...key and using the System Monitor screen Using the Stop Key 1 Press Stop If you press Stop while scanning originals placed on the platen glass Press OK Scanning stops and the copy job is canceled If you press Stop while scanning originals placed in the feeder Press OK Scanning stops and the copy job is canceled Stop OK OK ...

Page 29: ...s Stop while the machine is scanning an original placed in the optional feeder this may cause a paper jam For instructions on clearing paper jams in the feeder see Chapter 8 Troubleshooting in the Reference Guide If you press Stop after copying has started some sheets of blank paper may be output To cancel all settings and return the machine to the Standby display press Reset Using the System Moni...

Page 30: ...irst NOTE The messages and symbols displayed on the Copy Status screen are as follows PRINTING Current job A dash Reserved jobs 4 Press OK A confirmation message appears 5 Press to select YES The selected job is canceled NOTE If you do not want to cancel the job press to select NO If you want to cancel another job repeat steps 3 to 5 You cannot select multiple jobs and cancel them all at once Sele...

Page 31: ... While the Machine Is Waiting You can specify copy settings or scan originals while the machine is in the waiting state such as when the power has just been turned ON or after a paper jam is cleared Copying automatically begins when the machine is ready NOTE You can specify reserved copying while the machine is in the waiting state in the following cases Between the time that the machine is turned...

Page 32: ...TE If you place the original on the platen glass of the imageRUNNER 2016 or if the machine cannot detect the size of the original specify the size of the original after pressing Start Press or to select the size press Start 4 Once the original is scanned remove it from the machine NOTE To cancel a reserved copy see Canceling a Copy Job on p 1 18 Start ...

Page 33: ...u cannot change the copy quantity while the machine is copying Changing the Copy Quantity 1 Press Clear to clear the entered number 2 Use numeric keys to enter the desired copy quantity 1 to 99 The copy quantity appears on the right hand side of the LCD display IMPORTANT You cannot change the copy quantity while the machine is copying 2 3 ABC DEF JKL GHI MNO TUV PQRS WXYZ Tone SYMBOLS 4 5 5 6 7 8 ...

Page 34: ...elects the copy paper size IMPORTANT For the imageRUNNER 2016 the Feeder DADF P1 should be attached to the machine to use the Auto Paper Selection mode The size of the original cannot be detected when it is placed on the platen glass of the imageRUNNER 2016 You cannot use the Auto Paper Selection mode when copying the following types of originals Copy these originals using the Manual Paper Selecti...

Page 35: ...ed If not press Reset or press Paper Select repeatedly until AUTO appears on the LCD display AUTO and the size of the paper loaded in the paper drawer are automatically selected according to the detected original size are displayed on the LCD display NOTE If the message NO APPROPRIATE SIZE appears the paper loaded in the paper drawers or stack bypass is different in size from the original Load the...

Page 36: ...1 is not attached only the manual paper selection is available If you select the paper manually the Auto Orientation mode cannot be used even if you set AUTO ORIENTATION to ON in the COPY SETTINGS menu NOTE For details about the size and type of paper you can set in the stack bypass see Chapter 2 Basic Operations in the Reference Guide 1 Place your originals 2 Press Paper Select repeatedly to sele...

Page 37: ...aper drawers The suffix R such as in LTRR used in paper size designations indicates that the paper is loaded in a paper drawer or the stack bypass horizontally If you have not specified the paper size and type for the stack bypass using the Additional Functions menu a message prompting you to specify them appears on the LCD display when you select the stack bypass as the paper source See Chapter 5...

Page 38: ...fault setting is AUTO DENSITY Automatic Density Adjustment This mode enables you to set the machine to automatically adjust the copy density to the level best suited to the quality of the text original 1 Place your originals If is not displayed Press Density to select the auto mode Press OK The machine automatically adjusts the copy density to the level best suited to the quality of the original D...

Page 39: ...t Copying starts NOTE If you place the original on the platen glass of the imageRUNNER 2016 or if the machine cannot detect the size of the original specify the size of the original after pressing Start Press or to select the size press Start To cancel all settings and return the machine to the Standby display press Reset Manual Density Adjustment You can manually adjust the copy density to the mo...

Page 40: ...e density darker NOTE You can adjust the density to nine levels 4 Press OK 5 Press Start Copying starts NOTE If you place the original on the platen glass of the imageRUNNER 2016 or if the machine cannot detect the size of the original specify the size of the original after pressing Start Press or to select the size press Start To cancel all settings and return the machine to the Standby display p...

Page 41: ...es photos such as magazines or catalogues IMPORTANT Combination of these three modes Text Photo or Text Photo cannot be selected at the same time If you select one of these modes the previously set mode is canceled If you make copies of an original containing halftones such as a printed image using the Photo mode the moiré effect a shimmering wavy pattern may occur In this case you can lessen this...

Page 42: ...lly changes to manual mode when PHOTO or TEXT PHOTO is selected If the original is a transparency select the original type adjust the density to the most appropriate level for the original 1 Place your originals 2 Press Image Quality repeatedly until the desired type of original TEXT PHOTO or TEXT PHOTO appears Image Quality ...

Page 43: ... you place the original on the platen glass of the immageRUNNER 2016 or if the machine cannot detect the size of the original specify the size of the original after pressing Start Press or to select the size press Start To cancel all settings and return the machine to the Standby display press Reset Start ...

Page 44: ...specify the copy ratio manually Preset Copy Ratio The machine offers you a variety of preset copy ratios to reduce or enlarge standard size originals to another standard paper size NOTE Placing an original horizontally means setting the original with the longer side sideways See Orientation on p 1 11 1 Place your originals 2 Press Copy Ratio Copy Ratio ...

Page 45: ...4 141 A4 A3 200 MAX Enlarging or reducing using the preset copy ratio is not available with the 2 on 1 Combination mode To return the copy ratio to 100 press Copy Ratio repeatedly until 100 is displayed press OK Alternatively press or to select 100 for PRESET RATIO press OK You can also return the ratio to 100 using zoom by percentage See Zoom by Percentage on p 1 36 4 Press OK The selected mode i...

Page 46: ...detect the size of the original specify the size of the original after pressing Start Press or to select the size press Start To cancel all settings and return the machine to the Standby display press Reset Zoom by Percentage You can reduce or enlarge originals by any copy ratio in 1 increments The available copy ratios are from 50 to 200 Start CITY CITY CITY CITY CITY Original Copy ...

Page 47: ... the value using numeric keys Enlarging or reducing using the zoom by percentage is not available with the 2 on 1 Combination mode To return the copy ratio to 100 press Copy Ratio repeatedly until 100 is displayed press OK Alternatively press or to select 100 for PRESET RATIO press OK You can also return the ratio to 100 using a preset zoom ratio See Preset Copy Ratio on p 1 34 4 Press OK The sele...

Page 48: ...ace the original on the platen glass of the imageRUNNER 2016 or if the machine cannot detect the size of the original specify the size of the original after pressing Start Press or to select the size press Start To cancel all settings and return the machine to the Standby display press Reset Start ...

Page 49: ...when you are using 17 lb bond to 20 lb bond 64 g m2 to 80 g m2 paper If the number of sheets is greater than the limit they will not be stapled IMPORTANT Pull out the output auxiliary tray when stapling paper larger than 11 17 or LGL NOTE If AUTO COLLATE is set to COLLATE or STAPLE the Collate Offset Collate with the optional Finisher U1 attached or Staple mode is automatically set when you place ...

Page 50: ...htly offset vertically in the output tray as follows If the Staple Mode Is Set The copies are automatically collated into sets arranged in page order and stapled The output is as follows 4 3 2 1 4 3 2 1 4 3 2 1 4 3 2 1 Originals Set 1 Set 2 Three Copies of Each Page Collated in Page Order Set 3 4 3 2 1 1 1 1 Originals Copies 4 3 2 1 1 1 1 Originals Set 1 Three Copies of Each Page Collated in Page ...

Page 51: ...e optional FInisher U1 attached NOTE When AUTO COLLATE is set to COLLATE or STAPLE the Collate Offset Collate with the optional FInisher U1 attached or Staple mode is automatically set when you place the originals into the feeder See Auto Collate on p 3 14 3 Use numeric keys to enter the desired copy quantity 1 to 99 NOTE For more information about entering the copy quantity see Specifying the Req...

Page 52: ...place the original on the platen glass of the imageRUNNER 2016 or if the machine cannot detect the size of the original specify the size of the original after pressing Start Press or to select the size press Start To cancel this setting press Collate Staple repeatedly until the collate indicator turns off To cancel all settings and return the machine to the Standby display press Reset Start ...

Page 53: ...ction lights NOTE If AUTO COLLATE is set to COLLATE or STAPLE the Offset Collate or Staple mode is automatically set when you place the originals into the feeder See Auto Collate on p 3 14 3 Use numeric keys to enter the desired copy quantity 1 to 99 NOTE For more information about entering the copy quantity see Specifying the Required Number of Copies on p 1 23 Collate Staple 2 3 ABC DEF JKL GHI ...

Page 54: ...place the original on the platen glass of the imageRUNNER 2016 or if the machine cannot detect the size of the original specify the size of the original after pressing Start Press or to select the size press Start To cancel this setting press Collate Staple repeatedly until the staple indicator turns off To cancel all settings and return the machine to the Standby display press Reset Start ...

Page 55: ...ocument layout and image adjustment Two Page Separation 2 2 Frame Erase 2 5 Original Frame Erase 2 7 Book Frame Erase 2 9 Binding Hole Erase 2 11 2 on 1 Combination 2 14 Different Size Originals 2 17 Two Sided Copying 2 20 1 to 2 Sided 2 20 2 to 2 Sided 2 23 2 to 1 Sided 2 26 Book to 2 Sided 2 28 ...

Page 56: ...ombination or Different Size Originals mode Place your original on the platen glass The Two Page Separation mode cannot be used when the original is placed in the feeder NOTE You can start copying from the left page only To make two sided copies of books or bound originals use the Book to 2 Sided copying feature of the Two sided mode See Book to 2 Sided on p 2 28 The Two Page Separation mode can b...

Page 57: ...ration 3 Press or until ON appears press OK The Standby display appears and an asterisk appears on the LCD display indicating that the Two Page Separation mode is set NOTE If the message NO APPROPRIATE SIZE appears the paper loaded in the paper drawers or stack bypass is different in size from the original Load the paper of the appropriate size indicated on the LCD display into a paper drawer or t...

Page 58: ...f the original place your original on the platen glass press Start NOTE If you place the original on the platen glass of the imageRUNNER 2016 or if the machine cannot detect the size of the original specify the size of the original after pressing Start Press or to select the size press Start To cancel all settings and return the machine to the Standby display press Reset To cancel copy jobs see Ca...

Page 59: ...rase modes only for the original sizes shown on the LCD display NOTE You can select originals of the following sizes 11 17 LGL LTRR LTR STMTR or STMT You cannot select the free size paper loaded in the stack bypass Original Frame Erase The Original Frame Erase mode erases the dark borders and frame lines that appear around the copy if the original is smaller than the selected paper size You can al...

Page 60: ...ar if you are copying facing pages in a bound original onto a single sheet of paper Binding Hole Erase The Binding Hole Erase mode erases the shadows that appear on copies from binding holes on originals Original Book Frame Erase Selected Book Frame Erase Not Selected Copy Copy Original Binding Hole Erase Selected Binding Hole Erase Not Selected Copy Copy ...

Page 61: ...around the edge of the copy Before using this mode set the unit of measurement of the frame erase width in the Additional Functions menu See Frame Erase Width Unit of Measurement on p 3 24 IMPORTANT The Original Frame Erase mode cannot be used with the 2 on 1 Combination mode or Different Size Originals mode 1 Place your originals 2 Press Frame Erase 3 Press or until ORIGINAL FR appears press OK 4...

Page 62: ...g is 1 8 4 mm 6 Use numeric keys to enter the desired copy quantity 1 to 99 NOTE For more information about entering the copy quantity see Specifying the Required Number of Copies on p 1 23 The paper size is displayed according to the size of the original you selected in step 4 7 Press Start Copying starts NOTE To cancel all settings and return the machine to the Standby display press Reset To can...

Page 63: ... Width Unit of Measurement on p 3 24 IMPORTANT Place the book to be copied on the platen glass The Book Frame Erase mode cannot be used when the original is placed in the feeder The Book Frame Erase mode cannot be used with the 2 on 1 Combination mode or Different Size Originals mode 1 Place your original on the platen glass press Frame Erase If necessary see the screen shot in step 2 of Original ...

Page 64: ... 16 1 mm to 50 mm The default setting is 1 8 4 mm 5 Press or to set the frame erase width for the center of the bound original press OK The Standby display appears and an asterisk appears on the LCD display indicating that the Book Frame Erase mode is set NOTE You can set the book frame erase width for the center of the bound original from 1 16 to 1 15 16 1 mm to 50 mm The default setting is 3 8 1...

Page 65: ...To cancel copy jobs see Canceling a Copy Job on p 1 18 Binding Hole Erase The Binding Hole Erase mode erases the shadows that appear on copies from binding holes on originals Before using this mode set the unit of measurement of the frame erase width in the Additional Functions menu See Frame Erase Width Unit of Measurement on p 3 24 IMPORTANT Do not place originals with binding holes into the fee...

Page 66: ...ears press OK 3 Press or to select the border where the binding holes are located LEFT RIGHT TOP or BOTTOM press OK The border is where the binding holes are located on the original if you visualize the original as being face up 4 Press or to set the frame erase width press OK The Standby display appears and an asterisk appears on the LCD display indicating that the Binding Erase mode is set Frame...

Page 67: ...y quantity see Specifying the Required Number of Copies on p 1 23 6 Press Start Copying starts NOTE If the machine cannot detect the size of the original specify the size of the original after pressing Start Press or to select the size press Start To cancel all settings and return the machine to the Standby display press Reset To cancel copy jobs see Canceling a Copy Job on p 1 18 2 3 ABC DEF JKL ...

Page 68: ...mode cannot be used with the Two Page Separation Original Frame Erase Book Frame Erase or Different Size Originals mode NOTE If the optional Duplex Unit A1 is attached you can make two sided copies from one sided originals See 1 to 2 Sided on p 2 20 You can set originals of the following sizes 11 17 LGL LTRR LTR STMTR STMT The reduction ratio is automatically set so that the originals fit onto the...

Page 69: ... can select the size of the paper loaded in the paper drawers or stack bypass The Standby display appears and an asterisk appears on the LCD display indicating that the 2 on 1 Combination mode is set IMPORTANT You cannot use Auto Paper Selection in the 2 on 1 Combination mode NOTE The machine automatically selects the copy ratio depending on the selected paper size However you can also set the cop...

Page 70: ...on the LCD display press Start once for each original When scanning is complete press OK If you are copying in the Collate Offset Collate or Staple mode copying starts when the scanning of all pages is complete Otherwise copying starts when enough pages to make a 2 on 1 Combination copy have been scanned NOTE To cancel all settings and return the machine to the Standby display press Reset To cance...

Page 71: ...rent size originals are of the same weight paper type Set different size originals in the following combinations Other combinations may damage the originals 11 17 and LGL LTR and LGL LTR and LTRR Align the top edge of the originals with the back edge of the feeder or the platen glass if you are placing originals with different widths Width refers to the vertical measurement of the paper from the f...

Page 72: ... The paper size is specified in BYPASS STD SET in the COMMON SETTINGS menu The Auto Paper Selection is set to ON for the stack bypass in COPY of AUTO DRAWER SELCT in the COMMON SETTINGS menu 1 Place your originals in the feeder IMPORTANT If your machine is the imageRUNNER 2016 place your originals in the feeder to use the Different Size Originals mode 2 Press Different Size Originals 3 Press or to...

Page 73: ...tion about entering the copy quantity see Specifying the Required Number of Copies on p 1 23 5 Press Start Copying starts NOTE To cancel all settings and return the machine to the Standby display press Reset To cancel copy jobs see Canceling a Copy Job on p 1 18 2 3 ABC DEF JKL GHI MNO TUV PQRS WXYZ Tone SYMBOLS 4 5 5 6 7 8 9 0 1 0 9 Start ...

Page 74: ...with the back edge of the platen glass by the arrow in the top left corner or with the back edge of the feeder Paper used to make two sided copies must conform to the following specifications Paper size 11 17 LGL LTR LTRR or STMTR Paper weight 17 lb bond to 24 lb bond 64 g m2 to 90 g m2 1 to 2 Sided This mode enables you to make two sided copies from one sided originals IMPORTANT Make sure to plac...

Page 75: ...iginals will be printed as one sided copies on paper of their respective sizes If you want to make two sided copies with different size originals you must select the paper size beforehand See Manual Paper Selection on p 1 26 If the 1 to 2 Sided mode is used when the 2 on 1 Combination mode is set to ON two pages of the originals are printed on one side of the paper and another two pages on the oth...

Page 76: ...once for each original When scanning is complete press OK Copying starts NOTE If you place the original on the platen glass of the imageRUNNER 2016 or if the machine cannot detect the size of the original specify the size of the original after pressing Start Press or to select the size press Start To cancel all settings and return the machine to the Standby display press Reset To cancel copy jobs ...

Page 77: ...d that you set the originals in the feeder when copying in 2 to 2 Sided mode This enables you to automatically scan the front and back sides of the originals without the need to turn over and re feed the originals 1 Place your originals press Two Sided If necessary see the screen shot in step 2 of 1 to 2 Sided on p 2 20 2 Press or until 2 2 SIDED appears press OK Original Copy Two Sided OK ...

Page 78: ...are shown below The Standby display appears and an asterisk appears on the LCD display indicating that the 2 to 2 Sided mode is set BOOK TYPE The front and back sides of the original have the same top bottom orientation CALENDAR TYPE The front and back sides of the original have opposite top bottom orientations BOOK TYPE The front and back sides of the copy will have the same top bottom orientatio...

Page 79: ...nning is complete press OK Copying starts NOTE If you place the original on the platen glass of the immageRUNNER 2016 or if the machine cannot detect the size of the original specify the size of the original after pressing Start Press or to select the size press Start To cancel all settings and return the machine to the Standby display press Reset To cancel copy jobs see Canceling a Copy Job on p ...

Page 80: ...ls are placed vertically the back side of the original is copied upside down NOTE If the Feeder DADF P1 is attached it is recommended that you set the originals in the feeder when copying in 2 to1 Sided mode This enables you to automatically scan the front and back sides of the originals without the need to turn over and re feed the originals 1 Place your originals press Two Sided If necessary see...

Page 81: ...t once for each original When scanning is complete press OK Copying starts NOTE If you place the original on the platen glass of the imageRUNNER 2016 or if the machine cannot detect the size of the original specify the size of the original after pressing Start Press or to select the size press Start To cancel all settings and return the machine to the Standby display press Reset To cancel copy job...

Page 82: ...s from facing pages or from the front and back sides of a page in bound originals such as books and magazines Left Right Two Sided This setting makes two sided copies from facing pages Front Back Two Sided This setting makes two sided copies from the front and back sides of a page Original Copies Original Copies ...

Page 83: ...inal on the platen glass The Book to 2 Sided mode cannot be used when the original is placed in the feeder NOTE You cannot select the free size paper loaded in the stack bypass 1 Place your original on the platen glass To make copies in the correct page order begin copying from the first open page of the book or bound original Place your original face down making sure that its top edge is aligned ...

Page 84: ...platen glass of the imageRUNNER 2016 or if the machine cannot detect the size of the original specify the size of the original after pressing Start Press or to select the size press Start 6 When scanning is complete press OK Copying starts NOTE To cancel all settings and return the machine to the Standby display press Reset To cancel copy jobs see Canceling a Copy Job on p 1 18 L R 2 SIDED The fac...

Page 85: ...riority 3 5 Auto Orientation 3 6 Standard Image Quality 3 7 Standard Density 3 9 Standard Zoom Ratio 3 11 Standard Copy Quantity 3 13 Auto Collate 3 14 Standard Two Sided Copying 3 16 Standard Frame Erase 3 17 Standard Two Page Separation 3 18 Paper Drawer Selection 3 20 Sharpness 3 21 Paper Size Group 3 23 Frame Erase Width Unit of Measurement 3 24 Restoring the Default Copy Settings 3 25 ...

Page 86: ...T PHOTO TEXT PHOTO p 3 7 DENSITY AUTO MANUAL 9 steps 5 p 3 9 ZOOM RATIO PRESET RATIO 100 115 B4 A3 121 LGL 11 17 122 A4 B4 129 LTR 11 17 141 A4 A3 200 MAX 50 MIN 64 11 17 LTR 70 A3 A4 73 11 17 LGL 78 LGL LTR 81 B4 A4 86 A3 B4 MANUAL p 3 11 COPIES 1 99 p 3 13 AUTO COLLATE OFF COLLATE STAPLE p 3 14 TWO SIDED OFF 1 2 SIDED 2 2 SIDED 2 1 SIDED BOOK 2 SIDED p 3 16 FRAME ERASE OFF ORG FRAME ERASE BOOK F...

Page 87: ...gs 3 NOTE For instructions on setting the modes not described in this manual refer to the other manuals listed in Manuals for the Machine The Copy Settings menu consists of a list of individual settings Press or to scroll to the desired setting ...

Page 88: ...is pressed except while copying the Auto Clear function works the operation in the Additional Functions menu is finished The Standard Copy Settings consist of Image Direction Priority Auto Orientation Standard Image Quality Standard Density Standard Zoom Ratio Standard Copy Quantity Auto Collate Standard Two Sided Copying Standard Frame Erase Copying Standard Two Page Separation Copying Standard P...

Page 89: ...e the images on originals may be copied upside down depending on the copy mode set NOTE The default setting is OFF If IMAGE DIR PRIORTY is set to ON the copy speed is slower than normal 1 Press Additional Functions 2 Press or until COPY SETTINGS appears press OK The COPY SETTINGS menu appears 3 Press or until IMAGE DIR PRIORTY appears press OK The IMAGE DIR PRIORTY menu appears Additional Function...

Page 90: ...if necessary NOTE The default setting is ON If LTR or STMT originals are enlarged onto 11 17 or LGL paper Auto Orientation is not performed even if you select ON Only the images of standard size originals up to LTR paper can be rotated when the copy ratio is set to 100 If Auto Paper Selection is set and the most suitable paper size is not available the paper source that is loaded with paper of the...

Page 91: ...de is set and the LCD display returns to the COPY SETTINGS menu 4 Press Stop to return to the Standby display Standard Image Quality You can set the standard image quality for copying NOTE The default setting is TEXT 1 Press Additional Functions open the COPY SETTINGS menu If necessary see the screen shots in steps 1 and 2 of Image Direction Priority on p 3 5 OK OK Stop Additional Functions ...

Page 92: ... STANDARD SETTINGS menu appears 3 Press or until IMAGE QUALITY appears press OK The IMAGE QUALITY menu appears 4 Press or to select TEXT PHOTO or TEXT PHOTO press OK The selected mode is set and the LCD display returns to the STANDARD SETTINGS menu 5 Press Stop to return to the Standby display OK OK OK Stop ...

Page 93: ...is AUTO 1 Press Additional Functions open the COPY SETTINGS menu If necessary see the screen shots in steps 1 and 2 of Image Direction Priority on p 3 5 2 Press or until STANDARD SETTINGS appears press OK The STANDARD SETTINGS menu appears 3 Press or until DENSITY appears press OK The DENSITY menu appears Additional Functions OK OK ...

Page 94: ...he density automatically Select AUTO press OK If you want to set the density manually Select MANUAL press OK Press or to set the desired standard copy density press OK The selected mode is set and the LCD display returns to the STANDARD SETTINGS menu 5 Press Stop to return to the Standby display OK OK OK Stop ...

Page 95: ... RATIO and 100 1 Press Additional Functions open the COPY SETTINGS menu If necessary see the screen shots in steps 1 and 2 of Image Direction Priority on p 3 5 2 Press or until STANDARD SETTINGS appears press OK The STANDARD SETTINGS menu appears 3 Press or until ZOOM RATIO appears press OK The ZOOM RATIO menu appears Additional Functions OK OK ...

Page 96: ...crements Select MANUAL press OK 5 Press or to set the desired standard zoom ratio press OK If you select PRESET RATIO select from the following Reduction The available preset copy ratios for reducing originals are MIN 50 11 17 LTR 64 A3 A4 70 11 17 LGL 73 LGL LTR 78 B4 A4 81 A3 B4 86 Enlargement The available preset copy ratios for enlarging originals are B4 A3 115 LGL 11 17 121 A4 B4 122 LTR 11 1...

Page 97: ... mode is set and the LCD display returns to the STANDARD SETTINGS menu 6 Press Stop to return to the Standby display Standard Copy Quantity You can set the standard copy quantity NOTE The default setting is 1 1 Press Additional Functions open the COPY SETTINGS menu If necessary see the screen shots in steps 1 and 2 of Image Direction Priority on p 3 5 2 Press or until STANDARD SETTINGS appears pre...

Page 98: ... copy quantity from 1 to 99 5 Press Stop to return to the Standby display Auto Collate The Auto Collate mode enables automatic selection of the Collate Offset Collate mode when originals are placed in the feeder This is helpful when making multiple sets of copies because you do not need to remember to select the Finisher mode NOTE The default setting is OFF 1 Press Additional Functions open the CO...

Page 99: ...he machine to collate automatically select OFF If you want the machine to collate automatically select COLLATE If you want the machine to staple automatically select STAPLE The selected mode is set the LCD display returns to the STANDARD SETTINGS menu NOTE When the optional FInisher U1 is attached the Collate mode automatically changes to the Offset Collate mode STAPLE is available only when the o...

Page 100: ...ting is OFF 1 Press Additional Functions open the COPY SETTINGS menu If necessary see the screen shots in steps 1 and 2 of Image Direction Priority on p 3 5 2 Press or until STANDARD SETTINGS appears press OK The STANDARD SETTINGS menu appears 3 Press or until TWO SIDED appears press OK The TWO SIDED menu appears Additional Functions OK OK ...

Page 101: ...S menu 5 Press Stop to return to the Standby display Standard Frame Erase You can set the standard Frame Erase mode NOTE The default setting is OFF 1 Press Additional Functions open the COPY SETTINGS menu If necessary see the screen shots in steps 1 and 2 of Image Direction Priority on p 3 5 2 Press or until STANDARD SETTINGS appears press OK The STANDARD SETTINGS menu appears OK Stop Additional F...

Page 102: ...e selected mode is set and the LCD display returns to the STANDARD SETTINGS menu 5 Press Stop to return to the Standby display Standard Two Page Separation You can set the standard Two Page Separation mode NOTE The default setting is OFF 1 Press Additional Functions open the COPY SETTINGS menu If necessary see the screen shots in steps 1 and 2 of Image Direction Priority on p 3 5 OK OK Stop Additi...

Page 103: ... The STANDARD SETTINGS menu appears 3 Press or until 2 PAGE SEPARATION appears press OK The 2 PAGE SEPARATION menu appears 4 Press or to select OFF or ON press OK The selected mode is set and the LCD display returns to the STANDARD SETTINGS menu 5 Press Stop to return to the Standby display OK OK OK Stop ...

Page 104: ...ary see the screen shots in steps 1 and 2 of Image Direction Priority on p 3 5 2 Press or until STANDARD SETTINGS appears press OK The STANDARD SETTINGS menu appears 3 Press or until PAPER SELECT appears press OK The PAPER SELECT menu appears 4 Press or to select AUTO DRAWER 1 DRAWER 2 DRAWER 3 or DRAWER 4 press OK The selected mode is set and the LCD display returns to the COPY SETTINGS menu Addi...

Page 105: ...level Low If you make copies of an original containing halftones such as a printed image using the Photo mode the moiré effect a shimmering wavy pattern may occur In this case you can lessen this moiré effect by adjusting the sharpness level lower to produce a clearer copy Stop The world s coral reefs where brilliantly colored fish and a myriad of other creatures of the tropics come together The w...

Page 106: ... beauty serve as home to countless varieties of life and to us of the land this alluring dream like world forms a tropical paradise filled with romance The world s coral reefs where brilliantly colored fish and a myriad of other tropical creatures come together Aptly nicknamed Tropical Forests under the sea these spots of breathtaking beauty serve as home to countless varieties of life and to us o...

Page 107: ...t is 1 To copy text or lines clearly select a high sharpness level To copy originals containing printed images or other halftones select a low sharpness level 4 Press Stop to return to the standby display Paper Size Group You can set the paper size group for the machine NOTE The default setting is INCHES If the paper size group is changed the preset copy ratios will also change 1 Press Additional ...

Page 108: ...NGS menu 4 Press Stop to return to the Standby display 5 Restart the machine Turn OFF the machine wait at least 10 seconds and then turn it ON Frame Erase Width Unit of Measurement You can set the unit of measurement for the frame erase width NOTE The default setting is INCHES 1 Press Additional Functions open the COPY SETTINGS menu If necessary see the screen shots in steps 1 and 2 of Image Direc...

Page 109: ...lect INCHES If you want to set the standard frame erase width in mm select MM The selected mode is set and the LCD display returns to the COPY SETTINGS menu 4 Press Stop to return to the Standby display Restoring the Default Copy Settings Modes that have been changed in Copy Settings from the Additional Functions menu can be restored to their default settings See Copy Settings Table on p 3 2 NOTE ...

Page 110: ... SET appears press OK The INIT COPY SET menu appears 3 Press or to select OFF or ON To cancel initializing the Copy Settings Select OFF press OK The LCD display returns to the Additional Functions menu To restore to the default settings Select ON press OK The Copy Settings are initialized and the LCD display returns to the Additional Functions menu 4 Press Stop to return to the Standby display Add...

Page 111: ...CHAPTER 4 1 4 Appendix Combination of Copy Modes Chart 4 2 Index 4 3 ...

Page 112: ...ded 2 to 2 Sided 2 to 1 Sided Book to 2 Sided Different Size Originals P re s e t z o o m Combination Unavailable Z o o m b y p e rc e n ta g e A u to m a ti c D e n s it y C o n tr o l S ta p le R e s e rv e C o p y T w o P a g e S e p a ra ti o n 2 o n 1 C o m b in a ti o n O ri g in a l F ra m e E ra s e B o o k F ra m e E ra s e B in d in g H o le E ra s e 1 to 2 S id e d 2 to 2 S id e d 2 to ...

Page 113: ...able 3 2 D Default Copy Settings 3 25 Density 1 28 3 9 Standard Density 3 9 Different Size Originals 2 17 F Feeder 1 3 1 10 1 15 Finishing modes 1 39 Auto Collate 3 14 Collate 1 39 1 41 Offset 1 39 1 41 Staple 1 39 1 43 Frame Erase 2 5 Binding Hole Erase 2 6 2 11 Book Frame Erase 2 6 2 9 Original Frame Erase 2 5 2 7 Standard Frame Erase 3 17 Unit of Measurement 3 24 I Image Direction Priority 3 5 ...

Page 114: ...eserved Copying 1 21 Restoring the Default Copy Settings 3 25 S Sharpness 3 21 Sleep mode 1 2 Slide guides feeder 1 16 Specifying Copy Settings 3 4 Standard Copy Settings 3 4 Standard Zoom Ratio 3 11 T Two Page Separation 2 2 Standard Two Page Separation 3 18 Two page Separation 3 18 Two Sided Copying 2 20 3 16 1 to 2 Sided 2 20 2 to 1 Sided 2 26 2 to 2 Sided 2 23 Book to 2 Sided 2 28 Standard Two...

Page 115: ...Europark Fichtenhain A10 47807 Krefeld Germany CANON ITALIA S p A Via Milano 8 20097 San Donato Milanese MI Italy CANON LATIN AMERICA INC 703 Waterford Way Suite400 Miami Florida 33126 U S A CANON AUSTRALIA PTY LTD 1 Thomas Holt Drive North Ryde Sydney N S W 2113 Australia CANON CHINA CO LTD 15F North Tower Beijing Kerry Centre 1 Guang Hua Road Chao Yang District 100020 Beijing China CANON SINGAPO...

Reviews: