


width of both paper roll 1 and pa-
per roll 2
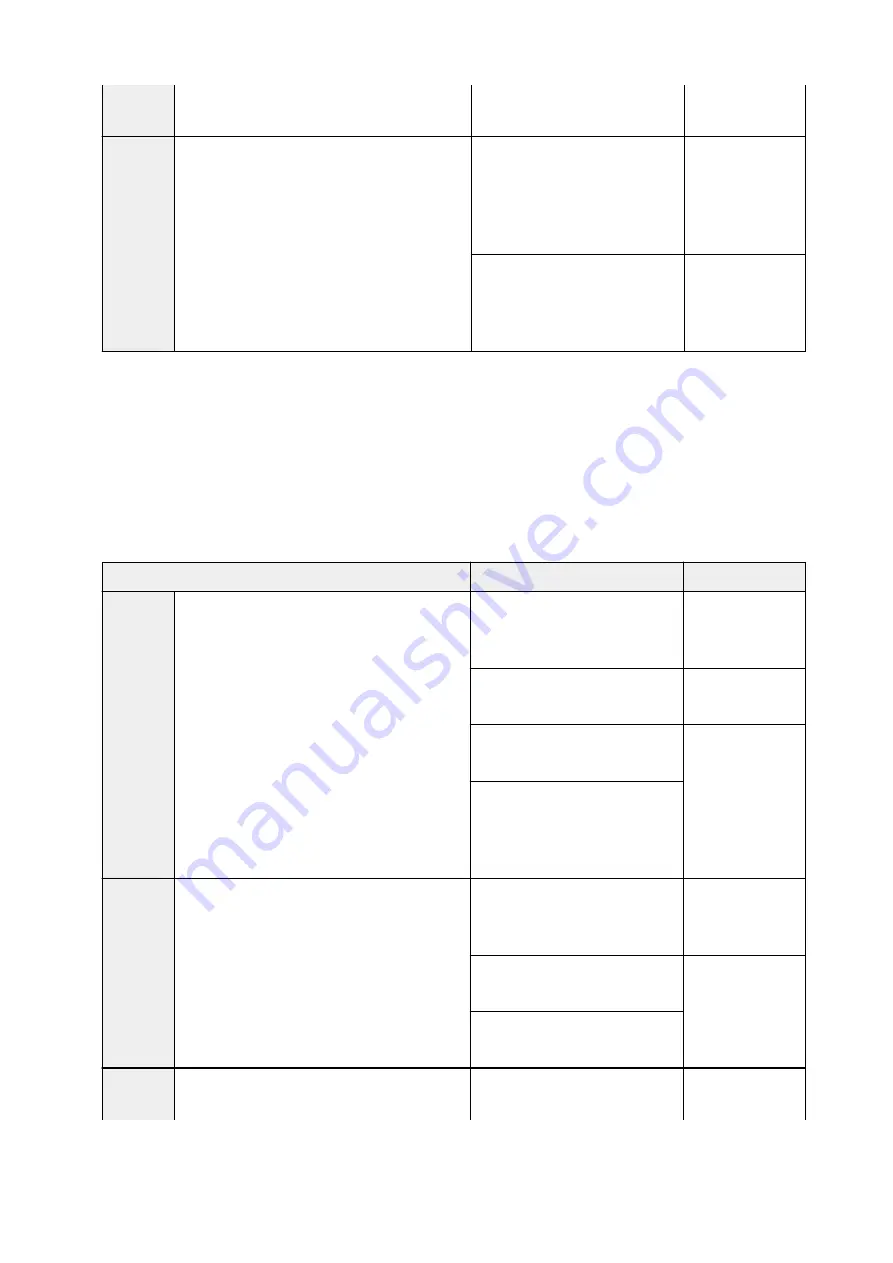
Condi-
tion 7
Is the width of paper roll 1 different from the
width of paper roll 2?
Roll width is different
Select the paper
roll whose width is
closer to the width
specified for the
print job
Roll width is the same
Select the paper
roll currently being
fed into the platen
*1
*1 In the following cases, neither roll 1 nor roll 2 are being fed onto the platen. In such cases, paper roll 1 is
selected.
• When the printer has switched to sleep mode and has returned to the initial position
• When the printer has been turned on
• When cut paper has been fed into the printer and has exited it
If the Detect paper setting mismatch setting is set on Display warning or Do not detect
Condition
Situation
Judgment result
Condi-
tion 1
Whether the paper roll loaded on the printer is
long enough to print the paper size specified for
the print job.
Only one of either paper roll 1 or
paper roll 2 is long enough
Select the paper
roll of sufficient
length
Neither paper roll 1 nor paper roll
2 are long enough
Error
Both paper roll 1 and paper roll 2
are long enough
To Condition 2
On the Printer's menu,
Manage
remaining roll amount
is set on
Disable
(length of the paper roll
cannot be determined)
Condi-
tion 2
Whether the paper roll loaded on the printer
matches the paper type specified for the print
job.
Only one of either paper roll 1 or
paper roll 2 matches the paper
type
Select the paper
roll matching the
paper type
Neither roll 1 nor roll 2 match the
paper type
To Condition 3
Both paper roll 1 and paper roll 2
match the paper type
Condi-
tion 3
In the Printer menu, how has the
Roll paper
auto switching
setting changed?
It has changed to
Do not identify
size
Select the paper
roll currently being
556
Summary of Contents for imagePROGRAF TX-3000
Page 47: ... Borderless printing is not supported on sheets 47 ...
Page 56: ...56 ...
Page 99: ...5 Tap Cut dust reduction 6 Tap ON 99 ...
Page 112: ...6 Lower release lever 112 ...
Page 113: ...Stacker Parts of the Stacker Using the Stacker Example Stacker Configurations 113 ...
Page 117: ...2 Pull out the stacker toward you to remove the stacker from the printer 117 ...
Page 121: ...121 ...
Page 134: ...134 ...
Page 144: ...8 Change Roll Holder Lock switch on roll unit to lock direction 144 ...
Page 155: ...11 Remove printed material that has been taken up from roll holder for each paper core 155 ...
Page 163: ...163 ...
Page 165: ...165 ...
Page 191: ...For more on setting items on the operation panel Setting Items on Operation Panel 191 ...
Page 230: ...F Range which cannot be printed G Paper for printing 230 ...
Page 234: ... Even if the image runs off the edge of the paper it is rotated to expand the print range 234 ...
Page 237: ...A Output object area B Fit to long side post processing size 237 ...
Page 239: ... ON is selected when printing on roll 239 ...
Page 241: ...A Position of cut when OFF B Position of cut when ON 241 ...
Page 243: ... When Enable is selected 243 ...
Page 251: ...251 ...
Page 259: ...Printed without upper lower blank area 259 ...
Page 265: ... Printed image after reduced A Position of cut for A3 size 265 ...
Page 267: ...The images are positioned as shown below and printing is performed 267 ...
Page 305: ...The resending setting is completed 305 ...
Page 319: ...Optional accessories Roll unit Parts of the Roll Unit Stacker Parts of the Stacker 319 ...
Page 330: ...For more on USB connection What Is USB Cable 330 ...
Page 352: ... For macOS Follow the instructions on the Canon website to redo setup 352 ...
Page 385: ...The print head is now straight and adjustment is complete 385 ...
Page 392: ...Adjusting Feed Amount Adjusting Feed Amount Adjusting Vacuum Strength 392 ...
Page 396: ...6 Tap paper to adjust A test pattern is printed for adjustment and adjustment is finished 396 ...
Page 403: ...Color Management Device Management Console Guide 403 ...
Page 423: ...423 ...
Page 447: ...447 ...
Page 450: ...Cutter Blade Cutter Blade Replacing the Cutter Blade 450 ...
Page 453: ...6 Turn hex screw with hex wrench until loose 7 Remove cutter blade while holding A 453 ...
Page 468: ...468 ...
Page 484: ...Specifications Specifications Print Area 484 ...
Page 510: ...Basic Printing Workflow Printing procedure Canceling print jobs Pausing Printing 510 ...
Page 529: ...Note The screen may differ slightly depending on the model you are using 529 ...
Page 531: ...Pausing Printing Pausing Printing 531 ...
Page 564: ...Adjusting Color Balance Adjusting Brightness Adjusting Contrast 564 ...
Page 572: ...Adjusting Color Balance Adjusting Brightness Adjusting Contrast 572 ...
Page 608: ...Printing from Printer Printing from USB Flash Drive 608 ...
Page 646: ...Setting the Print Quality Level Custom Printing a Color Document in Monochrome 646 ...
Page 671: ...671 ...
Page 677: ...6 Enter quantity to print in Copies and select Yes 677 ...
Page 680: ...6 Select Delete on displayed screen 680 ...
Page 691: ...5 Select Edit 6 In Edit job box dialog box enter name in Job box name and select OK 691 ...
Page 692: ...692 ...
Page 697: ...Note Enter the password if it is enabled for a saving box 5 Select print job 697 ...
Page 698: ...The details of the saved document appears 698 ...
Page 700: ...5 Select saved job and select Edit 6 Select Change 700 ...
Page 701: ...7 Enter name and select OK 701 ...
Page 727: ...4 Lift up the release lever 5 Hold the paper and pull it out toward the front 727 ...
Page 729: ...8 Turn on the power to the printer Turning the Printer On and Off 729 ...
Page 738: ...Replace the cutter blade Replacing the Cutter Blade 738 ...
Page 837: ...Note To stop printing press the Stop button 837 ...
Page 854: ...1201 Cause The ink tank cover is open What to Do Close the ink tank cover 854 ...
Page 855: ...1210 Cause The ink tank cover is open What to Do Close the ink tank cover 855 ...
Page 887: ...1500 Cause The ink in the ink tank is running low What to Do Prepare a new ink tank 887 ...
Page 927: ...3330 Cause Print data may be corrupt What to Do Check the print job 927 ...
Page 929: ...3332 Cause Unsupported JPEG data format What to Do Print from a PC 929 ...
Page 930: ...3333 Cause Unsupported JPEG data format What to Do Print from a PC 930 ...
Page 977: ...Contact your Canon dealer for assistance 977 ...


