


Configuring the Printer's NetWare Network Settings
Follow the steps below to configure the NetWare network settings.
1.
Start the web browser and enter the following URL in the
Location
(or
Address
) box to display the RemoteUI
page.
http://printer IP address or name/
Example: http://xxx.xxx.xxx.xxx/
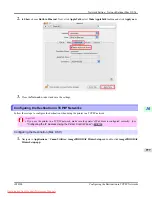
2.
Select
Administrator Mode
and click
Logon
.
3.
If a password has been set on the printer, enter the password.
4.
Click
Network
in the
Device Manager
menu at left to display the
Network
page.
5.
Click
Edit
in the upper-right corner of the
NetWare
group to display the
Edit NetWare Protocol Settings
page.
6.
Refer to the NetWare Settings Items table to complete the settings.
NetWare Settings Items
Item
Details
Default
Setting
Frame Type
Specify the type of frame to use in NetWare.
Disabled
NCP Burst Mode
Activate this setting to use NCP Burst Mode.
This mode supports fast data transfer when printing in queue server
mode. Normally, leave the setting On.
On
Print Application
Choose the print service.
•
Bindery PServer
•
RPrinter
•
NDS PServer
•
NPrinter
NDS PSer-
ver
Packet Signature
Select
If Requested by Server
to use packet signature.
If Reques-
ted by
Server
Bindery
PServer
File Server Name
Specify the name of a file server that has a NetWare print server.
(0–47 characters)
—
Print Server
Name
Specify the name of a NetWare print server.
(0–47 characters)
—
Print Server
Password
Set a password for the print server.
(0–20 characters)
—
Polling Interval
Specify the interval to confirm jobs.
(1–15 seconds)
5
RPrinter
Print Server
Name
Specify the name of a NetWare print server.
(0–47 characters)
—
Printer Number
Specify the number of the printer connected to the NetWare print
server.
(0–15)
0
Network Setting
>
Network Setting (Windows)
>
Configuring the Printer's NetWare Network Settings
iPF8300
10
964