10
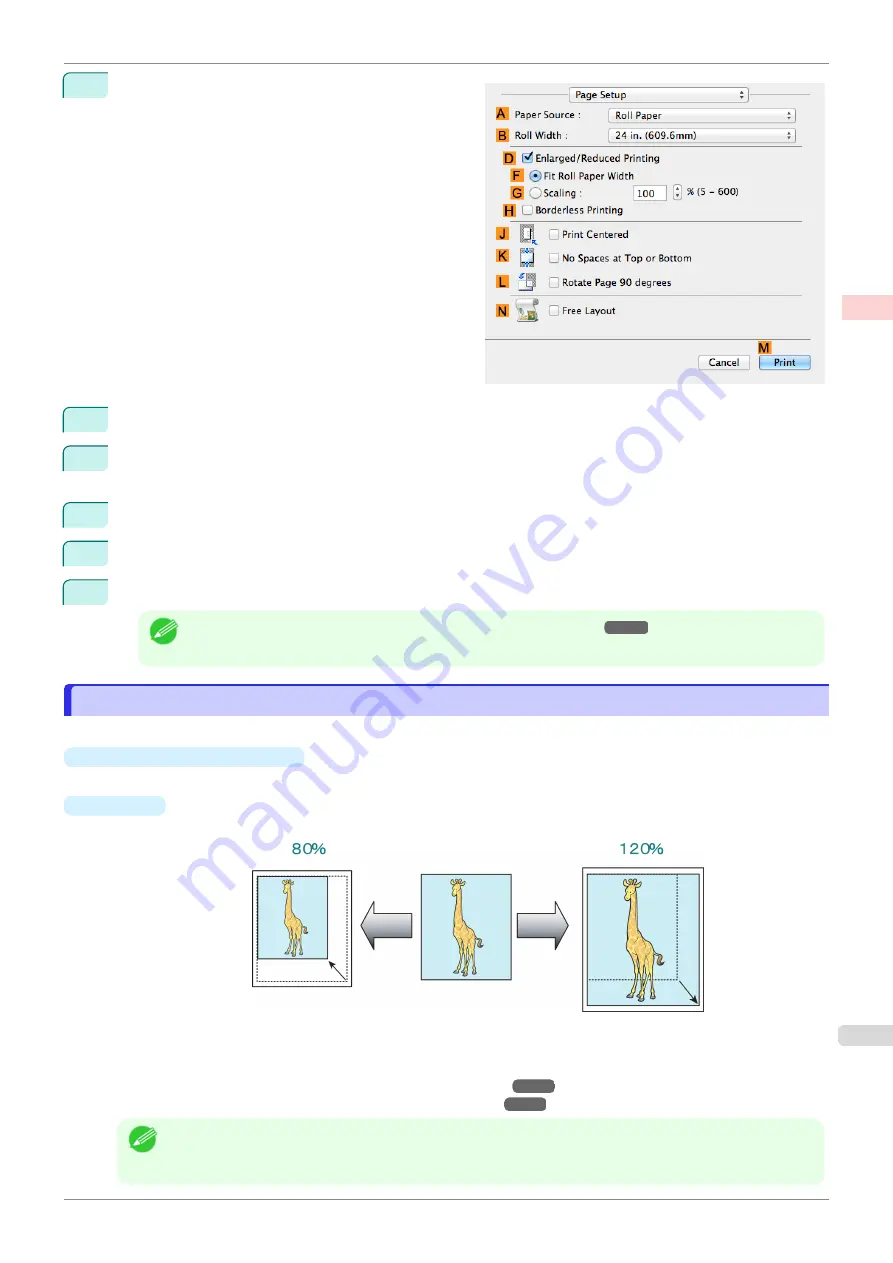
Access the
Page Setup
pane.
11
Select and click a roll paper in the
A
Paper Source
list.
12
Select the paper width of the roll loaded in the printer for
B
Roll Width
. In this case,
16 in. (406.4mm)
is
selected.
13
Select the
D
Enlarged/Reduced Printing
check box.
14
Click
F
Fit Roll Paper Width
.
15
Confirm the print settings, and then click
M
to start printing.
Note
•
For tips on confirming print settings,
Resizing Originals by Entering a Scaling Value
Resizing Originals by Entering a Scaling Value
You can freely adjust the size of originals by enlarging or reducing them as desired.
•
Enlarged/Reduced Printing
Enlarge or reduce the original in the printer driver, as desired.
•
Scaling
Enlarge or reduce originals by a particular amount, as desired.
For instructions on entering a scaling value to resize originals, refer to the following topics, as appropriate for
your computer and operating system.
•
Resizing Originals by Entering a Scaling Value (Windows)
•
Resizing Originals by Entering a Scaling Value (Mac OS)
Note
•
For better printing results when enlarging photos from a digital camera in TIFF or JPEG format, use an im-
age-editing application software such as Adobe Photoshop to specify an image resolution of 150 dpi or more
at actual size.
iPF685
Resizing Originals by Entering a Scaling Value
Enhanced Printing Options
Printing enlargements or reductions
65
Summary of Contents for imageprograf iPF685
Page 14: ...14 ...
Page 28: ...iPF685 User s Guide 28 ...
Page 248: ...iPF685 User s Guide 248 ...
Page 398: ...iPF685 User s Guide 398 ...
Page 434: ...iPF685 User s Guide 434 ...
Page 466: ...iPF685 User s Guide 466 ...
Page 520: ...iPF685 User s Guide 520 ...
Page 536: ...iPF685 User s Guide 536 ...
Page 640: ...iPF685 User s Guide 640 ...


