background image

Chapter 9  

9-54

F-9-146

9.7.22 Fixing Main Heater/Fixing Sub Heater

9.7.22.1 Preparation for Removing the Fixing Main 

Heater/the Fixing Sub Heater

0014-1190

imagePRESS C1 P / imagePRESS C1 / imagePRESS C1+ (Printer) / image-

PRESS C1+

1) Open the front door. 

2) Pull out the fixing/feeding unit toward you. 

9.7.22.2 Removing the Fixing Main Heater/the Fixing Sub 

Heater

0014-1191

imagePRESS C1 P / imagePRESS C1 / imagePRESS C1+ (Printer) / image-

PRESS C1+

1) Open the external delivery cover [1].

F-9-147

2) Open the internal delivery cover [1].

F-9-148

3) Detach the fixing front cover [1].

- 3 screws [2]

F-9-149

4) Detach the fixing upper cover [1].

- 2 stepped screws [2]

- 1 screw [3]

F-9-150

5) Move the 2 fixing upper unit mounts [1] in the direction of the arrow.

- 2 screws [2]

F-9-151

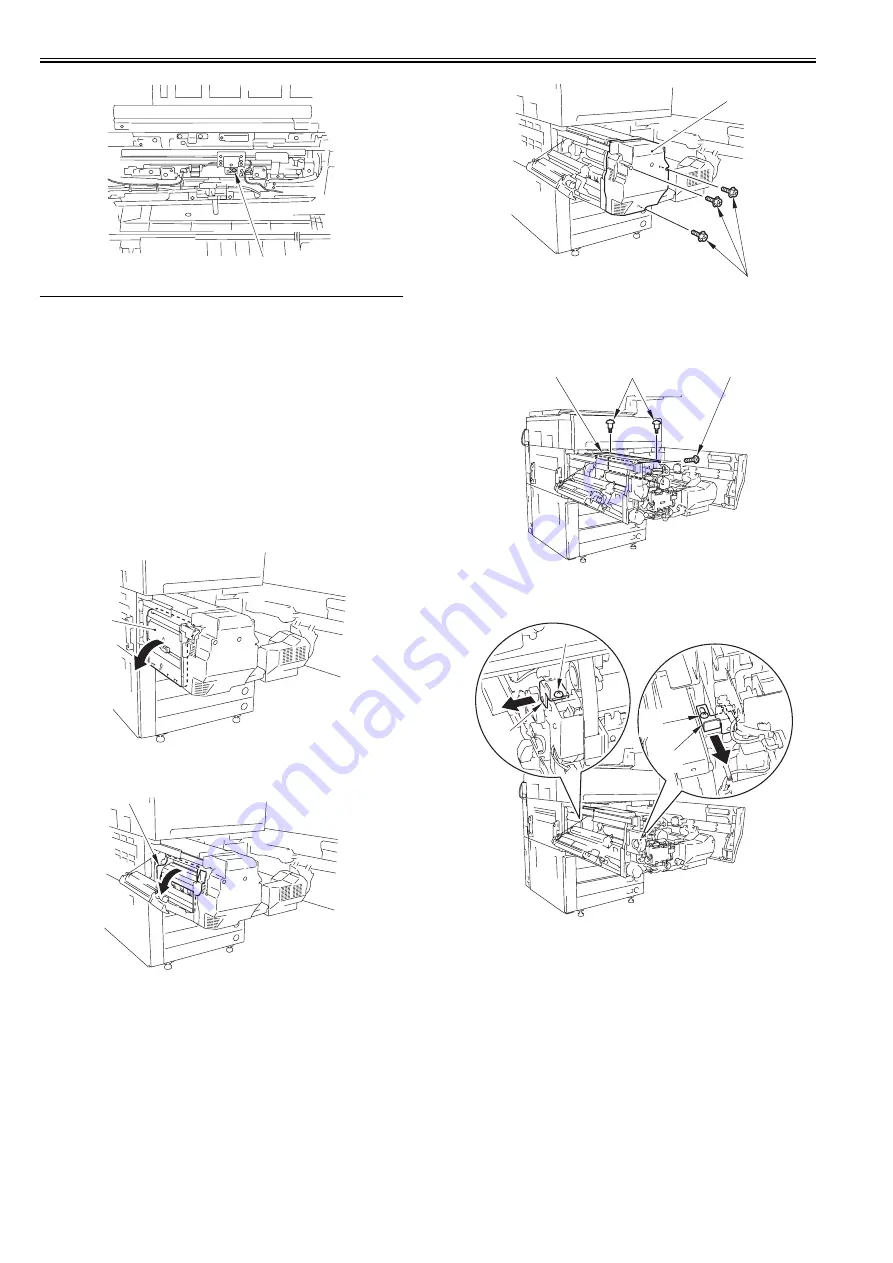
6) Open the fixing upper unit [1] in the direction of the arrow.

- 2 clamps [2]

- 2 edge saddles [3]

- 5 connectors [4]

[1]

[1]

[1]

[2]

[1]

[1]

[2]

[3]

[1]

[1]

[2]

[2]

Summary of Contents for imagePRESS C1

Page 1: ...Oct 22 2008 Service Manual imagePRESS C1 Series ...

Page 2: ......

Page 3: ... need arises In the event of major changes in the contents of this manual over a long or short period Canon will issue a new edition of this manual The following paragraph does not apply to any countries where such provisions are inconsistent with local law Trademarks The product names and company names used in this manual are the registered trademarks of the individual companies Copyright This ma...

Page 4: ...quiring care to avoid combustion fire Indicates an item prohibiting disassembly to avoid electric shocks or problems Indicates an item requiring disconnection of the power plug from the electric outlet Indicates an item intended to provide notes assisting the understanding of the topic in question Indicates an item of reference assisting the understanding of the topic in question Provides a descri...

Page 5: ...sed to indicate Low The voltage value how ever differs from circuit to circuit In addition the asterisk as in DRMD indicates that the DRMD signal goes on when 0 In practically all cases the internal mechanisms of a microprocessor cannot be checked in the field Therefore the operations of the microprocessors used in the machines are not discussed they are explained in terms of from sensors to the i...

Page 6: ......

Page 7: ...Settings 1 15 1 2 3 8 Mail Box Settings 1 16 1 2 3 9 Address Book Settings 1 17 1 2 3 10 User Administrator Mode 1 18 1 2 3 11 Common Settings 1 20 1 2 3 12 Timer Settings 1 22 1 2 3 13 Adjustment Cleaning 1 23 1 2 3 14 Report Settings 1 23 1 2 3 15 System Control Settings 1 23 1 2 3 16 Copy Settings 1 26 1 2 3 17 Communications Settings 1 26 1 2 3 18 Mail Box Settings 1 27 1 2 3 19 Address Book S...

Page 8: ...ting the Balancing Cylinder 2 38 2 2 12 Mounting the Balancing Cylinder 2 40 2 2 13 Mounting the Developing Assembly 2 41 2 2 14 Mounting the Developing Assembly 2 44 2 2 15 Mounting the Process Unit 2 47 2 2 16 Mounting the Process Unit 2 50 2 2 17 Mounting the Fixing Assembly 2 53 2 2 18 Fitting the Control Panel in Place 2 55 2 2 19 Setting of Environmental Switch 2 60 2 2 20 Turning the Main P...

Page 9: ... the Connection of the Network Cable 2 92 2 6 3 Making a Check Using a Loopback Address 2 92 2 6 4 Making a Check Using a Local Host Address 2 92 2 7 Relocating the Machine 2 92 2 7 1 Operation for Moving the Machine 2 92 2 8 Installing the Card Reader 2 93 2 8 1 Points to Note About Installation 2 93 2 8 2 Checking the Contents 2 93 2 8 3 Pre Settings 2 93 2 8 4 Turning Off the Machine 2 93 2 8 5...

Page 10: ...roller 3 4 Chapter 4 Main Controller 4 1 Construction 4 1 4 1 1 Configuration and Functions 4 1 4 1 2 Configuration and Functions 4 2 4 2 Construction of the Electrical Circuitry 4 4 4 2 1 Main Controller Circuit Board MAIN 4 4 4 2 2 Main Controller Circuit Board MAIN 4 6 4 2 3 SRAM Circuit Board 4 7 4 3 Start Up Sequence 4 7 4 3 1 Overview 4 7 4 3 2 Startup Sequence 4 7 4 4 Actions when HDD Error...

Page 11: ...7 Parts Replacement Procedure 4 23 4 7 1 Controller Box 4 23 4 7 1 1 Preparation for Removing the Controller Box 4 23 4 7 1 2 Removing the Controller Box 4 23 4 7 2 Main Controller PCB main 4 24 4 7 2 1 Preparation for Removing the Main Controller PCB 4 24 4 7 2 2 Removing the Main Controller PCB Main 4 24 4 7 2 3 Removing the Main Controller PCB Main 4 25 4 7 3 HDD 4 26 4 7 3 1 Preparation for Re...

Page 12: ...ion Offset Correction 5 15 5 3 6 4 CCD Output A D Conversion 5 15 5 3 6 5 Outline of Shading Correction 5 15 5 3 6 6 Shading Adjustment 5 15 5 3 6 7 Shading Correction 5 15 5 4 Parts Replacement Procedure 5 16 5 4 1 DADF 5 16 5 4 1 1 Removing the DADF imagePRESS C1 Series imagePRESS C7000 Series 5 16 5 4 2 Copyboard Glass 5 16 5 4 2 1 Removing the Copyboard Glass imagePRESS C1 Series imagePRESS C7...

Page 13: ...Close Sensor 5 36 5 4 10 1 Removing the ADF Open Close Sensor imagePRESS C1 Series 5 36 5 4 10 2 Removing the ADF Open Close Sensor imagePRESS C7000 Series 5 37 5 4 11 Scanner Home Position Sensor 5 38 5 4 11 1 Removing the Scanner Home Position Sensor imagePRESS C1 Series 5 38 5 4 11 2 Removing the Scanner Home Position Sensor imagePRESS C7000 Series 5 39 5 4 12 Original Sensor 5 40 5 4 12 1 Prep...

Page 14: ...FF Control 6 3 6 3 1 2 Main Scan Sync Control 6 4 6 3 1 3 Sub Scan Sync Control 6 5 6 3 2 Controlling the Intensity of Laser Light 6 6 6 3 2 1 APC Control 6 6 6 3 2 2 PWM Control 6 6 6 3 3 Controlling the Laser Scanner Motor 6 6 6 3 3 1 Laser Scanner Motor Control 6 6 6 3 4 Controlling the Laser Shutter 6 7 6 3 4 1 Laser Shutter Control 6 7 6 4 Parts Replacement Procedure 6 9 6 4 1 Laser Scanner U...

Page 15: ...R Control 7 21 7 4 9 ACVC Control 7 23 7 4 10 D max Control 7 24 7 4 11 D max Control 7 25 7 4 12 D half Control 7 26 7 4 13 D half Control 7 28 7 4 14 ARCDAT Control 7 30 7 4 15 ARCDAT Control 7 32 7 4 16 PASCAL Control 7 34 7 4 17 ACR Control Auto Carrier Refresh Control 7 37 7 4 18 ACR Control Auto Carrier Refresh Control 7 38 7 5 Charging Meachanism 7 39 7 5 1 Primary Charging Bias Control 7 3...

Page 16: ...80 7 13 1 ITB Heater Control 7 80 7 14 Parts Replacement Procedure 7 83 7 14 1 Process Unit 7 83 7 14 1 1 Preparation for Sliding the Processing Unit 7 83 7 14 1 2 Sliding the Processing Unit 7 83 7 14 1 3 Sliding the Processing Unit 7 84 7 14 2 Pre exposure LED Array 7 86 7 14 2 1 Preparation for Removing the Pre Exposure LED 7 86 7 14 2 2 Removing the Pre Exposure LED unit 7 86 7 14 3 Preconditi...

Page 17: ...d Seal Front 7 92 7 14 17 End Seal Rear 7 92 7 14 17 1 Preparation for Removing the End Seal Rear 7 92 7 14 17 2 Removing the End Seal Rear 7 93 7 14 18 Drum Cleaner Brush 7 93 7 14 18 1 Preparation for Removing the Drum Cleaner Brush 7 93 7 14 18 2 Removing the Drum Cleaner Brush 7 93 7 14 19 Photosensitive Drum Cleaning Blade 7 93 7 14 19 1 Preparation for Removing the Drum Cleaning Blade 7 93 7...

Page 18: ...condary Transfer Roller Brush Upper 7 106 7 14 35 Secondary Transfer Roller Brush Lower 7 107 7 14 35 1 Preparation for Removing the Secondary Transfer Roller Brush Lower 7 107 7 14 35 2 Removing the Secondary Transfer Roller Brush Lower 7 107 7 14 36 ITB Bias Roller Cleaning Blade Upper 7 107 7 14 36 1 Preparation for Removing the ITB Bias Roller Cleaning Blade Upper 7 107 7 14 36 2 Removing the ...

Page 19: ... 8 19 8 3 4 1 Paper Thickness Detection 8 19 8 4 Cassette 8 20 8 4 1 Overview 8 20 8 4 2 Paper Size Detection 8 21 8 4 3 Setting the Universal Cassette 8 22 8 4 4 Paper Level Sensor 8 22 8 5 Cassette Pick Up Unit 8 25 8 5 1 Configuration 8 25 8 5 2 Behavior of Lifter 8 25 8 5 3 Behavior of Pickup 8 26 8 5 4 Feeding Control Cassette 1 8 27 8 5 5 Pickup Control Cassette 2 to 4 8 28 8 6 Manual Feed P...

Page 20: ...ation for Removing the Horizontal Registration 8 61 8 10 6 2 Removing the Horizontal Registration 8 61 8 10 7 Pre Fixing Feeding Unit 8 62 8 10 7 1 Preparation for Removing the Pre Fixing Feeding Unit 8 62 8 10 7 2 Removing the Pre Fixing Feeding Unit 8 62 8 10 7 3 Removing the Pre Fixing Feeding Unit 8 63 8 10 8 Fixing Feeder Unit 8 63 8 10 8 1 Preparation for Pulling Removing the Fixing Feeding ...

Page 21: ...5 2 Control of the Fixing Cleaning Web Length Detection 9 25 9 5 3 Detached Attached Mechanism of the Cleaning Web Web Roller 9 26 9 5 4 Refresh Roller Attach Detach Mechanism 9 28 9 6 Protective Functions 9 29 9 6 1 Protective Circuit 9 29 9 6 2 Related Error Code 9 31 9 7 Parts Replacement Procedure 9 34 9 7 1 Fixing Drive Unit 9 34 9 7 1 1 Preparation for Removing the Fixing Drive Second Gear 9...

Page 22: ...ving the Fixing Main Thermistor 9 50 9 7 15 Fixing Sub Thermistor 9 50 9 7 15 1 Preparation for Removing the Fixing Sub Thermistor 9 50 9 7 15 2 Removing the Fixing Sub Thermistor 9 50 9 7 16 Outside Heating Main Thermistor 9 51 9 7 16 1 Preparation for Removing the External Heat Main Thermistor 9 51 9 7 16 2 Removing the External Heat Main Thermistor 9 51 9 7 17 Outside Heating Sub Thermistor 9 5...

Page 23: ...g Bush 9 59 9 7 26 3 After Replacing the Insulating Bush 9 59 9 7 27 Outside Heat Insulating Bush 9 59 9 7 27 1 Preparation for Removing the External Heat Insulating Bush 9 59 9 7 27 2 Removing the External Heat Insulating Bush 9 59 9 7 27 3 When Replacing the External Heat Insulating Bush 9 59 9 7 28 Lower Separation Claw 9 60 9 7 28 1 Preparation for Removing the Lower Separation Plate 9 60 9 7 ...

Page 24: ...for Removing the Right Lower Cover 10 12 10 5 1 3 2 Removing the Right Lower Cover 10 12 10 5 1 4 Right Rear Upper Cover 10 12 10 5 1 4 1 Removing the Right Rear Upper Cover 10 12 10 5 1 5 Right Rear Lower Cover 10 12 10 5 1 5 1 Removing the Right Rear Lower Cover 10 12 10 5 1 6 Upper Left Cover 10 12 10 5 1 6 1 Preparation for Removing the Left Upper Cover 10 12 10 5 1 6 2 Removing the Left Upper...

Page 25: ...10 5 9 1 Preparation for Removing the High Voltage Box Unit 10 27 10 5 9 2 Removing the High Voltage Box Unit 10 27 10 5 9 3 Removing the High Voltage Box Unit 10 28 10 5 10 HV1 PCB 10 29 10 5 10 1 Preparation for Removing the HV1 PCB Unit 10 29 10 5 10 2 Removing the HV1 PCB Unit 10 29 10 5 11 HV3 PCB 10 30 10 5 11 1 Preparation for Removing the HV3 PCB 10 30 10 5 11 2 Removing the HV3 PCB 10 30 ...

Page 26: ...eparation for Removing the Ozone Filter Left Upper 10 36 10 5 24 2 Removing the Ozone Filter Left Upper 10 36 10 5 25 Ozone Filter Lower Left 10 37 10 5 25 1 Removing the Ozone Filter Left Lower 10 37 10 5 26 Ozone Filter Rear 10 37 10 5 26 1 Removing the Ozone Filter Rear 10 37 10 5 27 Ozone Filter Lower Rear 10 37 10 5 27 1 Removing the Ozone Filter Rear Lower 10 37 10 5 28 Toner Filter Right 10...

Page 27: ...11 23 11 1 16 Adding a License File 11 24 11 1 17 Disabling a License File suspending a license 11 26 11 1 18 Downloading Removing an Invalidated License File 11 27 11 1 19 Reusable license 11 29 11 1 20 License for forwarding 11 29 11 1 21 Uninstalling an Application 11 32 11 1 22 Login Service 11 33 11 1 23 Changing Login Services 11 38 11 1 24 Initializing the Password 11 39 11 1 25 Creating a ...

Page 28: ...2 4 12 2 3 Printer Unit 12 4 12 3 Scheduled Servicing Basic Procedure 12 8 12 3 1 General Procedure for Scheduled Servicing 12 8 12 3 2 Scheduled Servicing List Reader Unit 12 8 12 3 3 Scheduled Servicing List Printer Unit 12 9 12 4 Cleaning 12 14 12 4 1 Cleaning for secondary transfer rear guide 12 14 12 4 2 Cleaning of registration roller registration guide and transparency sensor 12 15 12 4 3 C...

Page 29: ...3 8 Replacing the Waste Toner Sensor 13 7 13 3 9 After Replacing the ATR Sensor 13 7 13 3 10 After Replacing the Patch Image Reading Sensor 13 7 13 4 Fixing System 13 7 13 4 1 Checking the Nip Width 13 7 13 4 2 After Replacing the Fixing Roller 13 8 13 4 3 After Replacing the Fixing Belt 13 8 13 4 4 After Replacing the Fixing Cleaning Belt 13 8 13 4 5 After Replacing the Fixing Belt Pressure Pad C...

Page 30: ...n duplex printing position of image on both 1st and 2nd sides is displaced in sub scanning direction 14 9 14 3 1 4 Partially Blank Streaked 14 9 14 3 1 4 1 Void occurs in main scanning direction on halftone area oval shaped patterns E060 0000 J423 connector 11 pin CT connector on main body side of pre conditioning unit has poor contact 14 9 14 3 1 4 2 Void occurs in sub scanning direction upon ins...

Page 31: ...y due to Dirt on ATR Sensor Window 14 29 14 3 3 3 7 Power Supply Voltage Connector Error E009 0000 Indication at Replacement of the DC Controller PCB 14 29 14 3 3 3 8 ATR Error E020 XXXX Display at the time of Drum Replacement 14 30 14 3 3 4 User Warning Message 14 30 14 3 3 4 1 When connecting RUI using same PC and IP address upon replacement of machine message A error has occurred is displayed i...

Page 32: ...ctor pin of Fixing Heater Cable Unit moves back JP Model 14 43 14 3 7 23 E820 0003 is indicated Primary corona assembly is mounted incorrectly 14 45 14 3 7 24 E842 0009 occurs at last rotation performed during a continuous black and white job 14 45 14 3 8 Specifications Related FAQ 14 46 14 3 8 1 FAQ on Main Unit Specifications 14 46 14 3 8 1 1 Auto paper select function does not work after settin...

Page 33: ... 3 15 2 1 List of Error Codes 15 3 15 2 2 E602 HDD Encryption board error detail 15 19 15 3 Error Codes SEND 15 23 15 3 1 End Code Items 15 23 15 4 Jam Codes 15 24 15 4 1 Jam Code Printer Unit 15 24 15 4 2 Jam Code Finisher Related 15 25 15 4 3 Jam Code ADF Related 15 26 15 5 Alarm Codes 15 29 15 5 1 Alarm Code 15 29 ...

Page 34: ... 16 4 1 COPIER 16 71 16 4 1 1 COPIER List 16 71 16 4 1 2 COPIER List 16 90 16 4 1 3 COPIER List 16 101 16 4 2 FEEDER 16 115 16 4 2 1 FEEDER List 16 115 16 4 3 SORTER 16 117 16 4 3 1 SORTER List 16 117 16 5 FUNCTION Operation Inspection Mode 16 117 16 5 1 COPIER 16 117 16 5 1 1 COPIER List 16 117 16 5 1 2 COPIER List 16 131 16 5 1 3 COPIER List 16 145 16 5 2 FEEDER 16 156 16 5 2 1 FEEDER List 16 15...

Page 35: ...nt Mode 16 291 16 7 1 COPIER 16 291 16 7 1 1 COPIER List 16 291 16 7 1 2 COPIER List 16 293 16 8 COUNTER Counter Mode 16 295 16 8 1 COPIER 16 295 16 8 1 1 COPIER List 16 295 16 8 1 2 COPIER List 16 305 16 8 1 3 COPIER List 16 314 ...

Page 36: ...ng the Partitions 17 13 17 4 Downloading System Software 17 14 17 4 1 Batch Downloading 17 14 17 4 1 1 Outline 17 14 17 4 1 2 Downloading Procedure 17 14 17 4 2 Downloading the System Software Single 17 17 17 4 2 1 Downloading Procedure 17 17 17 5 Uploading and Downloading Backup Data 17 20 17 5 1 Outline 17 20 17 5 2 Uploading Procedure 17 20 17 5 3 Downloading Procedure 17 22 17 6 Version Upgrad...

Page 37: ...Contents Chapter18 Service Tools 18 1 Service Tools 18 1 18 1 1 Special Tools 18 1 18 1 2 Solvents and Oils 18 2 ...

Page 38: ...Contents ...

Page 39: ...Chapter 1 Introduction ...

Page 40: ......

Page 41: ...15 1 2 3 8 Mail Box Settings 1 16 1 2 3 9 Address Book Settings 1 17 1 2 3 10 User Administrator Mode 1 18 1 2 3 11 Common Settings 1 20 1 2 3 12 Timer Settings 1 22 1 2 3 13 Adjustment Cleaning 1 23 1 2 3 14 Report Settings 1 23 1 2 3 15 System Control Settings 1 23 1 2 3 16 Copy Settings 1 26 1 2 3 17 Communications Settings 1 26 1 2 3 18 Mail Box Settings 1 27 1 2 3 19 Address Book Settings 1 2...

Page 42: ......

Page 43: ... Reader H1 Overseas model only 6 Side Paper Deck AA1 7 Side Paper Deck AB1 8 Cassette Heater Unit 27 Overseas model only 9 Cassette Heater Kit F1 10 Reader Heater Kit C1 11 Platen Cover Type K 12 Power Supply Unit S1 This product is needed when attaching DADF R1 13 Stack Bypass Alignment Tray B1 1 1 2 System Configuration printing transmission accessories 0012 1781 imagePRESS C1 P imagePRESS C1 im...

Page 44: ...S C1 P imagePRESS C1 imagePRESS C1 Printer imagePRESS C1 1 Functions of Printing Transmission Accessories T 1 1 Function Accessory needed LIPS LX printing LIPS LX Printer Scanner Kit P1 iR512MB Expansion RAM C1 LIPS printing LIPS V Expansion Kit LIPS LX Printer Scanner Kit P1 iR512MB Expansion RAM C1 LIPS PS printing LIPS V PS Expansion Kit LIPS LX Printer Scanner Kit P1 iR512 MB Expansion RAM C1 ...

Page 45: ... A1 Adds PDF transmission functions w time stamp Web Browser Expansion Kit E1 Adds Web browser browsing functions to the touch panel Cases that need iR512MB expansion RAM C1 1 In the case that the PS print server unit is not connected In the case that any of the following options is added LIPS LX print function LIPS print function Background pattern print function PDF Tiff JPEG direct print functi...

Page 46: ...t lower cover 6 Upper right cover 7 Lower right cover 8 Lower right cover middle 9 Cassette 4 10 Cassette 3 11 Cassette 2 12 Cassette 1 13 Front cover 14 Toner replacement cover 15 Original delivery tray 16 Reader assembly 17 Decurler 18 Lower left cover 19 Test button 20 Leakage breaker 21 Cassette heater switch 22 environmental switch 23 Drum temperature switch 24 Lower rear cover 25 Upper rear ...

Page 47: ...wer right cover middle 9 Cassette 4 10 Cassette 3 11 Cassette 2 12 Cassette 1 13 Front cover 14 Toner replacement cover 15 Original delivery tray 16 Reader assembly 17 Decurler 18 Lower left cover 19 Test button 20 Leakage breaker 21 Cassette heater switch 22 environmental switch 23 Drum temperature switch 24 Lower rear cover 25 Upper rear cover ON ON 10 11 12 13 14 15 17 18 1 2 3 4 5 6 7 8 9 20 2...

Page 48: ... registration roller 21 Manual feeder pull off roller 22 Registration roller 23 Secondary transfer outside roller 24 Cassette 2 pickup roller 25 Cassette 2 feed roller 26 Cassette 2 separation roller 27 Cassette 2 28 Cassette 4 pickup roller 29 Cassette 4 feed roller 30 Cassette 4 separation roller 31 Cassette 4 32 Cassette 3 33 Cassette 3 separation roller 34 Cassette 3 feed roller 35 Cassette 3 ...

Page 49: ...ation roller 2 Separation roller 3 Pickup roller 4 Copyboard glass 5 CCD unit 6 Developing assembly 7 Developing rotary assembly 8 Laser scanner assembly 9 Primary charging assembly 10 Photosensitive drum 11 Drum cleaner assembly 12 Patch image sensor 13 ITB intermediate transfer belt 14 Primary transfer roller 15 Pre transfer charging assembly 16 ITB drive roller 17 Tension roller 18 Manual feed ...

Page 50: ...l off roller 22 Registration roller 23 Secondary transfer outside roller 24 Cassette 2 pickup roller 25 Cassette 2 feed roller 26 Cassette 2 separation roller 27 Cassette 2 28 Cassette 4 pickup roller 29 Cassette 4 feed roller 30 Cassette 4 separation roller 31 Cassette 4 32 Cassette 3 33 Cassette 3 separation roller 34 Cassette 3 feed roller 35 Cassette 3 pickup roller 36 Cassette 1 37 Cassette 1...

Page 51: ...e main power switch be sure that the Execute Memory lamp on the control panel is off Do not turn off the main power switch while downloading is under way Otherwise the machine may fail to operate The heaters remain powered as long as the cassette heater switch and the environmental switch is on even when the main power has been turned off F 1 9 1 Control panel power switch 2 Execute Memory lamp 3 ...

Page 52: ...twork registration of device information administration data in 1 parent machine 1 can transmit the same data to child machines 2 The child machines to which the device information was transmitted receives and updates the information F 1 11 T 1 2 1 Execute Memory lamp 9 Clear key 2 Error lamp 10 ID authentication key 3 Help key 11 Main power lamp 4 Check Counter key 12 Stop key 5 Initial Setup Sav...

Page 53: ...il Box Printer Receive Other Tray C Copy Mail Box Printer Receive Other If the Optional Finisher AA1 or Saddle Finisher AA2 Is Attached Tray A Copy Mail Box Printer Receive Other Tray B Copy Mail Box Printer Receive Other Tray C Copy Mail Box Printer Receive Other Tray Home Position Tray A Tray B Off Specify Tray C Finisher Top Tray Center Tray of the Main Unit Printing Priority Copy 1 2 3 Yes Pri...

Page 54: ...ment 00 00 to 23 59 in one minute increments No Auto Sleep Time 10 15 20 30 40 50 min 1 hour 90 min 2 3 4 hours Yes Auto Clear Time 0 Off to 9 minutes in one minute increments 2 min Yes Time Until Unit Quiet Down 0 Off to 9 minutes in one minute increments 1 min Yes Daily Timer Settings Sunday to Saturday 00 00 to 23 59 in one minute increments Yes Low power Mode Time 10 15 20 30 40 50 min 1 hour ...

Page 55: ...ven digit number maximum System Manager 32 characters maximum E mail Address 64 characters maximum Contact Information 32 characters maximum Comment 32 characters maximum Dept ID Management Dept ID Management On Off Yes Register Dept ID Password Register Edit Erase Limit Functions Yes Page Totals Clear Print List Clear All Totals No Allow Printer Jobs with Unknown IDs 2 On Off Yes Allow Remote Sca...

Page 56: ...triction Display Status Before Authentication On Off No Allow Secured Print from Print Status Screen On Off No Register LDAP Server 1 Register Edit Erase Register Edit LDAP Search Print List No MEAP Settings Use HTTP On Off Yes 4 Use SSL On Off Print System Information Print No Copy Set Numbering Option Settings Copy Set Num Op On Off Yes ID User Name On Off Date On Off Characters On Off Display R...

Page 57: ...nta Cyan Black 8 0 8 in 1 increments Density Fine Adjustment No Density Adjustment Mode A Mode B Mode No Refresh the Fixing Roller Press Start No Fixing Roller Auto Refresh Level Level 5 0 5 No Color Cast Correction Yellow Magenta Cyan Black 2 0 2 No Tail End Color Fading Graininess Correction On Off No White Gap Correction 1 to 3 to 4 No 2 Sided Print Image Uneven Gloss Correction On Off No Tail ...

Page 58: ...ignature Certificate Certificate Details Certificate Verification No Default Screen for Send Favorites Buttons One touch Buttons New Address No Enlarged Display On Off TX Terminal ID On Off Yes Printing Position Inside Outside Display Destination Name On Off Use Chunked Encoding with WebDav Sending 1 On Off Yes Gamma Value for YCbCr Send Jobs Gamma 1 0 Gamma 1 4 Gamma 1 8 Gamma 2 2 Yes Initialize ...

Page 59: ...O login service the system administrator setup mode may be used if the user type is an administrator If a dialog box appears asking you to type in the appropriate administrative group ID and system administration ID No do so Register Inbox Name 24 characters maximum Password Seven digits maximum URL Send Settings Initialize Item Settings Device Information Delivery Item Register Address Register N...

Page 60: ...ed by Service Switch 1 Refresh the Fixing Roller Start key Slightly glossy lines in parallel of the feed direction sometimes appear on the both ends of wider width paper after copying printing over hundreds sheets of narrower width paper ex using A3 after A4R Specifically in the high density area on heavy coated paper cloudlike glossy shading appears occasionally Refreshing the fixing roller and o...

Page 61: ...er deposit is Yes Although adjusting the color balance or performing fine adjustment for the density the amount of toner deposit is restricted B mode restriction on the amount of toner deposit is No When adjusting the color balance or performing fine adjustment for the density the amount of toner deposit may exceeds its limit F 1 12 F 1 13 F 1 14 ...

Page 62: ...efault display Form Standard paper Index paper Punched paper To register the style of the paper Default display Surface property High quality paper recycle paper coated paper one side coated paper both sides embossed paper vellum paper film label cotton paper To register the type of the paper Default display Creep displacement correction 0 00 to 2 00 mm To control the degree of displacement for ea...

Page 63: ...ity Photo Priority Yes Display the Black Mode Shortcut Key On Off No Inch Entry On Off Yes Drawer Eligibility For APS ADS Copy Printer Mail Box Receive Other Stack Bypass On Off All Other Paper Sources On Off No Copy Consider Paper Type On Off Register Paper Type Paper Source Selection No Paper Select Screen Priority Simple Detailed Yes Setting up Power state mode 10 25 50 None Yes Energy Consumpt...

Page 64: ...itch On Off No Display Shortcut Key On Off Reversed Display Color On Off No Offset Jobs 1 On Off Yes Job Separator between Jobs On Off Yes Job Separator between Copies On Off Yes Number of Copies Job Duration Status Display On Off No Cleaning Display for the Original Scanning Area 1 On Off No Register Sizes for Side Paper Deck 13 x19 12 5 8 x17 11 16 12 x18 11 x17 LGL LTR LTRR No Data Compression ...

Page 65: ... W Send Color Light Dark 1 to 9 levels 5 No Shading Correction Densitometer Correction Visual Correction Print Server Correction 1 No Character Background Contrast Adjustment Black Cyan Magenta No Relative Contrast Value 7 to 7 1 Standard Value Settings 0 to 64 24 Sample Print Sample Print Settings Latent String Density 0 to 36 8 Feeder Cleaning 1 Press Start No Wire Cleaning Press Start No Roller...

Page 66: ...ent On Off Yes Restrict New Addresses On Off Yes E mail I Fax Domain Sending Restriction Restrict Sending to Domains On Off Yes Register Edit Erase Allow PDF Send with Expired Certificates On Off Yes Always Add Device Signature to Send PDF On Off Yes Restrict Sending Files Other than PDF On Off Device Information Settings Device Name 32 characters maximum No Location 32 characters maximum No Forwa...

Page 67: ...Set Set Yes Encrypted Print Settings 1 Only Allow Encrypted Print Jobs On Off Yes Device Management Settings Auto Gradation Adjustment Full Adjust Quick Adjust Auto Gradation Adjust Method No Shading Correction Densitometer Correction Visual Correction Print Server Correction 1 No Dither Pattern Settings Gradation For Printer Resolution For Printer Reproduce Scan Image Newspaper Gradation High Gra...

Page 68: ...n On Off Yes Standard Settings Store Initialize No Initialize Copy Settings Initialize No Item Settings Device Information Delivery Item Common Settings TX Settings Unit Name 24 characters maximum No Erase Failed TX On Off Yes Data Compression Ratio High Ratio Normal Low Ratio Yes Handle Documents with Forwarding Errors Always Print Store Print Off Yes Retry Times 0 to 5 times 3 times Yes Edit Sta...

Page 69: ... Off Yes Select Drawer Switch A On Off Yes Switch B On Off Switch C On Off Switch D On Off Receive Reduction On Off Yes RX Reduction Auto Fixed Reduction Reduce 75 to 97 in 1 increments 90 Reduce Direction Vertical Horizontal Vertical Only Received Page Footer On Off Yes 2 On 1 Log On Off Yes Gamma Value for YCbCr Received Jobs Gamma 1 0 Gamma 1 4 Gamma 1 8 Gamma 2 2 Yes Item Settings Device Infor...

Page 70: ...e Switch 1 Refresh the Fixing Roller Start key Slightly glossy lines in parallel of the feed direction sometimes appear on the both ends of wider width paper after copying printing over hundreds sheets of narrower width paper ex using A3 after A4R Specifically in the high density area on heavy coated paper cloudlike glossy shading appears occasionally Refreshing the fixing roller and or wiping the...

Page 71: ...Sided copying toner may not be applied on the tail end of the paper and the area where toner is not applied may remain white Although this can be reduced by using the Tail End White Patch Correction mode the colors at the tail end of the paper may appear light when printing images of intense colors The setting is possibly set to OFF if Sample H of the faulty images appears This should be set to ON...

Page 72: ...Chapter 1 1 30 F 1 18 ...

Page 73: ...display Surface property High quality paper recycle paper coated paper one side coated paper both sides embossedpaper vellum paper film label cotton paper To register the type of the paper Default display Creep Displacement Correct 0 00 to 2 00 mm To control the degree of displacement for each type of paper when printed documents are bound up by the saddle stitch Default display Color White Blue C...

Page 74: ...ty and it is important to check and see that the breaker operates properly Advise the user to check the breaker on a periodical basis about once a month and keep a record of inspection Go through the following 1 Turn off the main power switch 2 Push the test button 1 of the breaker with the tip of a ball point pen or the like F 1 21 3 See that the breaker switch 1 shifts to the OFF side 1 2 1 ...

Page 75: ...k to the ON side F 1 23 Check to be sure that the breaker switch is on the ON side If it has stopped between the ON and OFF sides push it back to the OFF side and then to the ON side 5 Turn on the main power switch ON I side OFF side 1 ON I side OFF side 1 ...

Page 76: ...er operates properly Advise the user to check the breaker on a periodical basis about once a month and keep a record of inspection Go through the following 1 Turn off the main power switch 2 Push the test button 1 of the breaker with the tip of a ball point pen or the like F 1 24 3 See that the breaker switch 1 shifts to the OFF side F 1 25 4 Shift the breaker switch 1 back to the ON side F 1 26 1...

Page 77: ...apter 1 1 35 Check to be sure that the breaker switch is on the ON side If it has stopped between the ON and OFF sides push it back to the OFF side and then to the ON side 5 Turn on the main power switch ...

Page 78: ...d after August 1 1976 and prohibit the sale of laser products without certification The following labels certify compliance with the CDRH regulations and must be attached to all laser products that are sold in the US F 1 27 Reference The text of the label may differ among models 1 2 5 3 Handling of the Laser Assembly 0012 1790 imagePRESS C1 P imagePRESS C1 imagePRESS C1 Printer imagePRESS C1 Point...

Page 79: ...pe xenon lamp Lens type array fixed focus Photosensitive medium OPC drum 84 mm dia Image reading method light receiving element RGB line CCD Reproduction method indirect electrophotography Exposure method 2 beam laser Copy density adjustment function auto or manual Charging method corona Development method dry Development method color dry 2 component toner projection Development method mono dry 2 ...

Page 80: ...g m2 heavy paper up to 209 g m2 recycled paper 64 to 105 g m2 colored paper 80 g m2 index stock 80 g m2 transparency Multifeeder tray paper type plain paper 64 to 105 g m2 heavy paper up to 256 g m2 recycled paper 64 to 105 g m2 colored paper 80 g m2 Jpn postcard gvn 2 pane 4 pane transparency tracing paper label stock Paper deck paper type no standard deck Duplex paper type plain paper 64 to 105 ...

Page 81: ...0 zoom 1 0 250 to 4 000 between 25 and 400 in 1 increments Warm up time 11 min 40 sec or less Print area Maximum imaging guarantee area 307 X 466 5mm Maximum printing area 323 X 476 6 mm single sided 316 X 476 6 mm double sided Image margin leading edge 4 0 1 5 1 0mm Image margin trailing edge 2 0 1 5 1 5mm Image margin left right 2 5 1 5 1 5mm if double sided 2 5 2 0 2 0 mm Non image width leadin...

Page 82: ...ting environment atmospheric pressure 810 6 to 1013 3 hpa 0 8 to 1 0 atm Noise sound power level in standby 55 dB during copying 75 dB Power supply rating 100V 120V 230V Power consumption maximum 1800W or less Power consumption in standby 450 Wh reference only during continuous printing 1300 Wh reference only Ozone 0 01ppm Dimensions 855mm W X 898mm D X 1042mm H The control panel is not included W...

Page 83: ... 17 1 8 6 6 B4 LGL 7 35 30 7 23 23 3 5 16 15 A4R LTRR 7 43 30 7 29 29 3 5 17 15 B5R 7 43 30 7 29 23 3 5 17 15 A4 LTR B5R 14 2 60 60 7 35 35 7 30 30 A5R STMTR 14 2 30 30 7 17 17 7 15 15 Plain paper 80g m2 to 105g m2 A3 7 30 20 7 20 14 3 5 15 10 279mm x 432mm 11 x 17 7 30 20 7 20 14 3 5 15 10 305mm x 458mm 12 x 18 4 26 17 4 17 12 1 8 6 6 320mm x 450mm SRA3 4 26 17 4 17 12 1 8 6 6 330mm x 482mm 13 x ...

Page 84: ...0mm x 482mm 13 x 19 2 2 2 B4 LGL 2 5 2 5 2 5 A4R LTRR B5R 2 5 2 5 2 5 A4 LTR B5 3 3 3 A5R STMTR 3 3 3 Transparency A4 LTR 6 6 6 3 3 3 Postcard 4 pane postcard A4R non default 3 3 3 2 pane postcard AA5R non default 3 3 3 Jpo gvn postcard A6R non default 3 3 3 Tab stock A4 LTR 2 5 2 5 2 5 Paper type Paper size Cassette Manual feeder Auto duplexing cassette color singlecolor Bk single color L color s...

Page 85: ...Chapter 1 1 43 T 1 26 ...

Page 86: ...Plain paper 64 to 105 g m2 Eco paper Recycled paper Heavy paper 1 2 105 to 209 g m2 A3 B4 A4R 279mmX432mm 11 X17 LGL LTRR yes yes A4 B5 LTR yes yes B5R yes yes A5R STMTR yes yes 305mmX457mm 12 X18 330mmX482mm 13 X19 320mmX450mm SRA3 yes yes Exective yes yes 18K 16K 16KR yes yes ...

Page 87: ...L LTRR no yes 305mmX457mm 12 X18 330mmX482mm 13 X19 320mmX450mm SRA3 no yes Special paper transparency A4 LTR yes yes Jpn postcard gvn 2 pane 4 pane no yes label stock A4 A4R LTR LTRR B4 no yes tab stock A4 LTR yes no Paper type Paper size Source of paper cassette manual feeder ...

Page 88: ......

Page 89: ...Chapter 2 Installation ...

Page 90: ......

Page 91: ...tment 2 34 2 2 10 Preparation for Mounting the Developing Assembly 2 35 2 2 11 Mounting the Balancing Cylinder 2 38 2 2 12 Mounting the Balancing Cylinder 2 40 2 2 13 Mounting the Developing Assembly 2 41 2 2 14 Mounting the Developing Assembly 2 44 2 2 15 Mounting the Process Unit 2 47 2 2 16 Mounting the Process Unit 2 50 2 2 17 Mounting the Fixing Assembly 2 53 2 2 18 Fitting the Control Panel ...

Page 92: ...mmand 2 92 2 5 4 Using the PING Command 2 92 2 5 5 Making a Check Using the Remote Host Address 2 92 2 6 Troubleshooting the Network 2 92 2 6 1 Overview 2 92 2 6 2 Checking the Connection of the Network Cable 2 92 2 6 3 Making a Check Using a Loopback Address 2 92 2 6 4 Making a Check Using a Local Host Address 2 92 2 7 Relocating the Machine 2 92 2 7 1 Operation for Moving the Machine 2 92 2 8 In...

Page 93: ...Installation 2 115 2 14 2 Checking Components 2 115 2 14 3 Checking Components 2 116 2 14 4 Turning off the Machine 2 117 2 14 5 Installation Procedure 2 117 2 15 Installing the Printer Cover 2 127 2 15 1 Points to Note About Installation 2 127 2 15 2 Checking the Contents 2 127 2 15 3 Turning Off the Machine 2 128 2 15 4 Installation Procedure 2 128 2 16 Installing the Serial Interface Kit 2 132 ...

Page 94: ......

Page 95: ...lor Image Reader H1 Contents of the Color Image Reader H1 F 2 1 To install the equipment the Reader Attachment A1 is necessary When attaching the Platen Cover simultaneously attach the Platen cover upper right cover in the middle of the equipment installation procedure to improve operating efficiency 1 Reader 1pc 2 Reader front cover 1pc 1 2 3 4 5 6 8 9 7 10 11 12 16 15 14 13 17 ...

Page 96: ...5 4pc 11 Screw TP M4X6 4pc 12 Screw RS tighten M4X8 5pc 13 DDI S cable 1pc 14 Service label 1pc 15 No copy label 16 Lamp alert label For USA 3pc For USA 3pc For Europe 4pc For Europe 3pc For Asia 3pc For Asia 3pc 17 Sheet FCC Class A 1pc Included only for UL 1 Reader rear right cover 1pc 2 Fan unit 1pc 3 Lattice cable 1pc 4 Reader retaining plates left 2pc 5 S board plate 2pc 6 ZJ A Board 1pc 7 Sc...

Page 97: ...equent installation procedure is different between imagePRESS C1 Series and imagePRESS C7000 Series Refer to sections 1 2 through 1 2 4 for imagePRESS C1 Series Refer to sections 1 3 through 1 3 3 for imagePRESS C7000 Series ...

Page 98: ...n to the faucet water heater humidifier or refrigerator Assured range of operation image temperature 15 0 to 30 0 deg C humidity 5 to 80 3 The area near the source of fire place where dust gathers place where ammonia gas generates place exposed to the direct sunlight should be avoided If the place is exposed to the direct sunlight it is better to hang a curtain in the window 4 Although the ozone l...

Page 99: ...assembly is located on the side of the nail hole right of the slope plate The arrow shows the front side of the main body F 2 6 2 1 4 Checking the Contents 0020 5573 imagePRESS C1 Printer imagePRESS C1 The contents are stored in the box A A box B B box C C cassette D and the upper part of the host machine E F 2 7 100 mmor more 1 489 mm 2 492 mm 500 mmor more 500 mm or more FRONT 1 A B C D E ...

Page 100: ...ck screw binding M4X14 5pc 15 Screw P tightening M3X10 2pc 16 Screw P tightening M4X10 2pc FU5 8540 A3 330 483mm B4 A4 EXEC EXEC LEGAL LEGAL LTR FLSC FOLIO FOLIO OFICIO 8K 16K A5 B5 A4 A5 B5 13 19 12 18 11 8 14 17 12 1711 16 305 457mm 320 SRA3 450mm 5 8 1 2 8 11 1 2 LTR TR 8 11 1 2 STMT STMT 51 2 81 2 STMT STMT 51 2 81 2 10 13 14 15 16 17 18 19 20 21 22 11 12 1 2 3 4 5 6 7 8 9 Box A A 24 25 23 26 ...

Page 101: ...pc 38 Panel mount cover 1pc 39 Screw binding M4X8 10pc 40 Outer delivery roller cover 1pc 41 Screw P tightening M4X8 1pc 42 Buffer mounting plate front 1pc 43 Buffer mounting plate rear 1pc 44 Caster cover 1pc 45 Screw binding M4X8 2pc 46 Shut down label 1pc 47 Paper size label 4pc 48 Replenishment label 1pc 49 Document Tray 1pc 50 Washer 2pc 51 Stepped screw RS tight 2pc 52 2 Stepped screw M4 2pc...

Page 102: ...Chapter 2 2 8 2 1 5 Checking the Contents 0020 5576 imagePRESS C1 Printer imagePRESS C1 The contents are stored in the box A A box B B box C C and cassette D F 2 9 A B C D ...

Page 103: ...inding M4X10 15pc 14 Black screw binding M4X14 5pc 15 Screw P tightening M3X10 2pc 16 Screw P tightening M4X10 2pc FU5 8540 A3 330 483mm B4 A4 EXEC LEGAL LTR TR FLSC FLSC FOLIO OFICIO 8K 16K A5 B5 A4 A5 B5 13 19 12 18 11 8 14 17 12 1711 16 305 457mm 320 SRA3 450mm 5 8 1 2 8 11 1 2 LTR 8 11 1 2 STMT STMT 51 2 81 2 STMT STMT 51 2 81 2 10 13 14 15 16 17 18 19 20 21 22 11 12 1 2 3 4 5 6 7 8 9 Box A A ...

Page 104: ...ce cover A 2pc 32 Grip face cover B 2pc 33 Touch pen 1pc 34 Service book case 1pc 35 De curler 1pc 36 Delivery tray 1pc 37 Harness support plate 1pc 38 Panel mount cover 1pc 39 Screw binding M4X8 10pc 40 Outer delivery roller cover 1pc 41 Screw P tightening M4X8 1pc 42 Buffer mounting plate front 1pc 43 Buffer mounting plate rear 1pc 44 Caster cover 1pc 45 Screw binding M4X8 2pc 46 Power Cable 2pc...

Page 105: ...Chapter 2 2 11 2 1 6 Checking the Contents 0020 5577 imagePRESS C1 Printer imagePRESS C1 The contents are stored in the box A A box B B box C C and cassette D F 2 11 A B C D ...

Page 106: ...binding M4X10 15pc 14 Black screw binding M4X14 5pc 15 Screw P tightening M3X10 2pc 16 Screw P tightening M4X10 2pc FU5 8540 A3 330 483mm B4 A4 EXEC LEGAL LTR FLSC FLSC FOLIO OFICIO 8K 8K 16K A5 B5 A4 A5 B5 13 19 12 18 11 8 14 17 12 1711 16 305 457mm 320 SRA3 450mm 5 8 1 2 8 11 1 2 LTR 8 11 1 2 STMT STMT 51 2 81 2 STMT STMT 51 2 81 2 10 13 14 15 16 17 18 19 20 21 22 11 12 1 2 3 4 5 6 7 8 9 Box A A...

Page 107: ... 2pc 32 Grip face cover B 2pc 33 Touch pen 1pc 34 Service book case 1pc 35 De curler 1pc 36 Delivery tray 1pc 37 Harness support plate 1pc 38 Panel mount cover 1pc 39 Screw binding M4X8 10pc 40 Outer delivery roller cover 1pc 41 Screw P tightening M4X8 1pc 42 Buffer mounting plate front 1pc 43 Buffer mounting plate rear 1pc 44 Caster cover 1pc 45 Screw binding M4X8 2pc 46 Power Cable 2pc 47 Shut d...

Page 108: ...Chapter 2 2 14 2 1 7 Checking the Contents 0020 5575 imagePRESS C1 Printer imagePRESS C1 The contents are stored in the box A A box B B box C C and cassette D F 2 13 A B C D ...

Page 109: ...ding M4X10 15pc 14 Black screw binding M4X14 5pc 15 Screw P tightening M3X10 2pc 16 Screw P tightening M4X10 2pc FU5 8540 A3 330 483mm B4 A4 EXEC LEGAL LEGAL LTR FLSC FOLIO FOLIO OFICIO 8K 16K A5 B5 A4 A5 B5 13 19 12 18 11 8 14 17 12 1711 16 305 457mm 320 SRA3 450mm 5 8 1 2 8 11 1 2 LTR 8 11 1 2 STMT STMT 51 2 81 2 STMT STMT 51 2 81 2 13 14 15 16 17 18 19 20 21 22 10 11 12 1 2 3 4 5 6 7 8 9 Box A ...

Page 110: ...p face cover B 2pc 33 Touch pen 1pc 34 Service book case 1pc 35 De curler 1pc 36 Delivery tray 1pc 37 Harness support plate 1pc 38 Panel mount cover 1pc 39 Screw binding M4X8 10pc 40 Outer delivery roller cover 1pc 41 Screw P tightening M4X8 1pc 42 Buffer mounting plate front 1pc 43 Buffer mounting plate rear 1pc 44 Caster cover 1pc 45 Screw binding M4X8 2pc 46 Power Cable 2pc 47 Shut down label 2...

Page 111: ...w binding M4X8 6pc 7 Screw TP M4X8 1pc 8 Grip 2pc FU5 8540 A3 330 483mm B4 A4 EXEC LEGAL LEGAL LTR TR FLSC FOLIO FOLIO OFICIO 8K 16K A5 B5 A4 A5 B5 13 19 12 18 11 8 14 17 12 1711 16 305 457mm 320 SRA3 450mm 5 8 1 2 8 11 1 2 LTR TR 8 11 1 2 STMT STMT 51 2 81 2 STMT STMT 51 2 81 2 46 45 47 48 49 12 18 24 25 26 27 28 29 30 31 32 33 19 20 21 22 23 13 14 15 16 17 51 50 43 44 34 35 37 36 38 40 42 39 41 ...

Page 112: ...c 28 Screw TP M3X8 3pc 29 Flat screw 1pc 30 Screw W sems M4X12 1pc 31 Arm cover mount 1 1pc 32 Arm cover mount 2 1pc 33 Ferrite core 1pc 34 De curler 1pc 35 Delivery tray 1pc 36 Harness support plate 1pc 37 Panel mount cover 1pc 38 Screw binding M4X8 10pc 39 Outer delivery roller cover 1pc 40 Screw P tightening M4X8 1pc 41 buffer mounting plate front 1pc 42 buffer mounting plate rear 1pc 43 Shut d...

Page 113: ...cking the Contents 0015 0729 imagePRESS C1 P imagePRESS C1 1 Easy Operation Guide 2 Reference Guide 3 Support Guide 4 Manual CD 5 iW DM Personal 4V 10L 6 License agreement for software 7 imagePRESS C1 Limited Warranty 8 Drum Limited Warranty 9 Registration for Purchase in USA 10 MEAP Administration Software CD 11 N W ScanGear CD 12 Installation Check list ...

Page 114: ...A 2pc 10 Grip face cover B 2pc 11 Touch pen 1pc 12 Arm cover2 1pc FU5 8540 A3 330 483mm B4 A4 EXEC LEGAL LEGAL LTR FLSC FLSC FOLIO OFICIO 8K 16K A5 B5 A4 A5 B5 13 19 12 18 11 8 14 17 12 1711 16 305 457mm 320 SRA3 450mm 5 8 1 2 8 11 1 2 LTR 8 11 1 2 STMT STMT 51 2 81 2 STMT STMT 51 2 81 2 43 44 34 35 37 36 38 40 42 39 48 47 46 45 3 5 6 7 8 9 4 10 11 12 18 24 25 26 27 28 29 30 31 32 33 19 20 21 22 2...

Page 115: ...c 28 Screw TP M3X8 3pc 29 Flat screw 1pc 30 Screw W sems M4X12 1pc 31 Arm cover mount 1 1pc 32 Arm cover mount 2 1pc 33 Ferrite core 1pc 34 De curler 1pc 35 Delivery tray 1pc 36 Harness support plate 1pc 37 Panel mount cover 1pc 38 Screw binding M4X8 10pc 39 Outer delivery roller cover 1pc 40 Screw P tightening M4X8 1pc 41 buffer mounting plate front 1pc 42 buffer mounting plate rear 1pc 43 Shut d...

Page 116: ...c 7 Screw TP M4X8 1pc 8 Grip 2pc 9 Grip face cover A 2pc 10 Grip face cover B 2pc FU5 8540 A3 330 483mm B4 A4 EXEC LEGAL LEGAL LTR FLSC FLSC FOLIO OFICIO 8K 16K A5 B5 A4 A5 B5 13 19 12 18 11 8 14 17 12 1711 16 305 457mm 320 SRA3 450mm 5 8 1 2 8 11 1 2 LTR 8 11 1 2 STMT STMT 51 2 81 2 STMT STMT 51 2 81 2 43 44 34 35 37 36 38 40 42 39 48 47 46 45 3 5 6 7 8 9 4 10 11 12 18 24 25 26 27 28 29 30 31 32 ...

Page 117: ...X12 1pc 31 Arm cover mount 1 1pc 32 Arm cover mount 2 1pc 33 Ferrite core 1pc 34 De curler 1pc 35 Delivery tray 1pc 36 Harness support plate 1pc 37 Panel mount cover 1pc 38 Screw binding M4X8 10pc 39 Outer delivery roller cover 1pc 40 Screw P tightening M4X8 1pc 41 buffer mounting plate front 1pc 42 buffer mounting plate rear 1pc 43 Shut down label 1pc 44 Paper size label 4pc 45 Service book case ...

Page 118: ... Screw binding M4X8 6pc 7 Screw TP M4X8 1pc 8 Grip 2pc FU5 8540 A3 330 483mm B4 A4 EXEC LEGAL LEGAL LTR FLSC FLSC FOLIO OFICIO 8K 16K A5 B5 A4 A5 B5 13 19 12 18 11 8 14 17 12 1711 16 305 457mm 320 SRA3 450mm 5 8 1 2 8 11 1 2 LTR 8 11 1 2 STMT STMT 51 2 81 2 STMT STMT 51 2 81 2 43 44 34 35 37 36 38 40 42 39 48 47 46 45 41 12 18 24 25 26 27 28 29 30 31 32 33 19 20 21 22 13 14 15 16 17 3 5 6 7 8 9 4 ...

Page 119: ...4X12 1pc 31 Arm cover mount 1 1pc 32 Arm cover mount 2 1pc 33 Ferrite core 1pc 34 De curler 1pc 35 Delivery tray 1pc 36 Harness support plate 1pc 37 Panel mount cover 1pc 38 Screw binding M4X8 10pc 39 Outer delivery roller cover 1pc 40 Screw P tightening M4X8 1pc 41 buffer mounting plate front 1pc 42 buffer mounting plate rear 1pc 43 Shut down label 2pc 44 Paper size label 4pc 45 Service book case...

Page 120: ...c 6 Screw binding M4X8 6pc 7 Screw TP M4X8 1pc 8 Grip 2pc FU5 8540 A3 330 483mm B4 A4 EXEC LEGAL LEGAL LTR FLSC FLSC FOLIO OFICIO 8K 16K A5 B5 A4 A5 B5 13 19 12 18 11 8 14 17 12 1711 16 305 457mm 320 SRA3 450mm 5 8 1 2 8 11 1 2 LTR 8 11 1 2 STMT STMT 51 2 81 2 STMT STMT 51 2 81 2 43 44 34 35 37 36 38 40 42 39 48 47 46 45 3 5 6 7 8 9 4 10 11 12 18 24 25 26 27 28 29 30 31 32 33 19 20 21 22 23 13 14 ...

Page 121: ... tightening M4X10 2pc 28 Screw TP M3X8 3pc 29 Flat screw 1pc 30 Screw W sems M4X12 1pc 31 Arm cover mount 1 1pc 32 Arm cover mount 2 1pc 33 Ferrite core 1pc 34 De curler 1pc 35 Delivery tray 1pc 36 Harness support plate 1pc 37 Panel mount cover 1pc 38 Screw binding M4X8 10pc 39 Outer delivery roller cover 1pc 40 Screw P tightening M4X8 1pc 41 buffer mounting plate front 1pc 42 buffer mounting plat...

Page 122: ... 2 21 If the machine is moved from a cold to warm place condensation can occur If condensation occurs image faults can occur Before starting the work unpack the machine and leave it for 1 hour or more so that it becomes used to the room temperature Condensation If a piece of metal s moved from a low to warm place the moisture in the air around them becomes cooled rapidly turning into drops of wate...

Page 123: ...asters 1 with the slope plates and unload the machine by slid ing it on the slope plates with holding the grip 3 F 2 25 9 Turn the adjusters 1 in the direction shown by the arrow to lock them in place F 2 26 10 While pushing against the leaf spring 1 with a flat blade screwdriver remove the 2 grips 2 F 2 27 11 Remove the packing tape from the machine 12 Fit the 2 grip face covers A 1 over the grip...

Page 124: ...2 screws 2 F 2 31 18 Fit the 2 grips 1 removed in step 10 into the compartment 2 F 2 32 19 Attach the lower rear right cover 20 Attach the 2 grip face covers B 1 to the openings into which the grips have been put away F 2 33 2 2 3 Mounting Scanning System 0012 6269 imagePRESS C1 imagePRESS C1 1 Remove 3 scanning system fixing screws 1 When removing the spacer be sure to push the lever 2 in the dir...

Page 125: ...About Installation 0014 2687 imagePRESS C1 P imagePRESS C1 Printer 2 2 6 Mounting the Decurler 0012 7424 imagePRESS C1 P imagePRESS C1 imagePRESS C1 Printer image PRESS C1 1 Attach the buffer mounting plate front 1 3 screws binding M4X8 2 2 Attach the buffer mounting plate rear 3 2 screws binding M4X8 4 F 2 37 3 Fit the 4 shafts 1 of the decurler to the 4 hooks 2 at the left side of the main machi...

Page 126: ...ler 1 in place 2 screws binding M4X8 2 F 2 42 8 Close the decurler front cover 9 Connect the 5 connectors 1 to the main machine MEMO When attaching the decurler adhere the decurler to the the left side of the host machine and for approximate position refer to rear cover corner A and fit the corner decurler B upper approx 7 mm inside part approx 7 mm 3 2 1 2 2 2 1 1 1 B A 7mm 7mm 1 1 1 2 1 ...

Page 127: ... F 2 46 13 Attach the panel mounting cover 1 1 screw binding M4X8 2 F 2 47 2 2 7 Mounting the Delivery Tray 0012 9033 imagePRESS C1 P imagePRESS C1 imagePRESS C1 Printer image PRESS C1 1 Fit the 3 claws 2 of the delivery tray 1 into the holes 3 of decurler F 2 48 2 2 8 Attaching the Outer Delivery Roller Cover 0015 6342 imagePRESS C1 P imagePRESS C1 imagePRESS C1 Printer image PRESS C1 1 Open the ...

Page 128: ...very roller cover 2 Remove the delivery Tray 3 Open the decurler front cover 1 F 2 52 4 Remove the screw 1 slide the decurler upper cover 2 in the direction of the arrow to detach F 2 53 5 Remove the upper left cover 1 of the decurler two screws 2 F 2 54 6 Detach the decurler upper left cover 1 1 screw 2 F 2 55 7 Remove the adjusting shaft 1 1 resin ring 2 F 2 56 8 Open the decurler Insert the adj...

Page 129: ...ing the Developing Assembly 0012 6724 imagePRESS C1 P imagePRESS C1 imagePRESS C1 Printer image PRESS C1 1 Open the front door 2 Pull the shutter lever 1 found at the hopper fully toward you F 2 58 3 Open the toner replacement cover 1 F 2 59 4 Free the 2 harnesses from the wire saddle 1 Right Side F 2 60 5 Remove the 2 hopper fixing screws 1 from each side Right side F 2 61 Left side F 2 62 MEMO A...

Page 130: ... 7 connectors 2 F 2 66 11 Remove the 5 screws 1 F 2 67 12 Loosen the 2 process joint shafts 1 and the ITB joint shaft 2 Points to Note when Pulling up the Hopper Unit 1 Be sure to check with eyes that the lock arm 1 on the lower left of the hopper is hooked to the shaft 2 and the hopper unit is locked 2 Be sure not to swing the hopper unit In the case the hopper unit is not fully locked the hopper...

Page 131: ...f the ITB joint shaft 2 Unless the drum fixing member is held down the shaft is not loosened and rotates with the drum 2 Check to see that the fixing member of the connection shaft is removed certainly When the fixing member is removed the connection shaft moves back to front 3 Be sure to loosen the shaft fully since the processing unit cannot be removed unless this shaft is fully loosened Pay att...

Page 132: ... as instructed in the figure F 2 76 F 2 77 4 Open the 2 developing assembly fixing arms 1 2 screws 2 MEMO Paper is used for the purpose of preventing light transmittance In order to even the balance inside the rotary the developing assembly should be mounted by the following step balancing cylinder 1 balancing cylinder 2 M developing assembly 3 C developing assembly 4 BK developing assembly 5 Y de...

Page 133: ...of the developing rotary 3 F 2 79 6 Push the 2 developing assembly fixed arms 1 in the direction of A set them in the direction of B to fix 2 screws 2 F 2 80 F 2 81 7 Repeat the step 3 to 6 to set the 2 balancing cylinders to the developing rotary In the case of attaching the balancing cylinder make sure not to bump into the ATR sensor shutter 1 2 1 2 1 1 1 2 3 1 A A B B 1 2 2 ...

Page 134: ...F 2 85 5 Attach the balancing cylinder 1 to the developing rotary Make sure that the pin 2 at the Balancing Cylinder is found in the hole located at the backside of the developing rotary 3 Balancing cylinder 1 is a parts to maintain the balance in the inner Rotary Make sure to install it before installing the developing assembly The position for Balancing cylinder 1 installation is in the area wit...

Page 135: ...he figure 1 2 3 1 A A B B 1 2 2 MEMO When touching the developing assembly check to make sure that your hands are free of foreign matter especially metal pieces then start the work If there is foreign matter on your hand it may cause image fault The developing positioning sheet for each color is attached to A of the respective developing rotary Attach the developing assembly according to each posi...

Page 136: ...ng the developing cylinder gear 1 5 to 6 times in the di rection of the arrow to check if there is any scar on its surface and also make the starter in the unit even out F 2 94 7 Remove the 2 tapes 1 to remove the sponges 2 In the case of turning the developing rotary make sure that the developing assembly must be fixed with the screw 1 2 A B 2 1 2 1 Keep in mind not to touch the developing cylind...

Page 137: ...loping rotary F 2 97 10 Push the 2 developing assembly fixed arms 1 in the direction of A set them in the direction of B and fix 2 screws 2 Keep in mind not to touch the developing cylinder 2 In the case of attaching the developing assembly make sure not to bump into the ATR sensor shutter 1 1 2 2 1 2 1 After attaching the developing assembly check to see if the hole 2 of the ATR sensor shutter 1 ...

Page 138: ...then start the work If there is foreign matter on your hand it may cause image fault When you hold developing assembly make sure that you don t touch developing cylinder To set developing assembly to developing rotary refer to the following steps Bk developing assembly 1 Y developing assembly 2 M developing assembly 3 C developing assembly 4 L Clear developing assembly 5 1 A A B B 1 2 2 The develo...

Page 139: ...04 6 Manually turning the developing cylinder gear 1 5 to 6 times in the di rection of the arrow to check if there is any scar on its surface and also make the starter in the unit even out F 2 105 7 Remove the 2 tapes 1 to remove the sponges 2 In the case of turning the developing rotary make sure that the developing assembly must be fixed with the screw 1 2 A B 2 1 2 1 Keep in mind not to touch t...

Page 140: ...eloping rotary F 2 108 10 Push the 2 developing assembly fixed arms 1 in the direction of A set them in the direction of B and fix 2 screws 2 Keep in mind not to touch the developing cylinder 2 In the case of attaching the developing assembly make sure not to bump into the ATR sensor shutter 1 1 2 2 1 2 1 After attaching the developing assembly check to see if the hole 2 of the ATR sensor shutter ...

Page 141: ...RESS C1 1 With lifting the cable 1 attach the developing assembly cover 2 1 screw 3 F 2 111 2 Remove the A3 paper 1 F 2 112 3 Put back the process unit 1 F 2 113 4 Put back the fixing feeding unit 1 F 2 114 5 Tighten the 5 screws 1 1 A A B B 1 2 2 3 1 2 Keep in mind not to mix up the harness 1 1 1 ...

Page 142: ...e cable guide 2 and the clamp 3 F 2 119 10 Remove the A3 paper 1 F 2 120 11 Shift down the lock lever 1 in the direction of the arrow to release F 2 121 12 Hold it tight with both hands and move the hopper assembly 1 down slowly in the direction of the arrow Hold the drum fixing member 3 steady when tightening the shaft of the ITB joint shaft 2 If the drum fixing member is not held steady the shaf...

Page 143: ...replacement cover 1 F 2 123 14 Tighten the 2 hopper fixing screws 1 The right side F 2 124 The left side F 2 125 15 Fix the 2 harnesses with the clamp 1 Right side F 2 126 16 Attach the hopper cover right 1 1 screw binding M4X8 2 1 1 1 1 1 1 1 ...

Page 144: ...the lock 1 of the hopper s shutter lever in the direction of the arrow push the shutter lever F 2 130 22 Attach the cover 1 of process unit 4 screws binding M4X8 2 F 2 131 2 2 16 Mounting the Process Unit 0020 5004 imagePRESS C1 Printer imagePRESS C1 1 With lifting the cable 1 attach the developing assembly cover 2 1 screw 3 F 2 132 2 Remove the A3 paper 1 F 2 133 3 Put back the process unit 1 2 1...

Page 145: ... 2 F 2 138 8 Connect the connector 1 and other 7 connectors 2 F 2 139 9 Connect the 6 connectors 1 and fix it in place with the cable guide 2 and the wire saddle 3 F 2 140 Keep in mind not to mix up the harness 1 1 1 Hold the drum fixing member 3 steady when tightening the shaft of the ITB joint shaft 2 If the drum fixing member is not held steady the shaft 2 will rotate without tightening 1 2 1 3...

Page 146: ...42 12 Hold it tight with both hands and move the hopper assembly 1 down slowly in the direction of the arrow F 2 143 13 Open the toner replacement cover 1 F 2 144 14 Tighten the 2 hopper fixing screws 1 from each side Right side F 2 145 Left side F 2 146 15 Fix the 2 harnesses with the wire saddle 1 Right side 1 1 1 1 1 1 1 1 ...

Page 147: ...h releasing the lock 1 of the hopper s shutter lever in the direction of the arrow push the shutter lever F 2 151 22 Attach the cover 1 of process unit 4 screws binding M4X8 2 F 2 152 2 2 17 Mounting the Fixing Assembly 0012 7022 imagePRESS C1 P imagePRESS C1 imagePRESS C1 Printer image PRESS C1 1 Pull out the fixing feeding unit 1 F 2 153 2 Remove the 2 shipping tags 1 on the fixing belt 3 Releas...

Page 148: ...Check the slack of the fixing web 1 if there is slack around the fixing web execute the following steps 7 to 13 F 2 157 7 Press the two claws 2 and pull out the fixing feed unit to the full length F 2 158 8 Remove the fixing assembly cover 1 3 screws 2 F 2 159 9 Remove the web unit 1 2 screws 2 Make sure that the fixing web 1 is in contact with the web roller 2 1 1 2 3 2 1 1 1 A A B B 1 1 1 2 1 1 ...

Page 149: ...cover 2 3 screws F 2 163 F 2 164 14 Close the inside cover 15 Close the reversing delivery cover 16 Put back the fixing feeding assembly 17 Put back the fixing feeding release lever 18 Close the front door 2 2 18 Fitting the Control Panel in Place 0012 7275 imagePRESS C1 P imagePRESS C1 imagePRESS C1 Printer image PRESS C1 1 Detach the right reader cover 1 3 screws 2 F 2 165 2 Detach the upper rig...

Page 150: ...the edge saddle 2 F 2 169 6 Fix the arm cover mount 2 1 1 screw Binding M4X10 2 F 2 170 7 Fix the arm cover mount 1 1 1 screw Binding M4X10 2 F 2 171 8 Run the control panel interface cable 2 through the arm cover 2 1 and attach it to the control panel arm unit F 2 172 9 Fix the arm cover 2 1 2 screws Binding M4X10 2 2 cover rubber pieces Large 3 Be sure to tighten the screws in the order indicate...

Page 151: ...t 2 F 2 177 14 Turn the arm unit in the direction of the arrow to the position where the screw hole 1 of the arm unit is aligned with the hole of the control panel arm unit F 2 178 15 Fix the arm unit 1 using the screws binding M4X14 in the order of the 1 2 and the 4 3 F 2 179 16 Fix the control panel interface cable 1 using the 3 wire saddles 2 1 2 2 3 3 1 2 3 2 3 2 3 1 3 3 3 2 2 2 1 2 Be sure to...

Page 152: ...ehind the arm unit 2 screws P tightening M4X10 1 F 2 182 20 Fit the shaft 1 of the control panel into the arm unit 2 F 2 183 21 Tighten the flat screw 1 from behind the upper arm Be careful not to catch the cable Check to be sure that there is no displacement between the arm cover 1 and the arm cover 2 2 1 3 1 4 3 2 1 Be sure to fit the tip of the control panel shaft 1 into the round hole of the u...

Page 153: ... the arm cover 4 1 from behind the arm unit 1 screw Binding M4X10 2 F 2 188 26 Attach the lock hinge cover R 1 2 bosses 2 2 screws P tightening M3X10 3 1 1 1 1 2 3 4 1 Make the ferrite core 1 in the position of the chart 2 Be sure to adjust the cable length so that the cable 1 is located inside the plate 2 MEMO If the control panel tilts either to the left or right perform the following adjustment...

Page 154: ...2 19 Setting of Environmental Switch 0013 9816 imagePRESS C1 P imagePRESS C1 imagePRESS C1 Printer image PRESS C1 1 Check that the Environmental switch 1 is ON F 2 194 2 2 20 Turning the Main Power ON 0015 8524 imagePRESS C1 P imagePRESS C1 1 Connect the power cable with the inlet on the main body MEMO The lock hinge cover is easily attached if placing the arm unit 1 at the right angle to the cont...

Page 155: ...ew 3 F 2 197 3 There must be a grounding terminal for the machine Targets of Grounding Grounding terminal of power outlet Grounding terminal of which grounding work D Type is properly done 4 Connect the 2 power plugs 1 for the backside and 1 for the left side of the machine of the machine to different power outlets and turn on the main power 1 F 2 198 Use the correct power code to mach the locatio...

Page 156: ... There must be a grounding terminal for the machine Targets of Grounding Grounding terminal of power outlet Grounding terminal of which grounding work D Type is properly done 4 Connect the 2 power plugs 1 for the backside and 1 for the left side of the machine of the machine to different power outlets and turn on the main power 1 F 2 202 Before turning the main power on be sure to remove the packi...

Page 157: ...s set to 1 In case of 5 color model make sure that this setting is set to 0 2 2 24 Turning the Main Power ON 0020 7010 imagePRESS C1 Printer imagePRESS C1 1 Connect the power cable with the inlet on the main body 2 Connect the 2 power plugs 1 for the backside and 1 for the left side of the machine of the machine to different power outlets and turn on the main power 1 Before turning the main power ...

Page 158: ...onnect the 2 power plugs 1 for the backside and 1 for the left side of the machine of the machine to different power outlets and turn on the main power 1 Be sure to remove the packing material in the cassette before turning ON the main power switch Korean is not included among the languages for the control panel with this model at the time of shipment Thus be sure to follow the instructions below ...

Page 159: ... the high humidity environment set the drum temperature switch 1 to the lower side H High humidity condition is a condition of which the value of absolute humidity in a machine is 10 g or more Service mode COPIER DISPLAY ANALOG ABS HUM In a high humidity environment set the drum temperature switch 1 to the lower side H High humidity environment is a condition in which the value of the absolute hum...

Page 160: ...ntainer 1 fully inside F 2 213 5 Turn the tab 1 on the toner container to lock in place F 2 214 6 Repeat the foregoing steps for all colors 7 Close the toner replacement cover 2 2 31 Setting the Toner Container 0020 6481 imagePRESS C1 Printer imagePRESS C1 1 Take out the toner container from its package that comes with the ma chine 2 Open the toner replacement cover 1 When executing the step 3 and...

Page 161: ... as if to rotate it F 2 218 6 Hold the grip and insert the toner container 1 fully inside F 2 219 7 Turn the tab 1 on the toner container to lock in place F 2 220 8 Repeat the foregoing steps for all colors 9 Close the toner replacement cover 1 1 2 1 1 2 B A A When executing the step 5 and 6 be careful not to touch the shutter 1 found at the bottom of the toner container Be sure to turn the tab un...

Page 162: ...rn the tab 1 on the toner container to lock in place F 2 225 7 Repeat the foregoing steps for all colors 8 Close the toner replacement cover 2 2 33 Supplying Toner 0012 7685 imagePRESS C1 P imagePRESS C1 1 Select Supply Toner FUNCTION INSTALL SPLY H 4 from the service mode press OK key approx 2 min When executing the step 5 and 6 be careful not to touch the shutter 1 found at the bottom of the ton...

Page 163: ...er size to 8K 16K in the following service mode 5 In the case that the paper size is set to 8K Set to 40 in COPIER OPTION CST CST U2 6 In the case that the paper size is set to 16K Set to 39 in COPIER OPTION CST CST U1 7 Turn off on the main power supply according to the shutdown sequence 2 2 37 Automatic Gradation Correction Setting 0012 7686 imagePRESS C1 imagePRESS C1 1 Clean the copyboard glas...

Page 164: ...d from each cassette is within the range of the standard value There are 2 standard values as follows Standard value of left margin of image 2 5 1 5 mm Standard value of margin along leading edge of image 3 0 1 5 1 0 mm 2 2 41 Adjusting Left Margin of Image 0012 9075 imagePRESS C1 P imagePRESS C1 imagePRESS C1 Printer image PRESS C1 Adjusting methods of left margin of image in accordance with each...

Page 165: ...djust by changing the setting Each 1 setting value change results in the movement of 0 1 mm The image shifts toward the leading edge by setting the value larger 3 To activate the setting value follow the shutdown sequence and turn OFF ON the main power switch 4 Make sure that the margin along leading edge of image of which paper was fed from each cassette deck is L2 3 0 1 5 1 0 mm F 2 234 1 Feedin...

Page 166: ... 2 240 7 Free the 2 harnesses from the clamp 1 Right Side F 2 241 8 Remove the 2 hopper fixing screws 1 The right side F 2 242 The left side F 2 243 9 Close the toner replacement cover 10 Lift the hopper 1 in the direction of the arrow until it stops 2 1 1 2 1 1 1 1 1 ...

Page 167: ...clean it with alcohol solution F 2 246 16 By reversing the steps used to remove it mount the primary charging as sembly and pre transfer charging assembly 17 Shift down the lock lever 1 in the direction of the arrow to release F 2 247 18 Grip it tightly by both hands and shift down the hopper 1 gently in the direction of the arrow Points to Note when Pulling up the Hopper Unit 1 Be sure to check w...

Page 168: ... Open the toner replacement cover 1 F 2 249 20 Tighten the 2 hopper fixing screws 1 Right Side F 2 250 Left Side F 2 251 21 Fix the 2 harnesses with the clamp 1 F 2 252 22 Attach the hopper cover Right 1 1 screw 2 1 1 1 1 1 1 1 ...

Page 169: ...er 2 F 2 256 28 Attach the cover 1 of the process unit 4 screws 2 F 2 257 29 Close the front door 2 2 44 Cleaning the Charging Assembly 0020 5006 imagePRESS C1 Printer imagePRESS C1 Perform the following procedure when image fault vertical or horizontal lines occurs 1 Open the front door F 2 258 2 Remove the cover 1 of the process unit 4 screws 2 F 2 259 3 Pull the shutter lever 1 found at the hop...

Page 170: ... Left 1 1 screw 2 F 2 263 7 Free the 2 harnesses from the wire saddle 1 Right Side F 2 264 8 Remove the 2 hopper fixing screws 1 from each side Right side F 2 265 Left side F 2 266 9 Close the toner replacement cover 10 Lift the hopper 1 in the direction of the arrow until it stops 1 2 1 1 2 1 1 1 1 1 ...

Page 171: ...clean it with alcohol solution F 2 269 16 By reversing the steps used to remove it mount the primary charging as sembly and pre transfer charging assembly 17 Shift down the lock lever 1 in the direction of the arrow to release F 2 270 18 Grip it tightly by both hands and shift down the hopper 1 gently in the direction of the arrow Points to Note when Pulling up the Hopper Unit 1 Be sure to check w...

Page 172: ...replacement cover 1 F 2 272 20 Tighten the 2 hopper fixing screws 1 from each side Right Side F 2 273 Left Side F 2 274 21 Fix the 2 harnesses with the wire saddle 1 Right Side F 2 275 22 Attach the hopper cover Right 1 1 screw 2 1 1 1 1 1 1 1 ...

Page 173: ...he front door 2 2 45 Other Works 0014 3000 imagePRESS C1 P imagePRESS C1 imagePRESS C1 Printer image PRESS C1 1 Service Book Case 1 Attach the service book case to the lower right cover of the host machine 2 Touch Pen 1 Place the touch pen 1 on the position shown in the figure F 2 281 3 Shutdown Label 1 Attach the shutdown label 1 in appropriate language to the upper rear right cover 2 1 1 1 2 1 2...

Page 174: ...3 2 Turning Off the Machine imagePRESS C1 series 0016 9165 imagePRESS C1 Color Image Reader H1 imagePRESS C1 2 3 3 Installation Procedure imagePRESS C1 series 0016 9166 imagePRESS C1 Color Image Reader H1 imagePRESS C1 1 Remove the upper left cover 1 2 stepped screws 2 F 2 285 2 Remove the reader fixing plate at the front 1 and the rear 2 2 screws 3 Be sure to turn the caster cover to the position...

Page 175: ...the reader front cover 1 2 magnet catches 2 2 flat head screws 3 F 2 290 7 Place the reader unit 1 on the host machine F 2 291 8 Match the screw hole 1 of the reader unit and the screw hole 2 of the reader fixing plate F 2 292 9 Fit the bush 3 to the reader fixing plate front left 1 removed and rear left 2 which were remove in the step 2 1 2 3 1 2 3 1 2 1 2 In the case of maunting the readr 1 make...

Page 176: ...F 2 296 12 Attach the upper left cover removed in step 1 13 Attach the reader upper right cover 1 2 screws RS tightening M4X8 2 F 2 297 14 Attach the reader right cover 1 3 screws RS tightening M4X8 2 3 cover rubber pieces 3 Use the cover rubber that comes with the host machine F 2 298 15 Remove the mirror fixing screw 3 screws 1 F 2 299 16 Connect the reder power cable 1 1 2 3 1 2 3 1 1 2 1 1 3 3...

Page 177: ... 0016 9167 imagePRESS C1 Color Image Reader H1 imagePRESS C1 Check the following setting after the installation of this equipment is com pleted 1 Enter the service mode 2 Select COPIER OPTION BODY W SCNR 3 Make sure that 1 is set Default 0 4 Terminate the service mode 2 4 Unpacking and Installation imagePRESS C7000 Series 2 4 1 Points to Note When Turning ON OFF the power of Host Machine imagePRES...

Page 178: ...emove The sub station upper left cover detached is not used F 2 309 6 Detach the sub station left upper cover 1 9 screws 2 F 2 310 7 Detach the upper rear face cover 1 1 and upper rear face cover 2 2 Up per rear face cover 1 is not used when optional ADF is installed Upper rear face cover 2 is not used after it is detached Points to Note When Turning Off the Main Power of the Host Machine Be sure ...

Page 179: ...The fan duct detached is not used 2 screws 2 F 2 313 10 Disconnect the short connector 1 F 2 314 11 Connect the lattice cable 1 2 screws binding M3X6 2 F 2 315 12 Free the harness 2 from the wire saddle 1 at the connector side only F 2 316 13 Secure the 2 harnesses 1 with the edge saddle 2 F 2 317 14 Connect the 2 connectors 1 3 1 2 3 4 2 4 4 4 3 4 1 1 2 1 1 2 1 2 2 1 ...

Page 180: ...oard of the substation then move it to the direction of the arrow and align it to the reader fixing plate left 2 F 2 323 20 Remove the protective sheet and all the tapes which are affixed on the equipment 21 Attach the reader 2 Stepped screws RS tighten 6 4X2 5 1 F 2 324 22 Put the 1 Rubber bush 3 into the each holes found at the reader retaining plate F front right 1 and the reader retaining plat...

Page 181: ...en M4X8 2 Before attaching the reader fixing plate R rear right be sure to attach the parts of the DADF R1 described below Reader installation procedure step5 to 20 MEMO 1 In the case of installing the DADF R1 be sure to attach the following parts of the DADF R1 before attaching the reader fixing plate R rear right in order to improve operational efficiency Fan unit Fan holder Fan duct Electrostat...

Page 182: ...ation upper rear cover 33 Fix the upper rear face cover 3 With ADF 2 screws 1 F 2 334 With Platen Cover 1 screw 1 F 2 335 34 Only with the copy board cover attach the upper rear face cover 1 1 1 screw 2 In the case of installing the DADF R1 simultaneously be sure to attach the cover duct packaged with the DADF R1 to the reader right cover in advance When tighten the 2 upper screws tighten the scre...

Page 183: ...ower unit station rear cover 1 1 8 screws 2 F 2 338 41 Detach the main controller cover 2 1 10 screws 2 F 2 339 42 Detach the controller PCB guide 1 4 screws 2 F 2 340 43 Detach the S B board 1 2 screws 2 Make sure to store the 3 mirror fixing screws 1 surely because they are required when carrying MEMO When attaching the Platen cover attach the Platen cover upper right cover to improve the operat...

Page 184: ...2 screws 2 Attach the screw removed in the step 42 F 2 345 48 Attach the controller PCB guide 1 4 screws 2 F 2 346 49 Attach the main controller cover 2 50 Attach the power unit station rear cover 1 51 Connect one side of the reader communication cable 1 into the reader I F connector found at the right side of the power unit station 1 2 1 3 2 1 2 1 2 Make sure that the S B board is inserted toward...

Page 185: ...sequence to turn off the power 2 Turn on the main power switch of the machine After turning on the power of the machine check the following setting for usage of the ZJ A board 3 Enter service mode Check to find COPIER FUNCTION INSTALL GS CHECK 3 Operation Check 1 Set a paper on the copyboard glass 2 After making the following selections COPIER FUNCTION IN STALL GS CHECK press the OK key Connection...

Page 186: ...G command 2 Check with the system administrator to find out the remote host address 3 Add the appropriate remote host address to the PING command If the message is Response from host the connection to the network is normal If the message is No response from host the machine is not correctly connected to the network Start the following troubleshooting work 2 6 Troubleshooting the Network 2 6 1 Over...

Page 187: ...er deck and finisher has been installed carry in out the host machine after removing them 12 For re installation after moving be sure to secure the machine in place with the 2 adjusters and fix the caster cover with the 2 screws before per forming the operation 2 8 Installing the Card Reader 2 8 1 Points to Note About Installation 0013 4823 imagePRESS C1 P imagePRESS C1 imagePRESS C1 Printer image...

Page 188: ...e card reader mounting base 4 1 toothed washer 5 1 screw TP M4x8 6 F 2 361 7 Disconnect the relay connector 1 F 2 362 8 Connect the connector 1 of the card reader and the connector 2 of the host machine F 2 363 9 Fit the cut off 1 of the card reader on the stepped screws 2 that have been fitted in place in step 5 10 Fit the card reader 3 in the direction of the arrow and fix it in place 1 screw TP...

Page 189: ...gePRESS C1 Printer imagePRESS C1 1 Check to see that ID00000001 to ID00001000 have been created in Ad ditional Functions System Settings Dept ID Mangement Registor Dept ID Password Page Totals In the case of entering 1 as the first number in Service Mode COPIER FUNCTION IN STALL CARD 2 Exit from Additional Functions screen 3 Select Additional Functions System Settings Network Settings TCP IP Setti...

Page 190: ...stalling the Platen Cover 2 10 1 Checking the Contents 0013 6441 imagePRESS C1 P imagePRESS C1 imagePRESS C1 Printer image PRESS C1 Platen Cover Type K 1 Document Tray 1 pc 2 Washer 2 pc 3 Stepped screw 2 pc 4 Stepped screw M4 2 pc 5 Stepped screw M4X10 8 2 pc Not used in this host machine 1 Document Tray 1 pc 2 Washer 2 pc 3 Stepped screw 2 pc 4 Stepped screw M4 2 pc Not used in this host machine...

Page 191: ...ne 0013 4804 imagePRESS C1 P imagePRESS C1 imagePRESS C1 Printer image PRESS C1 See the host machine installation Points to note at the main power OFF 2 11 3 Installation Procedure 0013 4808 imagePRESS C1 P imagePRESS C1 imagePRESS C1 Printer image PRESS C1 1 Detach the upper rear right cover 1 Reader Communication Cable 2 2 screws 3 F 2 375 2 Cut off the upper rear right cover A detached in step ...

Page 192: ...appears on the control panel 5 Insert the control key and check to see that copying operation becomes en abled 2 12 Installing the Reader Heater 2 12 1 Checking the Parts 0014 7008 imagePRESS C1 P imagePRESS C1 imagePRESS C1 Printer image PRESS C1 Prepare the following parts because each part of the heater PCB is assigned as service part F 2 381 T 2 10 2 12 2 Turning Off the Host Machine 0013 3655...

Page 193: ...r 1 1 screw RS tightening M4X8 2 F 2 385 7 Move the mirror 1 base 1 in the left direction until it stops F 2 386 8 Insert the cable clamp 1 into the hole 2 of the frame F 2 387 9 Attach the lens heater 1 1 connector 2 1 cable clamp 3 1 screw RS tightening M4X8 4 When removing the copyboard glass take care not to touch the glass surface When dirt is attached clean the glass with lint free paper Whe...

Page 194: ...main power switch 2 13 Installing the Deck Heater 2 13 1 Checking the Contents Heater PCB F1 0013 7786 imagePRESS C1 P imagePRESS C1 imagePRESS C1 Printer imagePRESS C1 Every components of the cassette heater unit heater PCB F1 are supplied as service parts so have the following parts on hand Tighten the screw 3 while pushing the lens heater 1 in the direction of the embossed section 2 Be careful ...

Page 195: ...tection bushing 1pc 7 Power supply label 2pcs 8 Binding screw M4X4 4pcs 9 Wire saddle Not used for this product 3pcs 10 Cord mount 1pc 11 Screw with flat spring 1pc No Part name Part number QTY No Part name Part number QTY 1 Heater unit FG6 9651 000 1pc 7 Power supply label FS6 8725 000 1pc 2 AC input connector FG6 1117 000 1pc 8 Binding screw M4X4 XB1 2400 409 4pcs 3 Relay harness unit FG6 2957 0...

Page 196: ...ove three screws 1 and then detach the right cover 2 of the paper deck to the direction of the arrow shown F 2 394 4 Remove four screws 1 and two other screws 2 and then detech the rear cover 3 of the paper deck When installing the heater to the paper deck take the following precautions a The AC power plug of the host machine must have been removed from the outlet b Install the heater after instal...

Page 197: ... 1 and a connector 2 and then detach the front upper cover 3 F 2 396 6 Remove two screws 1 and then detach the top cover 2 F 2 397 7 Atach the supplied cable protection bushing 1 into the hole 2 on the top panel of the paper deck 1 1 2 3 1 2 3 1 2 ...

Page 198: ...from the hole 4 on the top plate 9 Insert two hooks 5 of the heater unit 1 into the holes 6 on the top plate of the paper deck and then secure the heater unit to the main body of the paper deck using a screw with toothed washer 7 F 2 399 10 Attach the heater connector 2 to the panel mount 1 F 2 400 2 1 2 4 3 1 7 5 5 6 6 1 2 ...

Page 199: ... two steps A B F 2 402 3 Using two binding screws M4X4 1 install the relay hareness unit 2 to the rear side panel 3 of the paper deck 4 Insert the bind locks of the cable ties in the holes at A shown below in the rear side panel to secure the relay harness 5 Connect the connector at both ends of the relay harness unit to the heater connector 4 and AC power connector 5 respectively 2 1 1 A B ...

Page 200: ... the AC cord to the power cord mount of the heater 7 Remove eight screws 1 and then detach the rear lower cover 2 of the host machine F 2 404 8 Remove two screws 1 at the lower right of the back of the host machine to remove the blind plate 2 4 5 1 1 2 A 3 1 2 1 ...

Page 201: ...2 Connect the connector of the AC cord to the connector 4 on the host machine F 2 407 13 Install the rear cover of the host machine using eight screws 14 Reatach the exterior covers of the paper deck in the following sequence 1 Top cover take care not to have the cables caught M4X8 2pcs 2 Front upper cover insert the connector M4X8 3pcs 3 Rear cover M3X8 2pcs M4X8 4pcs 4 Right cover M4X8 3pcs 15 M...

Page 202: ...ater power connectors explain to the user that any obstacle that can prevent the paper deck from opening should not be placed in the hatched area 1 Host machine 2 Paper deck A Front When installing the heater to the paper deck take the following precautions a The AC power plug of the host machine must have been removed from the outlet b Install the heater after installing the host machine and pape...

Page 203: ...he paper deck housing with your finger to open the housing 3 A Rear B Front F 2 410 3 Remove three screws 1 and then detach the right cover 2 of the paper deck to the direction of the arrow shown F 2 411 4 Remove four screws 1 and two other screws 2 and then detach the rear cover 3 of the paper deck 1 A 3 2 1 B 1 2 ...

Page 204: ...s 1 and a connector 2 and then detach the front upper cover 3 F 2 413 6 Remove two screws 1 and then detach the top cover F 2 414 7 Attach the supplied cable protection bushing 1 to the hole 2 on the top panel of the paper deck 1 1 2 3 1 2 3 1 2 ...

Page 205: ...from the hole 4 on the top plate 9 Insert two hooks 5 of the heater unit 1 into the holes 6 on the top plate of the paper deck and then secure the heater unit to the main body of the paper deck using a screw with toothed washer 7 F 2 416 10 Attach the heater connector 2 to the panel mount 1 F 2 417 2 1 2 4 3 1 7 5 5 6 6 1 2 ...

Page 206: ...nd cable 1 using the screw with toothed washer 2 F 2 420 4 Using two binding screws M4X4 1 install the relay harness unit 2 to the rear side panel 3 of the paper deck 5 Insert the bind locks of the cable ties into the holes at A shown below on the rear side panel to secure the relay harness 6 Connect the connectors at both ends of the relay harness unit to the heater connector 4 and AC power conne...

Page 207: ... the AC cord to the power cord mount of the heater 8 Remove eight screws 1 and then detach the rear lower cover 2 of the host machine F 2 422 9 Remove two screws 1 at the lower right of the back of the host machine to remove the blind plate 2 4 5 1 1 2 A 3 1 2 1 ...

Page 208: ...Connect the connector of the AC cord to the connector 4 on the host machine F 2 425 14 Install the rear lower cover of the host machine using eight screws 15 Reattach the exterior covers of the paper deck in the following sequence 1 Top cover Take care not to have cables caught M4X8 2pcs 2 Front upper cover Insert the connector M4X8 3pcs 3 Rear cover M3X8 2pcs M4X8 4 pcs 4 Right cover M4X8 3pcs 16...

Page 209: ...hecking Components 0013 5535 imagePRESS C1 P imagePRESS C1 Voice Guidance Kit A2 B1 2 To ensure smooth connection of the heater power connectors explain to the user that any obstacle that can prevent the paper deck from opening should not be placed in the hatched area 1 Host machine 2 Paper deck A Front In order to install this machine Voice Guidance Attachment B1 is required 1 1 2 A ...

Page 210: ...uires 3 cord guides 7pc 6 Voice Board 1pc 7 1 Voice Board Face Plate 1pc 8 Voice Board Face Plate 1pc 9 Screw Binding M3X6 2pc 10 Screw Binding M4X6 1pc 11 1 Screw Binding M4X40 2pc 12 1 Screw Binding M3X16 1pc 13 1 Screw Binding M4X16 1pc 14 Ferrite Core 1pc 15 1 Clamp 1pc 1 Not used for this machine Voice Guidance Kit A2 Voice Guidance Kit B1 2 User s Guide Voice Guidance Kit Users Guide User s ...

Page 211: ...Unit Lower 1pc 3 1 Cable 1300mm 1pc 4 Cable 1850mm 1pc 5 Cord Guide this machine requires 3 cord guides 7pc 6 Voice Board 7pc 7 1 Voice Board Face Plate 1pc 8 Voice Board Face Plate 1pc 9 Screw Binding M3X6 2pc 10 Screw Binding M4X6 1pc 11 1 Screw Binding M4X40 2pc 12 1 Screw Binding M3X16 1pc 13 1 Screw Binding M4X16 1pc 14 Ferrite Core 1pc 15 1 wire saddle 1pc 1 Not used for this machine Voice G...

Page 212: ... the rear upper cover 1 9 screws 2 F 2 432 3 Detach the panel mount cover 1 on the left upper cover rear 1 Screw 2 F 2 433 4 Remove the grounding wire 1 and detach the harness support plate 2 2 screws 3 F 2 434 1 1 1 2 2 2 2 1 2 1 3 2 ...

Page 213: ...9 5 Detach the harness support plate 2 from the reuse band 1 F 2 435 6 Disconnect the 5 connectors 1 F 2 436 7 Detach the left upper cover rear 1 2 screws 2 F 2 437 8 Detach the grounding plate 1 3 screws 2 1 2 1 1 2 ...

Page 214: ...2 F 2 439 10 Slide the controller box cover 1 in the direction of A to detach it F 2 440 11 Detach the face cover plate 1 The face cover plate detached here will not be used hereafter 2 screws 2 F 2 441 12 Attach the voice board face plate 2 onto the voice board 1 2 screws binding M3X6 3 1 2 1 1 1 2 A 1 1 2 ...

Page 215: ...board is to change the frequency 33MHz 66MHz according to the PCI bus transfer rate When the settings of the transfer rate and the switch are inappropriate the voice is not played properly resulting in catch during the play of the voice etc If the switch was flicked by an error return it to an appropriate position In this machine the switch must be positioned at 66MHz Insert the voice board perpen...

Page 216: ...ort plate Panel mount cover Controller box cover grounding plate Rear upper cover 2 reader communication cable connectors 17 Remove the 2 cover rubbers 1 and the screw 2 on the cover on the right upper area The cover rubbers and the screws removed here are not used F 2 446 18 Attach the option stay A 1 included in the Voice Guidance Attachment B1 on to the upper right cover 2 screws 2 binding M4X1...

Page 217: ...X6 F 2 448 20 Mount the speaker unit lower 1 2 screws W sems M4x16 2 Use the screws included in the Voice Guidance Attachment B1 F 2 449 21 Mount the speaker unit upper 1 onto the speaker unit lower and then fix it in place by the screw binding M4X6 2 from beneath 2 1 2 1 2 1 ...

Page 218: ...the cover 1 of the cord guide F 2 451 23 Attach the released paper of the cord guide 1 onto the position shown in the figure Right side 2 places F 2 452 Back side 1 place F 2 453 24 Connect the cable 2 with the speaker unit 1 2 1 1 1 1 ...

Page 219: ...the cord guide cover 3 F 2 455 26 Lead the cable 1 along the cord guide 2 and then attach the cord guide cover 3 F 2 456 27 Attach the ferrite core 1 onto the cable The distance 2 must be within 50mm Be sure that the cable is led under the reader power supply cable 4 1 2 3 2 1 1 4 2 3 ...

Page 220: ...PLAY ACC STS PCI1 When indicated as Voice Board on the screen the voice board is successfully recognized 2 Setup After Installation To use the voice guidance kit A2 after power on it is necessary to set the followings 1 Additional Functions System Settings Voice Guide Management Settings Use Voice Guide 2 Select ON 3 Press ON Default OFF 3 Checking Operations At the Point of Use 1 Hold down Reset ...

Page 221: ... C1 Printer Printer Cover A1 F 2 460 Before mounting the decurler install the this equipment 1 Dummy reader unit for printer 1 pc 2 printer upper cover 1 pc 3 Reader unit right cover 1 pc 4 Reader unit rear cover 1 pc 5 Reader unit fixing plate front right 1 pc 6 Reader unit fixing plate rear right 1 pc 7 Reader unit face cover 1 pc 8 Rubber bush 4 pc 9 Screw binding M3X6 2 pc 1 2 3 4 5 6 7 8 9 10...

Page 222: ...Remove the upper left cover 1 2 stepped screws 2 F 2 461 2 Remove the reader unit fixing plate front left 1 rear left 2 2 screws 3 F 2 462 3 Fit the Rubber bush 3 to the reader unit fixing plate front right 1 and the reader unit fixing plate rear right 2 F 2 463 4 Mount the reader unit fixing plate front right 1 2 screws TP M4X6 2 10 Stepped screw RS tightening 6X9 dia 4 pc 11 Screw TP M4X6 4 pc 1...

Page 223: ...Place the dummy reader unit for printer 1 on the Host machine F 2 466 7 Match the screw hole 1 of the Dummy reader unit for printer and the screw hole 2 of the reader unit fixing plate F 2 467 8 Fit the Rubber bush 3 to the reader unit fixing plate front left 1 rear left 2 removed in step 2 1 2 1 2 1 1 2 ...

Page 224: ...left 1 rear left 2 2 screws 3 F 2 469 10 Fix the dummy reader unit for printer in place 4 stepped screws RS tightening 6X9 dia 1 Left Side F 2 470 Right Side F 2 471 11 Mount the upper left cover removed in step 1 12 Open the toner replacement cover 1 1 2 3 1 2 3 1 1 ...

Page 225: ...of claw 1 are matched printer upper cover 2 is installed 4 screws RS tightening M4X8 2 F 2 474 15 Secure the toner replacement cover 1 in place 2 screws 2 use the screws removed in step 13 F 2 475 16 Close the toner replacement cover 17 Mount the reader unit rear cover 1 5 screws RS tightening M4X8 2 1 1 2 2 1 3 3 1 2 ...

Page 226: ... host machine F 2 478 2 16 Installing the Serial Interface Kit 2 16 1 Points to Note About Installation 0015 4684 imagePRESS C1 imagePRESS C1 2 16 2 Checking the Contents 0015 4685 imagePRESS C1 imagePRESS C1 Serial Interface Kit G1 1 To install this product Voice Guidance Attachment B1 is required 2 In case this product has been installed the card reader and the voice guidance kit cannot be insta...

Page 227: ...t mount 1 pc 4 Serial RS main L cable 1 pc 5 1 Serial RS main S cable 1 pc 6 1 Serial RS sub cable 1 pc 7 Cable guide 4 pc 8 1 Cable tie 2 pc 9 1 Blanking sheet 1 pc 10 2 Wire saddle 2 pc 11 Edge saddle 1 pc 12 Screw Binding M3X6 6 pc 13 1 Screw Binding M4X12 2 pc 14 1 Screw Binding M4X25 1 pc 15 1 Screw Binding M4X30 2 pc 16 Toothed lock washer 2 pc 1 Not used in this host machine 2 Use 1 for thi...

Page 228: ... F 2 482 3 Detach the reader right cover 1 3 screws 2 F 2 483 4 Remove the 4 cover rubber pieces 1 2 of removed cover rubber pieces will not be used F 2 484 5 Detach the upper right cover 1 3 screws 2 1 removed screw will not be used F 2 485 2 1 1 1 2 2 1 1 2 1 ...

Page 229: ...ight cover 1 F 2 486 7 Free the cable 2 from the edge saddle 1 F 2 487 8 Disconnect the connecter 5 pin side 1 from the relay connecter F 2 488 9 Connect the serial RS main L cable 1 2 connectors 2 F 2 489 Cut off the part A so that there are not burrs 1 2 A A 2 1 1 1 2 2 ...

Page 230: ...the serial RS main L cable 2 through the cut off 1 and then attach the upper right cover 3 2 screws 4 F 2 491 12 Attach the 2 cover rubber pieces 1 F 2 492 13 Attach the reader right cover 14 Attach the arm cover 3 15 Attach the option Stay A 1 2 screws biding M4X12 2 2 1 3 4 1 2 1 ...

Page 231: ...the coin vendor I F PCB unit 2 to the coin vendor I F Box joint mount 1 2 screws biding M3X6 3 F 2 495 18 Attach the coin vendor I F Box joint mount 1 to the host machine 2 toothed lock washes 2 2 screws W sems M4X16 3 F 2 496 19 Attach the edge saddle 1 and wire saddle 2 1 2 1 2 1 2 3 1 2 3 2 3 ...

Page 232: ... 21 Peel the release paper on the 4 cable guides 1 and attach it at the position shown in the figure F 2 499 22 Insert the connector 1 of the serial RS main L cable and attach the reuse band 2 F 2 500 23 Fix the serial RS main L cable 1 1 edge saddle 2 1 wire saddle 3 1 2 1 1 1 2 ...

Page 233: ... 139 F 2 501 24 Put the serial RS main L cable 1 through the 4 cable guides 2 and attach the 4 cable guide covers 3 F 2 502 25 Attach the coin vendor I F Box cover 1 4 screws 2 Bind M3X6 F 2 503 2 3 1 3 2 1 1 2 2 ...

Page 234: ......

Page 235: ...Chapter 3 Basic Operation ...

Page 236: ......

Page 237: ...Contents Contents 3 1 Construction 3 1 3 1 1 Function Configuration 3 1 3 1 2 Function Configuration 3 2 3 1 3 Main PCB Connection 3 3 3 1 4 DC Controller 3 4 ...

Page 238: ......

Page 239: ...ontroller PCB 2 Printer assembly C Laser Exposure system 6 Laser Scanner assembly D Image Formation system 7 Photosensitive drum 8 Y Developing assembly 9 M Developing assembly 10 C Developing assembly 11 Bk Developing assembly 12 ITB Intermediate Transfer Belt E Pickup Feed system 13 Pickup control assembly 14 Transfer assembly 15 Lower feeder assembly 16 Cassette 1 17 Cassette 2 18 Cassette 3 19...

Page 240: ...ser Exposure system 6 Laser Scanner assembly D Image Formation system 7 Photosensitive drum 8 Y Developing assembly 9 M Developing assembly 10 C Developing assembly 11 Bk Developing assembly 12 L Developing assembly 13 ITB Intermediate Transfer Belt E Pickup Feed system 14 Pickup control assembly 15 Transfer assembly 16 Lower feeder assembly 17 Cassette 1 18 Cassette 2 19 Cassette 3 20 Cassette 4 ...

Page 241: ...r driver PCB 17 Buffer PCB in the figure does not show the signal direction but shows main connections between PCBs 1 Main SW 3 4 2 9 6 7 J3 J40 J691 J6693 J6691 J4017 J4018 J4019 J4020 J4021 J134 J140 J141 J142 5 J261 J250 J252 J4022 J4001 J4001 J4008 J1101 J1170 J1165 J1171 J1122 J3500 J3503 J3502 J3501 10 J1120 J4500 8 J1036 J9003 11 J1188 J1189 J1176 J1184 J201 J202 J1501 J7 12 J1178 J1190 J11...

Page 242: ... IC2 This IC converts image data in even numbered lines output from ASIC1 into the Pulse Width Modulated data IC36 CPU This IC controls the print sequence and the interface with the controller IC46 RAM This IC stores the setup data such as service mode and the like IC52 Flash ROM This IC stores the firmware IC262 ASIC2 This IC controls the laser driver and the BD IC270 ASIC2 This IC controls the h...

Page 243: ... 3 Various Accessories Side paper deck Finisher etc 4 Various Loads Motor Sensor Clutch Solenoid 5 Main controller PCB 6 Laser driver PCB 7 BD PCB IC270 ASIC2 IC262 ASIC1 IC36 CPU 6 7 1 2 3 4 5 IC28 PWM IC1 IC46 RAM BAT1 IC52 IC227 Flash ROM IC29 PWM IC2 ...

Page 244: ......

Page 245: ...Chapter 4 Main Controller ...

Page 246: ......

Page 247: ...e Copy Function 4 16 4 6 2 Image Data Flow When Using the Copy Function 4 17 4 6 3 Image Data Flow When Using the BOX Function 4 17 4 6 4 Image Data Flow When Using the BOX Function 4 18 4 6 5 Image Data Flow When Using the SEND Function 4 18 4 6 6 Image Data Flow When Using the SEND Function 4 19 4 6 7 Image Data Flow When Using the FAX Receive Function 4 19 4 6 8 Image Data Flow When Using the F...

Page 248: ......

Page 249: ...log conversion direct mapping color balance fine zoom adjustment gradation conversion screen processing trimming add on 5 Relay Circuit Board Gu short Bus connections when EFI controller is not connected Main Controller Circuit Board SUB O B EFI controller connection 6 Main Controller Circuit Board SUB S B ZJ A Scanner interface scanner image processing resolution conversion image rotation compres...

Page 250: ... control and printer output image processing control 2 Panel I F Circuit Board Operation panel interface control 3 Main Controller Circuit Board SUB R A Color space conversion rotation for electronic sorting binarization resolution conversion 4 Main Controller Circuit Board SUB PPF A DQE A Image processing for printer output color space compression under color removal log conversion direct mapping...

Page 251: ...7 Main Controller Circuit Board SUB LAN bar A LAN connection HDD controller HDD power supply 8 BOOT ROM ROM memory storing the boot program 9 SRAM Circuit Board SRAM mounting 10 DDR SDRAM Program related data save image data save 11 LIPS LX Printer Scanner Kit Circuit Board RB A LIPS LX Printer Scanner Kit features add on optional HDD HDD System software storage image data storage image data save ...

Page 252: ...it Board SUB R A connector slot J1008 Main Controller Circuit Board SUB PF A DE A connector slot J1010 Main Controller Circuit Board SUB O B optional connector slot and Relay Circuit Board Gu short connector slot J1011 Main Controller Circuit Board SUB S B ZJ A connector slot J1012 Option board connector slot J1013 Main Controller Circuit Board SUB LAN bar A connector slot J1024 LIPS LX Printer Sc...

Page 253: ...Chapter 4 4 5 IC2 ASIC Operation panel control various I O control IC10 IC11 SDRAM CPU work memory built into IC2 IC No Function ...

Page 254: ...DQE A connector slot J1010 Main Controller Circuit Board SUB O B optional connector slot and Relay Circuit Board Gu short connector slot J1011 Main Controller Circuit Board SUB S B ZJ A connector slot J1012 Option board connector slot J1013 Main Controller Circuit Board SUB LAN bar A connector slot J1024 LIPS LX Printer Scanner Kit connector slot RB A optional J1036 Panel I F Circuit Board slot IC...

Page 255: ... with the BOOT ROM boot program and launches it The screen shown in the figure below is displayed on the Operation Panel while the CPU loads system software from the HDD and during initialization of memory and other system resources Progress status is represented by a Progress Bar displayed on screen F 4 6 Display of the Progress Bar indicates that the HDD is being accessed Do not turn off power d...

Page 256: ...ach program module is initialized 3 Control Program 2 Section 3 1 The initialization of each software module and configuration of the printer and scanner are completed 2 The startup sequences ends if the printer and scanner are detected normally If they are not detected normally a connection timeout occurs and E732 E733 is displayed Jobs can be accepted once the startup sequence ends normally An o...

Page 257: ...matted by HD CLEAR HD CHECK COPIER FUNCTION SYSTEM HD CHECK Performs Write Abort repairs for the entire HDD when CHK TYPE 0 HD CLEAR COPIER FUNCTION SYSTEM HD CLEAR Formats the partitions specified by CHK TYPE Image Memory DDR SDRAM CPU HDD System Area Image Data Area BootROM Self diagnostics Program Boot Program The arrows represent access to the program during execution Main Controller Circuit B...

Page 258: ...tart the Write Abort Sector repair routine causing the screen to go completely black 1 3 Progress status will appear after a short time as this routine takes about 40 to 50 minutes to execute Execution is done when the screen goes completely white When wrench mark normal indication is displayed 1 1 Set CHK TYPE 0 execute HD CHECK takes 40 to 50 minutes and turn the Main Power Switch OFF and then O...

Page 259: ...12 FAX 8 TMP_PSS PSS temporary files 1 5 9 10 11 12 PSS 9 3 PDLDEV PDL related file save area fonts registration forms color correction information file for ICCProfile PDL function 1 5 9 10 11 12 User Font ICCProfile Possible Specify PDLDEV 10 4 BOOTDEV Firmware save area Bootable MEAP key ID PDF dictionary RUI contents audio dictionary ICC profile PS test data 3 8 9 10 11 12 System Impossible Imp...

Page 260: ...and then turn the power OFF and then ON again 2 If the above does not correct the problem the HDD may be assumed to be damaged so replace the HDD and reinstall the system 8 5 File system error Repair operations in the boot partition can only be performed when using SST in Safe Mode 1 Start the system in Safe Mode perform a full format using SST reinstall the system System Lang RUI and turn the Mai...

Page 261: ...A R A PPF A DQE A PC Original Copy A A A Print Output Scan Image Data Other iR Device SEND FAX PullScan E Mai PDL Print BOX Main Controller Circuit Board MAIN YUV RGB 24 Processing used in place of conventional input masking Color correction is performed for the CCD s RGB filter If the image is monochrome only the BK signal results from this point on Background elimination BE BK signal generation ...

Page 262: ...ircuit Board MAIN YUV RGB 24 Processing used in place of conventional input masking Color correction is performed for the CCD s RGB filter If the image is monochrome only the BK signal results from this point on Background elimination BE BK signal generation monochrome mode Trimming Masking Frame removal RGB CMYK conversion Input direct mapping Edge enhancement Smoothing RGB phase correction Input...

Page 263: ...l Image Area Signal CMYK F value adjustment Color balance correction Trimming Masking Under color removal Generate BK signal Output direct mapping RGB CMY conversion Output gamma correction Optimum screen selection Smoothing RGB 24 CMYK 16 A BK signal is generated here if a black and white original is detected by ACS detection Data is throughput if a color original is detected UCR processing is pe...

Page 264: ...when using the copy function is shown below 4 Image Area Signal DDR SDRAM HDD PC PDL Input Rotation Color conversion JPEG compression JPEG compression JPEG expansion JPEG expansion Main Controller Circuit Board MAIN SUB R A IC1 RGB 24 Reader Unit Resolution conversion Magnification processing Binarization processing 4 Image Area Signal DDR SDRAM HDD PC PDL Input Rotation Color conversion JPEG comp...

Page 265: ... C1 P imagePRESS C1 The flow of image data when using the BOX function is shown below Main Controller Circuit Board MAIN SUB R A SUB PF A SUB DE A Reader Unit DC Controller Circuit Board RGB 24 Image Area Signal DDR SDRAM HDD JPEG compression JPEG decompression Rotation Magnification Color conversion Main Controller Reader Unit DC Controller RGB 24 Image Area Signal DDR SDRAM HDD JPEG compression ...

Page 266: ... imagePRESS C1 P imagePRESS C1 The flow of image data when using the SEND function is shown below Main Controller Circuit Board MAIN SUB S B SUB ZJ A SUB DE A Reader Unit DC Controller Circuit Board RGB 24 Image Area Signal DDR SDRAM HDD JPEG compression JPEG decompression Rotation Resolution conversion Main Controller Reader Unit DC Controller RGB 24 Image Area Signal DDR SDRAM HDD JPEG compressi...

Page 267: ...ve function is shown below Reader Unit RGB 24 Image Area Signal DDR SDRAM HDD Main Controller Circuit Board SUB LAN bar A Main Controller Circuit Board MAIN SUB S B SUB R A SUB ZJ A Rotation Resolution conversion Color conversion JPEG compression JPEG decompression MMR compression Binarization processing For Monochrome Images Reader Unit RGB 24 Image Area Signal DDR SDRAM HDD Main Controller Rotat...

Page 268: ...is shown below F 4 23 4 6 9 Image Data Flow When Using the PDL Function 0014 1310 imagePRESS C1 P imagePRESS C1 The flow of image data when using the PDL function is shown below Main Controller Circuit Board MAIN SUB R A DC Controller Circuit Board DDR SDRAM HDD FAX Unit Rotation Resolution conversion Main Controller DC Controller DDR SDRAM HDD FAX Unit Rotation Resolution conversion ...

Page 269: ...JPEG decompression JPEG compression DC Controller Circuit Board LIPS Data RGB JPEGTIFF PDF RGB CMYK DISPLAY LIST Data LIPS LX LIPS V PS Expansion Kit P1 PS PS Print Server Unit Q1 Direct Print Expansion Kit F1 PS Data Main Controller Circuit Board SUB O B Main Controller Circuit Board SUB LAN bar A ...

Page 270: ... C1 The flow of image data when using the PDL function is shown below F 4 25 DDR SDRAM HDD Main Controller JPEG decompression JPEG compression DC Controller LIPS Data RGB JPEGTIFF PDF RGB CMYK DISPLAY LIST Data LIPS LX LIPS V PS Expansion Kit P1 PS PS Print Server Unit Q1 Direct Print Expansion Kit F1 PS Data ...

Page 271: ...Detach the grounding plate 1 3 screws 2 F 4 26 2 Disconnect the connector 1 4 clamps 2 F 4 27 3 Loosen the 10 screws 1 on the controller box cover and then remove the 6 screws 2 F 4 28 4 Slide the controller box cover 1 in the direction of A and then open it in the direction of B to detach F 4 29 5 Disconnect the 12 connectors 1 1 edge saddle 2 F 4 30 6 Remove the 1 clamp 1 and the 1 edge saddle 2...

Page 272: ...n 0013 9391 imagePRESS C1 P imagePRESS C1 1 Remove the HDD unit 1 with support sheet metal 2 connectors 2 4 screws 3 F 4 34 2 Remove the TFT converter PCB 1 2 screws 2 F 4 35 3 Remove the main controller PCB sub R A 1 the main controller PCB sub PF A sub DE A 2 the relay PCB GU SHORT 3 the main controller PCB sub S B sub ZJ A 4 the main controller PCB sub LANBAR A 10 screws 6 1 connector 7 F 4 36 ...

Page 273: ...PCB 1 2 screws 2 F 4 40 3 Remove the main controller PCB sub R A 1 the main controller PCB PPF A DQE A 2 the relay PCB GU SHORT 3 the main control ler PCB sub S B sub ZJ A 4 the main controller PCB sub LAN BAR A 5 10 screws 6 1 connector 7 F 4 41 4 Remove each 1 memory PCB 1 2 the 1 BOOTROM PCB 3 the 1 SRAM PCB 4 F 4 42 5 Remove the main controller PCB main 1 8 screws 2 1 2 2 2 2 2 1 2 3 3 3 3 1 2...

Page 274: ...ach the grounding plate 1 3 screws 2 F 4 44 2 Loosen the 10 screws 1 on the controller box cover and then remove the 6 screws 2 F 4 45 3 Slide the controller box cover 1 in the direction of A and then open it in the direction of B to detach F 4 46 4 Remove the HDD unit 1 2 connectors 2 6 screws 3 F 4 47 5 Detach the cover 1 4 screws 2 F 4 48 6 Remove the HDD 1 2 connectors 2 4 screws 3 F 4 49 The ...

Page 275: ... after it has been removed When placing the HDD on the floor or on a table try to be as gentle as pos sible It is better to place the HDD on a thick blanket or other shock absorbent material rather than directly onto a surface ...

Page 276: ...Chapter 5 Original Exposure System ...

Page 277: ......

Page 278: ...rrection 5 15 5 3 6 4 CCD Output A D Conversion 5 15 5 3 6 5 Outline of Shading Correction 5 15 5 3 6 6 Shading Adjustment 5 15 5 3 6 7 Shading Correction 5 15 5 4 Parts Replacement Procedure 5 16 5 4 1 DADF 5 16 5 4 1 1 Removing the DADF imagePRESS C1 Series imagePRESS C7000 Series 5 16 5 4 2 Copyboard Glass 5 16 5 4 2 1 Removing the Copyboard Glass imagePRESS C1 Series imagePRESS C7000 Series 5 ...

Page 279: ...Close Sensor 5 36 5 4 10 1 Removing the ADF Open Close Sensor imagePRESS C1 Series 5 36 5 4 10 2 Removing the ADF Open Close Sensor imagePRESS C7000 Series 5 37 5 4 11 Scanner Home Position Sensor 5 38 5 4 11 1 Removing the Scanner Home Position Sensor imagePRESS C1 Series 5 38 5 4 11 2 Removing the Scanner Home Position Sensor imagePRESS C7000 Series 5 39 5 4 12 Original Sensor 5 40 5 4 12 1 Prep...

Page 280: ...ning direction image processing by controller Scanner drive control No 1 No 2 mirror base by pulse motor Scanning lamp activation control 1 by inverter circuit 2 by error detection Original size identification 1 Book Mode sub scanning direction image processing by controller main scanning direction by CCD 2 ADF in Use main scanning direction by slide guide in ADF sub scanning direction by photosen...

Page 281: ...ion sensor Signal size sensor A B configuration Scanner motor Copyboard glass Original Original scanning lamp Lens CCD No 1 mirror No 1 mirror base No 2 mirror No 2 mirror base No 3 mirror HP Image HP leading edge Size detection Stream reading position start position forward reverse Scanner motor Light blocking plate No 2 mirror base Original scanning lamp No 1 mirror base Scanner HP sensor ...

Page 282: ...J202 used for the power from the machine printer unit J312 J303 J306 J309 J203 J204 J601 J202 J602 J205 J206 J308 J201 J209 J307 J312 Inverter PCB Original scanning lamp Original scanning lamp activation control CCD unit Scanner motor Scanner motor drive control Scanner HP sensor Reader controller PCB Interface PCB To printer main controller To ADF J203 J202 J210 J209 IC1 CPU IC2 J201 DF J204 J207...

Page 283: ...n J208 used for connection with the original size sensor inch configuration J209 not used J210 not used IC Description IC1 CPU stores boot program IC2 ASCI built in RAM IC3 flash RAM stores firmware IC4 EEPROM backs up service mode settings Jack No Description Reader motor Original scanning lamp HP sensor STBY STBY SREADY Reverse Forward ON ON Scanner unit position HP shading position Gain correct...

Page 284: ...ding edge Stop position Original size detection position 1 shifts only if the copyboard cover ADF is open 2 executed only if 1 min or more power off has passed from the previous session 3 move to shift shading 4 fixed shading white plate dust detection shading correction 5 Start position move to shift 1 1 2 2 Reader motor Original scanning lamp HP sensor Start key ON STBY STBY SREADY SCRW SCFW Rev...

Page 285: ...tor 0012 9673 imagePRESS C1 Color Image Reader H1 imagePRESS C1 Printer imagePRESS C1 The following shows the construction of the mechanisms used to control the scanner motor 1 HP positioning 2 move to shift shading start position 6 original stream reading scan 7 stream reading dust detection move to the next point if there is dust 7 points Stream reading position Shading position Image leading ed...

Page 286: ...is read at 100 and the magnification is changed by the main controller block In SEND mode the reading size is switched between 100 and 50 depending on the selected resolution 5 3 3 Controlling the Scanning Lamp 5 3 3 1 Overview 0012 9676 imagePRESS C1 Color Image Reader H1 imagePRESS C1 Printer imagePRESS C1 The scanning lamp is controlled for the following with associated control mechanisms opera...

Page 287: ...he Size of Originals 5 3 4 1 Identifying the Size of Originals 0012 9679 imagePRESS C1 Color Image Reader H1 imagePRESS C1 Printer imagePRESS C1 The machine identifies the size of an original based on combinations of measurements taken of the light reflected by specific points using a reflection type sensor and CCD In consideration of possible displacement of the original when the ADF is closed th...

Page 288: ...ence of an original is indicated at the rear while the presence of an original is indicated at the front the machine will give priority to the indication at the front i e presence of an original Result of measurement Result of detection 1A 1B no no original absent yes no original present no yes original present yes yes original present Point of original detection 3 Point of original detection 4 Po...

Page 289: ...efore the machine will assume the absence of an original at points that detect external light external search The ADF open closed sensor identifies the condition as being closed and the machine starts original size identification At this position B5 B4 A4 and A3 are excluded from the list of possible sizes Point of detection yes no Size identified 1 yes yes 2 no yes 3 yes yes 4 no no Result B5 Doc...

Page 290: ...1 mirror base at point of original detection xenon lamp off original sensor off F 5 25 F 5 26 5 3 5 Dirt Sensor Control 5 3 5 1 Dust Detection Control at Stream Reading 0012 9682 imagePRESS C1 Color Image Reader H1 imagePRESS C1 Printer imagePRESS C1 At stream reading from the ADF the presence absence of dust is detected at the stream reading positions on the copyboard glass According to the detec...

Page 291: ...st detection again to regard the dust free position or the less dust position as the reading position 2 At paper interval dust correction There is no shift of the xenon lamp due to dust detection In the case of detecting dust at paper interval dust correction is executed by compensating the dust area with the pixels at both edges MEMO COPIER OPTION BODY DFDST L1 level 1 Adjusting dust reading dete...

Page 292: ...ents of its adjacent areas during shading correction with the aim of reducing the effects of the presence of dust Thereafter shading correction will be executed using the corrected coefficient F 5 30 5 3 6 Image Processing 5 3 6 1 Overview 0012 9684 imagePRESS C1 Color Image Reader H1 imagePRESS C1 Printer imagePRESS C1 The following shows the major functions of the machine s image processing syst...

Page 293: ...eceiving segment is divided into 2 analog signals of 2 channels for output even numbered pixels EVEN and odd numbered pixels ODD F 5 34 CCD AP PCB Reader controller PCB CCD A D conversion Shading processing Analog image processing Analog image processing block Controller block Digital image processing block CCD 1 line each for R G and B Analog image signal Analog image processing gain correction o...

Page 294: ...rection it carries out for every copy and shading adjustment for which the target value is set in service mode 5 3 6 6 Shading Adjustment 0012 9693 imagePRESS C1 Color Image Reader H1 imagePRESS C1 Printer imagePRESS C1 The machine performs shading adjustment in response to a command made in service mode The machine measures the density of blank white paper and that of the white plate to obtain de...

Page 295: ... the area using lint free paper and alcohol agent When the glass is soiled it could cause a line 5 4 2 2 Scanner Parts Replacement Procedure imagePRESS C1 Series imagePRESS C7000 Series 0014 1997 imagePRESS C1 Color Image Reader H1 imagePRESS C1 Parts CCD unit copyboard glass scanning lamp inverter PCB Procedure Execute the following Service Modes in order 1 COPIER ADJUST CCD W PLT X COPIER ADJUST...

Page 296: ...agePRESS C1 Series imagePRESS C7000 Series 0013 9945 imagePRESS C1 Color Image Reader H1 imagePRESS C1 1 Removing the copyboard glass page 5 16 Reference Removing the Copyboard Glass 5 4 4 2 Removing the Scanner Lamp imagePRESS C1 Series 0013 9946 imagePRESS C1 Color Image Reader H1 1 Open the toner replacement cover 1 F 5 41 2 Detach the hopper upper cover 1 in the direction shown by the arrow 2 ...

Page 297: ...CD unit cover 1 9 screws 2 3 on the right side of the reader unit F 5 49 F 5 50 Points to Note When Attaching the CCD Unit Cover When attaching the CCD unit cover be sure to hook the 2 claws 1 on the 2 slots and then fix it by screw F 5 51 11 Disconnect the connector 1 and then remove the cable 2 from the edge saddle 3 12 Remove the reused band 4 and then remove the cable 5 from the cable 2 3 1 2 ...

Page 298: ...r Image Reader H1 imagePRESS C1 1 Open the toner replacement cover 1 F 5 55 2 Detach the hopper upper cover 1 in the direction shown by the arrow 2 screws 2 2 claws 3 F 5 56 3 Close the toner replacement cover 4 Detach the reader front cover 1 2 screws 2 2 magnet catches 3 F 5 57 5 Detach the reader rear cover 1 1 connector 2 5 screws 3 F 5 58 6 Detach the reader rear upper cover 1 1 screw 2 1 emb...

Page 299: ...CD unit cover 1 9 screws 2 3 on the right side of the reader unit F 5 63 F 5 64 Points to Note When Attaching the CCD Unit Cover When attaching the CCD unit cover be sure to hook the 2 claws 1 on the 2 slots and then fix it by screw F 5 65 11 Disconnect the connector 1 and then remove the cable 2 from the edge saddle 3 12 Remove the reused band 4 and then remove the cable 5 from the cable 2 3 1 2 ...

Page 300: ... C7000 Series 0016 9495 Color Image Reader H1 1 Open the sub station front right cover 1 and the sub station front left cov er 2 F 5 69 2 Detach the sub station upper front cover 1 3 screws 2 F 5 70 3 Detach the sub station upper right cover 1 3 screws 2 F 5 71 4 Detach the reader front cover 1 2 screws 2 2 magnet catches 3 F 5 72 5 Detach the upper rear face plate 1 1 1 screw 2 F 5 73 4 5 3 2 1 1...

Page 301: ...nnector base 1 2 screws 2 F 5 77 9 Detach the reader rear cover 1 1 connector 2 5 screws 3 F 5 78 10 Detach the reader upper rear cover 1 1 screw 2 1 embossed section 3 F 5 79 11 Remove the magnet support 1 2 screws 2 F 5 80 In case of ADF 12 Remove the document tray 1 2 screws 2 Be sure to tighten the 2 screws on the top while pressing the upper rear cover in the direction of the arrow 1 1 3 1 3 ...

Page 302: ...screws 2 F 5 84 Subsequent steps are applied only for the ADF 16 Detach the CCD unit cover 1 9 screws 2 3 screws at the right side of the reader F 5 85 F 5 86 17 For the subsequent steps see step 11 to 14 in Removing Scanning Lamp in the case of imagePRESS C1 Series 1 2 1 2 3 2 3 1 2 2 2 Point to Note When Attaching CCD Unit Cover Be sure to hook the CCD unit cover onto the 2 claws 2 and secure it...

Page 303: ...er cover 1 2 cover rubbers 2 2 screws 3 F 5 87 2 Detach the reader right cover 1 3 cover rubbers 2 3 screws 3 F 5 88 3 Detach the CCD unit cover 1 9 screws 2 3 on the right side of the reader assembly F 5 89 F 5 90 Points to Note When Attaching the CCD Unit Cover When attaching the CCD unit cover be sure to hook the 2 claws 1 on the 2 slots and then fix it by screw F 5 91 4 Lift the original size ...

Page 304: ...ader H1 1 Open the sub station front right cover 1 and the sub station front left cov er 2 F 5 96 2 Detach the sub station upper front cover 1 3 screws 2 F 5 97 3 Detach the sub station upper right cover 1 3 screws 2 F 5 98 4 Detach the reader front cover 1 2 screws 2 2 magnet catches 3 F 5 99 5 Remove the magnet support 1 2 screws 2 F 5 100 In case of ADF 6 Remove the document tray 1 2 screws 2 2...

Page 305: ...2 F 5 104 Subsequent steps are applied only for the ADF 10 Detach the CCD unit cover 1 9 screws 2 3 screws at the right side of the reader F 5 105 F 5 106 11 For the subsequent steps see step 4 to 6 in Removing the Reader Con troller PCB in the case of imagePRESS C1 Series 1 2 1 2 3 2 3 1 2 2 2 Point to Note When Attaching CCD Unit Cover Be sure to hook the CCD unit cover onto the 2 claws 2 and se...

Page 306: ...stment of original feeding speed FEEDER ADJUST STRD S adjustment of the optical system stop position at stream reading mode for small size document FEEDER ADJUST STRD L adjustment of the optical system stop position at stream reading mode for large size document 4 Execute the following Service Modes in order COPIER ADJUST CCD W PLT X COPIER ADJUST CCD W PLT Y COPIER ADJUST CCD W PLT Z Enter the wh...

Page 307: ...eries 0013 9955 imagePRESS C1 Color Image Reader H1 imagePRESS C1 1 Detach the reader right upper cover 1 2 cover rubbers 2 2 screws 3 F 5 114 2 Detach the reader right cover 1 3 cover rubbers 2 3 screws 3 F 5 115 3 Remove the CCD unit cover 1 9 screws 2 3 on the right side of the reader assembly F 5 116 F 5 117 Points to Note When Attaching the CCD Unit Cover When attaching the CCD unit cover be ...

Page 308: ...d the sub station front left cov er 2 F 5 120 2 Detach the sub station upper front cover 1 3 screws 2 F 5 121 3 Detach the sub station upper right cover 1 3 screws 2 F 5 122 4 Detach the reader front cover 1 2 screws 2 2 magnet catches 3 F 5 123 5 Remove the magnet support 1 2 screws 2 F 5 124 In case of ADF 6 Detach the document tray 1 2 screws 2 4 3 5 1 2 1 2 1 2 1 2 1 2 2 3 3 2 1 ...

Page 309: ...e reader upper right cover 1 2 screws 2 F 5 128 The subsequent steps are applied only for ADF 10 Detach the CCD unit cover 1 9 screws 2 3 screws at the right side of the reader F 5 129 F 5 130 11 Remove the inverter PCB 1 1 flat cable 2 1 2 1 2 3 2 3 1 2 2 2 Point to Note When Attaching CCD Unit Cover When attaching the CCD unit cover be sure to hook the 2 claws 1 on the 2 claws 2 and then fix it ...

Page 310: ...1 imagePRESS C1 1 Detach the reader upper right cover 1 2 cover rubbers 2 2 screws 3 F 5 132 2 Detach the reader right cover 1 3 cover rubbers 2 3 screws 3 F 5 133 3 Detach the CCD unit cover 1 9 screws 2 3 screws at the right side of the reader F 5 134 F 5 135 Points to Note When Attaching the CCD Unit Cover When attaching the CCD unit cover be sure to hook the 2 claws 1 on the 2 slots 2 and then...

Page 311: ...nt right cover 1 and the sub station front left cov er 2 F 5 140 2 Detach the sub station upper front cover 1 3 screws 2 F 5 141 3 Detach the sub station upper right cover 1 3 screws 2 F 5 142 4 Detach the reader front cover 1 2 screws 2 2 magnet catches 3 F 5 143 5 Remove the magnet support 1 2 screws 2 F 5 144 In case of ADF 6 Remove the document tray 1 2 screws 2 1 2 1 2 2 3 4 3 4 1 2 1 2 1 2 1...

Page 312: ... 2 screws 2 F 5 148 The subsequent steps are applied only for ADF 10 Detach the CCD unit cover 1 9 screws 2 3 screws at the right side of the reader F 5 149 F 5 150 11 For the subsequent steps see step 4 to 6 in Removing the CCD Unit in case of imagePRESS C1 Series 1 2 1 2 3 2 3 1 2 2 2 Point to Note When Attaching CCD Unit Cover When attaching the CCD unit cover be sure to hook the 2 claws 1 on t...

Page 313: ...Reader H1 imagePRESS C1 1 Remove the copyboard glass page 5 16 Reference Removing the Copyboard Glass 5 4 9 2 Removing the Scanner Motor imagePRESS C1 Series 0013 9959 imagePRESS C1 Color Image Reader H1 imagePRESS C1 1 Detach the reader rear cover 1 1 connector 2 5 screws 3 F 5 151 2 Detach the reader rear upper cover 1 1 screw 1 1 embossed section 3 F 5 152 3 Remove the reader I F cable 2 from t...

Page 314: ... 5 159 5 4 9 3 Removing the Scanner Motor imagePRESS C7000 Series 0016 9499 Color Image Reader H1 1 In case of the copyboard cover detach the upper rear face plate 1 1 1 screw 2 F 5 160 2 Detach the upper rear face cover 3 1 In case of ADF 2 screws 1 F 5 161 In case of copyboard cover 1 screw 1 F 5 162 4 Remove the sub station upper rear cover 1 and the filter 2 6 screws 3 1 2 2 1 5 4 3 2 3 1 Be s...

Page 315: ...25 imagePRESS C1 Color Image Reader H1 imagePRESS C1 When attaching the scanner motor be sure to check that the timing belt 3 has been surely set to the scanner pulley 1 and the motor shaft 2 F 5 167 5 4 10 ADF Open Close Sensor 5 4 10 1 Removing the ADF Open Close Sensor imagePRESS C1 Series 0013 9962 imagePRESS C1 Color Image Reader H1 imagePRESS C1 1 Detach the reader rear cover 1 1 connector 2...

Page 316: ...e plate 1 1 1 screw 2 F 5 172 2 Detach the upper rear face cover 3 1 In case of ADF 2 screws 1 F 5 173 In case of copyboard cover 1 screw 1 F 5 174 3 Detach the top rear cover 1 of the sub station and remove the filter 2 6 screws 3 F 5 175 4 Detach the connector base 1 2 screws 2 2 1 2 1 1 2 When tightening the 2 screws at the top surface be sure to tighten them while pressing the upper rear cover...

Page 317: ...4 11 1 Removing the Scanner Home Position Sensor imagePRESS C1 Series 0014 2560 imagePRESS C1 Color Image Reader H1 imagePRESS C1 1 Detach the reader rear cover 1 1 connector 2 5 screws 3 F 5 179 2 Detach the reader rear upper cover 1 1 screw 2 1 embossed section 3 F 5 180 3 Remove the reader I F cable 2 from the 2 wire saddles 1 F 5 181 4 Remove the I F board shielding plate 1 8 screws 2 2 screws...

Page 318: ...r detach the upper rear face plate 1 1 1 screw 2 F 5 186 2 Detach the upper rear face cover 3 1 In case of ADF 2 screws 1 F 5 187 In case of copyboard cover 1 screw 1 F 5 188 3 Detach the top rear cover 1 of the sub station and remove the filter 2 6 screws 3 F 5 189 4 Detach the connector base 1 2 screws 2 1 2 2 2 1 1 2 1 2 When tightening the 2 screws at the top surface be sure to tighten them wh...

Page 319: ... H1 imagePRESS C1 1 Remove the copyboard glass page 5 16 Reference Removing the Copyboard Glass 5 4 12 2 Removing the Original Size Sensor imagePRESS C1 Series 0013 9950 imagePRESS C1 Color Image Reader H1 imagePRESS C1 1 Detach the reader upper right cover 1 2 cover rubbers 2 2 screws 3 F 5 193 2 Detach the reader right cover 1 3 cover rubbers 2 3 screws 3 F 5 194 3 Detach the CCD unit cover 1 9 ...

Page 320: ... the document size sensor 4 F 5 200 5 4 12 3 Removing the Original Size Sensor imagePRESS C7000 Series 0016 9502 Color Image Reader H1 1 Open the sub station front right cover 1 and the sub station front left cov er 2 F 5 201 2 Detach the sub station upper front cover 1 3 screws 2 F 5 202 3 Detach the sub station upper right cover 1 3 screws 2 F 5 203 4 Detach the reader front cover 1 2 screws 2 2...

Page 321: ... imagePRESS C1 Color Image Reader H1 imagePRESS C1 1 Detach the small cover left front 1 and the small cover left rear 2 using a flat blade screwdriver etc F 5 205 2 Remove the 2 screws 1 on the back side of the arm unit F 5 206 3 Press the arm cover 1 1 in the direction shown by the arrow to detach it upward F 5 207 4 Remove the control panel interface cable 2 from the 3 wire saddle 1 F 5 208 5 R...

Page 322: ... 1 2 cover rubbers large 2 2 screws 3 F 5 215 10 Remove the control panel interface cable 2 from the control panel arm unit 1 2 edge saddles 3 F 5 216 11 Remove the control panel arm unit 1 8 screws 2 F 5 217 Hook the claw 2 of the control panel arm unit 1 attach the 4 screws 3 and attach by the 4 screws 4 Be careful not to drop the screws 1 2 1 2 2 2 3 3 3 1 3 2 3 2 3 2 1 3 3 2 2 1 3 2 3 1 2 2 2 ...

Page 323: ...e reader power supply cable connector 1 F 5 221 15 Remove the control panel interface cable 2 from the 2 wire saddles 1 and then disconnect the connector 3 F 5 222 16 Detach the reader rear cover 1 5 screws 2 F 5 223 17 Detach the reader rear upper cover 1 1 screw 2 1 emboss 3 F 5 224 18 Detach the upper left cover 1 2 screws 2 1 3 3 4 4 2 1 2 1 2 2 3 3 1 3 1 2 1 2 2 3 1 ...

Page 324: ...ews 1 and tilt the connector mount 2 forward F 5 228 22 Remove the cable 3 from the 2 wire saddles 1 and then remove the reuse band 3 23 Disconnect the connector 4 and then remove the cable 6 from the edge saddle 5 F 5 229 24 Remove the DF right hinge mount 1 7 screws 2 F 5 230 25 Detach the small cover right rear 1 screw 2 2 1 1 2 2 2 3 2 1 2 1 1 1 2 3 5 6 4 1 2 2 2 ...

Page 325: ...3 F 5 235 30 Remove the 2 wire fixing screws 2 on the primary mirror mount 1 31 Remove the spring 3 to fix the wire 32 Remove the 2 hooks 4 of the wire from the right side of the reader frame 33 Remove the wire from each pulley F 5 236 5 4 13 3 Removing the Scanner Drive Wire imagePRESS C7000 Series 0016 9503 Color Image Reader H1 1 Detach the small cover left front 1 and the small cover left rear...

Page 326: ...tation upper front cover 1 3 screws 2 F 5 239 4 Detach the sub station upper right cover 1 3 screws 2 F 5 240 5 Detach the reader front cover 1 2 screws 2 2 magnet catches 3 F 5 241 6 Detach the upper rear face cover 1 1 1 screw 2 F 5 242 7 Detach the upper rear face cover 3 1 In case of ADF 2 screws 1 1 2 1 2 1 2 1 2 1 2 2 3 3 1 2 ...

Page 327: ...he reader rear cover 1 1 connector 2 5 screws 3 F 5 247 11 Detach the reader upper rear cover 1 1 screw 2 1 emboss 3 F 5 248 12 Detach the magnet support plate 1 2 screws 2 F 5 249 In case of ADF 13 Remove the document tray 1 2 screws 2 When tightening the 2 screws at the top surface be sure to tighten them while pressing the upper rear cover in the direction of the arrow 1 1 3 1 3 3 2 3 1 2 1 2 3...

Page 328: ... 15 Detach the reader right cover 1 3 screws 2 F 5 252 Only in case of ADF 16 Detach the reader upper right cover 1 2 screws 2 F 5 253 17 Attach the reader right rear cover 1 2 screws TP M4X6 2 F 5 254 18 Detach the sub station upper left cover 1 9 screws 2 F 5 255 19 Detach the reader left cover 1 4 screws 2 1 2 1 2 3 2 3 1 2 2 2 1 2 1 2 1 2 2 ...

Page 329: ... the wire onto each pulley and then fix one end onto the hook 3 at the left side and the other end onto the hook 4 at the right side temporar ily 3 Temporarily fix the wire fixing plate 2 to the primary mirror mount 5 4 Attach the reader upper frame F 5 257 F 5 258 5 4 13 5 Adjustment of Positions of the Mirror 1 2 Mount imagePRESS C1 Series imagePRESS C7000 Series 0014 1619 imagePRESS C1 Color Im...

Page 330: ...t 6 Remove the mirror positioning tool front rear 7 Assemble the mirror mounts by the reverse procedure to disassemble them 5 4 13 6 Points to Note When Attaching the Control Panel imagePRESS C1 Series 0014 2026 imagePRESS C1 Color Image Reader H1 imagePRESS C1 Points to Note When Attaching the Control Panel Arm Unit Be sure to fit the screws in order Hook the claw 2 of the control panel arm unit ...

Page 331: ...ure it in place by the 4 screws 3 F 5 265 Points to Note when Fixing the Control Panel Interface Cable 1 in Place Of the 3 positions of wire saddle 2 to be secured in place adjust the position of the wire saddle on the rear side and the seal 3 F 5 266 Points to Note when Attaching the Arm Cover 1 Be sure not to have the cable caught in F 5 267 Points to Note when Securing the Arm Cover 1 in Place ...

Page 332: ...Chapter 6 Laser Exposure ...

Page 333: ......

Page 334: ...ol 6 3 6 3 1 2 Main Scan Sync Control 6 4 6 3 1 3 Sub Scan Sync Control 6 5 6 3 2 Controlling the Intensity of Laser Light 6 6 6 3 2 1 APC Control 6 6 6 3 2 2 PWM Control 6 6 6 3 3 Controlling the Laser Scanner Motor 6 6 6 3 3 1 Laser Scanner Motor Control 6 6 6 3 4 Controlling the Laser Shutter 6 7 6 3 4 1 Laser Shutter Control 6 7 6 4 Parts Replacement Procedure 6 9 6 4 1 Laser Scanner Unit 6 9 ...

Page 335: ...Main scan sync control Sub scan sync control Light intensity control APC control PWM control Others Laser ON OFF control Laser scanner motor control Laser shutter control Item Description 1 Laser Unit Emit the laser beam 2 Polygonal Mirror Scan the laser beam in the main scan direction 3 BD Mirror Reflect the laser beam on BD PCB 4 BD PCB Produce BD signal 5 Laser Mirror 1 Reflect the laser beam w...

Page 336: ...B F 6 2 1 Laser ON OFF control 2 Main Scan Sync Control 3 Sub Scan Sync Control 4 APC Control 5 PWM Control 6 Laser Scanner Motor Control MN CON Main Controller PCB DC CON DC Controller PCB 6 2 Basic Sequence 6 2 1 Basic Sequence 0012 6308 imagePRESS C1 P imagePRESS C1 imagePRESS C1 Printer imagePRESS C1 The basic sequence for the laser exposure system is shown as follows 1 The print demand signal...

Page 337: ...olor mode ITBHP signal which is the standard position for color adjustment is detected from the ITB home position sensor when the image formation becomes possible PVREQ signal for each color is produced according to this signal For monochrome For monochrome it is unnecessary to adjust color When the image formation becomes possible PVREQ signal is produced at the specified timing regardless of the...

Page 338: ... imagePRESS C1 Sync control of main scanning is the control for adjustment of the writing position in the main scanning This control is performed at BD sync control circuit in PWM IC This circuit produces the sync signal of the main scanning used in DC controller PCB based on BD signal sent from BD PCB Here the operation of this circuit is explained VIDEO signal sent from the main controller PCB i...

Page 339: ...ere the operation of this circuit is explained ITB home position signal ITBHP output from the ITB home position sensor is detected at the sub scanning sync control circuit At the same time this circuit produces PVREQ signal for each color based on ITBHP signal output them to the main controller PCB The main controller PCB sends VIDEO signal to DC controller PCB synchronized with PVREQ signal for e...

Page 340: ...tween the laser lighting time and the image density is shown below With this machine the laser is exposed to the dark area image area not to the bright area non image area When the image density gets higher the laser lighting time becomes longer whereas when it gets lower the time becomes shorter F 6 8 6 3 3 Controlling the Laser Scanner Motor 6 3 3 1 Laser Scanner Motor Control 0012 7592 imagePRE...

Page 341: ...magePRESS C1 imagePRESS C1 Printer imagePRESS C1 This machine has the protection function that prevents exposing the laser to inside of the machine when opening the toner hopper assembly In this function the laser shutter lever that pushes the laser shutter in the laser scanner unit is opened when lifting the toner hopper assembly As a result of that the laser shutter is closed and the path of the...

Page 342: ...Chapter 6 6 8 F 6 10 1 Laser Light 2 Laser Shutter 3 Laser Shutter Lever 1 1 2 2 1 2 3 3 3 3 ...

Page 343: ...the toner replacement cover 5 Detach the high voltage box unit 6 4 1 2 Removing the Laser Scanner Unit 0013 9988 imagePRESS C1 P imagePRESS C1 imagePRESS C1 Printer image PRESS C1 1 Remove the delivery upper cooling fan 2 1 1 connector 2 1 screw 3 F 6 11 2 Remove the 2 scanner mount 1 2 screws 2 F 6 12 3 Disconnect the 5 connectors 1 and remove the 3 clamps 2 F 6 13 4 Slide the laser scanner unit ...

Page 344: ...Chapter 7 Image Formation ...

Page 345: ......

Page 346: ...l 7 21 7 4 9 ACVC Control 7 23 7 4 10 D max Control 7 24 7 4 11 D max Control 7 25 7 4 12 D half Control 7 26 7 4 13 D half Control 7 28 7 4 14 ARCDAT Control 7 30 7 4 15 ARCDAT Control 7 32 7 4 16 PASCAL Control 7 34 7 4 17 ACR Control Auto Carrier Refresh Control 7 37 7 4 18 ACR Control Auto Carrier Refresh Control 7 38 7 5 Charging Meachanism 7 39 7 5 1 Primary Charging Bias Control 7 39 7 5 2 ...

Page 347: ...80 7 13 1 ITB Heater Control 7 80 7 14 Parts Replacement Procedure 7 83 7 14 1 Process Unit 7 83 7 14 1 1 Preparation for Sliding the Processing Unit 7 83 7 14 1 2 Sliding the Processing Unit 7 83 7 14 1 3 Sliding the Processing Unit 7 84 7 14 2 Pre exposure LED Array 7 86 7 14 2 1 Preparation for Removing the Pre Exposure LED 7 86 7 14 2 2 Removing the Pre Exposure LED unit 7 86 7 14 3 Preconditi...

Page 348: ...d Seal Front 7 92 7 14 17 End Seal Rear 7 92 7 14 17 1 Preparation for Removing the End Seal Rear 7 92 7 14 17 2 Removing the End Seal Rear 7 93 7 14 18 Drum Cleaner Brush 7 93 7 14 18 1 Preparation for Removing the Drum Cleaner Brush 7 93 7 14 18 2 Removing the Drum Cleaner Brush 7 93 7 14 19 Photosensitive Drum Cleaning Blade 7 93 7 14 19 1 Preparation for Removing the Drum Cleaning Blade 7 93 7...

Page 349: ...condary Transfer Roller Brush Upper 7 106 7 14 35 Secondary Transfer Roller Brush Lower 7 107 7 14 35 1 Preparation for Removing the Secondary Transfer Roller Brush Lower 7 107 7 14 35 2 Removing the Secondary Transfer Roller Brush Lower 7 107 7 14 36 ITB Bias Roller Cleaning Blade Upper 7 107 7 14 36 1 Preparation for Removing the ITB Bias Roller Cleaning Blade Upper 7 107 7 14 36 2 Removing the ...

Page 350: ...nochrome color Level sensor with the video counter piezoelectric oscillator sensor Toner amount About 666g Toner 600g Carrier 66g Intermediate Transfer Block Specification Mechanism ITB Intermediate transfer belt Drive method Drum ITB motor Cleaning mechanism Brush roller Secondary Transfer Block Specification Mechanism Secondary transfer outside roller Drive method Secondary transfer outside roll...

Page 351: ...mbly C 16 Black Developing Assembly 17 Thermal Sensor 18 Potential Sensor 7 1 3 Main Components 0020 4107 imagePRESS C1 Printer imagePRESS C1 The main units used in the developing system of the machine are shown in the following figure ACVC control Determines the appropriate cleaning bias value Potential control Determines the appropriate primary grid bias value Dhalf control Determines the approp...

Page 352: ...rimary charging wire DC bias value 9k V 1000u A Grid Bias Charging method Corona charging Charging object Grid wire DC bias value 400 to 950V Developing Bias Charging method Roller charging Charging object Developing cylinder AC bias value 1 85k V Vpp DC bias value 0 to 700V Stray Toner Collection Bias Charging method Toner blocking terminal plate DC bias value DC 920V Pre transfer Charging Bias C...

Page 353: ...e 2 Developing Cylinder 3 Primary Charging Wire 4 Grid Plate 5 Primary Transfer Roller 6 Tension Roller 7 Secondary Transfer Inside Roller 8 Brush Roller 9 Bias Roller 10 Secondary Transfer Static Charge Eliminator 7 1 5 Charge Specification 0020 4109 imagePRESS C1 Printer imagePRESS C1 Primary Charging Bias Charging method Corona charging Charging object Primary charging wire DC bias value 9k V 1...

Page 354: ... 4 Grid Plate 5 Primary Transfer Roller 6 Tension Roller 7 Secondary Transfer Inside Roller 8 Brush Roller 9 Bias Roller 10 Secondary Transfer Static Charge Eliminator 7 2 Image Formation Process 7 2 1 Image Formation Process 0012 4907 imagePRESS C1 P imagePRESS C1 imagePRESS C1 Printer imagePRESS C1 Electrostatic Latent Image Formation Block This block consists of 3 steps and forming the electros...

Page 355: ...lt to a sheet Step 8 Separation 8 Separate the sheet from the ITB belt 4 Fixing Block Step 9 ITB Cleaning 9 Fixing the non fixed toner on a sheet to the sheet with heat and pressure 5 ITB Cleaning Block Step 10 ITB Cleaning 10 After the secondary transfer execute the ITB cleaning by contacting the brush roller to the ITB to remove the residual toner on it The brush roller attracts the residual ton...

Page 356: ...curs With the occurrence of the discharging phenomenon it becomes the drum memory As a result of that it attracts the residual toner on the cleaning blade at the drum memory area In order to remove the drum memory the pre cleaning exposure is executed F 7 7 1 Cleaning Blade 2 Pre cleaning Exposure LED 3 Drum Memory Step 13 Drum Cleaning 13 Remove the residual toner attached to the photosensitive d...

Page 357: ...itch to being the standby state is about 9min 10sec max time is less than 11min 40sec During the warm up rotation the following controls are executed Wire cleaning potential control primary secondary transfer ATVC control ITB cleaner ACVC control ATR patch control development idle rotation control D half control 1 1 Execute the control if there is the history of more than 500 sheets color printing...

Page 358: ...533 imagePRESS C1 P imagePRESS C1 In case of full color plain paper an A4 sheet 1 Feature Printer unit WMUPR Downstream ITB cleaner bias high pressure Secondary transfer outside roller drive motor Secondary transfer bias Secondary transfer cleaning bias ITB cleaner contact separation motor ITB cleaner rotation Primary transfer bias Tension roller bias Secondary transfer outside roller contact sepa...

Page 359: ...the ITB In case of 4 full color plain paper an A4 sheet PRINT LSTR PSTBY PINTR Drum ITB motor ITB cleaner contact separation motor ITB cleaner rotation Primary charging bias Developing bias DC Developing bias AC Developing clutch Primary transfer bias Secondary transfer bias Secondary transfer cleaning bias Upstream ITB cleaner bias Downstream ITB cleaner bias Potential guide plate roller bias Sec...

Page 360: ...eveloping rotary motor Laser scanner motor ITB HP signal PVREQ signal Laser Start key ON Image forming possible timing Y M C BK Pre conditioning LED Post charging bias Printer unit Contact Contact Separation Contact Contact Separation Separation Y L M C BK PRINT PSTBY PINTR Drum ITB motor ITB cleaner shift motor ITB cleaner rotation Primary charging bias Developing bias DC Developing bias AC Devel...

Page 361: ...ence is that reducing the process speed to 1 3 by detecting the HP detection side 2 reflecting surfaces that is located at the edge of the ITB with the ITB HP sensor PS1 PS2 7 4 Image Stabilization Control 7 4 1 Overview of Image Stabilization Control 0012 4998 imagePRESS C1 P imagePRESS C1 In order to produce stabled images regardless of the installation environment change or the deterioration of...

Page 362: ...Determines the appropriate developing bias value 2 ATR control Determines the toner supply 3 ATVC control Determines the appropriate transfer bias value 4 Potential control Determines the appropriate primary grid bias value 5 ACVC control Determines the appropriate cleaning bias value 6 ARCDAT control Determines the appropriate gradation table 7 Dhalf control Determines the appropriate gradation t...

Page 363: ...the appropriate primary grid bias value 5 ACVC control Determines the appropriate cleaning bias value 6 ARCDAT control Determines the appropriate gradation table 7 Dhalf control Determines the appropriate gradation table Printer 8 PASCAL control Determines the appropriate gradation table Printer Reader 8 Printer PASCAL control Determines the appropriate gradation table Printer MN CON 1 DC CON PRIN...

Page 364: ...time PASCAL control Initial rotation Interruption Last rotation after 500 sheets JAM recovery First in the morning Door open 400 sheet 4 2000 sheet 5 Potential control Full approx 20 sec Simple approx 4 5 sec Yes Yes 1 Yes 1 Yes 6 Yes 6 Yes 1 Patch sensor light intensity correction approx 30 sec Yes D half control approx 22 sec Yes Yes Yes 3 Yes ARCDAT control approx 20 sec Yes First idle rotation...

Page 365: ...l 2 Drum Surface Potential Measurement In the drum surface potential measurement as a prearrangement of the measurement it is checked if the charging assembly is worked normally by charging the photosensitive drum with Vg in the environment and executing the potential measurement Vd1 during the warm up rotation or copying If there is any fault an error message E061 0001 0007 to 0012 is displayed o...

Page 366: ...ast potential and obtain the target values of the grid bias and the developing bias from the point F 7 18 The measured data of the surface potential can be checked with DISPLAY DPOT after executing the service mode FUNCTION DPC DPC The target values in the field are indicated below 7 4 6 ATVC Control 0013 3674 imagePRESS C1 P imagePRESS C1 imagePRESS C1 Printer imagePRESS C1 When transferring tone...

Page 367: ...with the influence of the developing bias and the partial potential control executed without facing the developing assembly to the drum the state without the influence of the developing bias a Startup Condition Full Potential Control At the warm up rotation after the power is ON When executing the PASCAL control At the last rotation after passing 500 sheets Partial Potential Control At the warm up...

Page 368: ... bias The DC controller determines the appropriate primary transfer bias in consideration of the correction value Sequence Operation Description 1 Apply the constant current By applying the constant current to the secondary transfer roller feedback the voltage data of the secondary transfer roller to the DC controller 2 Create It Vt Curve By adding the predefined voltage 100V vary depending on the...

Page 369: ...output of color print on A4 paper The ATR sensor detects the patch image density and the developer toner and carrier in the developing assembly cylinder of each color If the results fall outside of the target density range toner supply target will be either increased or decreased F 7 21 1 Video count 2 Data from the patch image scan sensor 3 Data from the ATR sensor 4 Development rotary assembly P...

Page 370: ...lue 14 in three consecutive times E020 xxA9 Detected T D ratio in the ATR control falls below the minimum value 3 in three consecutive times E020 xxC0 Standard deviation in light Sig values of 8 samples is 100 or greater E020 xxC1 Ref standard deviation is 100 or greater in the ATR control E020 xxC2 Standard deviation of Sig average data is 400 or more in default patch detection E020 xxDA Standard...

Page 371: ...nt measurement detected by the front sensor is 30 or less in patch detection E020 xx89 Dark current measurement detected by the rear sensor is 30 or less in patch detection E020 xx8A Dark current measurement detected by the front sensor is 90 or greater in patch detection E020 xx8B Dark current measurement detected by the rear sensor is 90 or greater in patch detection E020 xx90 Calculation result...

Page 372: ...imagePRESS C1 imagePRESS C1 Printer imagePRESS C1 This equipment performs ACVC control which determines the most suitable cleaning bias in order to clear the residual toner from the surface of ITB F 7 23 1 Brush roller 2 Bias roller DC CON DC controller a Start Up Conditions When power is on during initial multiple rotation During last rotation after 500 printing jobs During initial rotation b Des...

Page 373: ...imal density Memo T 7 11 1 Vt Application Estimate the voltage corresponding the current listed on the environmental table and then apply Vt1 to Vt3 to the bias roller Gauge the current at HVT6 and feed back the results to the DC controller 2 Drawing Target It Vt Curve Measure the current It at the voltages Vt1 to Vt3 and draw an It Vt curve 3 Determining the Cleaning Bias DC controller calculates...

Page 374: ... the drum at every paper interval Afterwards the patch image read sensor PS3 measures the patch patterns to execute toner supply control according to patch density At this point the ATR sensor PS7 reads the sleeve surface of the developing assembly to measure the T D ratio The DC controller evaluates whether to execute toner supply by measuring result of the T D ratio to determine the developing b...

Page 375: ... at the DC controller when given conditions are met DC controller produces patch patterns of each color Y M C Bk on the drum based on this data Subsequently DC controller measures patch patterns with the patch image scan sensor PS3 PS4 PS76 and sends the results back to the main controller Based on the obtained measurements main controller then regulates the gradation correction in order to achiev...

Page 376: ...N CON 2 Start Up Patch Patten Formation Patch Scan PS3 PS4 PS76 D Half Correction Table Update Y M C Bk Example D Half Correction Table for Yellow Observed gradation characteristics Optimum gradation characteristics 0 100 Density Data DC CON Y1 Y2 Y3 Data Output MN CON Y4 Y5 Y6 Y7 Y8 Y10 Y9 Patch Pattern Data Output Main Controller DC Controller Main Controller Density Data Output 100 D Half Corre...

Page 377: ...olor L Y M C Bk on the drum based on this data Subsequently DC controller measures patch patterns with the patch image scan sensor PS3 PS4 PS76 and sends the results back to the main controller Based on the obtained measurements main controller then regulates the gradation correction in order to achieve optimal halftone image This control also produces a standard patch used in the ARCDAT control a...

Page 378: ...4 MN CON 2 Start Up Patch Patten Formation Patch Scan PS3 PS4 PS76 D Half Correction Table Update L Y M C Bk Example D Half Correction Table for Yellow Observed gradation characteristics Optimum gradation characteristics 0 100 Density Data DC CON Y1 Y2 Y3 Data Output MN CON Y4 Y5 Y6 Y7 Y8 Y10 Y9 Patch Pattern Data Output Main Controller DC Controller Main Controller Density Data Output 100 D Half ...

Page 379: ... patch patterns with the patch image scan sensor PS4 PS76 and sends the results back to the main controller Main controller then measures the obtained data up against the backup of ARCDAT standard data Main controller reflects the differences found between the two data as the offset value in D Half results and then in the next page Front Center Rear PDL Character 10 patches PDL Image 10 patches Co...

Page 380: ...n the second printed document As for patch patterns of PS76 PS4 DC CON 1 3 Laser Scanner unit 4 MN CON 2 Comparison of Obtained Data A and Standard Data A Main Controller Data Input MN CON Data Output MN CON 100 10 25 25 Current Gradation Characteristics 60 Gradation Characteristics after Gradation Correction PS4 PS76 Sending the Obtained Data A Patch Scan Start Up DC Controller Patch Pattern Form...

Page 381: ...t to sheet Description Main controller outputs the patch data of each color L Y M C Bk at the DC controller sheet to sheet DC controller produces patch patterns of each color L Y M C Bk on the drum based on this data The total of 5 patterns 1 pattern for each color Subsequently DC controller measures patch patterns with the patch image scan sensor PS4 PS76 and sends the results back to the main co...

Page 382: ... in the second printed document As for patch patterns PS76 PS4 DC CON 1 3 Laser Scanner unit 4 MN CON 2 Comparison of Obtained Data A and Standard Data A Main Controller Data Input MN CON Data Output MN CON 100 10 25 25 Current Gradation Characteristics 60 Gradation Characteristics after Gradation Correction PS4 PS76 Sending the Obtained Data A Patch Scan Start Up DC Controller Patch Pattern Forma...

Page 383: ...aracteristics correction control Memo This control is executed by the automatic gradation correction provided in the user mode Switch the Reader PASCAL and Printer PASCAL in the following mode System administration setting Device administration setting Automatic gradation correction Method of automatic gradation correction Reader PASCAL Control This machine performs PASCAL control image characteri...

Page 384: ...N DC CON Reader Read the data of test patterns Output the test patterns Activation Set the output test print in the reader unit Read the test print Reader unit Create an image correction table in the main controller M Y C Bk Example Image correction table for Color M Actual gradation characteristics Ideal image characteristics 0 100 Data output reader unit M1 M2 M3 M4 M5 Data output MN CON M63 M64...

Page 385: ...cteristics F 7 43 1 Color sensor driver PCB 2 Color sensor PCB 3 ROM PCB 4 Paper 5 Toner image 6 Photo unit 7 LED 8 Color sensor solenoid 9 Color sensor roller NM CON main controller DC CON DC controller The machine transports the test pattern to the reverse vertical path unit at a constant speed 105g m2 or less and transports it from the reverse vertical path unit to the duplexing feeding unit at...

Page 386: ...eveloping unit it drops by its own weight when the developing rotary is rotating and will be collected to the waste toner bottle by the waste toner feeding screw located inside the rotary shaft Activation Read the test pattern Color sensor Create an image correction table in the main controller M Y C Bk Example Image correction table for Color M Actual gradation characteristics Ideal image charact...

Page 387: ...R control which works for supplying developer and also discharging deteriorated carrier to increase the life of each developing unit The supplied developer is transported by the developer stirring screw in the developing unit After the waste toner is discharged by the developer stirring screw in the developing unit to the discharge mouth of the developing unit it drops by its own weight when the d...

Page 388: ...r imagePRESS C1 The primary charging bias is created to charge the photosensitive drum surface with even minus electric potential as a preparation for image formation The primary charging bias provides two types of biases primary charging DC bias and grid DC bias These biases are created in the high voltage PCB 1 based on an instruction by the DC controller and applied to the primary charging wire...

Page 389: ...se and it rotates the cleaner screw This moves the wire cleaner to the front side or backside to clean the charging wire The DC controller drives the primary charging cleaning motor by controlling two primary charging wire cleaning motor drive signals PRIM_WIRE_M_1 PRIM_WIRE_M_2 via the side driver PCB The relationship between the drive signal output from the DC controller and the cleaning operati...

Page 390: ...nment COPIER OPTION BODY In the high temperature humidity environment COPIER OPTION BODY 7 5 3 Pre Transfer Charging Bias Control 0012 8168 imagePRESS C1 P imagePRESS C1 imagePRESS C1 Printer imagePRESS C1 The pre transfer charging bias is applied to the toner on the photosensitive drum when development is performed in order to align the electric potential for the toner layer formed on the ITB The...

Page 391: ...o clean the charging wire The DC controller drives the pre transfer charging wire cleaning motor by controlling two pre transfer charging wire cleaning motor drive signals DRUMPOST_M_11 DRUMPOST_M_2 via the side driver PCB The relationship between the drive signal output from the DC controller and the cleaning operation is shown below When DRUMPOST_M_1 is 0 the wire cleaning moves to the backside ...

Page 392: ...every printing This removes the remanent charge on the drum surface and realizes a stable image formation The DC controller turns on off the pre exposure LED by controlling the pre exposure LED drive signal PRE_EXP_LED_ON via the side driver PCB The following drive signal is output from the DC controller When PRE_EXP_LED_ON is 0 the pre exposure LED lights off When PRE_EXP_LED_ON is 1 the pre expo...

Page 393: ... L Y M C Bk are stored inside the rotary When making prints the developing rotary motor M4 rotates the rotary counterclockwise The mechanism is to make the 5 color developing units sequentially face against the photosensitive drum The developing rotary motor M4 a stepping motor executes locking unlocking of the rotary A sensor PS21 is equipped in the rotary to detect the position of the rotary uni...

Page 394: ...ag is equipped at the back of the rotary The DC controller detects the rotary s home position to let the detection flag pass the PS21 Based on this home position the DC controller rotates the rotate the rotary and then stops the rotary at the specified position The rotary stop positions are the following 11 points home position 1 point developing standby position 2 point total each 1 point for mon...

Page 395: ...ping rotary driver sequence error in the case that there is an operational instruction during the drive of the rotary motor M Y C Bk Home position Developing standby position full color M C Bk Y Developing standby position monochrome Bk Y C M PRINT LSTR PSTBY PINTR developing rotary motor rotary HP sensor PS21 laser scanner motor ITB home position signal PVREQ signal laser Turning ON the start key...

Page 396: ...controller detects the rotary s home position to let the detection flag pass the PS21 Based on this home position the DC controller rotates the rotate the rotary and then stops the rotary at the specified position The rotary stop positions are the following 14 points home position 1 point developing standby position 3 point total each 1 point for monochrome and color developing position of each co...

Page 397: ...at there is an operational instruction during the drive of the rotary motor M Y C Bk Home position Developing standby position 5 color full color L mono color M C Bk Y Developing standby position Bk mono color Bk Y C M Developing standby position 4 color full color L Bk M C Y L L L Y L M C BK PRINT LSTR PSTBY PINTR developing rotary motor rotary HP sensor PS21 Turning ON the start key Timing that ...

Page 398: ...pigments The configuration and function of the developing assembly are shown below T 7 14 F 7 64 7 7 3 Developing Assembly Drive Control 0012 7125 imagePRESS C1 P imagePRESS C1 The developing assembly consists of the developing cylinder developing stirring screw A and developing stirring screw B applying driving load When the developing motor M3 and developing clutch CL1 are turned on driving load...

Page 399: ... Control 0012 7127 imagePRESS C1 P imagePRESS C1 The developing bias is created to apply toner on the electrostatic latent image on the surface of the photosensitive drum The developing bias provides two types of biases developing DC bias and developing AC bias These biases are created in the high voltage PCB based on an instruction from the DC controller and applied to the developing cylinder at ...

Page 400: ...surface of the photosensitive drum The developing bias provides two types of biases developing DC bias and developing AC bias These biases are created in the high voltage PCB based on an instruction from the DC controller and applied to the developing cylinder at a specified timing The developing DC bias value is determined based on the result of electric potential control DC CON DEV_CL_AC_ON DEV_...

Page 401: ...d toner level sensor When the toner bottle is set to the main unit toner is transported to the hopper unit and sent to the developing assembly on a timely basis The following seven types of electric loads are used in the toner supply route Motor 2 types cartridge motor hopper motor Sensor 3 types toner supply volume sensor toner replacement cover sensor toner level sensor Clutch 1 type developing ...

Page 402: ...bottles L Y M C Bk Each toner bottle consists of toner and a stirring plate The hopper unit consists of the toner supply screw toner feeder screw and toner level sensor When the toner bottle is set to the main unit toner is transported to the hopper unit and sent to the developing assembly on a timely basis The following seven types of electric loads are used in the toner supply route Motor 2 type...

Page 403: ...4 Toner replacement cover sensor TS1 to TS5 Toner level sensor piezo sensor 7 8 3 Toner Bottle Presence Detection 0012 9295 imagePRESS C1 P imagePRESS C1 This machine detects the presence of the toner bottle when the side driver PCB detects the toner bottle presence detection switch SW7 to SW10 The machine rotates the knob of the toner bottle of which protrusion presses the micro switch SW7 to SW1...

Page 404: ... the main unit toner in the bottle freely falls into the hopper unit In addition since the machine drops the toner remained in the bottle into the hopper unit it rotates the toner bottle motor M27 M30 after the developing assembly toner supply This rotates the stirring plate and removes the toner in the bottle The developing assembly toner supply as the next step is performed by the hopper motor M...

Page 405: ...to supply the specified amount of toner into the developing assembly At toner supply the side driver PCB monitors this sensor while activating the hopper motor After toner supply is completed the motor is stopped Accurate toner supply is completed by this step Related Error Code E025 0101 Y toner retainer motor error E025 0201 M toner retainer motor error E025 0301 C toner retainer motor error E02...

Page 406: ...t toner in the bottle freely falls into the hopper unit In addition since the machine drops the toner remained in the bottle into the hopper unit it rotates the toner bottle motor M27 M31 after the developing assembly toner supply This rotates the stirring plate and removes the toner in the bottle The developing assembly toner supply as the next step is performed by the hopper motor M39 to M43 dev...

Page 407: ...le the toner feeding screw is operated Related Error Code E025 0103 Y toner retainer motor connection detection error E025 0203 M toner retainer motor connection detection error E025 0303 C toner retainer motor connection detection error E025 0403 Bk toner retainer motor connection detection error E025 0503 L toner retainer motor connection detection error In the case of detecting that the connect...

Page 408: ...he toner level is 10 or less and the detection result will be sent to the side driver PCB The side driver PCB sends Toner Low 2 message to the main controller via the DC controller when the toner level reaches 0 1 When the toner is empty this machine stops operation 2 The toner level at which the Toner Low message appears can be changed to a different value anywhere between toner levels 5 and 100 ...

Page 409: ...ied print A4 200 print color ratio 10 after the toner level reaches 0 it sends Toner Empty message to the main controller Piezo sensor detection The mechanism of piezo sensor detection is that piezoelectric oscillator toner sensor TS1 to TS5 placed on the side of the hopper assembly determines the presence of toner in the hopper assembly This detection is activated when the toner level is 10 or le...

Page 410: ... 14 Secondary transfer cleaning bias roller 15 Secondary transfer inside roller 7 9 2 Transfer Bias Control 0013 7364 imagePRESS C1 P imagePRESS C1 imagePRESS C1 Printer imagePRESS C1 There are primary transfer bias used at the primary transfer assembly and secondary transfer bias used at the secondary transfer assembly There are three kinds of bias DC bias for primary transfer DC reverse bias for...

Page 411: ...control and is collected by the photosensitive drum cleaner Tension roller bias applied bias DC To prevent toner splash at roller position with belt pulled two potential plates covering ITB are installed Applying bias to three tension rollers tension roller bias against these potential plates prevents the toner splash Electric field is produced between the tension roller and the potential plate wh...

Page 412: ...e side driver PCB F 7 78 1 ITB drive roller 2 ITB cleaning screw 3 ITB cleaner 4 Brush roller 5 Bias roller 6 Cleaner blade 7 Side driver PCB PS24 Brush roller home position sensor M2 Drum ITB motor M18 Brush roller attachment detachment motor M26 Brush roller drive motor DC CON DC controller 7 9 4 ITB Cleaner Attachment Detachment Control 0013 6773 imagePRESS C1 P imagePRESS C1 imagePRESS C1 Prin...

Page 413: ...ent detachment cam clockwise See the following chart B The brush roller is separated from the ITB F 7 79 1 Side driver PCB 2 Attachment detachment cam 3 Attachment detachment arm 4 Brush roller M18 Brush roller attachment detachment motor M26 Brush roller drive motor DC CON DC controller 7 9 5 ITB Cleaner Attachment Detachment Detection 0013 6824 imagePRESS C1 P imagePRESS C1 imagePRESS C1 Printer...

Page 414: ...ere is any fault E078 0011 Brush roller attachment detachment motor error If HP sensor is displaced logically at the time of executing the operation it should be error 7 9 6 Overview of the Secondary Transfer Assembly 0013 7782 imagePRESS C1 P imagePRESS C1 imagePRESS C1 Printer imagePRESS C1 The secondary transfer assembly has the secondary transfer outside roller attachment detachment motor M17 ...

Page 415: ...river PCB to perform attachment detachment The following is the timing of attachment detachment 1 After completing primary transfer the DC controller outputs the secondary transfer outside roller attachment detachment motor drive signal 2 The clockwise rotation of the attachment detachment cam pushes the attachment detachment plate and pushes the attachment detachment arm down thereby locking the ...

Page 416: ...agePRESS C1 Printer imagePRESS C1 This machine performs home position detection to detect the position of the secondary transfer outside roller The DC controller monitors the output of the secondary transfer outside roller home position sensor PS23 to perform this detection At power ON or opening closing the front cover the DC controller detects the position of the secondary transfer outside rolle...

Page 417: ...vation of the secondary transfer outside roller attach ment detachment motor M17 this status should be judged as error 7 9 9 Secondary Transfer Roller Cleaning Control 0013 8138 imagePRESS C1 P imagePRESS C1 imagePRESS C1 Printer imagePRESS C1 This machine collects the patch pattern remained on the ITB and the residual toner on the secondary transfer outside roller into the waste toner case beneat...

Page 418: ...e secondary transfer outside roller is separated from the ITB F 7 84 1 ITB 2 Secondary transfer inside roller 3 Secondary transfer outside roller 4 Brush roller 5 Bias roller 6 Blade 7 Waste toner 8 Waste toner case 9 Feeding driver PCB M37 Secondary transfer outside roller drive motor DC CON DC controller Detection by Waste Toner Counter The waste toner level collected in the waste toner case is ...

Page 419: ... For full color print the DC controller produces sub scanning synchronized signal PVREQ four times based on this signal send them to the main controller After that the DC controller receives the video data for each color four times from the main controller and forms the toner image for each color in order on the specified position on the ITB F 7 85 1 ITB 2 Reflecting surface 3 Side driver PCB PS1 ...

Page 420: ...ore 03xx ITB HP was not detected only once ITB home position sensor A B should have detected alternately however the same HP were continuously detected 7 9 11 ITB Home Position Detection 0020 4177 imagePRESS C1 Printer imagePRESS C1 This machine detects the ITB home position to adjust the reading position of the image The ITB home position sensor PS1 PSS2 detects the home position detection surfac...

Page 421: ... 5 Full color one sheet print PVREQ signal image demanding signal for each color is produces based on A surface ITB home position detection signal I_TOP1A The image is formed based on this PVREQ signal F 7 90 2 5 Full Color 2 Sheet Continuous Printing 2 image printing See after mentioned note PVREQ signal image demanding signal for each color is produced based on the A surface ITB home position de...

Page 422: ...form the ITB home position detection at monocolor printing After determining the home position by the timer inside the DC controller PVREQ signal image demanding signal is produced The image is formed based on this PVREQ signal F 7 94 Related Error Code E070 ITB HP detection fault error xx 01 ITB home position sensor B xx 02 ITB home position sensor A only at ITB 1 1 speed XX 00 No discrimination ...

Page 423: ...e drum This unit is composed of five parts It cleans the photosensitive drum to be ready for the next print The residual toner collected by the brush roller and the cleaning blade is scraped by the scraper on the brush roller collected by the waste toner feed screw into the waste toner case at the back of the machine These driving loads are controlled by the DC controller and transmitted by turnin...

Page 424: ...waste toner discharged from the outlets of three image forming units drum cleaning unit toner developing assembly ITB cleaning unit into the waste toner bottle The DC controller activates the developing motor M3 to rotate the screw inside the waste toner pipe and transfer the waste toner The waste toner pipe is connected with the toner exhaust outlets Waste toner is transferred by the M3 drive to ...

Page 425: ...r bottle Detection by the magnetic sensor Detection by the waste toner counter The DC controller refers to these detection results for each print at power ON and opening closing the front door When the waste toner level exceeds the specified value the DC controller sends two kinds of messages full with waste toner alarm full with waste toner to the main controller The following are the display mes...

Page 426: ...etic sensor PS63 installed at the back of the waste toner bottle detects the waste toner level This detection is performed when the waste toner level is 0 to 80 The detection results are sent to the DC controller When the waste toner level reaches 80 the DC controller notices the full waste toner alarm to the main controller Memo The magnetic sensor changes the output due to the carrier level in t...

Page 427: ... 3 000 sheets 2 500 sheets Calculated for small size image ratio 5 document large size 1 250 sheets 1 250 sheets Calculated for small size image ratio 10 document large size 625 sheets These are the targets The values vary due to the usage of this machine Related Error Code E013 0001 Full waste toner error When the value of the soft counter exceeds the specified value E013 0002 Waste toner screw l...

Page 428: ...FF the heater when detecting the upper limit of temperature F 7 99 1 Thermo sensor 2 Thermistor 3 Photosensitive drum 4 Drum heater The drum heater control is activated by turning ON the environmental switch on the inside left side of the machine regardless of whether the main switch is turned on or off Temperature control by the thermo sensor 32 deg C 42 deg C is possible by switching the drum te...

Page 429: ...surface The thermal reed switch inside the ITB constantly measures the ITB temperature ITB temperature is controlled by repeating ON OFF of the ITB heater Memo When ITB temperature is low at printing etc ITB absorb the heat of the photosensitive drum to reduce the drum temperature ITB heater keeps the fixed temperature 45 deg C and prevents the reduction of the temperature of the drum surface The ...

Page 430: ...ironmental switch on the inside left side of the machine when the main switch is ON and also OFF F 7 102 1 Environmental switch Reference The thermistor for the temperature is used Then the temperature of ITB heater is not adjustable The temperature of the ITB heater cannot be checked by the service mode 1 2 3 ON ON 1 ...

Page 431: ...Chapter 7 7 82 ...

Page 432: ...rotate the drum clockwise If the drum is rotated clockwise which is the reverse of its normal direction the scoop up sheet may become soiled and toner may scatter 2 Disconnect the 6 connectors 1 and remove the cable from the cable guide 2 and the clamp 3 F 7 104 3 Disconnect the 1 connector 1 and the 7 connectors 2 F 7 105 4 Remove the 5 screws 1 F 7 106 5 Loosen the 3 processing link shafts 1 Che...

Page 433: ...inter imagePRESS C1 1 Remove the drum fixing mount 1 1 screw 2 F 7 113 Points to Note When Attaching the Drum Fixtures When attaching the drum fixtures be sure not to rotate the drum clockwise If the drum is rotated clockwise which is the reverse of its normal direction the scoop up sheet may become soiled and toner may scatter 2 Disconnect the 6 connectors 1 and remove the cable from the cable gu...

Page 434: ...se lever 1 in the direction below F 7 118 7 Slide the fixing feeding unit 1 When sliding the fixing feeding unit be sure to completely disconnect the connectors 1 in step 3 F 7 119 8 Hold down the claw 1 and then slide the fixing feeding unit F 7 120 9 Slide the processing unit 1 F 7 121 10 Place the A3 paper 1 onto the drum as shown in the figure This is for the purpose of light shielding 1 2 1 1...

Page 435: ...ge PRESS C1 1 Open the front cover 2 Detach the processing unit cover 3 Lift the hopper unit 4 Remove the primary corona assembly page 7 86 Reference Remov ing the Primary Corona Assembly 5 Remove the pre transfer corona assembly page 7 88 Reference Re moving the pre transfer corona assembly 6 Remove the drum unit page 7 89 Reference Removing the Drum Unit 7 Remove the photosensitive drum page 7 9...

Page 436: ...ation for Removing the Primary Grid Plate 0013 9727 imagePRESS C1 P imagePRESS C1 imagePRESS C1 Printer image PRESS C1 1 Open the front cover 2 Detach the processing unit cover 3 Lift the hopper unit 4 Remove the Primary Corona Assembly page 7 86 Reference Remov ing the Primary Corona Assembly 7 14 5 2 Removing the Primary Grid Plate 0013 9728 imagePRESS C1 P imagePRESS C1 imagePRESS C1 Printer im...

Page 437: ...shown by the arrow to remove it When removing be sure not to cut the corona wire 2 F 7 134 Points to Note when attaching the Primary Corona Assembly Slider When attaching the primary corona assembly slider 1 and the primary co rona assembly pad holder 2 fit them in the direction shown in the figure F 7 135 7 14 8 Pre transfer Charging Assembly 7 14 8 1 Preparation for removing the Pre transfer Cor...

Page 438: ...Ref erence Removing the Pre transfer corona assembly pad folder 7 14 10 2 Removing the Pre transfer Corona Assembly Slider 0013 9736 imagePRESS C1 P imagePRESS C1 imagePRESS C1 Printer image PRESS C1 1 Slide the pre transfer corona assembly slider hook 1 in the direction shown by the arrow A Be careful not to get the corona wire stuck on and then turn the pre transfer corona assembly slider 2 in t...

Page 439: ...ep these points also when handling all of the photosensitive drums 7 14 12 2 Preparation for Removing the Photosensitive Drum 0013 9747 imagePRESS C1 P imagePRESS C1 imagePRESS C1 Printer image PRESS C1 1 Open the front cover 2 Remove the process unit cover 3 Hold up the hopper unit 4 Remove the primary corona assembly page 7 86 Reference Remov ing the Primary Corona Assembly 5 Remove the pre tran...

Page 440: ...port Plate Front Rear When mounting the seal support plate front rear make the seal support plate 2 on the scoop up sheet 1 F 7 149 When attaching the seal support plate front 1 be sure to support the area shown in 2 so that the seal support plate front is not tilted F 7 150 7 14 14 Seal Support Plate Rear 7 14 14 1 Preparation for Removing the Seal Support Plate Rear 0013 9753 imagePRESS C1 P ima...

Page 441: ...Removing the Drum Cleaning Pre Exposure LED Unit 7 14 15 2 Removing the Scoop Up Sheet Support Plate 0013 9791 imagePRESS C1 P imagePRESS C1 imagePRESS C1 Printer image PRESS C1 1 Detach the scoop up sheet support plate 1 2 screws 2 F 7 155 7 14 16 End Seal Front 7 14 16 1 Preparation for Removing the End Seal Front 0013 9741 imagePRESS C1 P imagePRESS C1 imagePRESS C1 Printer image PRESS C1 1 Ope...

Page 442: ...h the seal support plate front page 7 91 Reference Removing the Seal Support Plate Front 7 14 18 2 Removing the Drum Cleaner Brush 0013 9758 imagePRESS C1 P imagePRESS C1 imagePRESS C1 Printer image PRESS C1 1 Remove the drum cleaner brush 1 3 E rings 2 2 gears 3 2 bearings 4 2 sponges 5 F 7 158 7 14 19 Photosensitive Drum Cleaning Blade 7 14 19 1 Preparation for Removing the Drum Cleaning Blade 0...

Page 443: ...he direction of the ar row F 7 165 6 Detach the hopper right inside cover 1 6 screws 2 F 7 166 7 Remove two toner retainer partitions 1 4 screws 2 F 7 167 8 Remove one connector 1 and one screw 2 F 7 168 9 Hold up the sub hopper 1 insert the paper 2 underneath as in the fol lowing figure and pull it out while preventing the toner from pouring F 7 169 7 14 20 3 Removing the Sub Hopper Unit 0020 512...

Page 444: ...n of the arrow to release the lock 5 Hold the grip of the toner retainer 2 pull it out in the direction of the ar row F 7 173 6 Detach the hopper right inside cover 1 6 screws 2 7 Detach the hopper left inside cover 3 4 screws 4 F 7 174 8 Remove two toner retainer partitions 1 4 screws 2 F 7 175 9 Remove one connector 1 and one screw 2 F 7 176 10 Hold up the sub hopper 1 insert the paper 2 underne...

Page 445: ...rinter image PRESS C1 1 Open the front cover 2 Remove the process unit cover 3 Hold up the hopper unit 4 Pull out the process unit page 7 83 Reference Sliding the Processing Unit 7 14 21 2 Removing the Developing Assembly 0014 0524 imagePRESS C1 P imagePRESS C1 imagePRESS C1 Printer image PRESS C1 1 Remove the developing assembly cover 1 1 screw 2 F 7 180 2 Hold the gear of the developing rotary 1...

Page 446: ... C1 P imagePRESS C1 imagePRESS C1 Printer image PRESS C1 1 Detach the upper rear right cover 2 Detach the upper rear cover 7 14 22 2 Removing the Developing Clutch 0013 9396 imagePRESS C1 P imagePRESS C1 imagePRESS C1 Printer image PRESS C1 1 Detach the grounding plate 1 3 screws 2 F 7 185 2 Remove the connector 1 4 clamps 2 F 7 186 3 Remove 3 clamps 1 F 7 187 4 Remove the DC controller box cover ...

Page 447: ...s 2 F 7 192 9 Remove the flywheel 2 screws 2 F 7 193 10 Remove the tensioner 1 1 spring 2 1 screw 3 F 7 194 Points to Note When Mounting the Tensioner In the case of mounting the tensioner mount it with the spring 2 first and then with the screw 3 11 Remove the timing belt 1 F 7 195 12 Remove the 8 clamps 1 disconnect the connector 2 and remove the edge saddle 3 1 1 1 1 1 3 2 2 2 2 1 1 2 1 3 2 1 ...

Page 448: ...l out the fixing feeding unit 8 Remove the intermediate transfer unit page 7 100 Reference Remov ing the Intermediate Transfer Unit 7 14 23 2 Removing the ITB Cleaning Unit 0013 9712 imagePRESS C1 P imagePRESS C1 imagePRESS C1 Printer image PRESS C1 1 Remove the mounts the front and the rear 1 4 screws 2 F 7 199 2 Move the ITB cleaning unit 1 in the direction of A and then move it in the direction...

Page 449: ... Drum Unit 7 Pull out the fixing feeding unit 7 14 24 2 Removing the Intermediate Transfer Unit 0014 0075 imagePRESS C1 P imagePRESS C1 imagePRESS C1 Printer image PRESS C1 1 Remove the high voltage connector cover 1 F 7 203 2 Disconnect the 3 connectors 1 F 7 204 3 Free the 2 harnesses 1 from the harness guide 2 4 Remove the ITB fan duct cover unit 3 2 screws 4 F 7 205 5 Remove the ITB drive unit...

Page 450: ...ter Roller Unit 0013 9762 imagePRESS C1 P imagePRESS C1 imagePRESS C1 Printer image PRESS C1 1 Remove the lever 1 1 screw 2 F 7 210 2 Detach the feeding front cover 1 2 screws 2 F 7 211 Points to Note When Attaching the Feeding Front Cover The feeding front cover has the button to open the lower cover of the fixing feed unit To prevent the bar at the end of the button from being broken take care t...

Page 451: ... 0013 9713 imagePRESS C1 P imagePRESS C1 imagePRESS C1 Printer image PRESS C1 1 Open the front door 2 Detach the process unit cover 3 Lift the hopper unit 4 Remove the primary charging assembly page 7 86 Reference Re moving the Primary Corona Assembly 5 Remove the pre transfer charging assembly page 7 88 Reference Re moving the pre transfer corona assembly 6 Remove the drum unit page 7 89 Referenc...

Page 452: ...C1 imagePRESS C1 Printer image PRESS C1 1 Open the front cover 2 Detach the process unit cover 3 Lift the hopper unit 4 Remove the primary charging assembly page 7 86 Reference Re moving the Primary Corona Assembly 5 Remove the pre transfer charging assembly page 7 88 Reference Re moving the pre transfer corona assembly 6 Remove the drum unit page 7 89 Reference Removing the Drum Unit 7 Pull out t...

Page 453: ...y Transfer Inside Roller 0013 9717 imagePRESS C1 P imagePRESS C1 imagePRESS C1 Printer image PRESS C1 1 Open the front cover 2 Detach the process unit cover 3 Lift the hopper unit 4 Remove the primary charging assembly page 7 86 Reference Re moving the Primary Corona Assembly 5 Remove the pre transfer charging assembly page 7 88 Reference Re moving the pre transfer corona assembly 6 Remove the dru...

Page 454: ...agePRESS C1 imagePRESS C1 Printer image PRESS C1 1 Open the front cover 2 Detach the process unit cover 3 Lift the hopper unit 4 Remove the primary charging assembly page 7 86 Reference Re moving the Primary Corona Assembly 5 Remove the pre transfer charging assembly page 7 88 Reference Re moving the pre transfer corona assembly 6 Remove the drum unit page 7 89 Reference Removing the Drum Unit 7 P...

Page 455: ...the ITB cleaner brush unit 1 by shifting it in the direction of ar row F 7 234 2 Remove 2 E rings 1 1 bearing 2 1 bushing 3 and 1 gear 4 F 7 235 3 Remove the ITB cleaner brush small 1 by shifting it in the direction of arrow 1 bushing 2 1 bearing 3 F 7 236 7 14 34 Secondary Transfer Roller Brush Upper 7 14 34 1 Preparation for Removing the Secondary Transfer Roller Brush Upper 0013 9773 imagePRESS...

Page 456: ...g feeding unit 8 Remove the intermediate transfer unit page 7 100 Reference Remov ing the Intermediate Transfer Unit 9 Remove the ITB cleaning unit page 7 99 Reference Removing the ITB Cleaning Unit 10 Remove the ITB cleaner brush large page 7 105 Reference Re moving the ITB Cleaner Brush Large 7 14 36 2 Removing the ITB Bias Roller Cleaning Blade Upper 0013 9722 imagePRESS C1 P imagePRESS C1 imag...

Page 457: ...a assembly 7 Remove the drum unit page 7 89 Reference Removing the Drum Unit 7 14 38 2 Removing the Potential Sensor 0014 0065 imagePRESS C1 P imagePRESS C1 imagePRESS C1 Printer image PRESS C1 1 Remove the process unit guide 1 2 screws 2 F 7 245 2 Remove the duct 1 by shifting it in the direction of the arrow 1 screw 2 F 7 246 3 Remove the potential sensor 1 by removing the claw 2 1 connector 3 F...

Page 458: ...hutter assembly 1 when the temperature reaches 158 deg C Release hand from the shutter assembly when the drum rotation stops approx 20 sec F 7 253 9 Execute the service mode COPIER FUNCTION DPC OFST 10 Return the value of the service mode COPIER FUNCTION IN STALL AINR OFF as 0 11 Turn OFF the main power switch 12 Attach the potential sensor onto the main body 7 14 39 ATR Sensor Unit 7 14 39 1 Prep...

Page 459: ... developing rotary clockwise When plugging in the connector 1 wrap the harness 3 around the wire saddle 2 once F 7 259 7 14 40 Drum Thermal Sensor Unit 7 14 40 1 Preparation for Removing the Drum Thermal Sensor Unit 0014 0066 imagePRESS C1 P imagePRESS C1 imagePRESS C1 Printer image PRESS C1 1 Open the front cover 2 Detach the process unit cover 3 Lift the hopper unit 4 Pull out the process unit p...

Page 460: ...Charging Wire 7 14 42 1 Preparation for Setting Up Charging Wire 0014 0978 imagePRESS C1 P imagePRESS C1 imagePRESS C1 Printer image PRESS C1 1 Open the front cover 2 Detach the process unit cover 3 Lift the hopper unit 4 Remove the primary charging assembly page 7 86 Reference Re moving the Primary Corona Assembly 5 Remove the primary grit plate page 7 87 Reference Removing the Primary Grid Plate...

Page 461: ... the charging wire positioning F 7 269 In case of the primary charging assembly lead the charging wire as indicated below F 7 270 9 Assemble the primary charging assembly in the reverse steps 10 Clean the charging wire using lint free paper moistened with alcohol so lution 11 Mount the wire cleaner Be sure the direction when mounting the wire cleaner 7 14 42 3 After Replacing the Primary Charging ...

Page 462: ...Chapter 8 Pickup Feeding System ...

Page 463: ......

Page 464: ... 1 Paper Thickness Detection 8 19 8 4 Cassette 8 20 8 4 1 Overview 8 20 8 4 2 Paper Size Detection 8 21 8 4 3 Setting the Universal Cassette 8 22 8 4 4 Paper Level Sensor 8 22 8 5 Cassette Pick Up Unit 8 25 8 5 1 Configuration 8 25 8 5 2 Behavior of Lifter 8 25 8 5 3 Behavior of Pickup 8 26 8 5 4 Feeding Control Cassette 1 8 27 8 5 5 Pickup Control Cassette 2 to 4 8 28 8 6 Manual Feed Pickup Unit ...

Page 465: ...ation for Removing the Horizontal Registration 8 61 8 10 6 2 Removing the Horizontal Registration 8 61 8 10 7 Pre Fixing Feeding Unit 8 62 8 10 7 1 Preparation for Removing the Pre Fixing Feeding Unit 8 62 8 10 7 2 Removing the Pre Fixing Feeding Unit 8 62 8 10 7 3 Removing the Pre Fixing Feeding Unit 8 63 8 10 8 Fixing Feeder Unit 8 63 8 10 8 1 Preparation for Pulling Removing the Fixing Feeding ...

Page 466: ... 330 2 mm X 482 6 mm 13 x 19 Max image assurance size 316 mm X 466 6 mm Max printable size 323 mm X 476 6 mm single sided 316 mm X 476 6 mm second side of double sided Margin Leading edge 4 0 1 5 1 0 mm Left 2 5 1 5 mm single sided 2 5 2 0 mm second side of double sided Back end 2 0 1 5 mm reference value Paper stack Cassette 1 to 4 550 sheets equivalent of 80 g m2 paper Manual feed tray 100 sheet...

Page 467: ...on roller 9 Color sensor roller 29 Cassette 2 pickup roller 10 Duplexing middle sensor 30 Cassette 2 delivery roller 11 Secondary transfer outside roller 31 Cassette 1 separation roller 12 Duplexing right sensor 32 Cassette 1 delivery roller 13 Registration roller 33 Cassette 1 separation roller 14 Manual feeding pull out roller 34 Reversal 2 roller 15 Manual feeding roller 35 Duplexing reversal d...

Page 468: ...Chapter 8 8 3 8 1 3 Paper Delivery Path 0012 8456 imagePRESS C1 P imagePRESS C1 imagePRESS C1 Printer imagePRESS C1 Face up delivery straight delivery F 8 2 Face down delivery reversal delivery F 8 3 ...

Page 469: ...rrangement of Sensors 0012 8457 imagePRESS C1 P imagePRESS C1 imagePRESS C1 Printer imagePRESS C1 F 8 5 PS36 PS34 PS54 PS30 PS20 PS19 PS25 PS15 PS18 PS17 PS76 PS78 PS28 PS53 PS40 PS26 PS27 PS9 PS12 PS5 6 PS13 PS65 PS14 PS49 PS47 PS56 PS41 PS43 PS55 ...

Page 470: ...Side registration sensor PS26 Vertical path 0 sensor PS27 Confluence sensor PS28 Cassette 1 pickup sensor PS30 Cassette 1 paper sensor PS34 Cassette 2 pickup sensor PS36 Cassette 2 paper sensor PS40 Duplexing right sensor PS41 Cassette 3 paper sensor PS43 Cassette 3 pickup sensor PS47 Cassette 4 pickup sensor PS49 Cassette 4 paper sensor PS53 Vertical path 1 sensor PS54 Vertical path 2 sensor PS55...

Page 471: ... roller M8 Reversal motor M9 Duplexing left motor M11 Duplexing right motor M12 Vertical path upper motor M13 Vertical path middle motor M14 Vertical path lower motor M15 Cassette 1 2 pickup motor M16 Cassette 3 4 pickup motor M37 Secondary transfer outside motor M38 Fixing motor M48 Decurler delivery 1 motor M49 Decurler delivery 2 motor M16 M14 M15 M13 M6 M7 M48 M49 M8 M38 M11 M9 M37 M12 M5 ...

Page 472: ...ding solenoid SL2 Reversal roller separation solenoid SL3 Delivery flapper solenoid SL4 Cassette 1 pickup solenoid SL5 Cassette 2 pickup solenoid SL6 Cassette 3 pickup solenoid SL7 Cassette 4 pickup solenoid SL1 SL2 SL3 SL4 SL5 SL6 SL7 ...

Page 473: ... to Registration Position a In case of Cassette 2 3 4 pickup F 8 8 p1 Point of start of acceleration pre registration stop position p2 Point of deceleration b In case of Cassette 1 pickup F 8 9 Interval Paper delivery speed A 500 mm sec B 600 mm sec C Normal speed mode 500 mm sec 1 3 speed mode 285 mm sec p1 p2 A B C p1 p2 A B C ...

Page 474: ... 1 sensor p2 Point of deceleration Interval Paper delivery speed A 500 mm sec B 255 mm sec to 600 mm sec The time varies depending on the time required from the pickup start to the vertical path 1 sensor ON C Normal speed mode 500 mm sec 1 3 speed mode 285 mm sec ...

Page 475: ...F 8 11 p1 Point of start of deceleration Interval Paper delivery speed A Normal speed mode 285 mm sec 1 3 speed mode 95 mm sec processing speed Interval Paper delivery speed A Normal speed mode 600 mm sec 1 3 speed mode 200 mm sec B Normal speed mode 285 mm sec 1 3 speed mode 95 mm sec processing speed A A B p1 ...

Page 476: ...f the trail edge passes the delivery outlet b In case of face down delivery Decelerate the delivery to prevent the delivery stacking fault due to the downward curl of a sheet F 8 13 Interval Paper delivery speed A Normal speed mode 285 mm sec 1 3 speed mode 95 mm sec processing speed B 314 mm sec Interval Paper delivery speed A Normal speed mode 285 mm sec 1 3 speed mode 95 mm sec processing speed...

Page 477: ...m downstream from the fixing nip area p2 Point of start of deceleration point where a point 40 mm of the trail edge passes the delivery outlet C Normal speed mode 627 mm sec 1 3 speed mode 180 mm sec D 600 mm sec E Normal speed mode 500 mm sec 1 3 speed mode 285 mm sec Interval Paper delivery speed ...

Page 478: ... 1 Stops at pre registration position There are acceleration deceleration in the shaded intervals in the figure 8 2 2 Manual Feeding 0013 5548 imagePRESS C1 P imagePRESS C1 imagePRESS C1 Printer imagePRESS C1 A4 plain paper 2 sheet and face up delivery Interval Paper delivery speed A Normal speed mode 285 mm sec 1 3 speed mode 95 mm sec processing speed B Normal speed mode 627 mm sec 1 3 speed mod...

Page 479: ...apter 8 8 14 F 8 16 Manual feeder holding plate solenoid SL1 Manual feed pre registration drive motor M5 OHT light emitting receiving sensor _ front rear PS5 6 STBY PRINT LSTR Registration drive motor M6 ...

Page 480: ...r PS27 Detect Detect Detect XX0A OHT sensor optical sensor Registration front sensor flag sensor 1 PS5 6 PS12 Detect Detect Not detect XX0B Secondary transfer rear sensor PS13 Detect 2 Not detect Detect 2 XX0C Fixing assembly inlet sensor PS14 Not detect Not detect Detect XX0D Inside delivery sensor PS15 Detect 3 Not detect Detect 3 XX0E Reversal inlet sensor PS17 Detect Detect Detect XX10 Reversa...

Page 481: ...ptical sensor Registration front sensor flag sensor PS5 6 PS12 Indicates that the registration sensor detects paper which length is shorter than as it is specified 0D92 Misprint 2 OHT sensor optical sensor PS5 6 Indicates that the OHT sensor detects the plain paper when OHT is set 0D93 Misprint 3 OHT sensor optical sensor PS5 6 Indicates that the OHT sensor detects OHT when OHT is not set Sensor C...

Page 482: ...sette 3 Cassette 3 4 pickup motor M16 Cassette 3 pickup sensor PS41 Cassette 4 Cassette 3 4 pickup motor M16 Cassette 4 pickup sensor PS47 Sensor N Sensor N 1 Remarks Vertical path 4 sensor PS56 Cassette 4 pickup sensor PS47 Vertical path 3 sensor PS55 Cassette 3 pickup sensor PS43 Vertical path 4 sensor PS56 Vertical path 2 sensor PS54 Cassette 2 pickup sensor PS34 Vertical path 3 sensor PS55 Ver...

Page 483: ...or PS15 Fixing assembly inlet sensor PS14 Detection of the paper wrapping over the fixing assembly Reversal inlet sensor PS17 Inside delivery sensor PS15 Reversal vertical path sensor PS18 Reversal inlet sensor PS17 Duplexing left sensor PS19 Reversal vertical path sensor PS18 Duplexing middle sensor PS20 Duplexing left sensor PS19 Duplexing right sensor PS40 Duplexing middle sensor PS20 Decurler ...

Page 484: ...hose thickness exceeds the spec ified thickness it considers as jam and stops the driving Purpose prevent cracking the surface of the fixing roller by passing heavy paper that exceeds the specified thickness Duplexing right sensor PS40 Decurler inlet sensor PS76 Decurler outlet sensor PS78 Sensor N Remarks Vertical path 4 sensor PS56 Vertical path 3 sensor PS55 Vertical path 2 sensor PS54 Vertical...

Page 485: ...the presence of a jam Paper thickness sensor jam E20A The paper stops in front of the secondary transfer roller MEMO Double feeding paper detection is not enabled Thus if the double feeding occurs and the thickness of the paper is over 350 u m it is judged as the paper thickness sensor jam Service Mode COPIER ADJUST MISC DF S NK Input the value of the paper thickness sensor Setting Range 1 to 5 Af...

Page 486: ...tches SW0 to SW3 turn OFF and the machine judges as no cassette When switchover AB paper and inch paper use the AB inch switch 3 When setting a cassette the switch SW4 turns OFF ON and recognizes the paper size either the AB or the inch F 8 23 T 8 8 AB size Size SW0 SW1 SW2 SW3 SW4 No cassette OFF OFF OFF OFF OFF A5R ON OFF ON ON OFF A4 ON ON ON ON OFF A4R OFF ON ON ON OFF A3 OFF ON OFF ON OFF B5 ...

Page 487: ...default 8 4 4 Paper Level Sensor 0012 8471 imagePRESS C1 P imagePRESS C1 imagePRESS C1 Printer imagePRESS C1 The paper level is detected based on the ON OFF combinations of the sensors indicated below T 8 10 Inch size Size SW0 SW1 SW2 SW3 SW4 No cassette OFF OFF OFF OFF OFF STMTR ON OFF ON ON ON LTR ON ON ON ON ON LTRR OFF ON ON ON ON LGL OFF ON OFF ON ON 11 x 17 ON ON OFF ON ON EXEC OFF OFF OFF O...

Page 488: ... the paper is fully loaded 1 Tray 5 Lifter motor 2 Paper level sensor flag 6 Lifter gear 3 Cassette paper level 1sensor 7 Cassette paper sensor 4 Cassette paper level 2 sensor 8 Flag 1 3 2 4 5 6 7 8 1 2 OFF OFF ON OFF 1 2 ON ON 1 2 ...

Page 489: ... F 8 25 Paper level sensor 1 1 Paper level sensor 2 2 Paper sensor 3 Paper level Display on the control panel OFF OFF OFF 100 to about 50 of the capacity ON OFF OFF About 50 to 10 of the capacity ON ON OFF Less than about 10 of the capacity ON No paper 3 ...

Page 490: ...unting a cassette the pickup roller descent and unfastening of the sensor flag from the stack height sensor simultaneously As a result of that the cassette lifter motor starts to drive and the lifter moves upward When the stack height sensor detect the surface of the paper the lifter motor stops For the case the lifter motor does not stop for some reasons the limiter and the limit sensor are equip...

Page 491: ...papers are fed from the cassette F 8 29 3 When the cassette 1 pickup sensor PS28 the cassette 1 pickup solenoid SL4 turns ON and moving away the cassette 1 pickup roller 1 from the surface of a paper As a result of that it is possible to pickup only one paper without pulling the subsequent paper In addition in order to prevent the double feeding the torque limiter is mounted to the cassette 1 sepa...

Page 492: ...rder to prevent the delayed pickup and in case the pickup goes ahead the pickup speed is decreased in order to prevent encounter with the prior paper F 8 32 1 Cassette 1 pickup roller 2 Vertical path 1 roller 3 Registration roller PS5 6 OHT sensor light emission reception PS12 Registration sensor PS53 Vertical path 1 sensor Interval Paper Pickup Speed A Pickup start position Vertical path 1 sensor...

Page 493: ...ion point to the registration point is accelerated The detail of control at each cassette Cassette 2 to 4 is the same thus the following is the explanation of the pickup control using the cassette 2 pickup as an example 1 Cassette 2 pickup roller 2 Vertical path 2 roller 3 Registration roller PS5 6 OHT sensor light emitting light receiving PS12 Registration sensor PS54 Vertical path 2 sensor Inter...

Page 494: ... plate fixing component 2 is released and then the lifting plate is lifted 3 F 8 33 2 By the drive of the pre registration motor M5 the manual feed extraction roller 1 and the manual feed roller manual separation roller 2 rotate and then pickup feeding of only 1 sheet of paper is carried out F 8 34 1 Manual feed extraction upper roller 2 Manual feed separation roller 3 Manual feed roller 4 Last pa...

Page 495: ... Paper width is detected by the output from the variable resistor coupled with the move of the slide guide The width of the slide guide on the manual feed tray is adjusted by users by sliding the slide guide when setting paper F 8 35 1 Slide guide rear 2 Variable resistor 3 Manual feed tray 4 Slide guide front 1 2 3 4 ...

Page 496: ...ot to form images within the ITB when the paper is out Only when feeding the last paper the last paper roller 1 rotates The rotation of the last paper roller 1 induces the output of the pulse signal from the last paper sensor PS10 by the slits on the roller When 4 output pulses or more were detected the paper is determined as the last one F 8 36 PS10 PS10 1 1 ...

Page 497: ...xcept OHT ex Plain Paper etc Transmission photosensor OHT sensor front PS5 OHT sensor rear PS6 OHT Flag photosensor pre registration sensor PS12 F 8 37 Also the OHT sensor front PS6 and the OHT sensor rear PS6 detect whether the paper fed into is OHT sheet or not when printing in the OHT mode Jam Code Description 0D90 Indicates that the OHT sheet for CLC out of specification sheet is detected 0D91...

Page 498: ... reaches the specified position position about 19 mm from the reversal 2 roller 1 criterion for the reversal sensor PS17 the duplexing reversal motor M8 stops reverse rotates and then feeds the paper to the duplexing left feeding assembly F 8 39 3 Side registration sensor PS25 performs the side registration detection of paper Then the paper is pressed by the duplexing left roller 1 to remove the s...

Page 499: ...r stops at the re pickup standby position leading edge of the paper at the position about 14mm downstream of the duplexing right roller 1 and then fed to the registration assembly by the duplexing middle motor M11 F 8 41 M11 1 ...

Page 500: ...or PS25 is performed at power on open close of the front cover open close of the right upper cover open close of the right lower cover recovery from the power saving function and end of print and then brought to the 13x19 paper detection position When the paper fed to the duplexing left feeding assembly reaches the duplexing left sensor PS19 side registration motor M21 is turned ON and then the si...

Page 501: ...ation sensor from the paper 1 After separating another 2 mm the machine put the side registration sensor closer to the paper to recognize the position the paper was detected as the edge of the paper F 8 44 2 2 In case no paper is detected in step 1 the machine separates the side registration sensor from the paper 1 by another 2 mm then the machine put the side registration sensor closer to the pap...

Page 502: ...Chapter 8 8 37 8 8 3 A4 size 5 Sheet Circulation 0012 8482 imagePRESS C1 P imagePRESS C1 imagePRESS C1 Printer imagePRESS C1 1 F 8 46 2 F 8 47 3 F 8 48 A Duplexing reversal position 1 2 1 2 1 A ...

Page 503: ...Chapter 8 8 38 4 F 8 49 5 F 8 50 B Duplexing re pickup stop position 6 F 8 51 2 1 3 2 1 B 1 3 2 ...

Page 504: ...Chapter 8 8 39 7 F 8 52 8 F 8 53 9 F 8 54 1 3 2 1 2 4 3 1 2 4 3 ...

Page 505: ...Chapter 8 8 40 10 F 8 55 11 F 8 56 12 F 8 57 1 4 2 3 5 4 1 3 2 1 4 2 5 3 ...

Page 506: ...Chapter 8 8 41 13 F 8 58 14 F 8 59 15 F 8 60 5 1 2 3 4 1 2 3 5 4 1 2 3 4 5 ...

Page 507: ...Chapter 8 8 42 16 F 8 61 1 2 3 4 5 ...

Page 508: ...Chapter 8 8 43 8 8 4 A3 Size 3 Sheet Circulation 0012 8483 imagePRESS C1 P imagePRESS C1 imagePRESS C1 Printer imagePRESS C1 1 F 8 62 2 F 8 63 1 1 ...

Page 509: ...Chapter 8 8 44 3 F 8 64 A Duplexing reversal position 4 F 8 65 2 1 A 2 1 ...

Page 510: ...Chapter 8 8 45 5 F 8 66 6 F 8 67 2 1 2 1 ...

Page 511: ...Chapter 8 8 46 7 F 8 68 8 F 8 69 3 2 1 3 2 1 ...

Page 512: ...Chapter 8 8 47 9 F 8 70 10 F 8 71 3 2 1 2 3 1 ...

Page 513: ...Chapter 8 8 48 11 F 8 72 B Duplexing re pickup stop position 12 F 8 73 3 2 B 1 3 1 2 ...

Page 514: ...Chapter 8 8 49 13 F 8 74 14 F 8 75 1 2 3 1 2 3 ...

Page 515: ...SS C1 1 When the delivery solenoid SL3 is turned OFF paper is fed in the direction of duplexing feeding assembly M10 Duplexing reversal motor PS17 Reversal inlet sensor Delivery Method Operation Mode Face up delivery When printing by 1 on 1 copying When printing multi copies from 1 sheet of original Face down delivery is used when the finisher is mounted When selecting non fixed size for manual tr...

Page 516: ...Chapter 8 8 51 F 8 77 SL3 M10 PS17 ...

Page 517: ...everse rotates 100msec after its stop and then the paper is fed in the direction of the decurler assembly with its trailing edge at the top F 8 79 4 When the leading edge of the prior paper exceeds 20 mm upstream of the decurler roller 1 reversal separation solenoid SL2 is turned ON in preparation for the approach of the subsequent paper and then the reversal 1 roller 2 is moved away The subsequen...

Page 518: ...e previous paper exceeds 40 mm upstream of the reversal 1 roller 1 the reversal separation solenoid SL2 is turned OFF to bring the reversal 1 roller 1 into contact Subsequent paper is fed to the reversal stop position F 8 81 M7 SL2 SL3 1 ...

Page 519: ...2 1 Decurler drive 1 roller 2 Decurler adjustment 1 roller 3 Decurler drive 2 roller 4 Decurler adjustment 2 roller 5 Decurler delivery roller 6 Decurler advancement adjustment 1 cam 7 Decurler advancement adjustment 2 cam PS76 Decurler inlet sensor PS78 Decurler outlet sensor PS79 Decurler advancement 1 HP home position sensor PS80 Decurler advancement 2 HP home position sensor PS81 Decurler fron...

Page 520: ...4 1 Decurler adjustment 1 roller 2 Decurler drive 1 roller 3 Decurler adjustment 2 roller 4 Decurler drive 2 roller Controlling Contents 1 Print 1 Determine length of paper advancement 8 levels Conditions paper type coated non coated paper weight paper size toner deposit amount based on video count delivery mode face up face down print mode single sided second side of the double sided print 2 The ...

Page 521: ...rive adjustment 1 roller M50 Decurler advancement adjustment 1 motor 4 During the last rotation after printing the machine returns the decurler advancement adjustment roller to the home position the level of advancement is adjusted to 0 2 Detection of the Home Position Detect the home position for the position control of the decurler advancement adjustment roller F 8 86 PS79 Decurler advancement 1...

Page 522: ...Chapter 8 8 57 0002 Indicates that the HP of the advancement adjustment 2 cam downstream cannot be detected within 2 sec ...

Page 523: ...e Cassette Pickup Unit 0013 9374 imagePRESS C1 P imagePRESS C1 imagePRESS C1 Printer image PRESS C1 A In the case of cassette 1 1 Open the upper right cover 1 to pull out the cassette 1 2 F 8 87 2 Remove the screw 2 to open the upper right cover 1 all the way F 8 88 3 Detach the connector cover 1 1 screw 2 F 8 89 4 Remove the cassette pickup unit 1 1 connector 2 1 screw 3 F 8 90 B In the case of c...

Page 524: ... 3 F 8 98 Cassette 4 F 8 99 8 10 2 Cassette Heater 8 10 2 1 Removing the Cassette Heater 0014 1127 imagePRESS C1 P imagePRESS C1 imagePRESS C1 Printer image PRESS C1 1 Press the cassette release button 1 to take out the cassette 1 and 2 2 F 8 100 2 Detach the cable cover 1 1 screw 2 F 8 101 3 Connect the connector 1 1 2 1 2 1 2 1 2 3 1 2 3 1 2 3 1 1 2 1 2 ...

Page 525: ...sette 1 2 and the cassette 2 3 F 8 105 C In the case of cassette 3 4 Pull out the cassette 3 2 and the cassette 4 3 F 8 106 2 Remove the pickup roller 2 1 hook 1 3 Remove the feed roller 4 1 resin ring 3 4 Remove the separation roller 6 1 resin ring 5 F 8 107 Ref As for pickup roller 1 mount it with the protrusions 2 shown in the fig ure below facing to the rear F 8 108 8 10 4 Manual Feed Roller 8...

Page 526: ...ide rear 4 F 8 112 2 As in the step 1 remove the paper guide center 1 MEMO As for removing mounting the paper guide center it is easier to work by pressing the separation roller shaft 2 F 8 113 3 Pick up the tab 1 of the separation roller to remove the separation roller 2 toward the rear side F 8 114 8 10 6 Horizontal Registration Assembly 8 10 6 1 Preparation for Removing the Horizontal Registrat...

Page 527: ...Connector 4 2 pc F 8 118 5 Draw the registration unit cable 1 from the edge saddle 2 in the direction of an arrow F 8 119 6 Remove the registration base Screw 2 4 screws F 8 120 8 10 7 Pre Fixing Feeding Unit 8 10 7 1 Preparation for Removing the Pre Fixing Feeding Unit 0014 1131 imagePRESS C1 P imagePRESS C1 imagePRESS C1 Printer image PRESS C1 1 Open the front door 2 Pull out the fixing feeding ...

Page 528: ...ng unit 1 3 1 Move it in the direction of the arrow A and then lift it in the direction of the arrow B to remove 3 E rings 2 2 bearings 3 1 gear 4 F 8 125 Points to Note When Mounting the Pre Fixing Feeding Unit In the case of mounting the pre fixing feeding unit make sure to execute af ter passing the harness 1 through a hole of the edge saddle 2 F 8 126 8 10 8 Fixing Feeder Unit 8 10 8 1 Prepara...

Page 529: ... 2 screws 2 F 8 131 Points to Note When Attaching the Feeding Front Cover The feeding front cover has the button to open the lower cover of the fixing feed unit To prevent the bar at the end of the button from being broken take care to attach the feeding front cover so that the bar is in proper position 5 Remove the fixing feeding unit 1 1 screw 2 F 8 132 Points to Note When Removing Mounting the ...

Page 530: ...S C1 imagePRESS C1 Printer image PRESS C1 1 Detach the panel mount cover 1 attached to the upper left cover rear 1 screw 2 F 8 135 2 Disconnect the grounding wire 1 and detach the harness support plate 2 2 screws 3 F 8 136 3 Remove the harness support plate 2 from the reuse band 1 F 8 137 4 Disconnect the 5 connectors 1 F 8 138 5 Open the decurler front cover 1 F 8 139 6 Remove the 2 screws 1 1 1 ...

Page 531: ...ge 8 65 Reference Removing the Decurler 8 10 10 2 Removing the Decurler Sponge Roller upper 0013 9781 imagePRESS C1 P imagePRESS C1 imagePRESS C1 Printer image PRESS C1 1 Open the front door 1 F 8 142 2 Pull the handle 2 of the decurler upper unit 1 toward you to release the lock F 8 143 3 Detach the upper cover 1 in the direction of the arrow 1 screw 2 F 8 144 4 Detach the upper left cover 1 3 sc...

Page 532: ...13 9777 imagePRESS C1 P imagePRESS C1 imagePRESS C1 Printer image PRESS C1 1 Remove the decurler page 8 65 Reference Removing the Decurler 8 10 11 2 Removing the Decurler Sponge Roller lower 0013 9779 imagePRESS C1 P imagePRESS C1 imagePRESS C1 Printer image PRESS C1 1 Open the front door 1 in the direction of the arrow F 8 150 2 Pull out the handle 2 of the decurler upper unit 1 toward you to re ...

Page 533: ...Chapter 8 8 68 F 8 154 1 2 4 3 2 3 4 ...

Page 534: ...Chapter 9 Fixing System ...

Page 535: ...trol of the Fixing Cleaning Web Length Detection 9 25 9 5 3 Detached Attached Mechanism of the Cleaning Web Web Roller 9 26 9 5 4 Refresh Roller Attach Detach Mechanism 9 28 9 6 Protective Functions 9 29 9 6 1 Protective Circuit 9 29 9 6 2 Related Error Code 9 31 9 7 Parts Replacement Procedure 9 34 9 7 1 Fixing Drive Unit 9 34 9 7 1 1 Preparation for Removing the Fixing Drive Second Gear 9 34 9 7...

Page 536: ...ving the Fixing Main Thermistor 9 50 9 7 15 Fixing Sub Thermistor 9 50 9 7 15 1 Preparation for Removing the Fixing Sub Thermistor 9 50 9 7 15 2 Removing the Fixing Sub Thermistor 9 50 9 7 16 Outside Heating Main Thermistor 9 51 9 7 16 1 Preparation for Removing the External Heat Main Thermistor 9 51 9 7 16 2 Removing the External Heat Main Thermistor 9 51 9 7 17 Outside Heating Sub Thermistor 9 5...

Page 537: ...g Bush 9 59 9 7 26 3 After Replacing the Insulating Bush 9 59 9 7 27 Outside Heat Insulating Bush 9 59 9 7 27 1 Preparation for Removing the External Heat Insulating Bush 9 59 9 7 27 2 Removing the External Heat Insulating Bush 9 59 9 7 27 3 When Replacing the External Heat Insulating Bush 9 59 9 7 28 Lower Separation Claw 9 60 9 7 28 1 Preparation for Removing the Lower Separation Plate 9 60 9 7 ...

Page 538: ...Protective mechanism A check is run for the following to cut power to the heater in the event of a fault check on the temperature using the main sub thermistor cutting the supply power using the thermal switch Fixing roller TP1 roller front end contact operating temperature of 180 7 deg C Fixing belt TP2 roller center non contact operating temperature of 130 5 deg C Outside heating roller TP3 roll...

Page 539: ...he fixing roller temporarily 9 Pressure pad Forms an appropriate fixing nip 10 Outside heating cleaning roller Cleans the outside heating roller 11 Cleaning web Cleans the fixing roller via collecting roller 12 Web roller Cleans the toner attached on the collecting roller 13 Fixing inlet guide Determines the advancing angle into the fixing nip area prevents end plate spring crease and friction 14 ...

Page 540: ...trol detection of rapid temperature rise Outside heating roller THM5 Contact temperature control detection of rapid temperature rise Sub thermistor Fixing roller THM2 Contact detection of rapid temperature rise Fixing belt THM4 Contact detection of rapid temperature rise Outside heating roller THM6 Contact detection of rapid temperature rise Thermal switch Fixing roller TP1 Contact 180 7 deg C Fix...

Page 541: ... inlet sensor PS15 Inside delivery sensor PS22 Web length sensor PS59 Fixing belt displacement control sensor front PS60 Fixing belt displacement control HP sensor PS61 Fixing belt attach detach HP sensor PS62 Fixing belt displacement control sensor rear PS66 Outside heating roller HP sensor PS67 Fixing belt state attached sensor SL11 Web solenoid PS61 PS67 PS59 PS62 PS60 PS22 PS66 PS15 PS11 SL11 ...

Page 542: ...r 7 Inlet roller PS59 Fixing belt displacement control sensor front SL11 Web solenoid PS60 Fixing belt displacement control HP sensor M33 Cleaning web attach detach motor PS61 Fixing belt attach detach HP sensor M34 Fixing belt attach detach motor PS62 Fixing belt displacement control sensor rear M35 Fixing belt displacement control motor PS66 Outside heating roller HP sensor M36 Fixing belt drive...

Page 543: ...ixing main heater TP1 Thermal switch fixing roller H2 Fixing sub heater TP2 Thermal switch fixing belt H3 Inlet heater TP3 Thermal switch outside heater H4 Outside heater UN35 AC driver PCB H2 UN35 J1803 J1812 J1804 2 1 3 1 2 1 H1 H3 H4 TP1 TP2 TP3 ...

Page 544: ...er THM5 Main thermistor outside heater THM2 Sub thermistor fixing roller THM6 Sub thermistor outside heater THM3 Main thermistor fixing belt UN2 DC controller PCB THM4 Sub thermistor fixing belt UN2 J1803 J1804 2 3 4 5 6 7 THM1 THM2 THM3 THM4 THM5 THM6 2 4 5 6 7 8 ...

Page 545: ... is separated from the fixing roller In this case the driving source of the fixing belt is switched to the fixing belt drive motor M36 The fixing belt is driven in the stand by mode in order to control temperature It is driven at low speed about 30 40 mm sec to prevent belt displacement F 9 7 1 Fixing roller 2 Fixing belt M36 Fixing belt drive motor M38 Fixing motor UN4 Fixing driver PCB FIX_MTR_O...

Page 546: ... fixing motor M38 is stopped The fixing belt is driven by the fixing belt drive motor M36 Error code E014 Fixing motor error 0001 Indicates that after the stable rotation of the fixing motor the phase lock signal of the fixing motor is not detected for 1 sec or more 0002 Indicates that after the stable rotation of the fixing belt motor the phase lock signal of the fixing belt motor is not detected...

Page 547: ... up 4 Until the fixing roller surface temperature reaches 160 deg C the fixing belt surface temperature reaches 190 deg C and the outside heating roller surface temperature reaches 90 deg C Thereafter shifts to STBY STBY standby Ready for a print request signal Control Temperature fixing roller surface temperature 165 deg C outside heating roller surface temperature 200 deg C fixing belt surface t...

Page 548: ...ime from the print start to delivery of paper Control temperature varies according to the color mode Control Temperature Full color Fixing roller surface temperature 155 deg C Outside heating roller surface temperature 200 deg C Fixing belt surface temperature 95 deg C Black and white Fixing roller surface temperature 160 deg C Outside heating roller surface temperature 200 deg C Fixing belt surfa...

Page 549: ...eipt of the print request signal to sending image signal PRINT print Time from the print start to delivery of paper Control temperature is constant regardless of the color mode Control Temperature Fixing roller surface temperature 155 deg C Outside heating roller surface temperature 200 deg C Fixing belt surface temperature 95 deg C LSTR1 last rotation 1 In the case the fixing belt surface tempera...

Page 550: ...lt Temperature 120 deg C 118 deg C 116 deg C 114 deg C 124 deg C Printing speed 55ppm 50ppm 45ppm Suspend Resume 1 Priority for fixing performance Temperature 126 deg C 124 deg C 122 deg C 120 deg C 130 deg C Printing speed 50ppm 45ppm 40ppm Suspend Resume 2 Priority for productivity Temperature 118 deg C 116 deg C 114 deg C 112 deg C 122 deg C Printing speed 57ppm 55ppm 50ppm Suspend Resume 20 de...

Page 551: ...ead edge by inside delivery sensor it is perceived as wrapping jam of the fixing to stop the fixing motor and separate the fixing belt from the fixing roller When the jam is cleared after the fixing wrapping jam it executes the detection of residual paper at the fixing inlet sensor PS14 F 9 14 PS14 Fixing inlet sensor PS15 Inside delivery sensor Mode Target Temperature Heater State Fixing Roller E...

Page 552: ... and the jam is cleared unlocking of the fixing belt When printing Adding pressure to the fixing belt F 9 15 Content of the Controls In the case of detecting the delay of the arrival of paper lead edge to the inside delivery sensor brake the fixing motor to stop Jam code 010D Afterwards when the jam is cleared and the power is OFF ON execute detection for the residual paper by the fixing inlet sen...

Page 553: ...Chapter 9 9 16 Heavy paper Less than B5 Available Available B5 or more Available Available Paper Paper size Detection for the wrap Detection for the residual ...

Page 554: ...heat roller locks unlocks against the fixing roller by the drive of the external heat detaching motor M45 communicates the cam shaft For controlling locking unlocking control of the external heat roller home position is detected by the external heat detached HP sensor PS66 F 9 16 1 Cam shaft 2 Roller support plate 3 External heat roller 4 Fixing roller M45 External heat detached attached motor PS6...

Page 555: ...detecting the home position 0009 Indicates that a hardware detecting mechanism has detected that the external heat roller has remained in contact with the fixing roller for 300sec or more 0011 In the case that the HP sensor is logically misplaced when executing operation 0101 When completing the operation it s not located at the specified position ...

Page 556: ...elt displacement control HP sensor 3 Steering roller PS62 Fixing belt displacement control sensor rear 4 Swing arm 5 Sensor arm FIX_BELT_HP_SNS Fixing belt HP detecting signal M35 Fixing belt displacement control motor FIX_BELT_SNS1 Fixing belt displacement front side detecting signal UN4 Fixing driver PCB FIX_BELT_SNS2 Fixing belt displacement rear side detecting signal M35 PS60 PS62 PS62 PS59 PS...

Page 557: ...he sensor flag 1 located on the steering roller shaft crosses the light path of the fixing belt displacement control HP sensor PS60 is the home position F 9 18 2 The position of the fixing belt is detected by the sensor arm 2 that locks the edge of the fixing belt 1 and by the fixing belt displacement control sensor front rear PS59 PS62 F 9 19 M35 PS60 1 PS59 PS62 1 2 B A C ...

Page 558: ...causing the skew of the steering roller shaft and the fixing belt is displaced the shaft direction F 9 21 4 In the case of detecting the position of D or E the machine stops the drive to detect as an error because the adjustment of the belt displacement is timed out Error code E007 Belt displacement error 0001 Front side belt displacement error 0002 Rear side belt displacement error 0007 Detection...

Page 559: ...moves up and down and the fixing belt lock unlock the fixing roller HP sensor PS61 detects the home position of the fixing belt fixing belt unit Also to detect that the fixing belt is securely locked the fixing belt attached sensor PS67 detect the locking state of the belt F 9 22 F 9 23 1 Fixing roller PS61 Fixing belt detached attached HP sensor UN4 J3310 1 2 3 4 5 6 FIX_BELT PRESS_MTR_B FIX_BELT...

Page 560: ...ched sensor 3 Fixing belt UN4 Fixing driver PCB 4 Fixing belt unit 5 Fixing belt unit support base FIX_BELT_CONT_HP_SNS Fixing belt home position signal M34 Fixing belt detached attached motor FIX_BELT_CONTACT_SNS Fixing belt attached detecting signal ...

Page 561: ...ms 9 5 1 Controll of the Fixing Cleaning Web Drive 0013 3410 imagePRESS C1 P imagePRESS C1 imagePRESS C1 Printer imagePRESS C1 To avoid fixing offset the residual toner found on the fixing roller is first collected on the collecting roller and then removed by the cleaning web maybe with silicone oil F 9 24 1 Fixing roller 2 Collecting roller 3 Web wrapping roller 4 Cleaning web The cleaning web is...

Page 562: ...ng web found on the web feed roller decreases the web length detecting arm 1 moves in the direction of the arrow causing the web length detecting arm 2 block the light path to the web level sensor PS22 After this sensor detection when the fixing web solenoid is ON for 4 times warning message for fixing web length is displayed on control panel State The number of web SL ON Remarks During the warm u...

Page 563: ...fixing web set the value clear 0 for the following service counters COPIER COUNTER DRBL 1 FX WEB Error Code E005 Fixing web absent 0000 After the fixing web length detecting sensor detects the absence of the web when printing more than 3000 counts 9 5 3 Detached Attached Mechanism of the Cleaning Web Web Roller 0013 7725 imagePRESS C1 P imagePRESS C1 imagePRESS C1 Printer imagePRESS C1 In the case...

Page 564: ...act while the fixing roller is in operation To remove the residual toner on the collecting roller B Off contact while the fixing roller is not in operation To prevent from the deformation of the roller by the pressure F 9 28 1 Swing shaft 2 Web roller 3 Collecting roller 4 Fixing roller Error Code E842 Cleaning belt attach detach error UN4 J3307 J3306 1 2 3 4 FX_WEB_B FX_WEB_A FX_WEB_A FX_WEB_B 4 ...

Page 565: ...ller by sending the driving of the web attach detach motor M33 to the shaft The driving source of the refresh roller shift is the web attach detach motor M33 and its shift is executed in synchronization with the cleaning web web roller shift F 9 29 1 Shaft 2 Refresh roller 3 Fixing roller M33 Web attach detach motor In the service mode and the user mode enabled by the service mode the following op...

Page 566: ...nts the damage caused by contacting the outside heating roller with the fixing roller while the fixing motor stops 6 AC relay Shut off the AC line in case of the triac short 7 Thermo switch Shut off the AC line in case of the triac short or AC relay fault Outside heater ON Outside heating roller Fixing roller Fixing belt inlet roller Outside heating HP sensor To I O Outside heating main Outside he...

Page 567: ...on control block Fixes the heater ON signal as OFF using ASIC in case a fixing system error occurs 9 Hardware timer Activates the timer when the ASIC control clock stops and 1 2 6 are not function properly Protection methods Functions ...

Page 568: ...ing 80 deg C FUNCTION CLEAR E RR 0020 Indicates the condition that the temperature of the outside heating roller is less than 50 deg C for 1 sec after reaching 80 deg C 0030 Indicates the condition that the temperature of the inlet roller is less than 50 deg C for 1 sec after reaching 80 deg C E003 Low temperature detection error 1 Mode correspondence 0041 Indicates the fixing roller low temperatu...

Page 569: ... error bit 2 Fixing main heater SSR error bit 3 Inlet heater SSR error E005 Web take up error 0000 Indicates the fixing web absent error Indicated when exceeding 4000 counts after the fixing web length detection detects the web absent state FUNCTION CLEAR E RR COUNTER MISC FX WEB COUNTER DRBL 1 FX WEB 0001 Indicates the fixing web drive solenoid open circuit error FUNCTION CLEAR E RR E006 Fixing u...

Page 570: ...hat the condition the outside heating roller keeps contact with the fixing roller for 300 msec while the fixing roller has been stopped is detected in terms of the hardware Outside heating roller engagement error 0001 Indicates that the engagement is not detected by HP sensor within 5 sec from the start of HP detection 0011 Indicates the logical displacement of HP sensor at the time of operation 0...

Page 571: ...C1 imagePRESS C1 Printer image PRESS C1 1 Open the external delivery cover 1 F 9 31 2 Open the internal delivery cover 1 F 9 32 3 Detach the fixing front cover 1 3 screws 2 F 9 33 4 Detach the fixing upper cover 1 2 stepped screws 2 1 screw 3 F 9 34 5 Move the 2 fixing upper unit mounts 1 in the direction of the arrow 2 screws 2 F 9 35 6 Open the fixing upper unit 1 in the direction of the arrow 2...

Page 572: ...1 Printer image PRESS C1 1 Open the front door 2 Pull out the fixing feeding unit toward you 9 7 2 2 Removing the Fixing Assembly Unit 0014 0230 imagePRESS C1 P imagePRESS C1 1 Open the external delivery cover 1 F 9 40 2 Open the internal delivery cover 1 F 9 41 3 Detach the fixing front cover 1 3 screws 2 F 9 42 4 Detach the fixing upper cover 1 2 stepped screws 2 1 screw 3 F 9 43 5 Remove the we...

Page 573: ...k surely held 8 Lift the fixing unit 1 in the direction of the arrow to remove 1 screw 2 F 9 47 9 7 2 3 Removing the Fixing Assembly Unit 0020 5130 imagePRESS C1 Printer imagePRESS C1 1 Open the external delivery cover 1 F 9 48 2 Open the internal delivery cover 1 F 9 49 3 Detach the fixing front cover 1 3 screws 2 F 9 50 4 Detach the fixing upper cover 1 1 2 2 1 1 1 1 2 3 3 3 3 3 2 2 2 3 3 3 3 3 ...

Page 574: ...e 6 connectors 3 F 9 53 7 Remove the fixing driver PCB 1 13 connectors 2 6 screws 3 F 9 54 Disconnect the connector 2 of J3313 with the connector hook surely held 8 Remove the exhaust duct 2 Push the claw 1 F 9 55 9 Lift the fixing unit 1 in the direction of the arrow to remove 1 screw 2 1 2 3 1 2 2 1 1 1 1 2 3 3 3 3 3 2 2 2 3 3 3 3 3 2 2 2 1 2 3 1 2 ...

Page 575: ...xing unit make sure not to directly touch the surface of the fixing belt and hold it with paper wrapped However you can touch the areas of 10mm from the both edge of the fixing belt because they are non image areas If there is any soil or scar on the fixing unit it may cause the image fault such as unevenness Clean it dry with a lint free paper F 9 57 1 Open the external delivery cover 1 F 9 58 2 ...

Page 576: ...lling the belt tension area 1 in the direction of the arrow A pull out the belt 2 in the direction of the arrow B F 9 66 10 Hold the gear of the fixing belt unit 2 turn the fixing belt unit 1 in the direction of the arrow A and then pull it out in the direction of the arrow B F 9 67 Points to Note When Mounting the Fixing Belt Unit Before mounting the fixing belt unit turn the gear 2 so that the h...

Page 577: ...er fixing sub heater page 9 54 Reference Removing the Fixing Main Heater the Fixing Sub Heater 9 7 4 2 Removing the Fixing Roller 0014 0187 imagePRESS C1 P imagePRESS C1 imagePRESS C1 Printer image PRESS C1 1 Remove the fixing roller 1 2 C rings 2 2 gears 3 2 bearings 4 2 fixing roller heat insulating bushes 5 1 holder 6 Points to Note When Mounting the Fixing Roller The orientation for mounting t...

Page 578: ... the arrow Clean evenly across the fixing belt with a lint free paper mois tened with alcohol while turning the belt 1 Clean for 1 to 2 rotations of the fixing belt 2 F 9 74 Remedy for Fixing Belt Replacement The fixing belt may be displaced while rotating When attaching it be sure that the fixing belt is located at the center 1 Turn the gear until it stops If turned in the direction shown by A th...

Page 579: ... 1 in the direction of the arrow A to release the tension of the belt and then pull out the fixing belt 2 in the direction of the arrow B F 9 78 In the case of removing the fixing belt 1 take care to handle the areas indi cated in 2 so that the fixing belt is not damaged F 9 79 Points to Note When Mounting the Fixing Belt For the position to mount the fixing belt make sure to set it around the cen...

Page 580: ...ations of the fixing roller 2 F 9 82 Cleaning the Fixing Belt The fixing belt 2 rotates by turning the belt 1 in the direction shown by the arrow Clean evenly across the fixing belt with a lint free paper mois tened with alcohol while turning the belt 1 Clean for 1 to 2 rotations of the fixing belt 2 F 9 83 Remedy for Fixing Belt Replacement The fixing belt may be displaced while rotating When att...

Page 581: ...ase adheres to the both edge 1 of the external heat roller when mounting the greased bushes to the fixing roller F 9 87 9 7 7 Oil Applying Roller 9 7 7 1 Preparation for Removing the Oil Coating Roller 0014 0189 imagePRESS C1 P imagePRESS C1 imagePRESS C1 Printer image PRESS C1 1 Open the front door 2 Pull out the fixing feeding unit toward you 3 Remove the fixing belt unit page 9 38 Reference Rem...

Page 582: ...the front door 2 Pull out the fixing feeding unit toward you 9 7 9 2 Removing the Web Roller 0014 0192 imagePRESS C1 P imagePRESS C1 1 Open the external delivery cover 1 F 9 92 2 Open the internal delivery cover 1 F 9 93 3 Detach the fixing front cover 1 3 screws 2 F 9 94 4 Detach the fixing upper cover 1 2 stepped screws 2 1 screw 3 F 9 95 5 Remove the web roller unit 1 2 screws 2 F 9 96 6 Remove...

Page 583: ... web roller unit 1 2 screws 2 F 9 102 6 Remove the web roller 1 1 screw 2 1 pressure plate 3 2 E rings 4 2 screws 5 2 bushings 6 F 9 103 9 7 10 Refresh Roller 9 7 10 1 Preparation for Removing the Refresh Roller 0014 0193 imagePRESS C1 P imagePRESS C1 imagePRESS C1 Printer image PRESS C1 1 Open the front door 2 Pull out the fixing feeding unit toward you 9 7 10 2 Removing the Refresh Roller 0014 0...

Page 584: ... and slide it out in the direction shown by B 1 E ring 2 F 9 110 Be sure not to touch the refresh roller Hold the gear or the bearing Points to Note when Attaching the Refresh Roller Unit Be sure to attach the refresh roller after removing the protection sheet The protection sheet cannot be removed after attaching the refresh roller Be sure to spread a sheet 3 beneath the fixing roller so as not t...

Page 585: ...e fixing upper cover 1 2 stepped screws 2 1 screw 3 F 9 115 5 Remove the web roller unit 1 2 screws 2 F 9 116 6 Pull out the external pressure roller assembly 1 in the direction of the ar row 2 screws 2 F 9 117 7 Shift the refresh roller unit 1 in the direction shown by A and slide it out in the direction shown by B 1 E ring 2 F 9 118 Be sure not to touch the refresh roller Hold the gear or the be...

Page 586: ... toward you 3 Remove the fixing belt unit page 9 38 Reference Removing the Fix ing Belt Unit 4 Remove the fixing belt page 9 42 Reference Removing the Fixing Belt 5 Remove the oil coating roller page 9 44 Reference Removing the Oil Coating Roller 6 Remove the pressure pad cover page 9 49 Reference Removing the Pressure Pad Cover 9 7 12 2 Removing the Pressure Pad 0014 0181 imagePRESS C1 P imagePRE...

Page 587: ...r image PRESS C1 1 Open the front door 2 Pull out the fixing feeding unit toward you 9 7 14 2 Removing the Fixing Main Thermistor 0014 0209 imagePRESS C1 P imagePRESS C1 imagePRESS C1 Printer image PRESS C1 1 Detach the fixing upper cover 1 2 stepped screws 2 1 screw 3 F 9 126 2 Remove the fixing main thermistor unit 1 1 connector 2 1 screw 3 F 9 127 3 Remove the fixing main thermistor 1 1 screw 2...

Page 588: ... screw 3 F 9 131 2 Remove the external heat main thermistor unit 1 1 connector 2 1 screw 3 F 9 132 3 Remove the external heat main thermistor 1 1 screw 2 1 mount 3 F 9 133 9 7 17 Outside Heating Sub Thermistor 9 7 17 1 Preparation for Removing the External Heat Sub Thermistor 0014 0202 imagePRESS C1 P imagePRESS C1 imagePRESS C1 Printer image PRESS C1 1 Open the front door 2 Pull out the fixing fe...

Page 589: ...black 2 1 mount 3 1 screw 4 1 screw silver 5 F 9 137 2 Remove the inlet main thermistor 1 and the sub thermistor 2 2 screws 3 F 9 138 Be sure not to damage or break the steering roller overlapped with the inlet thermistor inlet sub thermister when isolating it Points to Note When Mounting the Inlet Main Thermistor Sub Thermistor Make sure not to pinch harnesses to the areas A and B shown in the fi...

Page 590: ...Remove the external heat thermal switch unit 1 3 screws 2 F 9 143 9 7 21 Fixing Belt Thermal Switch 9 7 21 1 Preparation for Removing the Belt Thermal Switch 0014 1220 imagePRESS C1 P imagePRESS C1 imagePRESS C1 Printer image PRESS C1 1 Open the front door 2 Pull out the fixing feeding unit toward you 3 Remove the fixing assembly unit page 9 35 Reference Removing the Fixing Assembly Unit 9 7 21 2 ...

Page 591: ...r the Fixing Sub Heater 0014 1191 imagePRESS C1 P imagePRESS C1 imagePRESS C1 Printer image PRESS C1 1 Open the external delivery cover 1 F 9 147 2 Open the internal delivery cover 1 F 9 148 3 Detach the fixing front cover 1 3 screws 2 F 9 149 4 Detach the fixing upper cover 1 2 stepped screws 2 1 screw 3 F 9 150 5 Move the 2 fixing upper unit mounts 1 in the direction of the arrow 2 screws 2 F 9 ...

Page 592: ...s to Note when Attaching Detaching the Fixing Main Heat er Fixing Sub Heater Hold the white part 2 of the fixing main heater and the fixing sub heater 3 when handling them To hold other parts of these heaters place a piece of paper 1 underneath them F 9 157 9 7 23 Inlet Heater 9 7 23 1 Preparation for Removing the Fixing Belt Inlet Heater 0014 0227 imagePRESS C1 P imagePRESS C1 imagePRESS C1 Print...

Page 593: ... fixing upper cover 1 2 stepped screws 2 1 screw 3 F 9 160 2 Remove the harness guide 1 2 screws 2 F 9 161 3 Pull out the external pressure roller assembly 1 in the direction of the ar row 2 screws 2 F 9 162 Points to Note When Removing Mounting the External Heater In the case of removing mounting the external heater take care not to scratch the surface of the roller as indicated in the figure bel...

Page 594: ...ont cover 1 3 screws 2 F 9 168 4 Detach the fixing upper cover 1 2 stepped screws 2 1 screw 3 F 9 169 5 Remove the web roller unit 1 2 screws 2 F 9 170 6 While pushing the web feed roller 1 and the web take up roller 2 in the direction of the arrow remove the fixing cleaning web 3 F 9 171 Points to Note When Mounting the Fixing Cleaning Web Make sure to mount the fixing cleaning web to follow the ...

Page 595: ...move the web roller unit 1 2 screws 2 F 9 177 6 While pushing the web feed roller 1 and the web take up roller 2 in the direction of the arrow remove the fixing cleaning web 3 F 9 178 Points to Note When Mounting the Fixing Cleaning Web Make sure to mount the fixing cleaning web to follow the orientation shown in the figure Make sure to make the mutual positions of the fixing cleaning web 1 and th...

Page 596: ...h 0014 1198 imagePRESS C1 P imagePRESS C1 imagePRESS C1 Printer image PRESS C1 Apply grease Molykote HP 300 CK 8012 to the inner diameter area 1 and the outer diameter area 2 of the bushings for about 20 mg so that to make white coating in assigned areas Purpose to avoid abnormal sound F 9 181 Make sure to wipe off the excessive grease because the grease adheres to the both edges 1 of the fixing r...

Page 597: ...e Lower Separation Plate 0014 0217 imagePRESS C1 P imagePRESS C1 imagePRESS C1 Printer image PRESS C1 1 Open the front door 2 Pull out the fixing feeding unit toward you 9 7 28 2 Removing the Lower Separation Plate 0014 0218 imagePRESS C1 P imagePRESS C1 imagePRESS C1 Printer image PRESS C1 1 Open the external delivery cover 1 F 9 186 2 Open the internal delivery cover 1 F 9 187 3 Detach the inter...

Page 598: ...nit toward you 9 7 29 2 Detaching the Upper Separation Plate 0014 1229 imagePRESS C1 P imagePRESS C1 imagePRESS C1 Printer image PRESS C1 1 Open the external delivery cover 1 F 9 192 2 Open the internal delivery cover 1 F 9 193 3 Detach the internal delivery roller cover 1 2 screws 2 F 9 194 4 Remove the upper separation plate unit 1 2 screws 1 2 fixing pins 3 F 9 195 5 Detach the upper separation...

Page 599: ...Chapter 10 Externals and Controls ...

Page 600: ... the Right Lower Cover 10 12 10 5 1 3 2 Removing the Right Lower Cover 10 12 10 5 1 4 Right Rear Upper Cover 10 12 10 5 1 4 1 Removing the Right Rear Upper Cover 10 12 10 5 1 5 Right Rear Lower Cover 10 12 10 5 1 5 1 Removing the Right Rear Lower Cover 10 12 10 5 1 6 Upper Left Cover 10 12 10 5 1 6 1 Preparation for Removing the Left Upper Cover 10 12 10 5 1 6 2 Removing the Left Upper Cover 10 12...

Page 601: ...10 5 9 1 Preparation for Removing the High Voltage Box Unit 10 27 10 5 9 2 Removing the High Voltage Box Unit 10 27 10 5 9 3 Removing the High Voltage Box Unit 10 28 10 5 10 HV1 PCB 10 29 10 5 10 1 Preparation for Removing the HV1 PCB Unit 10 29 10 5 10 2 Removing the HV1 PCB Unit 10 29 10 5 11 HV3 PCB 10 30 10 5 11 1 Preparation for Removing the HV3 PCB 10 30 10 5 11 2 Removing the HV3 PCB 10 30 ...

Page 602: ...eparation for Removing the Ozone Filter Left Upper 10 36 10 5 24 2 Removing the Ozone Filter Left Upper 10 36 10 5 25 Ozone Filter Lower Left 10 37 10 5 25 1 Removing the Ozone Filter Left Lower 10 37 10 5 26 Ozone Filter Rear 10 37 10 5 26 1 Removing the Ozone Filter Rear 10 37 10 5 27 Ozone Filter Lower Rear 10 37 10 5 27 1 Removing the Ozone Filter Rear Lower 10 37 10 5 28 Toner Filter Right 10...

Page 603: ...olume VR6801 on the numeric key PCB so that users can adjust contrast on LCD screen 10 1 4 Function of Control Panel CPU 0014 2838 imagePRESS C1 P imagePRESS C1 imagePRESS C1 Printer imagePRESS C1 Key input monitoring Transmits the numeric key function key inputs to the CPU on main controller PCB Touch panel input monitoring Transmits the key input on touch panel to the CPU on main controller PCB ...

Page 604: ...not displayed Service mode variable Default not displayed Service mode variable 101 108 401 402 118 114 0 0 240V EUR 4 Total 1 Total Full colour mono colour large Total Full colour mono colour small Total BW large Total BW small Scan Total 1 Default not displayed Service mode variable Default not displayed Service mode variable 101 122 123 112 113 501 0 0 240V CA 5 Total 1 Total BW 1 Copy Full col...

Page 605: ... the duplex left sensor PS19 ON the printing of the first page of the duplex print is judged finished 10 3 Fans 10 3 1 Fan 0014 1313 imagePRESS C1 P imagePRESS C1 imagePRESS C1 Printer imagePRESS C1 The fan configuration and the wind direction are shown in the following figure Name and function of each fan are shown in the following table COPIER OPTION USER COUNTER1 to 6 For details refer to the a...

Page 606: ... outside YES YES E805 0004 6 FM6 Fixing Lower Front Fan Cool the fixing assembly NO NO E805 000A 7 FM7 ITB Cleaning Cooling Fan Cool the delivered paper NO YES E820 0003 8 FM8 Controller Fan Cool within the controller box NO NO 9 FM9 Power Supply Fan Exhaust heat from the power supply unit NO NO E804 000B 10 FM10 Delivery Cooling Fan 1 Cool the delivery block NO YES E805 000C 11 FM11 Fixing Belt C...

Page 607: ...the delivery block NO YES E805 000D 20 FM20 Reversing Cooling Fan 2 Cool the reversing block NO YES E805 0013 21 FM22 Rear Fan YES YES E805 0006 22 FM23 Fixing Upper Exhaust Fan Cool the fixing assembly YES YES E805 0007 23 FM25 Optional Power Supply Fan Cool the optional power supply NO NO E804 0016 24 FM26 Sub DC Power Supply Fan Cool the sub DC power supply NO NO E804 0017 25 FM27 decurler cool...

Page 608: ...nter power supply PCB The function of each PCB and distribution of power supply are as follow T 10 4 Name Function All night power supply PCB Supply power to the main controller Printer power supply PCB DC power supply PCB DC power relay PCB Generate the DC power supply 24V and 13V systems Supply DC power to the controller power supply PCB DC controller PCB pickup driver PCB fixing driver PCB high...

Page 609: ...ion 4A Overcurrent detection 5A Overcurrent detection 5A Overcurrent detection 6A Relay board Relay board Soft OFF Thermal lead SW ITB heater Reader heater Drum heater Cassette heater Deck heater 400W 400W 300W 400W Thermal switch Thermal switch Thermal switch Fixing main heater Fixing sub heater Belt heater Outside heater Inlet 100V 15A 120V 20A 230V 10A Noise filter Fixing heater drive Overcurre...

Page 610: ...of a type specifically indicated same name or equivalent Dispose of any used battery according to the instructions of its manufacturer 10 4 4 Energy Saving Function 10 4 4 1 Overview 0014 1318 imagePRESS C1 P imagePRESS C1 imagePRESS C1 Printer imagePRESS C1 1 Standby Mode The machine is in operation or is ready to start operation with all its loads supplied with power 2 Power Save Mode The machin...

Page 611: ...wer mode 4 Sleep Mode The machine s sleep mode consists of sleep mode 1 high rate of power saving in sleep and sleep mode 3 low rate of power saving in sleep and the selection of one over the other depends on how the machine is set and the presence absence of paper Conditions Initiating a Shift standby power save low power sleep The machine remains in a standby state for a specific period of time ...

Page 612: ...abling Use SNMP causes the operating system to collect machine status information at specific intervals pre venting the machine from starting a sleep state To avoid the situation disable the setting Windows printer properties Disabling Use SNMP 1 Select Configure Port on the Ports screen printer properties F 10 5 2 Remove the check mark from SNMP Status Enabled ...

Page 613: ...14 0359 imagePRESS C1 P imagePRESS C1 imagePRESS C1 Printer image PRESS C1 1 Open the right upper cover 1 in the direction of the arrow 2 Remove the right upper area cover 2 3 rubber covers 3 3 screws 4 F 10 8 3 Open the right upper cover 1 in the direction of the arrow 1 screw 2 F 10 9 4 Remove the connector blanking cover 1 1 screw 2 F 10 10 5 Remove one grounding terminal screw 1 and one reuse ...

Page 614: ... image PRESS C1 1 Remove the right rear upper cover 1 1 connector 2 2 screws 3 F 10 14 10 5 1 5 Right Rear Lower Cover 10 5 1 5 1 Removing the Right Rear Lower Cover 0014 0581 imagePRESS C1 P imagePRESS C1 imagePRESS C1 Printer image PRESS C1 1 Remove the right rear lower cover 1 2 screws 2 F 10 15 10 5 1 6 Upper Left Cover 10 5 1 6 1 Preparation for Removing the Left Upper Cover 0014 0353 imagePR...

Page 615: ...left 1 2 stepped screws 2 2 Remove the decurler hook right 3 3 stepped screws 4 F 10 18 3 Remove the left middle cover 1 3 screws 2 F 10 19 10 5 1 9 Left Rear Cover Upper 10 5 1 9 1 Removing the Left Rear Upper Cover 0014 0591 imagePRESS C1 P imagePRESS C1 imagePRESS C1 Printer image PRESS C1 1 Remove the reader communication cable connector 1 F 10 20 2 Remove the panel mount cover 1 attached on t...

Page 616: ...rews 2 F 10 27 10 5 1 11 Rear Upper Cover 10 5 1 11 1 Removing the Rear Upper Cover 0014 0587 imagePRESS C1 P imagePRESS C1 imagePRESS C1 Printer image PRESS C1 1 Remove two reader communication cable connectors 1 F 10 28 2 Remove the rear upper cover 1 9 screws 2 F 10 29 10 5 1 12 Rear Lower Cover 10 5 1 12 1 Removing the Rear Lower Cover 0014 0358 imagePRESS C1 P imagePRESS C1 imagePRESS C1 Prin...

Page 617: ...Cover 0014 0590 imagePRESS C1 P imagePRESS C1 imagePRESS C1 Printer image PRESS C1 1 Remove the process unit cover 1 4 screws 2 F 10 32 10 5 2 Hopper Drive Unit 10 5 2 1 Preparation for Pulling Up Removing the Hopper Unit 0014 0576 imagePRESS C1 P imagePRESS C1 imagePRESS C1 Printer image PRESS C1 1 Open the front cover page 10 11 Reference Front Cover Opening 2 Remove the process unit cover page ...

Page 618: ...1 1 screw 2 F 10 36 5 Remove two harnesses 2 from the clamp 1 F 10 37 6 Remove one hopper right fixing screw 1 F 10 38 7 Remove one hopper left fixing screw 1 F 10 39 8 Pull the hopper unit 1 up in the direction of the arrow until it hits 1 2 2 1 1 2 1 1 1 1 ...

Page 619: ...left lower to the hopper is hooked by the shaft 2 and the hopper unit is locked F 10 41 10 5 2 3 Pulling the Hopper Unit Up 0020 5437 imagePRESS C1 Printer imagePRESS C1 1 Pull the hopper unit shutter lever 1 forward to the end F 10 42 2 Open the toner replacement cover 1 F 10 43 3 Remove the hopper left cover 1 1 screw 2 F 10 44 4 Remove the hopper right cover 1 1 screw 2 F 10 45 5 Remove two har...

Page 620: ...ng Up the Hopper Unit In case the copyboard cover is attached make sure to open it prior to lifting up the hopper unit to prevent any damages caused by contact Check if the lock arm 1 at the left lower to the hopper is hooked by the shaft 2 and the hopper unit is locked F 10 50 10 5 2 4 Removing the Hopper Unit 0014 0578 imagePRESS C1 P imagePRESS C1 1 Pull the hopper unit shutter lever 1 forward ...

Page 621: ...right cover 1 1 screw 2 F 10 54 5 Remove the harness 2 from the wire saddle 1 and remove three con nectors 3 F 10 55 6 Open the right upper cover 1 7 Remove the right door small cover 1 1 cover rubber 2 2 screws 3 F 10 56 8 Remove one hopper right fixing screw 1 F 10 57 9 Remove one hopper left fixing screw 1 1 1 1 2 2 1 1 2 3 3 1 2 3 3 1 1 ...

Page 622: ...nit 1 as in the figure and remove it F 10 61 10 5 2 5 Removing the Hopper Unit 0020 5438 imagePRESS C1 Printer imagePRESS C1 1 Pull the hopper unit shutter lever 1 forward to the end F 10 62 2 Open the toner replacement cover 1 F 10 63 3 Remove the hopper left cover 1 1 screw 2 F 10 64 4 Remove the hopper right cover 1 1 screw 2 1 1 1 1 1 1 1 1 2 ...

Page 623: ... the right upper cover 1 7 Remove the right door small cover 1 1 cover rubber 2 2 screws 3 F 10 67 8 Remove one hopper right fixing screw 1 F 10 68 9 Remove one hopper left fixing screw 1 F 10 69 10 Remove two hopper right fixing screws 1 F 10 70 11 Remove two hopper left fixing screws 1 2 1 1 2 3 3 1 2 3 3 1 1 1 1 1 ...

Page 624: ...1 imagePRESS C1 Printer image PRESS C1 1 Remove eight clamps 1 F 10 73 2 Remove 19 connectors F 10 74 3 Remove the DC Power supply assembly 1 4 screws 2 F 10 75 10 5 4 Sub DC Power Supply 10 5 4 1 Preparation for Removing the Sub DC Power Supply 0013 9388 imagePRESS C1 P imagePRESS C1 imagePRESS C1 Printer image PRESS C1 1 Remove the left lower cover page 10 12 Reference Removing the Left Lower Co...

Page 625: ...the following adjust ment 1 Loosen four screws 1 on the backside of the control panel 2 Adjust and keep the control panel 2 at the desirable position and tighten the loosened screw F 10 80 3 Remove the hinge slide cover 1 in the direction of the arrow F 10 81 4 Remove the lock hinge cover L 1 1 screw 2 2 boss 3 F 10 82 MEMO If the arm unit 1 is made perpendicular to the control panel 2 the lock hi...

Page 626: ...ble length so that the cable 1 is in the inside of the sheet metal 2 F 10 87 8 Remove the ferrite core 1 F 10 88 9 Remove one screw 1 from the backside of the control panel F 10 89 10 Remove one flat screw 1 from the back of the upper arm F 10 90 11 Remove the control panel shaft 1 from the arm unit 2 F 10 91 When fixing the control panel shaft Fix the control panel shaft 1 edge into the upper arm...

Page 627: ...g the Rear Upper Cover 10 5 6 2 Removing the DC Controller PCB 0013 9307 imagePRESS C1 P imagePRESS C1 imagePRESS C1 Printer image PRESS C1 1 Detach the grounding plate 1 3 screws 2 F 10 93 2 Remove the connector 1 4 clamps 2 F 10 94 3 Remove the DC controller box cover 1 10 screws 2 F 10 95 4 Remove 16 clamps 1 F 10 96 5 Remove 40 connectors F 10 97 6 Remove the main body rear exhaust fan duct 1 ...

Page 628: ...he following service modes Waste toner bottle counter clear COPIER COUNTER MISC WST TNR Secondary transfer outside roller waste toner receptacle counter clear COPIER COUNTER MISC 2TC BOX Note2 On execution of this service mode the waste toner sensor offset adjustment is executed If toner is left inside the waste toner bottle here toner adjustment cannot be carried out properly resulting in an erro...

Page 629: ...618 imagePRESS C1 P imagePRESS C1 imagePRESS C1 Printer image PRESS C1 1 Remove the RD DC DC PCB 1 2 connectors 2 4 screws 3 F 10 105 10 5 9 High Voltage Box Unit 10 5 9 1 Preparation for Removing the High Voltage Box Unit 0013 9984 imagePRESS C1 P imagePRESS C1 imagePRESS C1 Printer image PRESS C1 1 Remove the decurler 2 Remove the left upper cover page 10 12 Reference Removing the Left Upper Cov...

Page 630: ...ing the High Voltage Box Unit 0020 5440 imagePRESS C1 Printer imagePRESS C1 1 Remove the hopper cover left 1 1 screw 2 F 10 110 2 Remove the left exhaust fan 1 with the duct 1 connector 2 1 screw 3 F 10 111 3 Remove the fixing upper exhaust fan 1 with the duct 1 connector 2 1 screw 3 F 10 112 4 Pull the high voltage box unit 1 out forward and remove it 7 connectors 2 2 clamps 3 1 screw 4 2 3 1 2 3...

Page 631: ...ence Removing the Rear Upper Cover 4 Remove the rear lower cover page 10 14 Reference Removing the Rear Lower Cover 10 5 10 2 Removing the HV1 PCB Unit 0013 9335 imagePRESS C1 P imagePRESS C1 imagePRESS C1 Printer image PRESS C1 1 Remove two clamps 1 and one wire clip 2 F 10 114 2 Remove the cover 1 F 10 115 3 Remove six connectors 1 F 10 116 4 Remove the main body rear exhaust fan duct 1 and the ...

Page 632: ...of the arrow 4 screws 2 F 10 120 2 Remove the harness from the guide 1 and remove the HV PCB mount 2 3 connectors 3 3 screws 4 F 10 121 3 Remove the HV3 PCB 1 3 connectors 2 3 screws 3 F 10 122 10 5 12 HV5 PCB 10 5 12 1 Preparation for Removing the HV5 PCB 0013 9348 imagePRESS C1 P imagePRESS C1 imagePRESS C1 Printer image PRESS C1 1 Remove the right rear upper cover page 10 12 Reference Removing ...

Page 633: ...l out the fixing feeder unit forward 10 5 13 2 Removing the HV8 PCB 0013 9362 imagePRESS C1 P imagePRESS C1 imagePRESS C1 Printer image PRESS C1 1 Move the registration guide unit 1 4 screws 2 F 10 128 2 Remove the harness from the guide A remove the HV PCB mount 1 3 connectors 2 3 screws 3 F 10 129 3 Remove the HV8 PCB 1 2 connectors 2 3 screws 3 F 10 130 10 5 14 Fixing Driver PCB 10 5 14 1 Prepa...

Page 634: ... 11 Reference Front Cover Opening 2 Pull out the fixing feeder unit 10 5 15 2 Removing the Feeding Driver PCB 0013 9404 imagePRESS C1 P imagePRESS C1 imagePRESS C1 Printer image PRESS C1 1 Remove the lever 1 1 screw 2 F 10 135 2 Remove the feeding front cover 1 2 screws 2 F 10 136 Points to Note When Attaching the Feeding Front Cover The feeding front cover has the button to open the lower cover o...

Page 635: ...B 1 5 screws 2 F 10 140 4 Remove the 2 connectors 1 and remove the AC driver PCB 2 F 10 141 10 5 17 Pickup Driver PCB 10 5 17 1 Preparation for Removing the Pick Up Driver PCB 0013 9393 imagePRESS C1 P imagePRESS C1 imagePRESS C1 Printer image PRESS C1 1 Remove the rear upper cover page 10 14 Reference Removing the Rear Upper Cover 2 Remove the rear lower cover page 10 14 Reference Removing the Re...

Page 636: ...er cover page 10 12 Reference Removing the Right Rear Upper Cover 10 5 19 2 Removing the Side Driver PCB 0013 9398 imagePRESS C1 P imagePRESS C1 imagePRESS C1 Printer image PRESS C1 1 Open the right upper cover 1 and remove one screw 2 F 10 145 2 Remove the connector blanking cover 1 1 screw 2 F 10 146 3 Remove one grounding terminal screw 1 and remove one reuse band 2 4 Remove the harness 4 from ...

Page 637: ...ear upper cover page 10 14 Reference Removing the Rear Upper Cover 3 Remove the controller box 10 5 20 2 Removing the Backside Driver PCB 0013 9402 imagePRESS C1 P imagePRESS C1 imagePRESS C1 Printer image PRESS C1 1 Remove the backside driver PCB 1 10 connectors 2 5 screws 3 F 10 151 10 5 21 Primary Suction Fan 10 5 21 1 Removing the Air Filter 0014 0337 imagePRESS C1 P imagePRESS C1 imagePRESS C...

Page 638: ...mage PRESS C1 1 Remove the decurler 10 5 23 2 Removing the Ozone Filter Left 0014 1135 imagePRESS C1 P imagePRESS C1 imagePRESS C1 Printer image PRESS C1 1 Remove the filter cover 1 1 claw 2 F 10 158 2 Remove the filter case 1 F 10 159 3 Remove the ozone filter left 2 from the filter case 1 F 10 160 10 5 24 Ozone Filter Upper Left 10 5 24 1 Preparation for Removing the Ozone Filter Left Upper 0014...

Page 639: ...0 164 10 5 26 Ozone Filter Rear 10 5 26 1 Removing the Ozone Filter Rear 0014 1140 imagePRESS C1 P imagePRESS C1 imagePRESS C1 Printer image PRESS C1 1 Remove the rear fan cover 1 3 screws 2 F 10 165 2 Remove the filter case 1 F 10 166 3 Remove the ozone filter rear 2 from the filter case 1 F 10 167 10 5 27 Ozone Filter Lower Rear 10 5 27 1 Removing the Ozone Filter Rear Lower 0014 1294 imagePRESS...

Page 640: ...the filter case 1 F 10 171 3 Remove the toner filter right 2 from the filter case 1 F 10 172 10 5 29 Toner Filter Left 10 5 29 1 Preparation for Removing the Toner Filter Left 0014 1143 imagePRESS C1 P imagePRESS C1 imagePRESS C1 Printer image PRESS C1 1 Remove the decurler 10 5 29 2 Removing the Toner Filter Left 0014 1144 imagePRESS C1 P imagePRESS C1 imagePRESS C1 Printer image PRESS C1 1 Remov...

Page 641: ...oner Filter Rear 10 5 30 1 Removing the Toner Filter Rear 0014 1145 imagePRESS C1 P imagePRESS C1 imagePRESS C1 Printer image PRESS C1 1 Remove the rear fan cover 1 3 screws 2 F 10 176 2 Remove the filter case 1 F 10 177 3 Remove the toner filter rear 2 from the filter case 1 F 10 178 1 1 2 2 1 1 1 2 ...

Page 642: ...Chapter 11 MEAP ...

Page 643: ......

Page 644: ...23 11 1 16 Adding a License File 11 24 11 1 17 Disabling a License File suspending a license 11 26 11 1 18 Downloading Removing an Invalidated License File 11 27 11 1 19 Reusable license 11 29 11 1 20 License for forwarding 11 29 11 1 21 Uninstalling an Application 11 32 11 1 22 Login Service 11 33 11 1 23 Changing Login Services 11 38 11 1 24 Initializing the Password 11 39 11 1 25 Creating a Bac...

Page 645: ......

Page 646: ...ss this problem Mandatory Function ID MFID is now supported MFID is not device dependent and declares the functions required by the MEAP application on a function by function basis This means that even for devices that have just newly been released as long as the MFID declared by the MEAP application are supported existing MEAP applications can be installed into the device without any alterations ...

Page 647: ...nt 5 0 Mac OS X v10 4 Safari 2 0 4 Operating System Supported browser Java Runtime Environment Windows XP Professional Microsoft Internet Explorer 6 SP1 Microsoft Internet Explorer 6 SP2 Microsoft Internet Explorer 7 Microsoft Internet Explorer 6 Sun Java Runtime Environment 1 3or later Microsoft Internet Explorer 7 Sun Java Runtime Environment 1 3or later Windows Server 2003 Windows Server 2003 R...

Page 648: ...re CPU Processor more than Intel Celeron 800 MHz corresponding Software OS Microsoft Windows 2000 Professional SP4 Microsoft Windows 2000 Server SP4 Microsoft Windows XP Professional SP2 Microsoft Windows XP Professional SP2 Microsoft Windows Server 2003 SP1 Microsoft Windows Server 2003 R2 Corresponding Active Directory Microsoft Windows 2000 Server SP4 Microsoft Windows Server 2003 SP1 Microsoft...

Page 649: ... imagePRESS C1 V3 10 0 A A A A B C C C C MEMO It must improve in the version of SSO Login application and version of SA when you want to use the function B or C The right of access to the domain controller and the right of access to the Windows 2003 DNS are necessary when the domain authentication is used with SSO Important information when using conventional SSO The device using SSO authenticatio...

Page 650: ...proxy server is in use enter the IP address of the MEAP device in the Exceptions field for the browser Open Internet Options dialog of Internet Explorer and select Connections tab LAN Settings button Use a proxy server option and Advanced button of Proxy server group Proxy Settings dialog will opens The Exceptions field is in the dialog As network settings vary among environments consult the netwo...

Page 651: ...p MEAP Device IP address 8000 sms Ex http 172 16 188 240 8000 sms F 11 4 Login method Authentication method Authentication service name Users who may log in Password authentication Password authentication SMS Installer Service Password Authentication Users who know the SMS login password RLS login SSO H SSO SDL also possible SMS Installer Service Remote Login Service Authentication Users registere...

Page 652: ...vice 8000 sms rls Ex http 172 16 188 240 8000 sms rls In the case the device authentication method is SSO F 11 6 11 1 5 Setting the method to login to SMS 0018 6614 imagePRESS C1 P imagePRESS C1 imagePRESS C1 Printer imagePRESS C1 MEMO When the device authentication method used is domain authentication enter the user name password and login destination registered with Active Directory and then cli...

Page 653: ...ion Stop RLS Authentication Start Password Authentication Login available with either method Login available only with Stop Password Authentication Login available only with RLS Authentication Setting unavailable If only login via RLS is programmed login may be disabled for the following reasons authentication server is down network problem no communication with authentication server In the event ...

Page 654: ...ent tab Utility tab Application Management Function tab F 11 8 3 Enter a check mark against the SMS Installer Service Password Authentication radio button and click on either Start or Stop Check that the status has changed accordingly F 11 9 ...

Page 655: ... possible Login error screen F 11 10 Password authentication started Password authentication stopped Setting for login by RLS Authentication The procedures for changing the RLS authentication Start Stop settings are as follows 1 In order to make a setting for Login by RLS Authentication you need to Login by Password Authentication URL http IP address of MEAP device 8000 sms rls Ex http 172 16 188 ...

Page 656: ...s being used by the applications both in absolute and relative terms as well as how much memory still remains Check this page before adding an application The information is collected from the manifest headers in other words the size of a resource represents the size as it is declared by the application in question not necessarily the size of resources actually used by the application The items of...

Page 657: ...cation 0018 6617 imagePRESS C1 P imagePRESS C1 imagePRESS C1 Printer imagePRESS C1 1 Log in to the SMS Refer to Login to SMS in this manual 2 Click Application List If the Application List is already being displayed this operation is not necessary 3 Click the radio button of the MEAP application in question and click Start or Stop F 11 16 ...

Page 658: ...r imagePRESS C1 You can check the versions of MEAP Contents MEAP Specifications and Java Virtual Machine of the device 1 Log in to SMS 2 Click System Management System Info tab F 11 18 Some applications may not be installed to some MEAP devices of specific specifications See MEAP Specifications MEMO iR3245 was made MFID enabled so MFID information was added to the platform information For details ...

Page 659: ...ice Specification IDs means that the application is operable in all the models declared Upon installation of MEAP application in using SMS or MEAP Enterprise Service Manager matching of Device Specification ID is executed on the side of MEAP platform machine The machine which doesn t support the ID declared by the application rejects installation of such an application Meanwhile MEAP Specification...

Page 660: ...6 7 9 10 11 13 14 15 iR C5180 Y Y Y Y Y 5 6 7 9 10 11 13 14 15 System v50 xx later CLC5151 Y iR C4580 Ver up Y Y Y Y Y Y CLC4040 Ver up Y iR C4080 Ver up Y Y Y Y iR C3380 Ver up Y Y Y Y Y Y 5 6 7 9 10 11 13 14 15 18 5 6 7 9 10 11 13 14 15 18 System v50 xx later iR C2880 Ver up Y Y Y Y Y Y imagePRESS C7000 VP Y Y Y Y Y Y 5 6 7 9 10 11 13 imagePRESS C6000 Y Y Y Y Y Y imagePRESS C6000 VP Y iR 5075 Ve...

Page 661: ...ater iR C2880 Ver up Y Y Y Y Y Y iR C3580 Y Y Y Y Y iR C3480 Y iR C3080 Y Y Y Y Y Y iR C2550 Y Y Y Y Y iR C2380 Y iR3245 Y Y Y Y Y Y 5 6 7 9 10 11 13 14 15 17 18 19 iR3235 Y Y Y Y Y Y iR3230 Y Y Y Y iR3225 Y Y Y Y Y MEAP Spec Version Description 1 MEAP basic function 2 MEAP Spec Version 1 function and SSL TSL Proxy 3 Reserved 5 MEAP Spec Version 1 function and CPCA V2 ERS Error Recovery Service Ne...

Page 662: ... follows 1 Colour devices None 2 BW devices iR3245 series MFID Overview Correspondence situation of iR3245 series MB10 MEAP basic functions Java VM OSGi etc A UIM10 UI functions VGA size A LO10 Login function A IMB10 Imaging functions BW printer A PR10 IMI printer functions A SC10 IMI scanner functions A SD10 IMI Send functions A FAX10 IMI FAX functions A DEV10 IMI basic functions A MEMO Applicati...

Page 663: ...s UIM20 UI functions PR10 printer functions SC10 scanner functions Installed MEAP app lication DID P OC MB10 basic functions UIM20 UI functions PR10 printer functions DID Q OC MB10 basic functions UIM10 UI functions SC10 scanner functions PR10 printer functions DID R OC MB10 basic functions UIM20 UI functions PR10 printer functions SC10 scanner functions SD10 Send functions Device1 Device2 Device ...

Page 664: ...articular application F 11 22 11 1 12 Printing the System Information of a MEAP Application 0018 6621 imagePRESS C1 P imagePRESS C1 imagePRESS C1 Printer imagePRESS C1 1 Make the following selections Additional Functions button System Settings button the down arrow button F 11 23 MEMO If the System manager ID and system password have already been assigned ID Entry dialog appears after System Setti...

Page 665: ...tes the status of the application in question specifically Installed the application has been installed Active the application is being in use Resolved the application is at rest Installed On It indicates the date on which the application was installed Vendor It is the name of the vendor that developed the application and is the name bundle vendor declared in a statement within the application pro...

Page 666: ...owings since the actual values vary according to the log in service authentication function selected by users and the configuration future models Product Name HDD Memory Thread Socket File Description iR5160 iR6060 iR2250 iR2850 iR3350 300MB 20MB 128 48 42 iRC2620 iRC3220 400MB 20MB 128 48 42 iR2270 iR2870 iR3570 iR4570 iR8570 iR7270 iR6570 iR5570 400MB 20MB 128 48 42 iRC3170 iRC2570 400MB 20MB 12...

Page 667: ...nstall Application License page appears 4 Click Browse button and select the application file and the license file of the application then click OK button F 11 26 MEMO Application File identified by the extension jar License File identified by the extension lic ...

Page 668: ... and license files required for installation of applications on several MEAP available devices on network The main targets are system administrators in big companies and CANON service engineers end users of devices do not use It is used when customized applications delivered to a certain company needs to be managed collectively You cannot install only the license You will not be able to install th...

Page 669: ... DIS installed When using this system on the firmware for version upgrading on October 2003 or older version upgrading of the system software on the field device is nec essary The versions available for ESM are as follows iR5160 iR6020 System v54 02 or newer MEAP Contents v53 07 or newer iR2220 iR3320 System v33 01 or newer MEAP Contents v33 02 or newer Other products Available from the initial ve...

Page 670: ...on Information page click License Management button F 11 30 5 Click Browse button and select the license file you want to install F 11 31 6 Click Install button F 11 32 7 Check the content of the confirmation page and click OK button ...

Page 671: ...want to disable F 11 34 To invalidate or suspend a license you must first stop the application in question Once suspended the status of the license will be Not Installed and its application will no longer be available for use You can later restore a suspended license file as long as you are doing so on the same iR the device with the same device serial number When replacing the device due to lease...

Page 672: ...PRESS C1 P imagePRESS C1 imagePRESS C1 Printer imagePRESS C1 You must remove the invalidated license file before uninstalling an application If re installation is a possibility you may download the license file to a PC for storage To download or delete a license file first disable it 1 Login to SMS 2 Application List page appears Once you have removed an invalidated license file you will no longer...

Page 673: ...plication Information page appears 5 On Application Information page click License Management tab F 11 38 6 License Management page appears To download click Download button F 11 39 7 When you have selected Download button specify where you want to store the file by following the instructions on the screen ...

Page 674: ...y times as needed by the same license file This kind of license is called Reusable license 11 1 20 License for forwarding 0018 6633 imagePRESS C1 P imagePRESS C1 imagePRESS C1 Printer imagePRESS C1 When the device is replaced due to lease up or trouble it is possible to continue using the current license information of MEAP application by forwarding it to a new device The license is forwarded by C...

Page 675: ... the download page of license forwarded for the device as sender http IP address of device 8000 sms ForwardLicense F 11 42 3 Specify the application to be forwarded F 11 43 4 Click Create at Create Transfer License File F 11 44 ...

Page 676: ...rm whether to create a transfer licence will be displayed Click OK F 11 45 6 Icon of license file for forwarding is displayed in the box of license file downloading Click Download F 11 46 7 The dialogue Open is displayed Click Save F 11 47 ...

Page 677: ...Application List page appears MEMO When requesting issuance of license for forwarding inform the sales company of the name of product name and serial No of the device as sender and of the name of product name and serial No of the forwarding destination The status of the license must be Not Installed or Unnecessary for its application to be uninstalled As necessary go to License File Management pag...

Page 678: ...ent ID management ON To use Department ID management in domain authentication the option imageWARE accounting manager is required When the setting is SSO H the card reader for the option controller card cannot be used When using SSO H the clock settings of the server managing the Active Directory and the MEAP device and the PC used to log in must be matched If there is a time difference of greater...

Page 679: ...that have a reliable relationship with the domain multi domain can also be authenticated The domain name of the login destination can be selected by the users themselves upon login The function makes use of options Net Spot Accountant iW Accounting Manager iW EMC Accounting MAnagement Plig in to enable analysis and management of the iR device usage status Depending on the login service different p...

Page 680: ...equired If domain authentication is selected as the authentication method without linkage to these systems login will be disabled and Department ID management will not come ON If Department ID management cannot be turned ON when using domain authentication and login is disabled switch the login service to Default Authentication and turn Department ID management OFF When SSO is linked to Net Spot A...

Page 681: ...etween site internal access mode non site internal access mode as well as detailed mode settings are done via DMS or iWEMC Site internal access mode settings window DMS Site list acquisition After booting up upon the first login by LLS or ILS RLS the site list is obtained from the Active Directory In order to obtain the site list from the Active Directory Active Directory needs to be accessed in L...

Page 682: ...or message will be displayed to the effect that the site information is incorrect Environment confirmation Refer to Environment confirmation in this manual for details on the system requirements when using login services T 11 20 1 Not supported since merged with SSO H in devices from iR3245 series onward SSO SDL handling SSO Ver3 x Excluded from pre installation but included in Administrator s CD ...

Page 683: ...ing Login Services 0018 6635 imagePRESS C1 P imagePRESS C1 imagePRESS C1 Printer imagePRESS C1 Steps to Change Login Services 1 Make the following selections System Management Enhanced Sys App F 11 55 2 A page will appear showing the various selections you can make for the login service Select the radio button of the login service mode you want to use then click Select button F 11 56 ...

Page 684: ...he confirmation message appears Click OK button Then Login page opens Enter the default password MeapSmsLogin to log in The password is case sensitive If you click Cancel button the Login page opens without initializing the password 11 1 25 Creating a Backup for MEAP Application Area Formatting the Hard Disk Restoring the MEAP Application Area with the Backup Using the SST Service Support Tool 001...

Page 685: ...icense files to a laptop for service operation Register a set of System files Language files Remote UI files HDD format files MeapContents files of a target product to SST System Support Tool Make sure the compatibility of the each file version 2 Prepare the required service parts of the HDD unit and replace the HDD unit on user s site While pressing 2 and 8 numerical keys simultaneously on the co...

Page 686: ...h the MEAP application uses the default is 8000 for the port on HTTP server and 8443 for the port on HTTPS server In the case that these ports have already used by the customer who is to introduce this application the MEAP application cannot use the HTTP or HTTPS server s By changing the following ports to use however the MEAP application can be used as well as the existing system HTTP server Sett...

Page 687: ...DE button again Then by pressing 2 button on control panel the screen is displayed 3 Press COPIER button 4 Press Option button 5 Press BODY button 6 Press or button 7 Press MEAP PN button F 11 62 8 Press the port number to specify on the control panel the numerical value input in the field is displayed and press OK button F 11 63 MEMO As for port on HTTPS server it only applies to the device that ...

Page 688: ...rol panel Then by pressing USER MODE button again SERVICE MODE screen is displayed 2 Startup level 2 of SERVICE MODE After starting up SERVICE MODE in step 1 press USER MODE button again Then by pressing 2 button on control panel the screen is displayed 3 Press COPIER button 4 Press Option button 5 Press BODY button 6 Press or button 7 Press MEAP SSL button F 11 65 8 Press the port number to speci...

Page 689: ...e USB keyboard can be used along with native functionality The SSO SSO K and SDL Login applications provided by Canon Inc use software keyboards so they are able to use USB keyboards USB keyboard T 11 21 Supported devices The device that supports the USB keyboard is as follows 1 Colour devices None 2 BW devices iR3245 series 11 1 30 USB memory related functions iR3245 series only 0021 2947 imagePR...

Page 690: ...image data stored in USB memory Maximum printable size is 2GB Settings for enlarged reduced printing and N up printing available The following functions and settings cannot be used Multiple document printing split binding and cover insert functions Editing functions such as coupled printing and page deletion etc Preview Free size paper printing If a USB memory device is connected while the device ...

Page 691: ...B memory function Class driver ON MEAP driver mode conventionally compatible mode USB memory can be used Can be used only via conventional MEAP USB driver USB memory cannot be used Device cannot be detected Loads conventional MEAP USB class driver OFF default Native driver mode USB memory cannot be used Device cannot be detected USB memory can be used Loads mass storage class driver MEMO The drive...

Page 692: ...ervers uses Java The MEAP platform uses J2ME a type of Java Java Script A script language developed by Netscape Communications in the U S A runs on web browsers such as Netscape Navigator and Internet Explorer Allows web designers to create interactive pages with HTML files such as animated buttons and display of timetables Java VM JAVA Virtual Machine The Java byte code interpreter The Virtual Ma...

Page 693: ...ng screen of error JAM such as JAM screen door opening no toner In the case that these errors occur there will be a display indicating call the service personnel etc Default value 1 No activation of warning display Setting range item 0 display warning screen 1 hide warning screen MEMO Part of the warning screens is displayed if shifting to the device screen As for the screens for jam and no toner ...

Page 694: ...operation is restricted by MEAP application make a setting to hide Native applications such as Copy Send Box With this setting disable screen transition with key Default value 0 OFF transit to Native screen Setting range item 0 OFF transit to Native screen 1 ON No transition to Native screen Setting Procedure 1 Startup SERVICE MODE After pressing USER MODE button of MEAP device press 2 button and ...

Page 695: ...Chapter 12 Maintenance and Inspection ...

Page 696: ......

Page 697: ...ter Unit 12 4 12 3 Scheduled Servicing Basic Procedure 12 8 12 3 1 General Procedure for Scheduled Servicing 12 8 12 3 2 Scheduled Servicing List Reader Unit 12 8 12 3 3 Scheduled Servicing List Printer Unit 12 9 12 4 Cleaning 12 14 12 4 1 Cleaning for secondary transfer rear guide 12 14 12 4 2 Cleaning of registration roller registration guide and transparency sensor 12 15 12 4 3 Cleaning for buf...

Page 698: ......

Page 699: ...5 000 sheets 6 Pre transfer charging assembly FM2 2495 000 1 250 000 sheets 7 Pad holder pre transfer FL2 2720 000 1 25 000 sheets 8 Slider pre transfer FL2 0462 000 1 25 000 sheets 9 Fixing main thermistor FK2 0608 000 1 500 000 sheets 10 Fixing sub thermistor FK2 0609 000 1 500 000 sheets 11 Inlet main thermistor FK2 0610 000 1 500 000 sheets 12 Inlet sub thermistor FK2 0611 000 1 500 000 sheets...

Page 700: ...Chapter 12 12 2 F 12 1 28 9 10 14 13 29 29 11 12 27 6 3 1 2 5 4 7 8 15 16 ...

Page 701: ...Chapter 12 12 3 F 12 2 17 20 24 23 25 26 19 18 24 21 22 ...

Page 702: ...rt plate FL2 2709 000 1 100 thousand sheets 7 End seal front FL2 2713 000 1 100 thousand sheets 8 End seal rear FL2 2714 000 1 100 thousand sheets 9 Drum cleaning brush FC5 8837 000 1 100 thousand sheets 10 Transfer belt ITB FL2 2584 000 1 75 thousand sheets 11 Primary transfer roller FC6 1545 000 1 75 thousand sheets 12 Secondary transfer inside roller FC5 1661 000 1 300 thousand sheets 13 ITB cl...

Page 703: ...2 Manual separation roller FB5 0873 000 1 120 thousand sheets Actual No of sheets 33 External heating insulating bush FC5 2582 000 2 500 thousand sheets 34 Refresh roller FL2 6048 000 1 100 thousand sheets 35 Refresh Heat Insulating Bushing FC7 0175 000 2 100 thousand sheets 36 73T Gear FU6 0609 000 1 200 thousand sheets As of September 2006 Number The name of part The Number of part Number of pie...

Page 704: ...Chapter 12 12 6 F 12 3 1 2 3 4 9 6 5 7 8 11 12 13 14 15 10 ...

Page 705: ...or the target of replacement the center value of evaluation result data is written The number of part may be changed due to design change etc 27 26 30 30 30 30 29 29 29 29 31 32 17 21 33 35 36 35 33 34 23 24 21 20 18 22 25 19 28 16 ...

Page 706: ...g glass 6 Implement the test copy 7 Implement the sample copy 8 Operation check for the leakage breaker Press the test switch of the leakage breaker at the status of power switch ON and check if the leakage breaker normally works The breaker switch tilts on the side of OFF to shut the power If the leakage breaker does not normally work replace the leakage breaker and check it again 2 Recovery Proc...

Page 707: ...heets 3 Toner filter left B 250 000 sheets 4 Toner filter rear B 250 000 sheets 5 Dust Proofing Filter B 250 000 sheets 6 Air filter 1 B 250 000 sheets 7 Air filter 2 B 250 000 sheets 8 9 Air filter 3 B 250 000 sheets 10 Air filter 4 B 250 000 sheets 11 12 imagePRESS C1 only Laser Exposure system Dustproof glass A 25 000 sheets Charging system Primary charging assembly B 250 000 sheets Primary cha...

Page 708: ...25 000 sheets 19 See 3 Secondary Transfer Outer Roller Waste Toner Case A 50 000 sheets 20 See 4 Secondary transfer front upper guide A 75 000 sheets 21 Feeder assembly Feeder belt A 150 000 sheets Transparency sensor A 250 000 sheets Registration roller A 250 000 sheets Registration roller guide upper lower A 250 000 sheets Buffer decurler feed roller upper lower A 25 000 sheets Buffer decurler s...

Page 709: ...nstream guide with lint free paper moistened with alcohol Also in order to prevent soil to the secondary transfer outer roller the guide should be cleaned after removing it from the secondary transfer outer roller unit 4 For cleaning the collecting area of the secondary transfer outer roller make sure to dispose the toner at the collecting area 5 50K for imagePRESS C1 Places to attach filters F 12...

Page 710: ... paper F 12 7 Cleaning method of developing cylinder cover 23 at the figure above 1 Clean the developing cylinder cover 1 and the toner blocking high voltage plate 2 with lint free paper 2 Turn the developing cylinder gear 3 5 to 6 times in the direction of the arrow to even out the developer F 12 8 Do not touch the developing cylinder After cleaning make copies 2 to 3 sheets using the test chart ...

Page 711: ...000 print Inlet main thermistor A_100 000 sheets B_500 000 sheets Inlet sub thermistor A_100 000 sheets B_500 000 sheets External heat main thermistor A_100 000 sheets B_500 000 sheets External heat sub thermistor A_100 000 sheets B_500 000 sheets Fixing thermal switch A_300 000 sheets B_1 000 000 sheets External heat thermal switch A 300 000 sheets B_1 000 000 sheets Inlet guide A 50 000 sheets D...

Page 712: ...ny foreign particle at this time F 12 10 12 4 Cleaning 12 4 1 Cleaning for secondary transfer rear guide 0012 1986 imagePRESS C1 P imagePRESS C1 imagePRESS C1 Printer imagePRESS C1 1 Open the front cover 2 Pull out the fixing feeder assembly 3 Clean ribs one by one from left to right by lint free paper soaked with alcohol solution as the arrow in the following chart Do not implement dry wiping bec...

Page 713: ... imagePRESS C1 1 Pull out the fixing feeder assembly 2 Push the leaf springs of both ends pull out more the fixing feeder assembly 3 Remove three screws 1 turn over the transparency upper sensor unit 2 F 12 12 4 Remove paper dust attached on the transparency sensor 1 by blower brush F 12 13 5 Remove two screws 1 and remove the grounding spring 2 6 Remove screw 3 1 2 1 ...

Page 714: ...tached on the transparency sensor 3 by blower brush F 12 16 10 While rotating the registration roller upper 1 and the registration roller lower 2 clean by lint free paper soaked with alcohol solvent F 12 17 12 4 3 Cleaning for buffer decurler 0021 2294 imagePRESS C1 P imagePRESS C1 Color Image Reader H1 imagePRESS C1 CUSTOM imagePRESS C1 Printer imagePRESS C1 1 Open the buffer decurler Then clean ...

Page 715: ...Chapter 12 12 17 F 12 18 1 1 2 2 ...

Page 716: ...Chapter 13 Standards and Adjustments ...

Page 717: ......

Page 718: ...the Waste Toner Sensor 13 7 13 3 9 After Replacing the ATR Sensor 13 7 13 3 10 After Replacing the Patch Image Reading Sensor 13 7 13 4 Fixing System 13 7 13 4 1 Checking the Nip Width 13 7 13 4 2 After Replacing the Fixing Roller 13 8 13 4 3 After Replacing the Fixing Belt 13 8 13 4 4 After Replacing the Fixing Cleaning Belt 13 8 13 4 5 After Replacing the Fixing Belt Pressure Pad Cover 13 8 13 4...

Page 719: ......

Page 720: ... service mode Full page halftone COPIER TEST PG TYPE 5 Note 2 Execute the following items Check to see that the developing assembly has been correctly fit to the developing rotary assembly Replace the HVT generating developing bias Replace the relevant developing assembly 13 1 2 Image Adjustment Basic Procedure 2 0016 2243 imagePRESS C1 P imagePRESS C1 imagePRESS C1 Printer imagePRESS C1 A NO YES ...

Page 721: ... system roller primary transfer roller secondary transfer roller Replacing the HVT HVT 2 to 4 8 to 9 13 1 3 Image Adjustment Basic Procedure 3 0016 2245 imagePRESS C1 P imagePRESS C1 imagePRESS C1 Printer imagePRESS C1 A C B NO NO YES YES NO YES YES NO YES NO 1 Check the transfer system See Note 4 2 Replace the photosensitive drum ...

Page 722: ...ic Procedure 4 0016 2247 imagePRESS C1 P imagePRESS C1 imagePRESS C1 Printer imagePRESS C1 B C NO YES NO YES YES NO NO YES 1 Clean or replace the primary wire 2 Replace the grid wire YES NO YES NO YES NO YES NO YES NO Clean the ITB 1 Clean the laser shutter and execute the laser adjustment 2 Replace the HV1 high voltage PCB ...

Page 723: ...he Bk developing assembly Is there any color whose DENS S value is 20 or less YES NO Is there any color whose DENS S value is 20 or less YES NO Are the values of DENS of Y M and C within 20 Replace the developing assemblies of Y M and C Clean the surface of the ATR sensor PS7 NO YES Is the surface of the ATR sensor PS7 dirt ...

Page 724: ...inside the reader front cover a Adjustment of image scanning starting position X direction applicable in fixed readings COPY ADJUST ADJ XY ADJ X b Adjustment of image scanning starting position Y direction applicable in fixed reading COPY ADJUST ADJ XY ADJ Y c Adjustment of feeder mode main scanning position COPY ADJUST ADJ XY ADJ Y DF d Color shift sub scanning direction correction value between ...

Page 725: ...tial sensor 1 by reference to the boss A of the electrode for checking potential FY9 xxxx 3 6 Connect the clip 4 for checking the potential sensor to the main body frame GND F 13 12 Check to see that potential sensor is attached in an appropriate direction to the electrode for checking the potential sensor F 13 13 7 After turning ON the main power set the service mode COPIER FUNC TION INSTALL AINR...

Page 726: ...re toner adjustment cannot be carried out properly resulting in an error code in some cases E0013 0006 waste toner sensor adjustment error Be sure to execute this service mode after removing the waste toner bottle from the main body 13 3 9 After Replacing the ATR Sensor 0014 8932 imagePRESS C1 P imagePRESS C1 imagePRESS C1 Printer image PRESS C1 Follow the procedure below to replace the ATR sensor...

Page 727: ...C1 P imagePRESS C1 imagePRESS C1 Printer image PRESS C1 Set the value clear 0 for the following service counters COPIER COUNTER DRBL 1 FX WEB 13 4 5 After Replacing the Fixing Belt Pressure Pad Cover 0014 6124 imagePRESS C1 P imagePRESS C1 imagePRESS C1 Printer image PRESS C1 Before installing a belt apply silicon oil S 20 FY9 6011 to the marked area of the pressure pad cover within the radius of ...

Page 728: ...rface of pressure pad 0 4ml Surface of oil coating roller 0 2ml Surface of inlet roller 0 1ml Pad cover surface between separation roller and pad cover 0 1ml Tools to be used Silicone oil Parts Number FY9 6011 Dropper 1 1 Make a paper slip to be used for applying the oil Cut A4 paper into 1 8 approx and fold the piece into three 1 2 Apply 0 4ml of silicone oil at the center 1 30mm inside from the ...

Page 729: ...ntroller PCB or clear the RAM clear the 2 types of the waste toner counter using the following service modes Waste toner bottle counter clear COPIER COUNTER MISC WST TNR Secondary transfer outside roller waste toner receptacle counter clear COPIER COUNTER MISC 2TC BOX Note2 On execution of this service mode the waste toner sensor offset adjustment is executed If toner is left inside the waste tone...

Page 730: ...11 Confirmation of Count Management In the User System select System Management Setup Group ID Setup Count Management Confirm that only ID s that have been downloaded are displayed 12 Confirmation of Performance Try photocopying a document using the User Card registered at the NSA and confirm the card is counted in the counting device of the NSA 13 5 5 Replacing the HV2 HV4 HV6 1 and HV6 2 0014 30...

Page 731: ...C1 Execute registering paper width standard value for each paper size A4R A4 A6R 1 Slide the manual feeder tray width guide 1 to fit for A4R F 13 34 2 Select the following service mode items COPIER FUNCTION CST MF A4R 3 Press OK key 4 Write down the standard value for A4R that was indicated on the control panel on the service label 5 Also make the following selections to register the paper width s...

Page 732: ...Chapter 14 Correcting Faulty Images ...

Page 733: ...ing position of image on both 1st and 2nd sides is displaced in sub scanning direction 14 9 14 3 1 4 Partially Blank Streaked 14 9 14 3 1 4 1 Void occurs in main scanning direction on halftone area oval shaped patterns E060 0000 J423 connector 11 pin CT connector on main body side of pre conditioning unit has poor contact 14 9 14 3 1 4 2 Void occurs in sub scanning direction upon installation ATR ...

Page 734: ...y due to Dirt on ATR Sensor Window 14 29 14 3 3 3 7 Power Supply Voltage Connector Error E009 0000 Indication at Replacement of the DC Controller PCB 14 29 14 3 3 3 8 ATR Error E020 XXXX Display at the time of Drum Replacement 14 30 14 3 3 4 User Warning Message 14 30 14 3 3 4 1 When connecting RUI using same PC and IP address upon replacement of machine message A error has occurred is displayed i...

Page 735: ...ctor pin of Fixing Heater Cable Unit moves back JP Model 14 43 14 3 7 23 E820 0003 is indicated Primary corona assembly is mounted incorrectly 14 45 14 3 7 24 E842 0009 occurs at last rotation performed during a continuous black and white job 14 45 14 3 8 Specifications Related FAQ 14 46 14 3 8 1 FAQ on Main Unit Specifications 14 46 14 3 8 1 1 Auto paper select function does not work after settin...

Page 736: ...rticle in the scanning system mirror white plate copyboard glass reflector Check if the mirror mount moves smoothly there is no soil on the rail Check if there is no flickering of scanning lamp Check if the scanning system wire is set properly Check if there is no condensation in the scanning system 2 Process Check if there is toner in the toner container Check if the drum unit is reliably attache...

Page 737: ...s been standing in a location such as a freezing warehouse to a warm room as it leads to internal dew formation 1 E110 caused by dew formation in the BD sensor 2 Low image density in the vertical scanning direction caused by dew formation in the LDE lens 3 Low image density caused by dew formation in the reader mirrors and copyboard glass 4 Paper feed malfunction caused by dew formation in the pic...

Page 738: ...drum unit or laser scanning system 3 Vertical white black line If there is white line in the image it may be caused by fault of developing system 4 Density unevenness at the rear front If there is density unevenness at the rear front it may be caused by fault of drum unit laser scanning system or transfer unit F 14 1 14 2 5 Full Area Half Tone TYPE 5 0013 4604 imagePRESS C1 P imagePRESS C1 imagePR...

Page 739: ... lower roller or the secondary transfer outer roller F 14 3 14 2 7 MCYBk Horizontal Line TYPE 10 0013 4607 imagePRESS C1 P imagePRESS C1 imagePRESS C1 Printer imagePRESS C1 This test print can mainly check the dark area density of each color balance among each color and white line by developing 1 Solid density of each color and balance among each color a Density is not extremely light b In the cas...

Page 740: ...ePRESS C1 Printer imagePRESS C1 Full color 16 gradation test print can mainly check gray balance gradation performance of each color YMCBk and foggy image 1 Gray balance Check to see if the output comes with even density of each color at gray scale area 2 Gradation performance Check gradation performance and density difference of each color YMCBk 3 Foggy image If there is foggy image at the white ...

Page 741: ...r causing the symptom press Duplicate and input a name for the paper type then press OK 3 Select the type of paper registered in Step2 above and make the selections like Details Edit Secondary Transfer Voltage Change then adjust the secondary transfer voltage using or and press OK As for the adjustment direction or please refer to the attached PDF file The adjustable range is between 10 and 10 T 1...

Page 742: ... if solved finish this field remedy If not go to Step 3 3 Using A3 size plain paper perform a double side job in single color mode and output 10 solid red images continuously 4 Using A3 size plain paper perform a double side job in single color mode and output 10 solid green images continuously 5 Using A3 size plain paper perform a double side job in single color mode and output 10 solid blue imag...

Page 743: ...heck the value for ABS HUN moisture content if the value is 10g or greater go through Step 2 and 3 Service mode COPIER Display ANALOG 2 Check to make sure that the environment switch SW13 1 is set to ON 3 Set the drum temperature switch SW16 2 to H lower side F 14 9 Reference The drum heater control is performed in disregard of the main power switch setting when the environmental switch in the rea...

Page 744: ... duplex printing the registration adjustment was executed in service mode Field Remedy In service mode COPIER Adjust FEED ADJ REGIST change the setting value The adjustment range is 50 to 50 unit 0 1mm 14 3 1 4 Partially Blank Streaked 14 3 1 4 1 Void occurs in main scanning direction on halftone area oval shaped patterns E060 0000 J423 connector 11 pin CT connector on main body side of pre condit...

Page 745: ...rotation 4 If no problem was found with the connectors in Step 1 and 2 check J431 connector in the LED side pre exposure LED and J425 connector photosensitive drum cleaning pre exposure LED for poor contact If pins are deformed modify them and then re fit the connectors 5 Perform Step 3 again 6 If the symptom still occurs check J1167 connector on the DC Controller PCB If pins are deformed modify t...

Page 746: ... C1 Printer imagePRESS C1 Inspected by Canon Inc Description When lines appear because of scratches made on the fixing roller in the circumferential direction suspect dirty stays and shafts around the roller When replacing the fixing roller with a new one to prevent this symptom refer to the following field remedy Field Remedy 1 Prepare brand new fixing roller collecting roller and heating roller ...

Page 747: ...r unit after mounting all the rollers above be sure to insert the pin on the fixing plate into the shaft hole and then tighten the screw to secure the fixing plate If the screw is tightened incompletely the jam code 010E the error code E007 or abnormal noise may occur FL2 6945 Fixing Roller FC7 0169 Roller FC7 0932 Heating Roller 14 3 1 4 4 Lines smeared image Mylar comes off post duct in P kit as...

Page 748: ...ent items which are used by the system administrator to from the Additional Functions Mode screen 2 In Additional Functions Mode System Settings Device Management Settings White Gap Correction change the setting to 1 or 2 and then press OK 3 In order to prevent a poor color balance that may be caused as a negative effect from Step 2 perform Auto Gradation Correction Full Adjustment Reference As a ...

Page 749: ...o go back to Step 1 1 1 5 When fixing the controller box cover firstly tighten the screw that is at the upper right of the box when viewed from the rear side of the machine Secondly tighten a screw to the long circler screw hole at the bottom right and then tighten all the other screws 2 If the symptom still occurs replace the PF A board with a new one by referring to the procedure described in St...

Page 750: ...Description Since a few dark spots A appeared on output images the developing assembly was replaced and the toner discharge amount was increased by means of service mode F 14 19 When the same symptom occurs follow the procedure below Field Remedy 1 Replace the developing assembly of color corresponding to the dark spots 2 In service mode level 2 COPIER Option BODY DEVL VHT change the setting from ...

Page 751: ... seal support plate 2 is below the scoop up sheet 1 and make a correction if it is not In the case of mistakenly attaching perform operation to attach after replacing the new scoop up sheet F 14 20 2 Clean the potential control plate A Using lint free paper remove the waste toner found at the both sides of potential guide plate F 14 21 image sample 1 2 1 1 1 2 1 1 2 ...

Page 752: ...the following procedure 1 Execute aging print a image 50 copies total using the following image 10 sheets of A3 2 sided solid color Green image in full color mode 10 sheets of A3 2 sided solid color Blue image in full color mode 10 sheets of A3 2 sided solid color Red image in full color mode 10 sheets of A3 2 sided solid color Black image in monochrome mode 10 sheets of A3 2 sided solid color whi...

Page 753: ...C1 Color Image Reader H1 imagePRESS C1 Printer imagePRESS C1 Case in the field Description When placing an original on the copyboard glass and then making a copy to check the image quality upon installation a faulty image occurred however this image was corrected by re fitting the S B Board PCB Even when this symptom was occurring PG test print printouts were generated without any image problem ...

Page 754: ...ged the density measurement will not be performed properly Therefore be sure not to change this value This is true of not only this model but also all the other color models Field Remedy 1 If the value for OFST was changed in service mode reset it by referring to the value value at time of factory shipment in the service label on the backside of the front cover of the Reader 2 Perform the auto gra...

Page 755: ... that was output from this machine the output image took on a tinge of yellow When performing a test printing with a PG test chart type 5 Y 35 M 35 and C 10 in use and use the output image A for a copy job to confirm the aforementioned symptom the similar kind of faulty hue image B was output F 14 25 Field Rermedy Workaround as of Nov 29 2006 1 Change the original mode from Test Printed Img to Col...

Page 756: ...n Initial Setup Save Key System Control Settings Device Management Settings Auto Gradation Correction 2 Execute shading correction Initial Setup Save Key System Control Settings Device Management Settings Shading Correction 3 Execute auto gradation correction full correction Initial Setup Save Key System Control Settings Device Management Settings Auto Gradation Correction Image sample F 14 26 14 ...

Page 757: ...s plate 14 3 2 1 2 Paper misalignment occurs when stapling Return Guide Sheet of Finisher AA1 AA2 has ridden on Operation Tray Bin 0020 7526 imagePRESS C1 P imagePRESS C1 Color Image Reader H1 imagePRESS C1 CUSTOM imagePRESS C1 Printer imagePRESS C1 Case in the field Description In the field when using staple mode the trail edge of paper was skewed a little at the operation tray causing paper misa...

Page 758: ...1 Check the version of the Finisher Controller Software if it is earlier than Ver 5 01 upgrade the software to Ver 5 01 2 Referring to Procedure for Adjusting Height of Swing Roller in Swing Unit perform the height adjustment and then run a booklet copying Reference For the 1st sheet of paper the swing guide goes down under its own weight and applies pressure to the upper and lower stack delivery ...

Page 759: ...unt measured in Step 2 The skew amount is changed by 0 2 to 0 3mm every time the registration unit is moved by one scale When the skew amount of the paper at the position A is large move the registration unit in the direction B When the skew amount of the paper at the position B is large move the registration unit in the direction A 1 2 1 ...

Page 760: ...r 14 3 2 2 Wrinkle 14 3 2 2 1 Wrinkles appear on output paper Pad cover wears out 0018 1585 imagePRESS C1 P imagePRESS C1 Color Image Reader H1 imagePRESS C1 CUSTOM imagePRESS C1 Printer imagePRESS C1 Case in the field Description Since wrinkles appeared on printed paper the pressure pad and pad cover of the fixing belt assembly were replaced with a new one for solution The pressure pad is used to...

Page 761: ...Cable of DC Controller PCB causes wire pinching 0016 2877 imagePRESS C1 P imagePRESS C1 Color Image Reader H1 imagePRESS C1 Printer imagePRESS C1 Case in the field Description Since the cable at the bottom side of the DC Controller PCB was caught by the cover no power was supplied In this field case this machine indicated the error code E805 0014 even when power was supplied once in a while When t...

Page 762: ...1 imagePRESS C1 Printer imagePRESS C1 Case in the field Description A machine of which system software was of version earlier than 7 08 and the service mode TEMP TBL mode for the fixing temperature control was set to 4 sometimes kept displaying the message Adjusting gradation Please wait a moment Cause Since TEMP TBL was set to 4 20 deg C control the machine might not reach the target temperature ...

Page 763: ...suddenly occurred and the error code E748 4901 followed the power off on operation that was performed for solution to the jam then this machine was shut down in the shutdown mode and the main power switch was turned ON again However this machine failed to started up In this field case the main power indicator on the control panel came on When the same symptom occurs go through the field remedy bel...

Page 764: ...0 XXA2 XXA8 XXA9 XXC0 XX10 XX11 XXDA Filed Measure Clean the ATR sensor window and the ATR sensor shutter with the following procedure 1 Remove the ATR sensor from the main body 2 Press the plunger 1 of the ATR sensor lever solenoid in the direction of the arrow 3 Clean the ATR sensor window 2 and the ATR sensor shutter 3 with lint free paper 4 F 14 39 14 3 3 3 7 Power Supply Voltage Connector Err...

Page 765: ... in IE browser 0015 7322 imagePRESS C1 P imagePRESS C1 Color Image Reader H1 imagePRESS C1 Printer imagePRESS C1 Case in the field Description When trying to connect the Remote UI with the same IP address in use after replacing this machine the message A error has occurred was displayed and the connection ended in failure Field Remedy Perform the following procedure cache clear in the IE browser T...

Page 766: ...llected into the waste toner bottle is calculated If the level reaches 80 or more the calculation result is sent to the DC Controller to display a warning If the level reaches 100 the waste toner full is communicated to the Main Controller to stop this machine and indicate the error code E013 0001 Detection of the waste toner level inside the waste toner box on the secondary transfer mount assembl...

Page 767: ... 2 If the gears are broken replace it by a new one Note Points to note when moving the hopper assembly up and down When moving the hopper assembly of a copyboard cover type machine be sure to open the copyboard cover before lifting the assembly As for a machine with a feeder unit the same symptom does not occur because the hopper assembly does not hit on the feeder unit even when it is lifted Howe...

Page 768: ...al Functions System Settings Network Settings Ethernet Driver Settings Auto Detect OFF make a selection to Communication Mode and Ethernet Type OK 3 Turn the main power switch OFF ON to restart this machine 4 Execute the Ping command 60 sec after power on to check if the host responds it 14 3 5 Jam Main Unit 14 3 5 1 010A Jam Code occurs when using B5 size paper Paper feed roller of right door ass...

Page 769: ... roller failed to rotate when printing a small size paper causing 011B jam Field Remedy 1 Re fit J3806 J3811 connector of the backside driver PCB 2 Re fit J4025 J4204 connector of the decurler PCB 3 If the symptom still occurs replace the backside driver PCB with a new one FM2 7732 Rear Driver PCB Assembly 14 3 5 3 021B Jam Code abnormal noise open lever is hard to shift Longer screw is used to fi...

Page 770: ...gePRESS C1 P imagePRESS C1 Color Image Reader H1 imagePRESS C1 CUSTOM imagePRESS C1 Printer imagePRESS C1 Case in the field Description When the jam code 179F occurs during a saddle job perform the following field remedy 179F Jam can be displayed when the saddle assembly does not notice normal delivery of paper within about 10 sec after the stacker assembly notices paper transportation to the sadd...

Page 771: ...remove the front cover of the fixing assembly 14 3 7 3 E014 0003 Load is applied to fixing roller drive assembly 0016 3647 imagePRESS C1 P imagePRESS C1 Color Image Reader H1 imagePRESS C1 Printer imagePRESS C1 Inspected by Canon Inc Description Since machines having a serial number earlier than the following did not have an appropriate space between the flange of the one way gear FU6 0646 in the ...

Page 772: ...xing belt drive assembly 0021 4613 imagePRESS C1 P imagePRESS C1 Color Image Reader H1 imagePRESS C1 CUSTOM imagePRESS C1 Printer imagePRESS C1 Inspected by Canon Inc Description Ball bearing 1 equipped to the fixing belt drive shaft was broken resulting heavy load on the belt drive motor and E014 0003 occurrence E014 0003 Detects unlock of motor lock for 1 sec or more after the belt drive motor p...

Page 773: ...boss hole the shutter did not move when the solenoid SL9 was turned ON F 14 48 Field Remedy 1 Turn the main power switch OFF and then ON 2 If Step 1 does not work on the symptom check to see if the boss on the ATR shutter link is fit to the boss hole like B 3 If the boss comes off the hole like C re fit it like B F 14 49 Note When detaching and then attaching the developing assembly during install...

Page 774: ...nector of the yellow hopper motor M39 had poor contact the error code E025 0102 was displayed E025 0102 can be displayed when an error in timeout of a supplying motor occurs The first 2 digits of sub code means the problem color as follows 01 Y 02 M 03 C 04 K Field Remedy Check the sub code for a problem color and then check to see the connection of the applicable hopper motor before replacing the...

Page 775: ...ment after replacing potential sensor PCB 0018 1620 imagePRESS C1 P imagePRESS C1 Color Image Reader H1 imagePRESS C1 CUSTOM imagePRESS C1 Printer imagePRESS C1 Manual related Description After replacement of the potential sensor PCB using the electrode for checking potential FY9 3057 perform the 0 level adjustment of the potential sensor and then mount the sensor If the sensor is mounted without ...

Page 776: ... new ones because the fuse may have had an open circuit FL2 3427 Front Fan FL2 3426 Rear Fan FM2 4662 Interface PCB Assembly 14 3 7 15 E225 0001 occurs with machine in which R CON software Ver 1 27 is installed 0018 6304 imagePRESS C1 P imagePRESS C1 Color Image Reader H1 imagePRESS C1 CUSTOM imagePRESS C1 Printer imagePRESS C1 Inspected by Canon Inc Description A machine in which R CON software V...

Page 777: ...ings are changed color balance will be lost To modify color balance execute the Auto Gradation Adjustment full adjust and then run several print jobs 3 If it is confirmed that a setting other than High Definition and Compatible has been selected in Step1 turn OFF the main power switch and check the connection of the connectors on the DC Controller PCB and the Main Controller PCB then turn tne main...

Page 778: ...the protection circuit of the fixing assembly Cause The tie wrap 2 binding the cable of the fixing heater cable unit in the fixing assembly side came in contact with the edge saddle 3 and received excessive stress This might make the drawer connector pin 1 in the fixing assembly side tilt Since the fixing assembly was set in this condition the connector hit against the connector in the main body s...

Page 779: ...at the cable does not escape from the saddle edge 3 F 14 56 5 Push the connector pin from the backside of the fixing drawer connector by the finger and then check to see from the front side of the connector if the connector pin 7 is still set back far from the connector frame edge Or replace the fixing heater cable unit by a new one Reference The fixing heater cable unit that is offered as a servi...

Page 780: ...y moves with click i e if there is play suspect that the assembly is not mounted correctly 2 Using a screw fix the fixture 2 at the bottom left within its movable range 14 3 7 24 E842 0009 occurs at last rotation performed during a continuous black and white job 0019 4405 imagePRESS C1 P imagePRESS C1 Color Image Reader H1 imagePRESS C1 CUSTOM imagePRESS C1 Printer imagePRESS C1 Inspected by Canon...

Page 781: ...when printing 0017 3329 imagePRESS C1 P imagePRESS C1 Color Image Reader H1 imagePRESS C1 CUSTOM imagePRESS C1 Printer imagePRESS C1 Manual related Description Although the face up delivery is possible in copying it cannot be selected when printing in the current specifications As of April 2007 This is for your information but the face up delivery is possible in the following cases only when makin...

Page 782: ...replacement of the original machine licenses of such options have to be transferred to the new machine Field Remedy 1 Invalidate the license of an option that are used with the original machine and obtain an invalidation certificate key 2 Obtain a new license key for the new machine 3 Install the new license key in the new machine For more details refer to the attached How to Invalidate and Transf...

Page 783: ...184 SL4 J1404 J1412 J1177 SL5 J1404 J1412 J1177 SL6 J1405 J1412 J1177 SL7 J1405 J1412 J1177 SL8 J3802 J3810 J1198 SL9 J3802 J3810 J1198 SL10 J1301 J1314 J1184 SL11 J3304 J3312 J1181 Number Parts Parts No PART CHK CL1 Developing clutch FK2 0033 CL 1 SL1 Manual feeder holding plate solenoid FK2 0115 SL 1 SL2 Reverse roller gap solenoid FK2 0034 SL 2 SL3 Delivery flapper solenoid FK2 0835 SL 3 Number...

Page 784: ...noid FH7 5838 SL 10 SL11 Web solenoid FK2 0127 SL 11 Number Connector No Side driver PCB Feeding driver PCB Back driver PCB Pickup driver PCB Fixing driver PCB DC controller PCB CL1 J3807 J3810 J1198 SL1 J3421 J3401 J1193 SL2 J1301 J1314 J1184 SL3 J1301 J1314 J1184 SL4 J1404 J1412 J1177 SL5 J1404 J1412 J1177 SL6 J1405 J1412 J1177 SL7 J1405 J1412 J1177 SL8 J3802 J3810 J1198 SL9 J3802 J3810 J1198 SL...

Page 785: ...motor Activation of duplexing left roller FK2 0571 MTR 9 M11 Duplexing right motor Activation of duplexing confluence roller FK2 0572 MTR 11 M12 Vertical path 1 motor Activation of vertical path 1 roller FK2 0028 MTR 12 M13 Vertical path 2 motor Activation of vertical path 2 roller FK2 0028 MTR 13 M14 Vertical path 3 4 motor Activation of vertical path 3 and 4 rollers FK2 0028 MTR 14 M15 Cassette ...

Page 786: ...r FK2 0578 MTR 37 M38 Fixing motor Activation of fixing roller fixing belt FK2 0568 MTR 38 E014 M39 Y hopper motor Supply from hopper assembly to developing assembly FK2 0583 MTR 39 M40 M hopper motor Supply from hopper assembly to developing assembly FK2 0583 MTR 40 M41 C hopper motor Supply from hopper assembly to developing assembly FK2 0583 MTR 41 M42 Bk hopper motor Supply from hopper assembl...

Page 787: ... J3411 J3402 J1195 M29 J3411 J3402 J1195 M30 J3411 J3402 J1195 M33 J3307 J3312 J1181 M34 J3310 J3312 J1181 M35 J3314 J3312 J1181 M36 J3316 J3312 J1181 M37 J1308 J1312 J1183 M38 J3308 J3312 J1181 M39 J3411 J3420 J1166 M40 J3411 J3420 J1166 M41 J3411 J3420 J1166 M42 J3411 J3420 J1166 M45 J3305 J3312 J1181 M46 J1310 J1312 J1183 M48 J4208 J4201 J1199 M49 J4208 J4201 J1199 M50 J4207 J4201 J1199 M51 J42...

Page 788: ...ion Parts No E code M501 Scanning motor Activation of No 1 No 2 mirror base FK2 1182 E202 Number Connector No I F PCB Reader controller PCB M501 J306 307 J203 M7 M33 M4 M2 M3 M5 M12 M13 M15 M16 M14 M51 M48 M49 M50 M1 M39 M27 M26 M8 M9 M6 M22 M23 M24 M25 M18 M19 M20 M11 M45 M46 M21 M17 M37 M40 M28 M41 M42 M29 M30 M34 M38 M35 M36 ...

Page 789: ...0569 MTR 4 E021 M5 Manual feed pre registration drive motor Activation of manual feed pickup assembly pre registration roller FK2 0028 MTR 5 M6 Registration drive motor Activation of registration roller FK2 0030 MTR 6 M7 Outer delivery motor Activation of outer delivery roller and curl reducing roller FK2 0139 MTR 7 M8 Duplexing reverse motor Activation of reverse 1 2 rollers duplexing inlet rolle...

Page 790: ...8 M35 Fixing belt displacement control motor Correction of displacement of fixing belt FK2 0577 MTR 35 M36 Fixing belt drive motor Activation of fixing belt during standby temperature control FK2 0567 MTR 36 M37 Secondary transfer roller drive motor Activation of secondary transfer roller FK2 0578 MTR 37 M38 Fixing motor Activation of fixing roller fixing belt FK2 0568 MTR 38 E014 M39 Y hopper mot...

Page 791: ... J3409 J3406 J1196 M33 J3307 J3312 J1181 M34 J3310 J3312 J1181 M35 J3314 J3312 J1181 M36 J3316 J3312 J1181 M37 J1308 J1312 J1183 M38 J3308 J3312 J1181 M39 J3411 J3420 J1166 M40 J3411 J3420 J1166 M41 J3411 J3420 J1166 M42 J3411 J3420 J1166 M43 J3409 J3406 J1196 M45 J3305 J3312 J1181 M46 J1310 J1312 J1183 M48 J4208 J4201 J1199 M49 J4208 J4201 J1199 M50 J4207 J4201 J1199 M51 J4207 J4201 J1199 Number ...

Page 792: ...Function Parts No Connector No Interface PCB FM1 Reader cooling fan 2 Cooling of reader assembly FK2 1188 J323 FM2 Reader cooling fan 1 Cooling of reader assembly FK2 1189 J323 M7 M33 M4 M2 M3 M5 M12 M13 M15 M16 M14 M51 M48 M49 M50 M1 M39 M27 M43 M31 M26 M8 M9 M6 M22 M23 M24 M25 M18 M19 M20 M11 M45 M46 M21 M17 M37 M40 M28 M41 M42 M29 M30 M34 M38 M35 M36 ...

Page 793: ... ON 11 E805 000E FM12 Fixing belt cooling fan 2 Cooling of fixing belt FK2 0539 FAN ON 12 E805 000F FM13 Fixing belt cooling fan 3 Cooling of fixing belt FK2 0539 FAN ON 13 E805 0010 FM14 Fixing belt cooling fan 4 Cooling of fixing belt FK2 0539 FAN ON 14 E805 0011 FM15 Reverse cooling fan Cooling of reversing assembly FK2 0124 FAN ON 15 E805 0012 FM16 Left exhaust fan FK2 0103 FAN ON 16 E805 0015...

Page 794: ...84 FM5 J3811 J1197 FM6 J1301 J1314 J1184 FM7 J3404 J3401 J1193 FM8 J1007 J301 FM9 J4023 J4004 J1138 FM10 J3803 J3810 J1198 FM11 J3301 J3312 J1181 FM12 J3301 J3312 J1181 FM13 J3301 J3312 J1181 FM14 J3301 J3312 J1181 FM15 J1301 J1314 J1184 FM16 J3803 J3810 J1198 FM17 J3804 J3811 J1197 FM18 J3803 J3810 J1198 FM19 J3803 J3810 J1198 FM20 J3809 3811 J1197 FM22 J3804 J3811 J1197 FM23 J3803 J3811 J1197 FM...

Page 795: ...Printer unit Number Parts Function Parts No Connector No Interface PCB FM1 Reader cooling fan 2 Cooling of reader assembly FK2 1188 J323 FM2 Reader cooling fan 1 Cooling of reader assembly FK2 1189 J323 FM2 FM18 FM23 FM16 FM4 FM3 FM19 FM10 FM17 FM1 FM15 FM6 FM7 FM9 FM22 FM5 FM8 FM20 FM27 FM26 FM25 FM11 FM12 FM13 FM14 FM2 FM1 ...

Page 796: ...ooling of reversing assembly FK2 0124 FAN ON 15 E805 0012 FM16 Left exhaust fan FK2 0103 FAN ON 16 E805 0015 FM17 Fixing lower rear fan Cooling of fixing assembly FK2 0124 FAN ON 17 E805 0014 FM18 Primary exhaust assist fan FK2 0009 FAN ON 18 E824 0002 FM19 Delivery cooling fan 2 Cooling of delivery assembly FK2 0124 FAN ON 19 E805 000D FM20 Reverse cooling fan 2 Cooling of reversing assembly FK2 ...

Page 797: ... P006 7 0 Close J322 308 J202 PS502 Scanner HP sensor Detection of scanner home position FK2 0149 P006 5 0 HP J321 308 J202 CF1 Original size sensor AB configuration Detection of original size A B vertical scanning direction FK2 0238 J207 CF2 Original size sensor INCH configuration Detection of original size INCH vertical scanning direction FK2 0238 J208 FM2 FM18 FM23 FM16 FM4 FM3 FM10 FM19 FM17 F...

Page 798: ...aper FK2 0149 P005 00 1 Paper present PS10 Manual feeder last sheet detecting sensor Detection of last manual fed paper FK2 0149 P005 01 1 Paper present PS11 Fixing web detachment attachment HP sensor FK2 0149 E005 PS12 Pre registration sensor Registration paper detection FK2 0149 xx0A E10A 0D91 PS13 Secondary transfer rear sensor Detection after secondary transfer WG8 5749 xx0B PS14 Fixing inlet ...

Page 799: ...of cassette 2 paper height FK2 0149 P011 05 0 Pickup position PS38 Cassette 2 paper level sensor 1 Cassette 2 paper level detection 1 FK2 0149 P011 06 1 Paper present PS39 Cassette 2 paper level sensor 2 Cassette 2 paper level detection 2 FK2 0149 P011 07 1 Paper present PS40 Duplexing right sensor Duplexing right detection FK2 0149 xx14 PS41 Cassette 3 pickup sensor Detection of cassette 3 pickup...

Page 800: ...ion of fixing belt attachment FK2 0149 E842 PS68 Y toner supply screw HP sensor Detection of Y toner supply screw HP FK2 0149 P002 00 1 HP flag passed PS69 M toner supply screw HP sensor Detection of M toner supply screw HP FK2 0149 P002 01 1 HP flag passed PS70 C toner supply screw HP sensor Detection of C toner supply screw HP FK2 0149 P002 02 1 HP flag passed PS71 Bk toner supply screw HP senso...

Page 801: ...4 PS14 J3301 3312 J1181 PS15 J3306 J3312 J1181 PS17 J1302 J1314 J1184 PS18 J1302 J1314 J1184 PS19 J1302 J1314 J1184 PS20 J1302 J1314 J1184 PS21 J3802 J3810 J1198 PS22 J3306 J3312 J1181 PS23 J1302 J1314 J1184 PS24 J3404 J3401 J1193 PS25 J1301 J1314 J1184 PS26 J3421 J3401 J1193 PS27 J1179 PS28 J1404 J1412 J1177 PS29 J1404 J1412 J1177 PS30 J1404 J1412 J1177 PS31 J1404 J1412 J1177 PS32 J1401 J1403 J11...

Page 802: ...3302 J3312 J1181 PS62 J3301 J3312 J1181 PS63 J1172 PS65 J1306 J1312 J1183 PS66 J3303 J3312 J1181 PS67 J3302 J3312 J1181 PS68 J3418 J3420 J1166 PS69 J3418 J3420 J1166 PS70 J3418 J3420 J1166 PS71 J3418 J3420 J1166 PS74 J3418 J3420 J1166 PS75 J3301 J3312 J1181 PS76 J3415 J3414 J1192 PS77 J4205 J4204 J1164 PS78 J4205 J4204 J1164 PS79 J4205 J4204 J1164 PS80 J4205 J4204 J1164 PS82 J3416 J3419 J1167 PS10...

Page 803: ...S36 PS42 PS44 PS41 PS55 PS43 PS48 PS50 PS47 PS56 PS49 PS10 PS26 PS65 PS21 PS6a PS5a PS6b PS5b PS9 PS13 PS23 PS24 PS40 PS2 PS70 PS69 PS68 PS78 PS17 PS25 PS19 PS18 PS79 PS67 PS61 PS14 PS62 PS59 PS15 PS22 PS11 PS60 PS27 PS76 PS3 PS4 PS58 PS33 PS39 PS46 PS52 PS32 PS63 PS38 PS45 PS51 PS77 PS1 PS80 PS100 PS66 PS82 PS74 PS8 PS57 PS12 PS20 PS7 PS71 ...

Page 804: ...cal scanning direction FK2 0238 J207 CF2 Original size sensor INCH configuration Detection of original size INCH vertical scanning direction FK2 0238 J208 Number Parts Function Parts No I O RCON Connector No Interface PCB Reader controller PCB PS501 ADF open closed sensor Detection of ADF open closed FK2 0149 P006 7 0 Close J322 308 J202 PS502 Scanner HP sensor Detection of scanner home position F...

Page 805: ...orizontal registration sensor Detection of horizontal registration paper FH7 7196 E051 PS26 Vertical path sensor Detection of pickup vertical path paper FK2 0149 P005 02 P015 05 1 On 1 Paper present xx11 PS27 Confluence sensor Vertical path confluence paper detection FK2 0149 P015 13 1 Paper present xx09 PS28 Cassette 1 pickup sensor Detection of cassette 1 pickup FK2 0149 P015 00 1 Paper present ...

Page 806: ...side heating HP sensor Detection of outside heating HP FK2 0149 E842 PS67 Fixing belt attachment sensor Detection of fixing belt attachment FK2 0149 E842 PS68 Y toner supply screw HP sensor Detection of Y toner supply screw HP FK2 0149 P002 00 1 HP flag passed PS69 M toner supply screw HP sensor Detection of M toner supply screw HP FK2 0149 P002 01 1 HP flag passed PS70 C toner supply screw HP sen...

Page 807: ...PS42 J1405 J1412 J1177 PS43 J1405 J1412 J1177 PS44 J1405 J1412 J1177 PS45 J1418 J1403 J1178 PS46 J1418 J1403 J1178 PS47 J1405 J1412 J1177 PS48 J1405 J1412 J1177 PS49 J1405 J1412 J1177 PS50 J1405 J1412 J1177 PS51 J1418 J1403 J1178 PS52 J1418 J1403 J1178 PS53 J1404 J1412 J1177 PS54 J1404 J1412 J1177 PS55 J1405 J1412 J1177 PS56 J1405 J1412 J1177 PS57 J1406 J1412 J1177 PS58 J1173 PS59 J3301 J3312 J118...

Page 808: ...J1164 PS79 J4205 J4204 J1164 PS80 J4205 J4204 J1164 PS82 J3416 J3419 J1167 PS100 J4205 J4204 J1164 Number Connector No Side driver PCB Feeding driver PCB Back driver PCB Pickup driver PCB Fixing driver PCB Decurler PCB DC controller PCB ...

Page 809: ...PS35 PS37 PS34 PS54 PS36 PS42 PS44 PS41 PS55 PS43 PS48 PS50 PS47 PS56 PS49 PS10 PS26 PS65 PS21 PS6a PS5a PS6b PS5b PS9 PS13 PS23 PS24 PS40 PS2 PS70 PS69 PS72 PS68 PS78 PS17 PS25 PS19 PS18 PS79 PS67 PS61 PS14 PS62 PS59 PS15 PS22 PS11 PS60 PS27 PS76 PS3 PS4 PS58 PS33 PS39 PS46 PS52 PS32 PS63 PS38 PS45 PS51 PS77 PS1 PS80 PS100 PS66 PS82 PS74 PS8 PS57 PS12 PS20 PS7 PS71 TS5 TS1 TS2 TS3 TS4 ...

Page 810: ... presence of M toner retainer WC4 5263 P006 01 1 Set SW9 C toner retainer detection switch Detection of absence presence of C toner retainer WC4 5263 P006 02 1 Set SW10 Bk toner retainer detection switch Detection of absence presence of Bk toner retainer WC4 5263 P006 03 1 Set SW13 Environment switch Drum heater reader heater cassette heater deck heater ON OFF WC1 5179 SW14 Cassette heater switch ...

Page 811: ...closed WC4 5125 P013 15 1 Open SW4 Management key switch unit Management key FH7 6392 SW5 Waste toner lock switch Detection of lock of waste toner screw WC4 5270 P014 07 0 Toner clogged E013 0002 SW6 Fixing feeding lock switch Detection of lock release of fixing feeding unit release lever WC4 5231 P012 05 1 Lock SW7 Y toner retainer detection switch Detection of absence presence of Y toner retaine...

Page 812: ...OFF WC1 5179 SW15 Hopper shutter switch Detection of hopper shutter open closed WC4 5262 P001 11 1 Open SW16 Drum temperature switch Switching temperature of drum heater FM2 7737 Number Connector No AC driver PCB DC power supply relay PCB DC controller PCB Main controller PCB Side driver PCB Drum heater driver PCB SW1 J1802 SW2 J4002 SW3 J4002 SW4 J1020 SW5 J1179 SW6 J1169 SW7 J1195 J3412 J3402 SW...

Page 813: ... unit T 14 37 Number Parts Function Parts No PART CHK E code H501 Lens heater Anti condensation for lens FK2 0226 100V FK2 0228 230V H502 Mirror heater Anti condensation for mirror FK2 0227 100V FK2 0229 230V LA1 Scanning lamp Exposure of original FK2 0224 MISC R SCANLAMP E225 SW4 SW15 SW7 SW11 SW8 SW9 SW2 SW3 SW5 SW1 SW6 SW10 SW16 SW13 SW14 ...

Page 814: ...2 0547 000 100V 120V FH7 4725 230V H6 ITB heater Anti condensation for ITB FK2 0548 000 100V 120V FK2 0549 000 230V H7 Cassette heater Moisture absorption prevention for paper inside cassette FH7 4740 100V FH7 4742 230V LED1 Pre exposure LED Removing residual charge on photosensitive drum FK2 0621 LED2 Photosensitive drum cleaning pre exposure LED Prevention of drum memory generated during primary...

Page 815: ...umber Parts Function Parts No PART CHK E code H501 Lens heater Anti condensation for lens FK2 0226 100V FK2 0228 230V H502 Mirror heater Anti condensation for mirror FK2 0227 100V FK2 0229 230V LA1 Scanning lamp Exposure of original FK2 0224 MISC R SCANLAMP E225 Number Connector No Main controller PCB AC driver PCB DC controller PCB Side driver PCB H5 H6 H3 H2 H4 H1 H7 LED1 LED2 HDD1 ELCB1 H502 H5...

Page 816: ... control of fixing belt FK2 0557 00V E000 E001 E002 E003 FK2 0558 120V FK2 0559 230V H4 Outside heating heater Supplementary heat retention of fixing roller FK2 0554 100V E000 E001 E002 E003 E004 FK2 0555 120V FK2 0556 230V H5 Drum heater Anti condensation for drum FK2 0547 000 100V 120V FH7 4725 230V H6 ITB heater Anti condensation for ITB FK2 0548 000 100V 120V FK2 0549 000 230V H7 Cassette heat...

Page 817: ...9 LED2 J1167 J3416 J3419 ELCB1 J1801 HDD1 J1013 J1014 J301 Number Parts Parts No Function 1 Interface PCB FM2 4662 Interface between printer and ADF 2 Reader controller PCB FM2 3932 Controlling reader assembly 3 CCD AP PCB FM2 3920 CCD unit Analogue image processing 4 Inverter PCB FK2 1187 Activation of scanning lamp Number Connector No Main controller PCB AC driver PCB DC controller PCB Side driv...

Page 818: ...CB FM2 7728 Controlling sensor motor fan solenoid of feeding assembly 13 Laser driver PCB FM2 6066 Drive control for laser scanner unit 14 BD PCB Generation of BD signal 15 HV1 PCB FM2 2633 Controlling primary charging gird pre transfer charging bias 16 HV2 PCB FM2 7188 Control of primary transfer bias 17 HV2 SUB PCB FM2 7197 Controlling primary transfer secondary transfer tension roller ITB clean...

Page 819: ...ation conversion screen processing trimming add on 39 Relay PCB GU SHORT FM2 5919 Bus connection 40 Main controller PCB sub S B FM2 7362 Scanner interface scanner image processing resolution conversion image rotation compression and expansion Main controller PCB sub ZJ A FM2 7352 41 Main controller PCB sub LANBAR A FM2 5898 LAN connection HDD controller HDD power supply 42 BOOTROM PCB Activation o...

Page 820: ...terface between printer and ADF 2 Reader controller PCB FM2 3932 Controlling reader assembly 3 CCD AP PCB FM2 3920 CCD unit Analogue image processing 4 Inverter PCB FK2 1187 Activation of scanning lamp 14 17 20 25 23 22 16 13 9 2 12 46 19 4 18 30 24 3 47 10 11 21 29 5 6 7 45 35 48 27 15 1 26 36 38 37 43 42 41 39 33 40 26 26 26 32 34 31 8 44 51 52 49 50 28 ...

Page 821: ...of paper size of cassette 3 7 Cassette 4 size sensor FM2 0849 Detection of paper size of cassette 4 8 Drum heater driver PCB FM2 7735 100V 120V Controlling drum heater FM2 7736 230V 9 Back driver PCB FM2 7732 10 Side driver PCB FM2 7730 11 Manual feed paper width sensor PCB FH7 7600 Detection of manual feed paper width 12 Feeding driver PCB FM2 7728 Controlling sensor motor fan solenoid of feeding...

Page 822: ...CB sub PF A FM2 7353 Image processing for printer output color space compression under cover removal LOG conversion direct mapping color balance zoom fine tuning gradation conversion screen processing trimming add on 39 Relay PCB GU SHORT FM2 5919 Bus connection 40 Main controller PCB sub S B FM2 7362 Scanner interface scanner image processing resolution conversion image rotation compression and e...

Page 823: ...14 4 8 Connectors 14 4 8 1 List of connector 0014 6157 imagePRESS C1 14 17 20 25 23 22 16 13 9 2 12 47 19 4 18 30 24 3 48 10 11 21 29 5 6 7 46 35 49 27 28 15 1 26 36 38 37 43 42 44 41 39 33 40 26 26 26 32 34 31 8 45 52 53 50 51 ...

Page 824: ... 89 F 14 88 CN2 CN1 J2 J20 J6 J309 J302 J322 J301 J323 J5100 J209 J207 J321 J1302 J5101 J5102 J201 J208 J210 J21 J22 J19 J14 J13 J10 J9 J204 J205 J206 J307 J7 J305 J303 J101 J102 J312 J308 J202 J505 J203 J306 Reader ...

Page 825: ...003 J1186 J1185 J20 J1812 J1804 J1803 J1813 J1802 J9001 J1036 J465 J18 J809 J836 J814 J835 J807 J837 J3307 J3316 J3306 J3305 J754 J753 J465 J752 J755 J750 J751 J804 J830 J3301 J827 J826 J820 J821 J822 J823 J3308 J802 J829 J825 J838 J810 J3310 J813 J18 J17 J16 J55 J14 ...

Page 826: ...Chapter 14 14 91 F 14 90 J704 J705 J709 J707 J727 J719 J706 J743 J724 J712 J720 J717 J713 J715 J714 J725 J710 J703 J1302 J1307 J721 J1301 J711 J702 J701 J726 J1303 ...

Page 827: ...pter 14 14 92 F 14 91 J738 J739 J740 J729 J730 J733 J742 J737 J736 J1016 J1001 J1007 J1002 J1003 J1034 J1008 J733 J731 J1310 J1311 J1309 J1308 J1304 J1306 J1305 J732 J734 J741 J1010 J1011 J1012 J1013 J1009 ...

Page 828: ...3312 J3313 J1314 J69 J3100 J3104 J3350 J3351 J3101 J3103 J204 J202 J203 J201 J78 J53 J54 J3353 J1181 J1182 J1184 J1183 J3352 J3102 J86 J441 J472 J442 J401 J494 J445 J445 J474 J1702 J812 J841 J61 J62 J35010 J3506 J3504 J3503 J3505 J3502 J85 J4015 ...

Page 829: ...Chapter 14 14 94 F 14 93 J406 J206 J209 J203 J92 J3802 J57 J84 J91 J52 J79 J203 J204 J208 J201 J551 J1168 J115 ...

Page 830: ...7 J308 J306 J385 J335 J334 J334 J332 J447 J449 J331 J34D J433 J440 J303 J304 J301 J302 J387 J490 J467 J468 J476 J38 J3418 J3411 J3421 J4099 J4005 J4014 J384 J39 J44 J24D J29D J35 J56 J28 J27 J31 J1811 J382 J386 J388 J383 J60 J305 ...

Page 831: ...477 J456 J476 J468 J4035 J4033 J4034 J1170 J4500 J3501 J3500 J3503 J3502 J3412 J353 J434 J316 J314 J312 J310 J4201 J4202 J4203 J4204 J320 J315 J339 J313 J319 J338 J311 J318 J337 J309 J317 J336 J351 J42 J43 J5 J31 J35 J555 J553 J544 J20 J22 J25 J21 J4206 J70 J4207 J4208 J4205 J532 ...

Page 832: ...Chapter 14 14 97 F 14 96 J3420 J3402 J3414 J3419 J1166 J1195 J1193 J1192 J7 J12 J11 J13 J6 J8 J1167 J3404 J3401 J3403 J3405 J241 J253 J259 J258 J257 J256 J254 J255 J251 J10 ...

Page 833: ...97 J1188 J1189 J451 J471 J201 J202 J101 J660 J3600 J3251 J3250 J66 J23 J36 J30 J42 J22 J26 J7300 J300 J102 J83 J4001 J41 J10 J73 J72 J74 J3400 J3401 J3151 J3050 J3051 J3150 J204 J207 J206 J205 J660 J3600 J7300 J300 J203 J450 ...

Page 834: ...Chapter 14 14 99 F 14 98 J420 J432 J423 J422 J3417 J3415 J421 J427 J426 J454 J430 J425 J3410 J431 J425 J429 J433 J3416 ...

Page 835: ...Chapter 14 14 100 F 14 99 J480 J489 J3422 J377 J376 J375 J373 J371 J402 J403 J1173 J1180 J3807 J4008 J4022 J4001 J1169 J481 J470 J482 J478 J488 J374 J372 ...

Page 836: ...8 J526 J548 J544 J547 J536D J546 J545 J543 J542 J538 J541 J535D J540 J539 J537 J1821 J1810 J1113 J520D J521D J536D J535D J1190 J1819 J1818 J1411 J1404 J1405 J1420 J1407 J1412 J1413 J1406 J455 J1820 J1817 J1822 J1816 J1823 J1177 J1128 J566 J556 J550 J560 J552 J555 J551 J557 J553 J558 J559 J554 ...

Page 837: ...F 14 101 J2113 J505 J511 J512 J513 J514 J515 J1418 J1403 J1402 J506 J507 J508 J2121 J2120 J2119 J791 J1178 J2111 J2507 J2508 J2107 J2124 J1020 J1021 J1019 J1016 J1017 J2125 J501 J502 J516 J503 J518 J1419 J1401 J517 J504 ...

Page 838: ...Chapter 14 14 103 F 14 102 J3202 J2011 J419 J1414 J4001 J3801 J4013 J4012 J4010 J483 J58 J17 J13 J51 J75 J59 J4 J486 J3413 J485 J484 J36 J65 J50 J1415 J4009 J4007 J4002 J32 J34M ...

Page 839: ...14 103 J70 J453 J452 J1198 J3806 J3805 J3810 J3811 J415 J414 J1197 J3211 J3201 J1087 J1176 J1501 J1515 J1502 J1511 J3702 J4510D J3303 J4008 J1810 J1811 J1823 J39 J1822 J1817 J1816 J1820 J1821 J1818 J87 J38 J455 J681 J1819 ...

Page 840: ...Chapter 14 14 105 F 14 104 J444 J446 J417 J141 J140 J142 J150 J3 J418 J134 J143 J412 J448 J410 J407 J411 J443 J416 J3809 J3803 J3804 J15 J4022 J487 J1 J4023 J4021 J4020 J4019 J4018 J4017 ...

Page 841: ...Chapter 14 14 106 F 14 105 J1172 J1179 J461 J1174 J462 J6 J492 J561 J4 J1152 J1101 J1408 J4004 J4008 J1409 J1410 J1138 J9 J459 J458 J464 J565 J564 J562 J563 J457 J463 J250 ...

Page 842: ...7 F 14 106 14 4 8 2 List of Connector 0020 5958 imagePRESS C1 J301 J1014 J1018 J2110 J5003 J2121 J5002 J2122 J37 J33 J1037 J252 J4101 J4011 J113 J97 J84 J6 J38 J48 J1806 J1801 J1805 J1807 J96 J4 J115 J5 J98 J40 J50 J30 ...

Page 843: ...108 F 14 107 CN2 CN1 J2 J20 J6 J309 J302 J322 J301 J323 J5100 J209 J207 J321 J1302 J5101 J5102 J201 J208 J210 J21 J22 J19 J14 J13 J10 J9 J204 J205 J206 J307 J7 J305 J303 J101 J102 J312 J308 J202 J505 J203 J306 Reader ...

Page 844: ...9003 J1186 J1185 J20 J1812 J1804 J1803 J1813 J1802 J9001 J1036 J465 J18 J809 J836 J814 J835 J807 J837 J3307 J3316 J3306 J3305 J754 J753 J465 J752 J755 J750 J751 J804 J830 J3301 J827 J826 J820 J821 J822 J823 J3308 J802 J829 J825 J838 J810 J3310 J813 J18 J17 J16 J55 J14 ...

Page 845: ...Chapter 14 14 110 F 14 109 J704 J705 J709 J707 J727 J719 J706 J743 J724 J712 J720 J717 J713 J715 J714 J725 J710 J703 J1302 J1307 J721 J1301 J711 J702 J701 J726 J1303 ...

Page 846: ...ter 14 14 111 F 14 110 J738 J739 J740 J729 J730 J733 J742 J737 J736 J1016 J1001 J1007 J1002 J1003 J1034 J1008 J733 J731 J1310 J1311 J1309 J1308 J1304 J1306 J1305 J732 J734 J741 J1010 J1011 J1012 J1013 J1009 ...

Page 847: ...J3312 J3313 J1314 J69 J3100 J3104 J3350 J3351 J3101 J3103 J204 J202 J203 J201 J78 J53 J54 J3353 J1181 J1182 J1184 J1183 J3352 J3102 J86 J441 J472 J442 J401 J494 J445 J445 J474 J1702 J812 J841 J61 J62 J35010 J3506 J3504 J3503 J3505 J3502 J85 J4015 ...

Page 848: ...Chapter 14 14 113 F 14 112 J406 J206 J209 J203 J92 J3802 J57 J84 J91 J52 J79 J203 J204 J208 J201 J551 J1168 J115 ...

Page 849: ...07 J308 J306 J385 J335 J334 J334 J332 J447 J449 J331 J34D J433 J440 J303 J304 J301 J302 J387 J490 J467 J468 J476 J38 J3418 J3411 J3421 J4099 J4005 J4014 J384 J39 J44 J24D J29D J35 J56 J28 J27 J31 J1811 J382 J386 J388 J383 J60 J305 ...

Page 850: ...J477 J456 J476 J468 J4035 J4033 J4034 J1170 J4500 J3501 J3500 J3503 J3502 J3412 J353 J434 J316 J314 J312 J310 J4201 J4202 J4203 J4204 J320 J315 J339 J313 J319 J338 J311 J318 J337 J309 J317 J336 J351 J42 J43 J5 J31 J35 J555 J553 J544 J20 J22 J25 J21 J4206 J70 J4207 J4208 J4205 J532 ...

Page 851: ...Chapter 14 14 116 F 14 115 J3420 J3402 J3414 J3419 J1166 J1195 J1193 J1192 J7 J12 J11 J13 J6 J8 J1167 J3404 J3401 J3403 J3405 J241 J253 J259 J258 J257 J256 J254 J255 J251 J10 ...

Page 852: ...116 J1188 J1189 J451 J471 J201 J202 J101 J660 J3600 J3251 J3250 J66 J23 J36 J30 J42 J22 J26 J7300 J300 J102 J83 J4001 J41 J10 J73 J72 J74 J3400 J3401 J3151 J3050 J3051 J3150 J204 J207 J206 J205 J660 J3600 J7300 J300 J203 J450 ...

Page 853: ...Chapter 14 14 118 F 14 117 J420 J432 J423 J422 J3417 J3415 J421 J427 J426 J454 J430 J425 J3410 J431 J425 J429 J433 J3416 ...

Page 854: ...Chapter 14 14 119 F 14 118 J480 J489 J3422 J377 J376 J375 J373 J371 J402 J403 J1173 J1180 J3807 J4008 J4022 J4001 J1169 J481 J470 J482 J478 J488 J374 J372 ...

Page 855: ...8 J526 J548 J544 J547 J536D J546 J545 J543 J542 J538 J541 J535D J540 J539 J537 J1821 J1810 J1113 J520D J521D J536D J535D J1190 J1819 J1818 J1411 J1404 J1405 J1420 J1407 J1412 J1413 J1406 J455 J1820 J1817 J1822 J1816 J1823 J1177 J1128 J566 J556 J550 J560 J552 J555 J551 J557 J553 J558 J559 J554 ...

Page 856: ...F 14 120 J2113 J505 J511 J512 J513 J514 J515 J1418 J1403 J1402 J506 J507 J508 J2121 J2120 J2119 J791 J1178 J2111 J2507 J2508 J2107 J2124 J1020 J1021 J1019 J1016 J1017 J2125 J501 J502 J516 J503 J518 J1419 J1401 J517 J504 ...

Page 857: ...Chapter 14 14 122 F 14 121 J3202 J2011 J419 J1414 J4001 J3801 J4013 J4012 J4010 J483 J58 J17 J13 J51 J75 J59 J4 J486 J3413 J485 J484 J36 J65 J50 J1415 J4009 J4007 J4002 J32 J34M ...

Page 858: ...14 122 J70 J453 J452 J1198 J3806 J3805 J3810 J3811 J415 J414 J1197 J3211 J3201 J1087 J1176 J1501 J1515 J1502 J1511 J3702 J4510D J3303 J4008 J1810 J1811 J1823 J39 J1822 J1817 J1816 J1820 J1821 J1818 J87 J38 J455 J681 J1819 ...

Page 859: ...Chapter 14 14 124 F 14 123 J444 J446 J417 J141 J140 J142 J150 J3 J418 J134 J143 J412 J448 J410 J407 J411 J443 J416 J3809 J3803 J3804 J15 J4022 J487 J1 J4023 J4021 J4020 J4019 J4018 J4017 ...

Page 860: ...Chapter 14 14 125 F 14 124 J1172 J1179 J461 J1174 J462 J6 J492 J561 J4 J1152 J1101 J1408 J4004 J4008 J1409 J1410 J1138 J9 J459 J458 J464 J565 J564 J562 J563 J457 J463 J250 ...

Page 861: ...Chapter 14 14 126 F 14 125 J301 J1014 J1018 J2110 J5003 J2121 J5002 J2122 J37 J33 J1037 J252 J4101 J4011 J113 J97 J84 J6 J38 J48 J1806 J1801 J1805 J1807 J96 J4 J115 J5 J98 J40 J50 J30 ...

Page 862: ...Chapter 15 Self Diagnosis ...

Page 863: ...1 List of Error Codes 15 3 15 2 2 E602 HDD Encryption board error detail 15 19 15 3 Error Codes SEND 15 23 15 3 1 End Code Items 15 23 15 4 Jam Codes 15 24 15 4 1 Jam Code Printer Unit 15 24 15 4 2 Jam Code Finisher Related 15 25 15 4 3 Jam Code ADF Related 15 26 15 5 Alarm Codes 15 29 15 5 1 Alarm Code 15 29 ...

Page 864: ... Error in electric potential control E070 Error in detecting ITB HP sensor E073 Error in connection with transfer drawer E077 Error in detecting HP of secondary transfer roller E078 Error in detecting HP of ITB cleaner E100 Error in failure of BD detection E102 Error in laser EEPROM E110 Error in scanner motor E193 Error in gate array E196 Error in color sensor EEPROM E197 Error in expansion seria...

Page 865: ...ommunication E733 Error in printer communication E740 Error in Ethernet board E744 Error in language file bootROM E747 Error in ASIC for image processing or memory control communication control E748 Error in CL2 board dependent or board E749 Error in reboot command due to change in PDL configuration E800 Error in detecting fixing feeding knob E804 Error in fan E805 Error in detecting stop of fixin...

Page 866: ...ircuit or poor contact in the following main thermistor THM1 THM3 THM5 thermal switch TP1 TP2 TP3 or heater H1 H2 H3 H4 The AC driver PCB or DC controller is faulty 0010 The temperature of the fixing roller reaches 80 deg C but drops 50 deg C or less for 1 sec Reset in service mode COPIER FUNCTION CLEAR ERR 0020 The temperature of the external heat roller reaches 80 deg C but drops 50 deg C or les...

Page 867: ...Check the connection of fixing assembly 0001 Error in connection of fixing unit software detection At sleep or energy saving mode unmounted fixing unit was detected for continuous 500 msec or more with the front cover closed 1 Check to see that the lever of the fixing feed assembly has been correctly set 2 Check the connection of the fixing driver PCB 3 Check the connection of the DC controller 00...

Page 868: ... mode by selecting the followings COPIER COUNTER MISC 2TC BOX 0006 Error in offset adjustment of waste toner full level sensor After disposing the waste toner reset the reading of the waste toner counter value by executing the followings in service mode COPIER COUNTER MISC WST TNR E014 Error in fixing motor 0002 After stabilized rotation of the motor a lock state is not identified for 1 sec or mor...

Page 869: ...rn off and then on the main power Replace patch image read sensor Replace patch detecting shutter xx92 At patch detection the value delta D obtained from the computation result Sig D of patch reading is 5 0 or less 3 times continuously Turn off and then on the main power Replace patch image read sensor Replace patch detecting shutter xx93 At patch detection the value delta D obtained from the comp...

Page 870: ...er 0015 Laser power adjustment is not completed no convergence within effective range 0050 Patch potential control error The laser power value reaches the vicinity of the upper limit F0 or more and also the patch contrast potential 30 40V required cannot be achieved Clean the dustproof glass Replace the photosensitive drum Applies to DC controller Ver07 02 or later E070 There is an error of the de...

Page 871: ...m is mismatched Replace the color sensor unit 0002 At the time of EEPROM reading of the color sensor B the checksum is mismatched Replace the color sensor unit E197 Error in expansion serial communication 0000 Initialization time out of expansion serial DC controller PCB is faulty Replace DC controller PCB 0001 0004 When a communication error occurs between the fixing feed PCB fixing driver PCB fe...

Page 872: ... sensor does not go off when the rear edge assist motor has been rotated for a specific period of time 1 Check the rear edge assist home position sensor Is the sensor normal 2 Check the wiring between the finisher controller PCB and the rear edge assist motor Is the wiring normal 3 Check the rear edge assist mechanism Is there a fault 4 Try replacing the rear edge assist motor Is the problem corre...

Page 873: ...error in the staple swing mechanism finisher saddle finisher 8001 The home position sensor does not go off even when the swing motor has rotated for a specific period of time 1 Check the swing home position sensor Is the sensor normal 2 Check the wiring between the finisher controller PCB and the swing motor Is the wiring normal 3 Check the swing mechanism Is there a fault 4 Try replacing the swin...

Page 874: ... No 1 tray area sensors 1 through 3 Are the sensors normal 2 Check the wiring between the finisher controller PCB and the No 1 tray shift motor Is the wiring normal 3 Is there a fault in the up down mechanism of the tray 4 Try replacing the No 1 shift motor Is the problem corrected 0005 In the case of detecting fault in speed 1 Check the No 1 tray area sensors 1 through 3 Are the sensors normal 2 ...

Page 875: ...ult in the up down mechanism of the tray 4 Try replacing the No 2 shift motor Is the problem corrected 0007 In the case of detecting Lock Detect signal 1 Check the No 2 tray area sensors 1 through 3 Are the sensors normal 2 Check the wiring between the finisher controller PCB and the No 2 tray shift motor Is the wiring normal 3 Is there a fault in the up down mechanism of the tray 4 Try replacing ...

Page 876: ...isher 0001 The number of detection pulses of the paper folding motor clock sensor is lower than specified The paper folding motor M2S the paper folding motor clock sensor PI4S Check the paper folding motor M2S paper folding motor clock sensor PI4S 0002 The state of the paper folding home position sensor does not change when the paper folding motor has been driven for 3 sec The paper folding motor ...

Page 877: ... the paper pushing plate leading edge sensor PI15S Check the connectors of the paper pushing plate leading edge sensor PI15S E5F9 There is an error in the saddle switch saddle finisher 0001 With any of the following sensor is identifying its respective cover a being closed the inlet cover switch is identified as being open for 1 sec or more after the start of the initial rotation of the machine or...

Page 878: ...priate type and check the cable then turn on the main power If the machine fails to reset re install the system software of the external controller 0080 There is an error in the communication with the printer after the external controller has started up normally Turn off the main power and check the cable then turn on the main power If the machine fails to start up re install the system software o...

Page 879: ...oller PCB SUB LANBAR A then turn on the main power 0003 At time of start up PHY ID is found to be illegal Turn off the main power and replace the Main Controller PCB SUB LANBAR A then turn on the main power E744 There is a language file Boot ROM error 0001 The version of the language file on the HDD is different from the version of bootable Download the appropriate language files of the correct ve...

Page 880: ...R A 2 Replace the main controller PCB 4180 An access error has occurred 1 Main Controller PCB SUB LANBAR A 2 Replace the main controller PCB 4190 An access error has occurred Replace the main controller PCB 4220 The nature of SPD of the RAM slot 0 is illegal or cannot be read 1 Disconnect and connect DDR SDRAM of the slot in question 2 Replace DDR SDRAM of the slot in question 4221 The nature of S...

Page 881: ...replace fan and then turn on the main power Error in lower front fan of fixing assembly 000A The lower front fan of fixing assembly is unlocked Turn off the main power check power supply to the fan replace fan and then turn on the main power Cooling fan 1 of delivery unit 000C The cooling fan 1 of delivery unit is unlocked Turn off the main power check power supply to the fan replace fan and then ...

Page 882: ...f the fixing belt 0102 At the time of finishing the operation it is not positioned in a specified position Check the detached attached motor of the fixing belt Check the HP sensor of the fixing belt Check the attached sensor of the fixing belt 1002 Between HoldOn at starting operation and MtrOn 50msec the theory of sensor has changed Check the detached attached motor of the fixing belt Check the H...

Page 883: ...st 1 Start in safe mode and execute all format and reinstallation of system via SST and then turn OFF ON the power 2 Replace HDD after replacement system needs to be reinstalled 07 If ICC profile color resource file does not exist 1 Start in safe mode and execute all format and reinstallation of system via SST and then turn OFF ON the power 2 Replace HDD after replacement system needs to be reinst...

Page 884: ...ok data on remote UI 2 Enter the download mode from service mode and execute the all format and system reinstallation via SST and then turn OFF ON the power 7 1 Execute HD CLEAR by CHK TYPE 1 2 3 5 and turn OFF ON the power 2 After replacing HDD reinstall the system 8 Recovery operation by Boot partition is only available by using SST on safe mode 1 Start in safe mode and execute all format and re...

Page 885: ...urn OFF ON the power 2 After clearing the encryption key execute HDD format and reinstallation of system via SST 01 If cannot recognize the encryption board 1 After clearing the encryption key execute HDD format and reinstallation of system via SST 02 Encryption board HDD failure 1 Remove insert the encryption board and turn OFF ON the power 2 After clearing the encryption key execute HDD format a...

Page 886: ...ission job has ended 2 Delete the files from the box If the symptom still appears turn off and then on the machine s main power 711 Indicates that the Box memory is full Delete the documents within the Box 712 Indicates that the Box document is full Delete the documents within the Box 749 Indicates the failure of job execution as service call is displayed Turn OFF the main power switch wait for 10...

Page 887: ...d then transmit the job again Indicates that the reception data volume exceeded the upper limit reception data processing Repeat the print after all the job is completed If that is not effective check the transmission data Indicates that secure jobs of which amount is more than available at one time were introduced Execute or delete the secure job accumulated in the Host machine and then execute t...

Page 888: ...utlet sensor PS78 E10A Registration ON delay jam PS12 E20A Thick paper detection jam PS65 0D91 Wrong size specification plain paper with smaller size than the specified one is fed PS12 In the modes other than OHP mode 0D92 Wrong material specification plain paper is fed in the OHP sheet setting PS5 PS6 0D93 Wrong material specification OHP sheet is fed in the plain paper setting PS5 PS6 Code Type ...

Page 889: ...r feed stationary jam When a sheet fails to come out of the Saddle inlet sensor even if the Saddle feed motor feeds it by a specified amount after the Saddle inlet sensor detects the leading edge of the sheet 17A2 Saddle feed sensor feed stationary jam When a sheet fails to come out of the Saddle delivery sensor even if the folding motor feeds a stack of sheets by a specified amount after the Sadd...

Page 890: ...front sensor detects a document after it is fed by a specified amount length of document x 1 5mm after the registration roller front sensor is turned ON during the reverse operation 0022 Pickup leading edge skew S4 S5 When a difference in the leading edge detection timing between the separation sensor and the skew sensor is 10mm or more during the separation operation 0023 Pickup trailing edge ske...

Page 891: ... a scanned document is moved to the right side of the platen roller during the fixed reading 0073 Illegal size S3 When the registration roller rear sensor detects a document after it is fed by a specified amount 30mm from the waiting position during the LDR stream reading 0074 Manual feed document size error S9 S1 When the reverse sensor detects a document while the multifeed registration roller s...

Page 892: ...tes the cassette 3 retry pickup error 0014 Indicates the cassette 4 retry pickup error 0017 Indicates the MPtray retry pickup error 0018 Indicates the otion deck retry pickup error 0031 Indicates the cassette 1 lifter motor overcurrent 0032 Indicates the cassette 2 lifter motor overcurrent 0033 Indicates the cassette 3 lifter motor overcurrent 0034 Indicates the cassette 4 lifter motor overcurrent...

Page 893: ...invalid 75 EFI 0001 Indicates the occurrence of error in EFI 0002 Indicates the invalid SVG analysis from EFI 78 GL 0001 None 0002 Indicates the confirmation of CTM CTM Current Transfer Matrics logical coordinate to physical coordinate 0004 Indicates the absence of the current point 80 BDL 0001 Indicates the error at translator boot 0002 Indicates the memory management error 0003 Indicates the dat...

Page 894: ...Chapter 16 Service Mode ...

Page 895: ......

Page 896: ...COPIER 16 71 16 4 1 1 COPIER List 16 71 16 4 1 2 COPIER List 16 90 16 4 1 3 COPIER List 16 101 16 4 2 FEEDER 16 115 16 4 2 1 FEEDER List 16 115 16 4 3 SORTER 16 117 16 4 3 1 SORTER List 16 117 16 5 FUNCTION Operation Inspection Mode 16 117 16 5 1 COPIER 16 117 16 5 1 1 COPIER List 16 117 16 5 1 2 COPIER List 16 131 16 5 1 3 COPIER List 16 145 16 5 2 FEEDER 16 156 16 5 2 1 FEEDER List 16 156 16 6 O...

Page 897: ...nt Mode 16 291 16 7 1 COPIER 16 291 16 7 1 1 COPIER List 16 291 16 7 1 2 COPIER List 16 293 16 8 COUNTER Counter Mode 16 295 16 8 1 COPIER 16 295 16 8 1 1 COPIER List 16 295 16 8 1 2 COPIER List 16 305 16 8 1 3 COPIER List 16 314 ...

Page 898: ...al board Each of COPIER FEEDER SORTER and BOARD has seven large items as shown below F 16 2 Initial screen Level 1 Main intermediate item screen Level 1 Sub item screen Level 1 Sub item screen Level 1 User screen Initial screen Level 2 Reset key Previous next page 2 8 Select a main item from the top of screen The corresponding intermediate items are then displayed and can be selected Select an ite...

Page 899: ... once The screen returns to the initial screen of Service Mode 2 Press the Reset key twice The Service Mode is cancelled and the screen returns to the User screen standard screen When you have used the Service Mode ADJUST FUNCTION or OPTION be sure to turn OFF ON the main power switch after canceling the Service Mode 16 1 4 Back Up 0011 9619 imagePRESS C1 P imagePRESS C1 imagePRESS C1 Printer imag...

Page 900: ...0011 9621 imagePRESS C1 P imagePRESS C1 imagePRESS C1 Printer imagePRESS C1 F 16 6 16 1 6 Main intermediate Item Screen 0011 9624 imagePRESS C1 P imagePRESS C1 imagePRESS C1 Printer imagePRESS C1 1 1 COPIER FEEDER SORTER BOARD Initial item Touch to select an item FAX ...

Page 901: ...y Ready to receive service copy operation Paper jam Executing service mode Performing warmup or similar operation Cover open Copying Error NO TONER No toner WTNR FUL Waste toner full NO PAPER No paper ALERM Alarm READY JAM SERVICE WAITING DOOR COPYING ERROR Adjust Function Option Test Counter I O PREV NEXT OK xxxxx yyyyy aaaaa to bbbbb Toggles value s sign key Stops running operations Sets entered...

Page 902: ...rk interface PCB 1 SDL STCH ROM version of the saddle stitcher controller PCB 1 OP CONT ROM version of the optional controller PCB 1 MN CONT ROM version of the main controller PCB 1 RUI Version of the remote UI 1 PUNCH Version of the punch unit 1 LANG EN Version of the English language file 1 LANG FR Version of the French language file 1 LANG DE Version of the German language file 1 LANG IT Versio...

Page 903: ...ANG BU Version of the Bulgarian language file 2 LANG CR Version of the Croatian language file 2 LANG RM Version of the Romanian language file 2 LANG SK Version of the Slovakian language file 2 LANG TK Version of the Turkish language file 2 LANG CA Version of the Catalan language file 2 MEDIA JA Version of the Japanese paper brand information 2 MEDIA EN Version of the English paper brand informatio...

Page 904: ...d 1 Finisher 2 Saddle finisher 3 Saddle finisher inserter 4 Saddle finisher paper folding unit 5 Saddle finisher inserter paper folding unit 6 3K stacker 7 Inner finisher 8 External small finisher Y 0 Not connected 1 2 holes 2 2 3 holes 3 4 holes FRN 4 4 holes SWDN 1 DECK Display the connection status of the paper deck 0 Not connected 1 Connected small 2 POD deck light with multi tray 1 CARD Displ...

Page 905: ...o check moisture content environment sensor in g 1 DR TEMP Temperature around the photosensitive drum Display the drum surface temperature detected by the drum thermistor Unit deg C Setting range 0 to 60 deg C 1 FIX UC Use it to check the surface temperature of the middle of the fixing upper roller as detected by the main thermistor in deg C 1 FIX UE Use it to check the surface temperature at the ...

Page 906: ... question 6 press to go to the previous Jam Indication screen 7 press it to go to the next Jam Indication screen a Jam Screen Indication Items No Indicates the order of occurrence of the jam in question 1 through 50 the higher the number the older the jam DATE Indicates the date of the jam in question TIME1 Indicates the time of the jam in question TIME2 Indicates the jam recovery time L Use it to...

Page 907: ...ationary jam xx02 left deck pickup sensor PS40 does not detect a stationary jam xx03 cassette 3 pickup sensor PS48 does not detect a stationary jam xx04 cassette 4 pickup sensor PS54 does not detect a stationary jam xx05 vertical path 4 sensor PS63 xx06 vertical path 3 sensor PS62 xx07 vertical path 2 sensor PS61 xx08 vertical path 1 sensor PS60 xx09 vertical path confluence sensor PS32 when the s...

Page 908: ...sor PI7 the post separation sensor does not detect paper when a feed of 452 mm has been made after the start of separation 0002 post separation sensor PI7 the separation sensor detects paper after a feed of 500 mm if extra length 200 mm 45 5 mm has been made the sensor goes on within a feed of 12 mm after detection of the trailing edge holed paper the post separation sensor detects paper when a fe...

Page 909: ...ing the shift motor is faulty 0090 ADF open closed sensor 1 PS502 the ADF is opened during operation 0091 ADF open closed sensor 1 PS502 the ADF is opened during operation while paper is in wait 0092 DF cover open closed sensor PI6 A cover is opened during operation while a drive mechanism is in operation 0093 DF cover pen closed sensor PI6 A cover is opened during operation in wait for paper 0094...

Page 910: ...ent level for primary transfer ATVC K color in monochrome mode Unit µA 2 1EL Monitor value for the ITB tension roller bias Display range 4000 to 0 Standard value 4000 Unit V 2 2EL Monitor value for the secondary transfer static eliminator bias Display range 4000 to 0 Standard value 0 Unit 0V 2 COPIER DISPLAY CCD Subheading Contents Level TARGET B Shading target value for BLUE color 2 TARGET G Shad...

Page 911: ...Correct value 2 0 to 4 0 1 REF Y M C Standard of the developer density on the developing cylinder Y M C The value is updated at the point when toner supply is performed after the main power switch was turned on Correct value 464 to 560 1 SGNL Y M C Measurement value of the developer density Y M C Measurement is performed every time when a job is entered Reference The value is updated at the point ...

Page 912: ...o 1023 100 to 900 in a normal condition 1 PP S DAT Paper thickness of the paper thickness detection sensor Display the thickness of the paper which last passed Unit µm Display range 0 to 999 1 LPOWER Real time display of the laser volume Setting range 00 to FF hex 2 COPIER DISPLAY ALARM 1 Subheading Contents Level IMG DT Y M C K Average value of the image ratio created in Y M C K color 1 LST DY Y ...

Page 913: ...nge replace the patch sensor Location code Alarm code 02 scanner 0002 indicates the presence of dirt on the glass for stream reading 0020 line correction alarm upon detection of dust on the stream reading glass between originals 04 pickup feed 0001 0002 0003 0004 0008 cassette 1 lifter error cassette 2 lifter error cassette 3 lifter error cassette 4 lifter error optional deck lifter error 33 fan 0...

Page 914: ... of ARCDAT C in Screen B 2 Setting range 0 to 1023 Standard value 0 TGT B K Target value in each pattern of ARCDAT K in Screen B 2 Setting range 0 to 1023 Standard value 0 TGT C Y Target value in each pattern of ARCDAT Y in Screen C 2 Setting range 0 to 1023 Standard value 0 TGT C M Target value in each pattern of ARCDAT M in Screen C 2 Setting range 0 to 1023 Standard value 0 TGT C C Target value...

Page 915: ...ting range 1023 to 1023 Standard value 0 SUM C K Total control volume in each pattern of ARCDAT K in Screen C 2 Setting range 1023 to 1023 Standard value 0 SGNL A Y Latest patch result in each pattern of ARCDAT Y in Screen A 2 Setting range 0 to 1023 Standard value 0 SGNL A M Latest patch result in each pattern of ARCDAT M in Screen A 2 Setting range 0 to 1023 Standard value 0 SGNL A C Latest patc...

Page 916: ...tandard value 0 DLTA B Y Difference between the latest patch result and the target value in each pattern of ARCDAT Y in Screen B 2 Setting range 1023 to 1023 Standard value 0 DLTA B M Difference between the latest patch result and the target value in each pattern of ARCDAT M in Screen B 2 Setting range 1023 to 1023 Standard value 0 DLTA B C Difference between the latest patch result and the target...

Page 917: ... of the English voice dictionary 1 WEB BRWS Version of the Web browser 1 HELP Version of the simple navigation 1 LANG CS Version of the Czechoslovakian language file 2 LANG DA Version of the Danish language file 2 LANG EL Version of the Greek language file 2 LANG ES Version of the Spanish language file 2 LANG ET Version of the Esthonian language file 2 LANG FI Version of the Finnish language file ...

Page 918: ...tion 2 MEDIA RM Version of the Romanian paper brand information 2 MEDIA CA Version of the Catalan paper brand information 2 COPIER DISPLAY ACC STS Subheading Contents Level SORTER Display the connection status of the finisher and punch unit X Connection status of the finisher Y Connection status of the punch unit X 0 Not connected 1 Finisher 2 Saddle finisher 3 Saddle finisher inserter 4 Saddle fi...

Page 919: ...o check the machine inside temperature environment sensor in deg C 1 HUM Use it to check the machine inside humidity environment sensor in RH 1 ABS HUM Use it to check moisture content environment sensor in g 1 DR TEMP Temperature around the photosensitive drum Display the drum surface temperature detected by the drum thermistor Unit deg C Setting range 0 to 60 deg C 1 FIX UC Use it to check the s...

Page 920: ...dicates the type of jam 5 Sensor in question 6 press to go to the previous Jam Indication screen 7 press it to go to the next Jam Indication screen a Jam Screen Indication Items No Indicates the order of occurrence of the jam in question 1 through 50 the higher the number the older the jam DATE Indicates the date of the jam in question COPIER DISPLAY CST STS Subheading Contents Level WIDTH MF Use ...

Page 921: ...r open jam detection by software 0D91 size mismatch paper shorter than specified size 0D92 medium mismatch paper instead of transparency 0D93 medium mismatch transparency instead of paper Code Sensor type Sensor number Remarks xx01 right deck pickup sensor PS33 does not detect a stationary jam xx02 left deck pickup sensor PS40 does not detect a stationary jam xx03 cassette 3 pickup sensor PS48 doe...

Page 922: ...le delivery sensor feed delay jam PI11 1793 saddle inlet sensor feed delay jam PI22 17A1 saddle feed sensor feed stationary jam PI18 PI19 PI20 17A2 saddle delivery sensor feed stationary jam PI11 PI17 17A3 saddle inlet sensor feed stationary jam PI22 1786 saddle stapler staple jam S STP 1787 saddle power on jam PI11 PI18 PI19 PI20 PI22 1788 saddle door open jam DOOR Code Sensor type Sensor notatio...

Page 923: ...045 feed sensor PI8 1st not reaching the read sensor 0046 feed sensor PI8 1st stationary at the read sensor 0047 delivery reversal sensor PI9 1st not reaching heat delivery sensor 0048 delivery reversal sensor PI9 1st stationary sensor at the delivery sensor 0071 wrong timing error software timing 0073 wrong timing the shift motor is faulty 0090 ADF open closed sensor 1 PS502 the ADF is opened dur...

Page 924: ...or mode Unit µA 2 1ATVC K1 Target current level for primary transfer ATVC K color in monochrome mode Unit µA 2 1EL Monitor value for the ITB tension roller bias Display range 4000 to 0 Standard value 4000 Unit V 2 2EL Monitor value for the secondary transfer static eliminator bias Display range 4000 to 0 Standard value 0 Unit 0V 2 COPIER DISPLAY DPOT Subheading Contents Level DPOT K Electric poten...

Page 925: ...toner supply is performed after the main power switch was turned on Correct value 250 to 760 1 DENS S Y M C K Detected density value of the sample image created in ATR control Y M C Bk Correct value 250 to 450 2 D Y M C TRGT Target value of the developer density Y M C 2 P SENS P Detected value of the light volume on the base drum in patch detection ATR control 2 DEV DC Y M C K Output value of the ...

Page 926: ...23 100 to 900 in a normal condition 1 PP S DAT Paper thickness of the paper thickness detection sensor Display the thickness of the paper which last passed Unit µm Display range 0 to 999 1 LPOWER Real time display of the laser volume Setting range 00 to FF hex 2 COPIER DISPLAY ALARM 1 Subheading Contents Level IMG DT Y M C K Average value of the image ratio created in Y M C K color 1 LST DY Y M C ...

Page 927: ...nge replace the patch sensor Location code Alarm code 02 scanner 0002 indicates the presence of dirt on the glass for stream reading 0020 line correction alarm upon detection of dust on the stream reading glass between originals 04 pickup feed 0001 0002 0003 0004 0008 cassette 1 lifter error cassette 2 lifter error cassette 3 lifter error cassette 4 lifter error optional deck lifter error 33 fan 0...

Page 928: ... of ARCDAT C in Screen B 2 Setting range 0 to 1023 Standard value 0 TGT B K Target value in each pattern of ARCDAT K in Screen B 2 Setting range 0 to 1023 Standard value 0 TGT C Y Target value in each pattern of ARCDAT Y in Screen C 2 Setting range 0 to 1023 Standard value 0 TGT C M Target value in each pattern of ARCDAT M in Screen C 2 Setting range 0 to 1023 Standard value 0 TGT C C Target value...

Page 929: ...ting range 1023 to 1023 Standard value 0 SUM C K Total control volume in each pattern of ARCDAT K in Screen C 2 Setting range 1023 to 1023 Standard value 0 SGNL A Y Latest patch result in each pattern of ARCDAT Y in Screen A 2 Setting range 0 to 1023 Standard value 0 SGNL A M Latest patch result in each pattern of ARCDAT M in Screen A 2 Setting range 0 to 1023 Standard value 0 SGNL A C Latest patc...

Page 930: ... to 1023 Standard value 0 DLTA B Y Difference between the latest patch result and the target value in each pattern of ARCDAT Y in Screen B 2 Setting range 1023 to 1023 Standard value 0 DLTA B M Difference between the latest patch result and the target value in each pattern of ARCDAT M in Screen B 2 Setting range 1023 to 1023 Standard value 0 DLTA B C Difference between the latest patch result and ...

Page 931: ...eb browser 1 HELP Version of the simple navigation 1 WEBDAV Version of the WebDAV file 1 TIMESTMP Version of the Time Stamp file 1 LANG CS Version of the Czechoslovakian language file 2 LANG DA Version of the Danish language file 2 LANG EL Version of the Greek language file 2 LANG ES Version of the Spanish language file 2 LANG ET Version of the Esthonian language file 2 LANG FI Version of the Finn...

Page 932: ...nit X 0 Not connected 1 Finisher 2 Saddle finisher 3 Saddle finisher inserter 4 Saddle finisher paper folding unit 5 Saddle finisher inserter paper folding unit 6 3K stacker 7 Inner finisher 8 External small finisher Y 0 Not connected 1 2 holes 2 2 3 holes 3 4 holes FRN 4 4 holes SWDN 1 DECK Display the connection status of the paper deck 0 Not connected 1 Connected small 2 POD deck light with mul...

Page 933: ...ting range 0 to 60 deg C 1 FIX UC Use it to check the surface temperature of the middle of the fixing upper roller as detected by the main thermistor in deg C 1 FIX UE Use it to check the surface temperature at the edge of the fixing upper roller as detected by the sub thermistor in deg C 1 FIX LC Use it to indicate the temperature of the center of the fixing lower roller unit deg C 1 FIX LE Use i...

Page 934: ...ress to go to the previous Jam Indication screen 7 press it to go to the next Jam Indication screen a Jam Screen Indication Items No Indicates the order of occurrence of the jam in question 1 through 50 the higher the number the older the jam DATE Indicates the date of the jam in question TIME1 Indicates the time of the jam in question TIME2 Indicates the jam recovery time L Use it to indicate the...

Page 935: ...jam xx03 cassette 3 pickup sensor PS48 does not detect a stationary jam xx04 cassette 4 pickup sensor PS54 does not detect a stationary jam xx05 vertical path 4 sensor PS63 xx06 vertical path 3 sensor PS62 xx07 vertical path 2 sensor PS61 xx08 vertical path 1 sensor PS60 xx09 vertical path confluence sensor PS32 when the source of paper is NOT the right deck xx0A transparency sensor front rear PS3...

Page 936: ...fter a feed of 500 mm if extra length 200 mm 45 5 mm has been made the sensor goes on within a feed of 12 mm after detection of the trailing edge holed paper the post separation sensor detects paper when a feed of 50 m has been made after the separation sensor goes on 0003 registration sensor PI1 the registration sensor does not detect paper when a feed of 134 8 mm has been made after the post sep...

Page 937: ...sor PI6 A cover is opened during operation while a drive mechanism is in operation 0093 DF cover pen closed sensor PI6 A cover is opened during operation in wait for paper 0094 registration sensor separation sensor feed sensor delivery reversal sensor PI1 PI7 PI8 PI9 Paper is detected in the path while the 1st sheet is being picked up 0095 original placement sensor DF cover open closed sensor ADF ...

Page 938: ...2 GAIN EG Adjustment value for the gain level of the even bit for CCD GREEN color for color 2 GAIN ER Adjustment value for the gain level of the even bit for CCD RED color for color 2 COPIER DISPLAY DPOT Subheading Contents Level DPOT K Surface potential of photosensitive drum unit V Checking point Optical value 400 to 950 note that this value applies during image formation If the value is out of ...

Page 939: ...lue 462 to 562 Replace the ATR sensor 1 SGNL Y M C Measured value Y M C of developer density the value will be measured per every job Reference value will be updated when the toner supply operation is executed after the power ON Optical value 250 to 760 If the value exceeds the upper limit 760 or more copy 10 sheets of solid image If the value exceeds the lower limit 250 or less copy 10 sheets of ...

Page 940: ...lor To display the supply history of last 8 cases Display renge 00 to 50 0 to 800g Checking point Optical value 0 to 5 Since it is fixed from 0 to 5 on engine control other values will not appear 2 DENS S L Detected density value of the sample image created in ATR control L Correct value 250 to 450 2 D L TRGT Target value of the developer density L 2 DEV DC L Output value of the target developing ...

Page 941: ...ing range 00 to FF hex 2 COPIER DISPLAY ALARM 1 Subheading Contents Level SUC Y M C K Average value of the image ratio created in Y M C K color is displayed 1 SUC L Average value of the image ratio created in L color is displayed 1 SUA Y M C K Last output image duty Y M C K color is displayed Display range 0 to 100 2 SUA L Last output image duty L color is displayed Display range 0 to 100 2 Item D...

Page 942: ... fan 50 ADF 0010 indicates that the original separation alarm condition has occurred 3 times in sequence i e faulty pickup of the 1st original 61 finisher 0001 staple absent 62 saddle stitcher 0001 stitch staple absent 65 puncher 0001 punch waste case full Item Description No order of data collection highest number indicating oldest data DATE date of data collection TIME time of data collection D ...

Page 943: ...tal control volume in each pattern of ARCDAT K in Screen A 2 Setting range 1023 to 1023 Standard value 0 SUM B Y Total control volume in each pattern of ARCDAT Y in Screen B 2 Setting range 1023 to 1023 Standard value 0 SUM B M Total control volume in each pattern of ARCDAT M in Screen B 2 Setting range 1023 to 1023 Standard value 0 SUM B C Total control volume in each pattern of ARCDAT C in Scree...

Page 944: ...nge 1023 to 1023 Standard value 0 DLTA A C Difference between the latest patch result and the target value in each pattern of ARCDAT C in Screen A 2 Setting range 1023 to 1023 Standard value 0 DLTA A K Difference between the latest patch result and the target value in each pattern of ARCDAT K in Screen A 2 Setting range 1023 to 1023 Standard value 0 DLTA B Y Difference between the latest patch res...

Page 945: ...ange 0 to 1023 Standard value 0 SUM D L Display of the total control volume L color of Screen D at each pattern of ARCDAT control 2 Setting range 1023 to 1023 Standard value 0 SGNL D L Display of the latest patch result L color of Screen D at each pattern of ARCDAT control 2 Setting range 0 to 1023 Standard value 0 DLTA D L Display of the difference between the latest patch result and the target v...

Page 946: ...put from IMG1 L Detected 13 Primary wire HP sensor PS82 0 HP 12 Detection of locking of the backside driver reserve FAN L Locked synchronous rotation 11 Detection of open close of the multi tray movement PS8 L Open 10 ITOP sensor PS1 L ITOP mark detected 9 ITOP sensor PS2 L ITOP mark detected 8 Rotary HP sensor PS21 O HP 7 ITB cleaner HP sensor PS24 H HP Flag is set protected against light 6 5 Scr...

Page 947: ...9 Cartridge motor M M28 H On 8 Cartridge motor Y M27 H On 7 6 Side board remote H Remote on 5 Hopper motor LC M44 H On 4 Hopper motor LM M43 H On 3 Hopper motor K M42 H On 2 Hopper motor C M41 H On 1 Hopper motor LCM M40 H On 0 Hopper motor Y M39 H On P005 15 14 13 Detection of cartridge motor connection LC M32 L Connected 12 Detection of cartridge motor connection LM M31 L Connected 11 Detection ...

Page 948: ...tch detection FRONT LED on PS4 H On 8 Pre exposure LED on LED1 H On 7 6 5 4 ITB cleaning brush roller drive motor 11 M26 port2 port3 0 0 Setting 0 Excitation off 0 1 Setting 1 1 0 Setting 2 1 1 Setting 3 3 ITB cleaning brush roller drive motor 10 M26 2 ITB cleaning brush roller CW M26 1 ITB cleaning brush roller MODE M26 0 Full step 2 phase excitation 1 Half step 1 2 phase excitation 0 ITB cleanin...

Page 949: ...ed synchronous rotation 7 Excessive heating at the edge of the fixing belt thermistor THM4 L Error 6 Excessive heating at the edge of the external heating thermistor THM6 L Error 5 Excessive heating of the fixing belt thermistor THM3 L Error 4 Excessive heating of the external heating thermistor THM5 L Error 3 Excessive heating at the edge of the fixing roller thermistor THM2 L Error 2 Detection o...

Page 950: ...f the cassette 3 size 3 UN11 L Active 2 Detection of the cassette 3 size 2 UN11 L Active 1 Detection of the cassette 3 size 1 UN11 L Active 0 Detection of the cassette 3 size 0 UN11 L Active P014 15 Detection of 30 deg C at the drum heater thermopile H Detection of temperature 14 Detection of 50 deg C limiter at the drum heater thermistor H Error 13 Incoming volume adjustment 1 HP upstream PS80 H ...

Page 951: ...H On 4 Buffer board remote L On 3 DCP fan OP2 new FM26 L On 2 DCP fan OP1 new FM25 L On 1 Left exhaust half speed ON FM16 H On 0 Left exhaust full speed ON FM16 H On P018 15 14 13 12 11 Fixing exhaust fan half speed ON FM5 H On 10 Fixing exhaust fan full speed ON FM5 H On 9 Primary exhaust assist fan half speed ON FM2 FM18 H On 8 Primary exhaust assist fan full speed ON FM2 FM18 H On 7 Paper thick...

Page 952: ...9 8 Detection of 24V ON 1 ON 7 6 5 4 3 2 1 0 P022 15 14 13 12 11 10 9 8 7 Displacement correction roller HP 0 1 HP 1 HP 6 Displacement correction sensor front 1 Displacement at front 0 Normal 1 Displacement at front 0 Normal 5 Displacement correction sensor rear 1 Displacement at rear 0 Normal 1 Displacement at rear 0 Normal 4 Belt detachment attachment sensor 0 1 HP 1 HP 3 Web length sensor 0 web...

Page 953: ...hment sensor 0 Detached 1 Attached 4 Detection of locking of the fixing belt 0 Normal 1 Abnormal 3 Web detachment attachment HP sensor 1 Attached 0 Detached 2 Inner delivery sensor 0 Paper is absent 1 Paper is present 1 Fixing inlet sensor 1 Paper is present 2 Paper is absent 0 P024 15 Not used 14 Not used 13 Not used 12 Not used 11 Not used 10 Not used 9 Not used 8 Not used 7 Not used 6 Not used ...

Page 954: ...etected 7 Pre registration sensor 0 Paper is absent 1 Paper is present 6 Pick up sensor 0 Paper is absent 1 Paper is present 5 OHP sensor 0 0 Paper is absent 1 Paper is present 4 OHP sensor 1 0 Paper is absent 1 Paper is present 3 Detection of rotation of the feeder fan 2 0 Normal 1 Abnormal 2 Detection of rotation of the feeder fan 1 0 Normal 1 Abnormal 1 Reverse cooling fan 0 Normal 1 Abnormal 0...

Page 955: ...030 15 14 13 Delivery cooling fan full speed 1 ON 0 OFF 12 Color sensor SL recovery 1 ON 0 OFF 11 Color sensor SL suction 1 ON 0 OFF 10 All sensors ON 0 ON 1 OFF 9 OHP sensor 1 LED ON 1 ON 0 OFF 8 OHP sensor 0 LED ON 1 ON 0 OFF 7 Feeder fan half speed 1 ON 0 OFF 6 Feeder fan full speed 1 ON 0 OFF 5 4 Pre fixing lower fan half speed 1 ON 0 OFF 3 Horizontal registration 24V 1 ON 0 OFF 2 Delivery fla...

Page 956: ...transmission data DDI_TXD P035 7 A D input Refer to an attached sheet AN7 6 A D input Refer to an attached sheet AN6 5 A D input Refer to an attached sheet AN5 4 A D input Refer to an attached sheet AN4 3 A D input Refer to an attached sheet AN3 2 A D input Refer to an attached sheet AN2 1 A D input Refer to an attached sheet AN1 0 A D input Refer to an attached sheet AN0 P036 7 6 5 4 3 Control of...

Page 957: ...1 ON signal of FAN1 This is usually 0 0 Detection of locking of FAN1 This is usually 1 P002 7 Size detection input port Indefinite 6 Size detection input port Indefinite 5 Size detection input port Indefinite 4 3 Optical motor clock signal Indefinite value 2 13V detection port This is usually 0 1 24V detection port This is usually 0 0 Lamp ON signal Indefinite P003 7 6 5 SP10 of DDIS Indefinite va...

Page 958: ...e value 1 Pre registration sensor Indefinite value 0 Lead edge signal This is usually 0 P002 7 Reverse motor phase B Indefinite value 6 Separation standard REF Indefinite value 5 Reverse motor phase A Indefinite value 4 Separation motor PWM Indefinite value 3 Belt motor phase B Indefinite value 2 Belt motor phase A Indefinite value 1 Belt motor phase B Indefinite value 0 Belt motor phase A Indefin...

Page 959: ...per is absent 0 DF open close detection 1 when DF is closed P008 7 Manual feed document detection sensor 0 when paper is absent 6 Delivery sensor 0 when paper is absent 5 Not used 4 Not used 3 Cover front sensor 1 when DF is closed 2 Pickup paper detection sensor 2 0 or 1 1 Pickup paper detection sensor 1 0 or 1 0 Pickup HP sensor This is usually 1 P009 7 Solenoid timer Indefinite value 6 Separati...

Page 960: ... 1 P015 Separation clock F V Indefinite value P016 Delivery clock F V Indefinite value P017 Document detection sensor AD Indefinite value P018 Document detection sensor AD Indefinite value P019 Reverse motor current adjustment Indefinite value P020 Belt motor current adjustment Indefinite value P021 Document detection sensor adjustment Indefinite value P022 Trail edge detection sensor adjustment I...

Page 961: ...unch dommunication IRQ2 0 ON 3 7 Not used P006 STACKER 0 Not used 1 Lower tray motor LOCK 0 locked 2 Not used 3 Lower tray motor ON 0 ON 4 Not used 5 Motor standby signal 0 ON 6 7 Not used P007 STACKER 0 7 Not used P008 STACKER 0 Lower tray area sensor 1 0 detected 1 Lower tray area sensor 2 0 detected 2 Lower tray area sensor 3 0 detected 3 Not used 4 Punch feed motor CLK IRQ4 5 Lower tray FG IRQ...

Page 962: ...signal 1 Aligning plate R motor phase B signal 2 Aligning plate R motor current switch IO 0 ON 3 7 Not used Address Controller Bit Description Remarks P016 STACKER 0 Aligning plate F motor phase signal A 1 Aligning plate F motor phase signal B 2 Aligning plate F motor current switch I0 0 ON 5 7 Not used P017 STACKER 0 Trailing edge assist motor phase A signal 1 Trailing edge assist motor phase B s...

Page 963: ...er present 4 Lower tray paper sensor 0 paper present 5 24V detection 0 detected 6 Front cover interlock 1 OPEN 7 Fan error detection 0 detected P024 SADDLE 0 Fan ON signal 1 ON 1 LED1 0 ON 2 LED2 0 ON 3 LED3 0 ON 4 X4 POWER ON signal 0 ON 5 7 Not used P025 SADDLE 0 Saddle guide motor phase A signal 1 Saddle guide motor phase B signal 2 Saddle guide motor current switch I0 0 ON 3 Saddle feed motor ...

Page 964: ...ting TOP sensor IRQ5 1 butting position 6 Trimmer IN IRQ6 0 HP 7 Saddle feed motor CLK IRQ7 P032 SADDLE 0 Saddle tray paper sensor 0 paper present 1 Positioning plate paper sensor 0 paper present 2 Saddle crescent roller sensor 0 HP 3 Saddle delivery sensor 0 paper present 4 Saddle trailing edge sensor 1 1 detected 5 Saddle trailing edge sensor 2 1 detected 6 Saddle trailing edge sensor 3 1 detect...

Page 965: ...used P041 PUNCHER 0 EEPROM IN 1 EEPROM OUT 2 EEPROM CLK 3 EEPROM CS 4 Horizontal registration HP sensor 1 ON 5 Horizontal registration motor STB 0 ON 6 Punch motor CCW 0 ON 7 Punch motor CW 0 ON P042 PUNCHER 0 3 Not used 4 DIPSW4 0 ON 5 Horizontal registration motor CUR 0 ON 6 PWM 7 Not used P043 PUNCHER 0 LED 1 0 ON 1 Horizontal registration motor INA 2 Horizontal registration motor INB 3 LED 2 0...

Page 966: ...reset signal 2 DDI P CTS signal printer controller 3 DDI P RTS signal controller printer 4 DDI P Power Ready signal controller printer 5 DDI P Power Ready signal printer controller 6 Copy permission signal control card 7 Copy permission signal coin robo P003 0 Controller cooling fan ON signal 1 ON 0 OFF 1 USB host power 5V control signal 1 ON 0 OFF 2 PCI Serror interruption clear 3 FAX reset signa...

Page 967: ...al 7 For R D P007 0 Not used 1 Not used 2 Electric power control signal 3 6 Not used 7 Modem board detection signal 0 Connected 1 Not connected P008 0 FRAM CLK 1 FRAM DATA 2 FRAM WP 3 7 Not used P009 0 SPD CLK 1 SPD DT 2 4 Not used 5 Emergency night power 13V ON signal 0 OFF 1 ON 6 Emergency night power switching signal 0 High efficiency 1 Normal 7 Emergency night power 24V ON signal 0 OFF 1 ON P0...

Page 968: ...the value indicated in the service label 1 1 to 211 Factory setting value Factory adjustment value Value after RAM clear 20 When you changed the setting value for this item write down the changed value in the service label ADJ Y Adjust the CCD reading starting cell position the starting position to read the image in the main scanning direction Adjustment method When the non image width is larger t...

Page 969: ...m write down the changed value in the service label ADJ Y FX Adjust the main scanning position for DF fixed reading Adjustment method When you increase the setting value by 1 the starting position to read the image moves to the front by 0 1mm When you executed RAM clear for the reader controller PCB or replaced the reader controller PCB enter the value indicated in the service label 1 1 to 211 Fac...

Page 970: ...the white level data for the white plate Adjustment method When you executed RAM clear for the reader controller PCB or replaced the reader controller PCB enter the value indicated in the service label When you replaced the copyboard glass enter the numeric value indicated on the copyboard glass 1 Adjustment range 1 to 9999 Factory setting value Factory adjustment value Value after RAM clear W PLT...

Page 971: ... after RAM clear 0 FCCDU RG Correction value of color registration between Red and Gree in the sub scanning direction which is dependent on the CCD unit at factory setting Adjustment method When you executed RAM clear for the reader controller PCB or replaced the reader controller PCB enter the value indicated in the service label 1 Adjustment range 9 to 9 Factory setting value Factory adjustment ...

Page 972: ...nged the setting value for this item write down the changed value in the service label 100 GB Display an offset value of color registration G B at BOOK mode 100 reading Adjustment method When you executed RAM clear for the reader controller PCB or replaced the reader controller PCB enter the value indicated in the service label 1 Setting range 256 to 256 Factory setting value Factory adjustment va...

Page 973: ...to 2047 Factory setting value Factory adjustment value Value after RAM clear 1159 When you changed the setting value for this item write down the changed value in the service label DFTAR G Enter a shading target value GREEN color when DF is used normal document reading position Adjustment method When an error occurred to an image caused by dirt on the chart etc after executing COPIER FUNCTION CCD ...

Page 974: ...ting value Factory adjustment value Value after RAM clear 0 Reference This mode is used to enter a factory adjustment value Do not make an adjustment in the field REG2 V Y K Make a coarse adjustment of the Y K color writing position in the sub scanning direction the second image of the two images aligned on ITB Adjustment method When you increase the value by 1 the pattern moves to the trail edge ...

Page 975: ...C color Adjustment method When you executed RAM clear for the reader controller PCB or replaced the reader controller PCB enter the value indicated in the service label 1 Adjustment range 462 to 562 Factory setting value Factory adjustment value Value after RAM clear 512 P SGNL Y M C K Signal value of Y M C K color toner density on the photosensitive drum when INIT is performed Adjustment method W...

Page 976: ... clear 59 BLANK B Enter an adjustment value for non image width trail edge Adjustment method When you executed RAM clear for the main controller PCB or replaced the SRAM PCB enter the value indicated in the service label 1 Adjustment range 0 to 1000 Factory setting value Factory adjustment value Value after RAM clear 47 BLANK C1 Set a lead edge margin for Cassette 1 Adjustment method When you exec...

Page 977: ...t electric potential Y M C K color Adjustment method The larger the setting value is the darker the density is 2 Adjustment range 30 to 30 Unit 1V Factory setting value Value after RAM clear 0 Use of this mode must be avoided as much as possible when the machine has been operating normally VBACK Y M C K Adjust the electric potential Y M C K color to eliminate fogging Adjustment method The larger t...

Page 978: ...lacing the reader controller input the value written on the service label once again OFSTP2K Adjust the density at test print reading Keep the K density adjustment value when test print reading was performed Media 2 1 Adjustment range 128 to 128 Standard value 0 When replacing the reader controller input the value written on the service label once again OFSTP2LM Not used 1 OFSTP2LC Not used 1 OFST...

Page 979: ... set a larger value the image density becomes darker When you set a smaller value the image density becomes lighter 1 Adjustment range 8 to 8 Factory setting value Value after RAM clear 0 OFST Y M C K Adjust the density and color balance of a bright section Y M C K color Adjustment method When you set a smaller value fogging is reduced 1 Adjustment range 32 to 32 Factory setting value Value after ...

Page 980: ...djust the parameter setting ratio of the primary charging bias laser power at the feeding speed of 1 3 speed 2 Setting range 0 to 100 This can be set in the unit of 1 Factory setting value Value after RAM clear 100 COPIER ADJUST HV TR Subheading Contents Level PRE TR Set a current value of the pre transfer charging assembly common to Y M C K 1 Adjustment range 120 to 0 Unit 5 0 uA Factory setting ...

Page 981: ... Not used 12 Postcard 13 Label Factory setting value Value after RAM clear 1 Reference 6 items of 2TR TGT 2TR SHR TR PPR TR ENV TR CLR and TR DUP are treated as one set TR ENV1 to 8 Environmental setting items for the secondary transfer ATVC setting 2 Setting range 0 to 3 0 Not used 1 Low humidity 2 Normal humidity 3 High humidity Factory setting value Value after RAM clear 2 Reference 6 items of ...

Page 982: ...ue Value after RAM clear 0 1TR STS1 Offset value of the target current for the primary transfer paper interval at constant speed 2 Setting range 10 to 10 Unit 5 0µA Factory setting value Value after RAM clear 0 1TR STS3 Offset value of the target current for the primary transfer paper interval at 1 3 speed 2 Setting range 10 to 10 Unit 5 0µA Factory setting value Value after RAM clear 0 PRE TR Y M...

Page 983: ...m Factory setting value Value after RAM clear 0 REG SPD Make a fine adjustment of the registration motor speed at constant speed Change the registration speed at constant speed in the range of or 10 scales against the default value 2 Setting range 10 to 10 Standard value 0 REG SPD2 Make a fine adjustment of the registration motor speed at 1 3 speed Change the registration speed at 1 3 speed in the...

Page 984: ...e the sensor detection level varies among paper thickness detection sensors set the sensor rank information when replacing the sensor or executing DconRAM clear 1 Setting range 1 to 5 ACS ADJ Adjust the color recognition level at ACS mode Adjustment method To make it easier to recognize a black and white document increase the setting value To make it easier to recognize a color document decrease t...

Page 985: ...ach image is printed 2 Adjustment range 0 to 4 Factory setting value Value after RAM clear 0 COPIER ADJUST EXP LED Subheading Contents Level CLN EXP Set a cleaner pre exposure current image area Set the light volume of cleaner pre exposure for an image area at printing 1 Setting range 5 to 10 Unit 10mA Standard value 8 CLN EXP2 Set the cleaner pre exposure current color paper internal Set the ligh...

Page 986: ...1023 Standard value 0 CS1OFHIY Adjust the main unit offset of the HT ideal brightness value Y for Color Sensor 1 1 Setting range 0 to 1023 Standard value 0 CS2OFDMK Adjust the main unit offset of the solid actual measurement brightness value K for Color Sensor 2 1 Setting range 0 to 1023 Standard value 0 CS2OFDMC Adjust the main unit offset of the solid actual measurement brightness value C for Co...

Page 987: ...Color Sensor 2 1 Setting range 0 to 1023 Standard value 0 CS1OFWMM Adjust the main unit offset of the solid white actual measurement brightness value M for Color Sensor 1 1 Setting range 0 to 1023 Standard value 0 CS1OFWIY Adjust the main unit offset of the solid white ideal brightness value Y for Color Sensor 1 Setting range 0 to 1023 Standard value 0 COPIER ADJUST LASER Subheading Contents Level...

Page 988: ...the M color writing position in the sub scanning direction Adjustment method When you increase the value by 1 the pattern moves to the trail edge When you executed RAM clear for the reader controller PCB or replaced the reader controller PCB enter the value indicated in the service label 1 Adjustment range 10 to 10 Unit 1 pixel Factory setting value Factory adjustment value Value after RAM clear 0...

Page 989: ...8 to 108 Factory setting value Factory adjustment value Value after RAM clear 0 COPIER ADJUST BLANK Subheading Contents Level BLANK T Enter an adjustment value for non image width lead edge Adjustment method When you executed RAM clear for the main controller PCB or replaced the SRAM PCB enter the value indicated in the service label 1 Adjustment range 0 to 1000 Factory setting value Factory adjus...

Page 990: ... PCB enter the value indicated in the service label 1 Adjustment range 35 to 35 Factory setting value Factory adjustment value Value after RAM clear 0 BLANK C4 Set a lead edge margin for Cassette 4 Adjustment method When you executed RAM clear for the main controller PCB or replaced the SRAM PCB enter the value indicated in the service label 1 Adjustment range 35 to 35 Factory setting value Factor...

Page 991: ...Subheading Contents Level OFST P Y M C K Adjust the offset for the test print reading signal Y M C K color at PASCAL control for automatic gradation correction full correction Adjustment method When you set a larger value the image density after automatic gradation correction full correction becomes darker 1 Adjustment range 128 to 128 Standard value 0 COPIER ADJUST COLOR Subheading Contents Level...

Page 992: ... value Value after RAM clear 0 Use of this mode must be avoided as much as possible when the machine has been operating normally COPIER ADJUST HV PRI Subheading Contents Level PRIMARY Adjust the current of the primary charging assembly 1 Adjustment range 0 to 1200 Unit µA Factory setting value Value after RAM clear 1000 GRID Adjust the grid bias of the primary charging assembly 1 Setting range 0 t...

Page 993: ...transfer ATVC is offset according to the setting value of this mode 2 Adjustment value 10 to 10 Unit 150V Factory setting value Value after RAM clear 0 Reference 6 items of 2TR TGT 2TR SHR TR PPR TR ENV TR CLR and TR DUP are treated as one set TR PPR1 to 8 Paper type setting items for the secondary transfer ATVC setting 2 Paper type setting items for the secondary transfer ATVC setting value which...

Page 994: ... range 16 to 16 Unit 5 Standard value 0 1EL Set a ITB tension roller bias value After monitoring is performed to the bias value by DISPLAY HV STS 1EL set a bias value using this mode 2 Setting range 2000 to 0 Unit V Factory setting value Value after RAM clear 1899 2EL Set a bias value of the secondary transfer static eliminator Adjustment method After monitoring is performed to the bias value by D...

Page 995: ... or 10 scales against the default value 2 Setting range 10 to 10 Standard value 0 COPIER ADJUST CST ADJ Subheading Contents Level MF A4R Enter the basic value of the paper width for the manual feed tray A4R Adjustment method When you executed RAM clear for the DC controller PCB or replaced the DC controller PCB enter the value indicated in the service label When you replace the paper width detecti...

Page 996: ...ng value To make it easier to recognize a color document decrease the setting value 1 Adjustment range 3 to 3 Factory setting value Value after RAM clear 0 ACS EN Adjust the ASC judgment area 2 Setting range 2 to 2 Factory setting value Value after RAM clear 1 ACS CNT Set the chromatic color count area for ASC 2 Adjustment range 2 to 2 Factory setting value Value after RAM clear 0 ACS EN2 Adjust t...

Page 997: ... 1 Setting range 0 to 1023 Standard value 0 CS1OFDMM Adjust the main unit offset of the solid actual measurement brightness value M for Color Sensor 1 1 Setting range 0 to 1023 Standard value 0 CS1OFDMY Adjust the main unit offset of the solid actual measurement brightness value Y for Color Sensor 1 1 Setting range 0 to 1023 Standard value 0 CS1OFDIM Adjust the main unit offset of the solid ideal ...

Page 998: ...1 Setting range 0 to 1023 Standard value 0 CS2OFHIK Adjust the main unit offset of the HT ideal brightness value K for Color Sensor 2 1 Setting range 0 to 1023 Standard value 0 CS2OFHIC Adjust the main unit offset of the HT ideal brightness value C for Color Sensor 2 1 Setting range 0 to 1023 Standard value 0 CS2OFWMK Adjust the main unit offset of the solid white actual measurement brightness val...

Page 999: ...AM clear for the reader controller PCB or replaced the reader controller PCB enter the value indicated in the service label 1 1 to 211 Factory setting value Factory adjustment value Value after RAM clear 79 When you changed the setting value for this item write down the changed value in the service label COPIER ADJUST ADJ XY Subheading Contents Level ADJ Y DF Adjust the main scanning position for ...

Page 1000: ... the value indicated in the service label 1 Adjustment range 9 to 9 Factory setting value Factory adjustment value Value after RAM clear 0 When you changed the setting value for this item write down the changed value in the service label CCDU GB Correction value of color registration between Green and Blue in the sub scanning direction which is dependent on the CCD unit Adjustment method When you ...

Page 1001: ...ged the setting value for this item write down the changed value in the service label 50DF RG Display an offset value of color registration R G at ADF mode 50 reading Adjustment method When you executed RAM clear for the reader controller PCB or replaced the reader controller PCB enter the value indicated in the service label 1 Setting range 256 to 256 Factory setting value Factory adjustment valu...

Page 1002: ...actory setting value Factory adjustment value Value after RAM clear 1189 When you changed the setting value for this item write down the changed value in the service label DFTAR B Enter a shading target value BLUE color when DF is used normal document reading position Adjustment method When an error occurred to an image caused by dirt on the chart etc after executing COPIER FUNCTION CCD DF WLVL1 D...

Page 1003: ... factory adjustment value Do not make an adjustment in the field REG2 V M Make a coarse adjustment of the M color writing position in the sub scanning direction the second image of the two images aligned on ITB Adjustment method When you increase the value by 1 the pattern moves to the trail edge When you executed RAM clear for the reader controller PCB or replaced the reader controller PCB enter ...

Page 1004: ...n adjustment value for non image width lead edge Adjustment method When you executed RAM clear for the main controller PCB or replaced the SRAM PCB enter the value indicated in the service label 1 Adjustment range 0 to 1000 Factory setting value Factory adjustment value Value after RAM clear 94 BLANK L Enter an adjustment value for non image width left edge Adjustment method When you executed RAM ...

Page 1005: ... 1 VCONT Y M C K Adjust the target contrast electric potential Y M C K color Adjustment method The larger the setting value is the darker the density is 2 Adjustment range 30 to 30 Unit 1V Factory setting value Value after RAM clear 0 Use of this mode must be avoided as much as possible when the machine has been operating normally VBACK Y M C K Adjust the electric potential Y M C K color to elimin...

Page 1006: ...bel once again OFSTP2K Adjust the density at test print reading Keep the K density adjustment value when test print reading was performed Media 2 1 Adjustment range 128 to 128 Standard value 0 When replacing the reader controller input the value written on the service label once again OFSTP2LM Not used 1 OFSTP2LC Not used 1 OFSTP3Y Adjust the density at test print reading Keep the Y density adjust...

Page 1007: ...ode must be avoided as much as possible when the machine has been operating normally COPIER ADJUST HV PRI Subheading Contents Level PRIMARY Adjust the current of the primary charging assembly 1 Adjustment range 0 to 1200 Unit µA Factory setting value Value after RAM clear 1000 GRID Adjust the grid bias of the primary charging assembly 1 Setting range 0 to 1000 Unit 1V Factory setting value Value a...

Page 1008: ...2TR TGT 2TR SHR TR PPR TR ENV TR CLR and TR DUP are treated as one set TR DUP1 to 8 Single or double sided paper mode setting items for the secondary transfer ATVC setting 2 Setting range 1 to 4 1 Single sided 2 Automatic double sided 3 Manual feed double sided 4 POD deck Factory setting value Value after RAM clear 1 Reference 6 items of 2TR TGT 2TR SHR TR PPR TR ENV TR CLR and TR DUP are treated ...

Page 1009: ...1mm When you executed RAM clear for the DC controller PCB or replaced the DC controller PCB enter the value indicated in the service label 1 Adjustment range 50 to 50 Unit 0 1mm Factory setting value Value after RAM clear 0 ADJ REFE Adjust the horizontal registration for double sided copy for factory use Adjustment method When you increase the value the second side image moves to the rear side Whe...

Page 1010: ...o make it easier to recognize a character document decrease the setting value 1 Adjustment range 4 to 4 Factory setting value Value after RAM clear 0 K ADJ Adjust the black recognition level for black character processing Adjustment method To make it easier to recognize black color increase the setting value 1 Adjustment range 3 to 3 Factory setting value Value after RAM clear 0 DF S RK Set a char...

Page 1011: ...tential control is turned off Feeding speed 1 1 speed 2 Setting range 5 to 10 Unit 10mA Standard value 8 COPIER ADJUST P PASCAL Subheading Contents Level CS1OFWMY Adjust the main unit offset of the solid white actual measurement brightness value Y for Color Sensor 1 1 Setting range 0 to 1023 Standard value 0 CS1OFWIM Adjust the main unit offset of the solid white ideal brightness value M for Color...

Page 1012: ...e K for Color Sensor 2 1 Setting range 0 to 1023 Standard value 0 CS2OFHIC Adjust the main unit offset of the HT ideal brightness value C for Color Sensor 2 1 Setting range 0 to 1023 Standard value 0 CS2OFWMK Adjust the main unit offset of the solid white actual measurement brightness value K for Color Sensor 2 1 Setting range 0 to 1023 Standard value 0 CS2OFWMC Adjust the main unit offset of the ...

Page 1013: ...eeding speed for feeder stream reading When you increase the setting value the speed becomes slow The image is shortened 1 Adjustment range 30 to 30 Unit 0 1 STRD S Adjust the optical system stop position at stream reading mode for small size document 1 Setting range 7 to 7 Unit 0 5mm Remark The position of printed image is changed By setting the value larger the image shifts toward the front By s...

Page 1014: ...ial supply from the toner container Y M C K to the toner buffer Select an item to highlight it and press the OK key The operation starts 1 SPLY H 4 Perform initial supply from the four color toner cartridge to the toner buffer Operation method Select an item to highlight it and press the OK key The operation starts 1 CARD Make a setting for installation of the card reader 1 to 2001 Factory setting...

Page 1015: ...g for color toner FUNCTION INSTALL INISET 4 is normally completed the invalidation of initial multiple rotations is automatically released This prevents a failure to turn the switch back to the original position When the initial setting is not completed the invalidation is not released Setting range 0 Initial multiple rotations are valid 1 Initial multiple rotations are invalid This is an item to ...

Page 1016: ... control initial setting of patch electric potential Initial setting of patch detection initial setting of patch detection ATR 1 Operation method 1 Select an item to highlight it and press the OK key Start the operation Execute countdown 2 After the operation completes OK is displayed Remark Use at initial installation of the machine unit Set 0 at AINR OFF Turn ON the initial multiple rotation exe...

Page 1017: ... 297mm To make a fine adjustment after a basic value is registered execute COPIER ADJUST CST ADJ MF A4 RMF A6R MF A4 Operation method 1 Set A4R size paper in the manual feeder and set the size guide to A4R width 2 Select MF A4R in this service mode to highlight it and press the OK key The value is registered after automatic adjustment is performed 3 Register basic values for A6R and A4 sizes in th...

Page 1018: ...ils of control When you copy or print more than 100 sheets of narrow paper and then copy or print wide paper a thin glossy line sometimes appears in parallel with the feeding direction with the same width as the paper used previously For example when you use A3 paper after using A4R paper For US when you use 12x18 size paper after using 11x17 size paper In this case you may be able to minimize the...

Page 1019: ...eration method 1 Select KEY CHK to display a number name of the entered key 2 Press a key to be checked If there is no problem the relevant character is displayed in the touch panel Refer to an attached table 3 Select KEY CHK again The checking stops 1 TOUCHCHK Adjust the coordinate position of the analog touch panel Operation method Adjust the pressing position in the touch panel to the LCD coord...

Page 1020: ...er supply fan 10 FM10 Delivery upper cooling fan 1 11 FM11 Fixing belt cooling fan 1 12 FM12 Fixing belt cooling fan 2 13 FM13 Fixing belt cooling fan 3 14 FM14 Fixing belt cooling fan 4 15 FM15 Delivery lower cooling fan 16 FM16 Left exhaust fan 17 FM17 Post fixing lower fan 18 FM18 Primary exhaust assist fan 19 FM19 Delivery cooling fan 2 20 FM20 Reverse cooling fan 21 FM21 Buffer cooling fan 22...

Page 1021: ...rtridge motor LC 32 M33 Cleaning web detachment attachment motor 33 M34 Fixing belt detachment attachment motor 34 M35 Fixing belt displacement control motor 35 M36 Fixing belt drive motor detachment 36 M37 Secondary transfer roller drive motor 37 M38 Fixing motor 38 M39 Hopper motor Y 39 M40 Hopper motor M 40 M41 Hopper motor C 41 M42 Hopper motor K 42 M43 Hopper motor LM 43 M44 Hopper motor LC 4...

Page 1022: ...he system administrator specified in the user mode The password is cleared after the OK key is pressed Operation method 1 Select this item and press the OK key 1 ADRS BK Clear the address book data The address book data is cleared after the main power switch is turned OFF ON 1 Select this item and press the OK key 2 Turn OFF ON the main power 1 CNT MCON Clear the service counter executed for the m...

Page 1023: ... the counter detecting waste toner box full Method of Operation Select the item to highlight and press the OK key to start operation 1 LANG ERR Clear the language related error When a language related error has occurred after switching a default language to a different one use this mode to eliminate the error and set the language to a default language 1 ERDS DAT Clear the SRAM data of E RDS Set th...

Page 1024: ...ou have deleted the data by mistake you need to ask the user to reinstall the SSL server certificate If no certificate is additionally installed by a user the setting values are initialized to be the same as the factory setting and there is no impact to the user Operation method 1 Select this item and press the OK key 2 When the data is cleared normally OK is displayed 3 Turn OFF ON the main power...

Page 1025: ... or later KEY HIST Print out the control panel key input history Operation method 1 Select this item 2 Press the OK key to perform printing 1 HIST PRT Print out the jam history and error history Operation method 1 Select this item 2 Press the OK key to perform printing 1 TRS DATA Transfer the data received in memory to the box Operation method 1 Select this item 2 Press the OK key to perform print...

Page 1026: ...the recorded jobs are printed out The difference to PJH P2 is the number of jobs printed out 1 PJH P 2 Print out the print job history with detailed information for all jobs Print out the history of all jobs stored in the copier main unit with detailed information Operation Press the item to highlight it and press the OK key to perform printing Remarks The print job history is printed out with det...

Page 1027: ...at the initial rotation as first power on This mode executes the following image stabilization control Electric potential control Primary transfer ATVC Developer idling Patch electric potential control This operation is executed for approximately one minute 1 When selecting the item to highlight and pressing OK key the operation is started 2 COPIER FUNCTION SYSTEM Subheading Contents Level DOWNLOA...

Page 1028: ...ecified by CHK TYPE When 0 or 4 is specified this mode is invalid When 1 is specified the image control data saved in the SRAM area or versatile file saving area is also initialized Operation method 1 Select this item 2 Press the OK key When 1 or 3 is selected in CHK TYPE and HD CLEAR is executed initialization is performed after the power is turned OFF ON It takes approximately five minutes for i...

Page 1029: ...The settings executed by this mode are shown below Electric potential control Primary transfer ATVC Development idling adjustment of the charging volume of the developer Correction of the optical volume of the patch detection sensor adjustment of the optical volume of the patch detection sensor Transfer cleaning ACVC determination of high pressure of the transfer cleaning upstream downstream brush...

Page 1030: ...a mistake by a serviceman or improve his her work efficiency The settings executed by this mode are shown below Electric potential control Primary transfer ATVC Development idling adjustment of the charging volume of the developer Correction of the optical volume of the patch detection sensor adjustment of the optical volume of the patch detection sensor Transfer cleaning ACVC determination of hig...

Page 1031: ...xecute the drum replacement mode When replacing a drum forcibly reset the laser power offset value which has been changed according to the drum durability and execute initial multiple rotations 1 COPIER FUNCTION CST Subheading Contents Level MF A4R MF A6R MF A4 Register a basic value of the paper width for the manual feeder DADF Width for A4R 210mm Width for A6R 105mm Width for A4 297mm To make a ...

Page 1032: ...ayed and cleaning stops automatically 1 2TR CLN Clean the secondary transfer roller Operation method Select an item to highlight it and press the OK key to start operation Cleaning stops automatically 1 FX CLN E Refresh the fixing roller Details of control When you copy or print more than 100 sheets of narrow paper and then copy or print wide paper a thin glossy line sometimes appears in parallel ...

Page 1033: ...ht in the control panel Operation method 1 Select this item to stop the LED CHK operation 1 KEY CHK Check the input of keys Operation method 1 Select KEY CHK to display a number name of the entered key 2 Press a key to be checked If there is no problem the relevant character is displayed in the touch panel Refer to an attached table 3 Select KEY CHK again The checking stops 1 TOUCHCHK Adjust the c...

Page 1034: ...g exhaust fan 3 FM3 Feeding fan front 4 FM4 Feeding fan rear 5 FM5 Fixing exhaust fan 6 FM6 Fixing lower front fan 7 FM7 ITB cleaning brush roller cooling fan 9 FM9 Power supply fan 10 FM10 Delivery upper cooling fan 1 11 FM11 Fixing belt cooling fan 1 12 FM12 Fixing belt cooling fan 2 13 FM13 Fixing belt cooling fan 3 14 FM14 Fixing belt cooling fan 4 15 FM15 Delivery lower cooling fan 16 FM16 Le...

Page 1035: ...rtridge motor LC 32 M33 Cleaning web detachment attachment motor 33 M34 Fixing belt detachment attachment motor 34 M35 Fixing belt displacement control motor 35 M36 Fixing belt drive motor detachment 36 M37 Secondary transfer roller drive motor 37 M38 Fixing motor 38 M39 Hopper motor Y 39 M40 Hopper motor M 40 M41 Hopper motor C 41 M42 Hopper motor K 42 M43 Hopper motor LM 43 M44 Hopper motor LC 4...

Page 1036: ...DRS BK Clear the address book data The address book data is cleared after the main power switch is turned OFF ON 1 Select this item and press the OK key 2 Turn OFF ON the main power 1 CNT MCON Clear the service counter executed for the main controller PCB main Refer to the section of COUNTER mode for the target counters The counter value is cleared after the OK key is pressed 1 Select this item an...

Page 1037: ... the counter detecting waste toner box full Method of Operation Select the item to highlight and press the OK key to start operation 1 LANG ERR Clear the language related error When a language related error has occurred after switching a default language to a different one use this mode to eliminate the error and set the language to a default language 1 ERDS DAT Clear the SRAM data of E RDS Set th...

Page 1038: ...ou have deleted the data by mistake you need to ask the user to reinstall the SSL server certificate If no certificate is additionally installed by a user the setting values are initialized to be the same as the factory setting and there is no impact to the user Operation method 1 Select this item and press the OK key 2 When the data is cleared normally OK is displayed 3 Turn OFF ON the main power...

Page 1039: ...he OK key to perform printing 1 USER PRT Print out the user mode list Operation method 1 Select this item 2 Press the OK key to perform printing It takes approximately three seconds before printing is performed 1 LBL PRNT Print out the service label Operation method 1 Set the A4 LTR paper in Cassette 1 2 Select this item 3 Press the OK key to perform printing It takes approximately 15 seconds befo...

Page 1040: ... is printed out with detailed information which is not displayed output in the job history screen displayed by system condition print job history printer and in the print job history report The history of all the recorded jobs up to 5000 jobs in the BW3 CL2 or later machine are printed out The difference to PJH P1 is the number of jobs printed out 1 PT LPADJ Adjust the initial reflector light volu...

Page 1041: ...vel DOWNLOAD Switch the mode to the download mode Operation method 1 Select this item 2 Press the OK key The machine enters the download mode and waits for a command waits for connection In this status STAND BY or STNDBY is displayed next to the small item of DOWNLOAD 3 Perform download using the service support tool CONNECTED is displayed during communication with a PC 4 When communication ends H...

Page 1042: ...t to print out logs stored on the HDD Procedure 1 Select the item 2 Press the OK key 3 See that the log is printed about 2 sheets of A4 Do not use for servicing For the analysis of the cause of trouble Obey the instruction by the quality support section for usage 2 COPIER FUNCTION INSTALL Subheading Contents Level STIR Y M C K Stir developer in the developing unit Y M C K Select an item to highlig...

Page 1043: ...L 0 1 RGW PORT Specify a port number for a sales company s server used for E RDS Setting range 1 to 65535 Factory setting value Value after RAM L 443 1 COM TEST Check the connection to a sales company s server used for E RDS Try to connect to the sales company s server A judgment is made whether the connection has succeeded or not and the result is displayed as OK or NG Result OK Connection is pos...

Page 1044: ...t intensity volume Adjustment of the patch detection sensor light intensity volume Transfer cleaning ACVC Determination of high voltage for upstream downstream brush for transfer cleaning Initial setting of optical ATR Initial setting of noncontact optical ATR Initial setting of control of patch electric potential Initial setting of patch electric 1 INIT L Execution of reading of the initial value...

Page 1045: ... Select an item and press the OK key The displayed message is changed to ACTIVE and cleaning of wires starts 2 After the operation completes OK is displayed and cleaning stops automatically 1 2TR CLN Clean the secondary transfer roller Operation method Select an item to highlight it and press the OK key to start operation Cleaning stops automatically 1 FX CLN E Refresh the fixing roller Details of...

Page 1046: ... control panel Operation method 1 Select this item and press the OK key to start operation The LEDs light up in order 2 Press LED OFF to stop the operation 1 LED OFF Check the LED light in the control panel Operation method 1 Select this item to stop the LED CHK operation 1 KEY CHK Check the input of keys Operation method 1 Select KEY CHK to display a number name of the entered key 2 Press a key t...

Page 1047: ...g exhaust fan 3 FM3 Feeding fan front 4 FM4 Feeding fan rear 5 FM5 Fixing exhaust fan 6 FM6 Fixing lower front fan 7 FM7 ITB cleaning brush roller cooling fan 9 FM9 Power supply fan 10 FM10 Delivery upper cooling fan 1 11 FM11 Fixing belt cooling fan 1 12 FM12 Fixing belt cooling fan 2 13 FM13 Fixing belt cooling fan 3 14 FM14 Fixing belt cooling fan 4 15 FM15 Delivery lower cooling fan 16 FM16 Le...

Page 1048: ...4 M35 Fixing belt displacement control motor 35 M36 Fixing belt drive motor detachment 36 M37 Secondary transfer roller drive motor 37 M38 Fixing motor 38 M39 Hopper motor Y 39 M40 Hopper motor M 40 M41 Hopper motor C 41 M42 Hopper motor K 42 M43 Hopper motor LM 43 M44 Hopper motor LC 44 M45 External heating detachment attachment motor 45 M46 Feeding motor 46 M48 Decurler feeding 1 motor 47 M49 De...

Page 1049: ...r value is cleared after the OK key is pressed 1 Select this item and press the OK key 1 OPTION Set the setting value of a service mode OPTION back to a default value a value after RAM clear is executed The setting value is cleared after the OK key is pressed The data of the main controller DC controller and reader controller is cleared Operation method 1 Print out the service mode data by COPIER ...

Page 1050: ...D which causes a security problem Therefore a serviceman must perform this operation Be sure to make sure that OK is displayed after the operation is performed When NG is displayed the CA certificate and key pair may have not been normally deleted Therefore it is necessary to surely delete them by initializing the HDD etc When this operation is performed the SSL server certificate and key pair add...

Page 1051: ...ighlight it 2 Press the OK key Each operation is performed for a few seconds and stops automatically 3 Press the OK key to perform printing Reference When a failure occurs to the photosensitive drum caused by the lighting operation of the post exposure lamp rotate the drum 1 D PRINT Print out the service mode DISPLAY This is a mode to print out only the items displayed in the DISPLAY service mode ...

Page 1052: ...g the item to highlight and pressing OK key the operation is started 2 ATR EX Forcibly execute the ATR control Forcibly execute the ATR control when the correction value for the ATR control is lost after the E020 error occurs or the DC controller is replaced in the field maintenance service 1 When selecting the item to highlight and pressing OK key the operation is started 2 INTR EX Forcibly execu...

Page 1053: ...tion by the quality support section for usage 2 DEBUG 2 Use it to print out logs stored on the HDD Procedure 1 Select the item 2 Press the OK key 3 See that the log is printed about 2 sheets of A4 Do not use for servicing For the analysis of the cause of trouble Obey the instruction by the quality support section for usage 2 FEEDER FUNCTION Subheading Contents Level SENS INT Select a sensitivity a...

Page 1054: ... fixing 2 when giving preference to the speed productivity PASCAL Set if using the contrast electric potential and gradation correction data obtained by automatic gradation correction full correction control or not 1 Setting range 0 Use the data 1 Do not use the data 2 Reserve same operation as 1 3 Reserve same operation as 0 Standard value 1 The setting value becomes valid after the main power sw...

Page 1055: ...etting to 1 when blistering of paper occurs 1 Setting range 0 OFF default 1 5 deg C 2 10 deg C 3 15 deg C 4 20 deg C Standard value 0 W SCNR Set the presence absence of the reader for the copy model 1 Setting range 0 Printer model without a scanner 1 Model with a scanner Standard value 0 The setting value becomes valid after the main power switch is turned OFF ON RUI DSP Set the options for the co...

Page 1056: ...mperature Set the log acquisition interval for COPIER FUNCTION MISC P ENV PRT and COPIER DISPLAY ENVRNT 1 Setting range 0 to 480 minute Standard value 60 Reference Log acquisition not implemented at 0 minute T1 TEMP Switch the down sequence table for thick paper 1 1 Setting range 0 Default 1 Fixing is prioritized 2 Productivity is prioritized Standard value 0 The setting value becomes valid after ...

Page 1057: ...ed as small size Default 1 Count the paper larger than LTR as large size A paper that is LTR or smaller is considered as small size The scan counter threshold at copy is determined as follow depending on the combination with the setting value of B4 L CNT COPIER OPTION USER B4 L CNT In case SC L CNT B4 L CNT 0 0 Count the paper larger than B4 as large size A paper that is B4 or smaller is considere...

Page 1058: ...tems executed by a system administrator When not hide is selected the following four items are displayed in the system administrator setting Curl correction volume Adjustment of the air volume for the paper separation fan Adjustment of the image position Adjustment of the secondary transfer voltage 1 Setting range 0 Hide 1 Do not hide Standard value 0 Hide ARCDT SW ON OFF of ARCDAT Select whether ...

Page 1059: ...0 The setting value becomes valid after the main power switch is turned OFF ON SCANSLCT Set ON OFF of the function to calculate the scan area based on the paper size 2 Setting range 0 OFF Determine the scan area by document detection 1 ON Determine the scan area by paper size Standard value 0 When setting as 1 if the media size is larger than the original size productivity decreases due to a large...

Page 1060: ...face up delivery is usually performed However this mode is provided to perform face down delivery to guarantee stacking condition However this mode is invalid when a finisher is installed 2 Setting range 0 Face up for all setting for one sheet of document 1 Face up when specifying one copy and face down when specifying multiple copies for one sheet of document Standard value 0 The setting mode bec...

Page 1061: ...of the transmission screen in the control panel 2 Setting range 0 Hide 1 Do not hide Standard value 1 UI FAX Select hide or not hide of the FAX screen in the control panel 2 Setting range 0 Hide 1 Do not hide Standard value 1 TMC SLCT Switch the coefficient used for error diffusion Use this mode to increase dot stability and granularity so that pitch unevenness or course image that occurred on an ...

Page 1062: ...etwork connection is not actually performed in the model which includes a network board as standard equipment This mode is provided for a machine which is not connected to network such as Lawson while a NADA machine is connected to network as a default setting 2 Setting range 0 Do not display the message 1 Display the message Standard value 1 FX SPD Make a fine adjustment of the fixing roller spee...

Page 1063: ... value is set as 1 original size detection at open close of the pressure plate is not performed For detection of the original size without lightning the scanning lamp original size sensor photo sensor is required UISW DSP Set hide or not hide of the SW to switch the display to the user screen Set hide or not hide of the SW to determine which of the normal screen or the simple screen Lawson type is...

Page 1064: ...g range 0 Dependent on SMTP 1 Do not use the authentication Standard value 0 NS LGN Restrict the use of LOGIN authentication in SMTP authentication Make this setting to restrict the use of LOGIN authentication in SMTP authentication 2 Setting range 0 Dependent on SMTP 1 Do not use the authentication Standard value 0 MEAP PN Set a port number for the HTTP server used by MEAP application 2 Setting r...

Page 1065: ... range 100 to 10000 can be set in the unit of 1 Standard value 1000 SSH SW Set whether or not to activate the SSH server Make this setting to specify whether or not to activate the SSH server when activating the main unit 2 Setting range 0 Do not activate the SSH server when activating the main unit 1 Activate the SSH server when activating the main unit Standard value 0 SSH server does not start ...

Page 1066: ...ord of a user who can be connected to the SSH server Specify a password of a login user required to connect to the SSH server 2 Setting range 8 characters maximum one byte alphanumeric chafacter Standard value Vs8DuwJ This item is for future expansion Do not change it This item becomes available only when the setting value of SSH SW is 1 ON Passwords are masked on the screen CDEV IDL Set ON OFF of...

Page 1067: ...e rotations in all environments 2 This mode is not used for this machine CHNG STS Use it to set the T O T TUIF over TCP IP status connection port number 2 Changes the port number for status connection in a TUIF over TCP IP environment This is used for changing the port No in service NAVI settings 1 to 65535 default 20010 MEMO T O T TUIF over TCP IP Communication protocol between embedded applicati...

Page 1068: ...not display the code 1 Display the code Standard value 0 The setting value becomes valid after the main power switch is turned OFF ON MEAP SSL Set an HTTP port for MEAP Set a port for the HTTP server when using SSL in the HTTP of MEAP 2 Setting range 1 to 65535 Standard value 8443 MIX FLG Switch the image area flag for image compositing Switch the image processing method when an image for image co...

Page 1069: ...rmation using the original size after conversion PDF RDCT Set whether or not to reduce and send the image for reception transfer transmission in the PDF format 2 Reduce and send the image when converting the image received by FAX or iFAX into the PDF format and performing transmission by e mail or file Setting range 0 Convert the image into the PDF format but do not reduce it for reception transfe...

Page 1070: ... the sleep mode 2 Setting range 0 Provide a notice 1 Do not provide a notice Standard value 0 WUEV INT Set the interval to provide a notice of the sleep mode operation 2 Setting range 0 to 65535 Standard value 600 WUEV POT Set a port number for the destination to provide a notice of the sleep mode operation 2 Setting range 1 to 65535 Standard value 11427 WUEV RTR Set a range to provide a notice of...

Page 1071: ...etting items 2 Setting range 0 Use the WEBDAV function 1 Do not use the WEBDAV function Standard value 0 Reference Although the WEBDAV function is included in the main unit as a standard function there are cases when this function is not used in order to reduce the memory usage PASCL TY Set the paper type used for the automatic gradation correction PASCAL This mode is used when executing PASCAL fo...

Page 1072: ... when executing shutdown 2 Setting range 0 Execute shutdown after the DCON fan control is terminated 1 Execute shutdown before the DCON fan control is terminated Standard value 0 ADJ VPP Adjust the developing bias Vpp Function to adjust Vpp for the developing AC bias 2 Setting range 4 to 2 Standard value 0 AST SEL Change the range of the advanced smoothing AST SEL AST level SELect 2 Setting range ...

Page 1073: ...n the user mode WEB DISP Set whether or not to display the message web is almost empty in the user screen 1 Setting range 0 Do not display the message 1 Display the message Standard value 1 Display the message Remarks A Message on the UI Display a warning message default Whether or not to display the warning message can be set by this mode B Display in the service mode The message is always displa...

Page 1074: ...range 0 to 999 Standard value 0 COUNTER 6 Use it to set soft counter 6 for the counter status verification screen 1 Setting range 0 to 999 Standard value 0 Valid or invalid Number Counter Details yes 002 Remote copy full color 1 yes 003 Remote copy full color 2 yes 004 Remote copy mono color 1 yes 005 Remote copy mono color 2 yes 006 Remote copy black and white 1 yes 007 Remote copy black and whit...

Page 1075: ...7 Total A2 yes 128 Total A large yes 129 Total A small yes 130 Total A full color 1 yes 131 Total A full color 2 yes 132 Total A black and white 1 yes 133 Total A black and white 2 yes 134 Total A mono color large yes 135 Total A mono color small yes 136 Total A black and white large yes 137 Total A black and white small yes 138 Total A 1 double sided yes 139 Total A 2 double sided yes 140 large A...

Page 1076: ...208 Copy A small yes 209 Local copy Total 1 yes 210 Local copy Total 2 yes 211 Local copy large yes 212 Local copy small yes 213 Remote copy Total 1 yes 214 Remote copy Total 2 yes 215 Remote copy large yes 216 Remote copy small yes 217 Copy full color 1 yes 218 Copy full color 2 yes 219 Copy mono color 1 yes 220 Copy mono color 2 yes 221 Copy black and white 1 yes 222 Copy black and white 2 yes 2...

Page 1077: ... copy full color small yes 281 Local copy mono color large yes 282 Local copy mono color small yes 283 Local copy black and white large yes 284 Local copy black and white small yes 285 Local copy full color mono color large yes 286 Local copy full color mono color small yes 287 Local copy full color mono color 2 yes 288 Local copy full color mono color 1 yes 289 Local copy full color large double ...

Page 1078: ...e sided yes 355 PDLPrint black and white large double sided yes 356 PDLPrint black and white small double sided Valid or invalid Number Counter Details yes 401 Copy print full color large yes 402 Copy print full color small yes 403 Copy print black and white large yes 404 Copy print black and white small yes 405 Copy print black and white2 yes 406 Copy print black and white1 yes 407 Copy print ful...

Page 1079: ... color 2 yes 620 Box print full color mono color 1 yes 621 Box print full color large double sided yes 622 Box print full color small double sided yes 623 Box print mono color large double sided yes 624 Box print mono color small double sided yes 625 Box print black and white large double sided yes 626 Box print black and white small double sided Valid or invalid Number Counter Details yes 701 Rec...

Page 1080: ...full color Gray scale 2 no 820 Report print full color Gray scale 1 yes 821 Report print full color large double sided yes 822 Report print full color small double sided no 823 Report print Gray scale large double sided no 824 Report print Gray scale small double sided yes 825 Report print black and white large double sided yes 826 Report print black and white small double sided Valid or invalid N...

Page 1081: ...ission scan Database black and white no 955 Transmission scan Local print color no 956 Transmission scan Local print black and white no 957 Transmission scan Box color no 958 Transmission scan Box black and white COPIER OPTION USER Subheading Contents Level CONTROL enables disables the charging mechanism PDL job 1 When connecting with the account managing device e g coin vendor non Canon control c...

Page 1082: ... 232 Counter 4 Print full color mono color 1 324 1 Counter 1 Total 2 102 Counter 2 Copy full color mono color 2 231 Counter 3 Total A full color mono color 2 148 Counter 4 Copy black and white 2 222 Counter 5 Total A black and white 2 133 2 The setting value 0 with mono color Counter 1 Total 1 101 Counter 2 Total black and white 1 108 Counter 3 Copy full color mono color 1 232 Counter 4 Print full...

Page 1083: ...to be displayed for Counter 8 in the user mode Set a value for the 8th counter to be displayed in the user mode 1 Setting range 1 to 26 39 41 to 45 Standard value 0 Not displayed LDAP SW Set the switching of the searching condition for LDAP search Set a matching condition to search e mail addresses or FAX numbers from the LDAP server 1 Setting range 0 Include the specified keyword 1 Do not include...

Page 1084: ...n e mail address 1 Prohibit transmission to an e mail address Standard value 0 Remarks In case of changing the setting from 0 to 1 while the e mail addresses are registered it is desirable to delete the e mail addresses manually Without deleting them they can be used In case the setting is 1 the import registration of the e mail addresses from RUI and machine information delivery is not accepted T...

Page 1085: ...air heater is controlled For coated paper pickup cannot be performed until the air heater is turned on and warm air blows Furthermore when the machine is used in the environment near the ON OFF switching condition it is assumed that the ON OFF switching of the air heater is frequently performed and it increases the wait time When you receive a claim from a user that the wait time is too long perfo...

Page 1086: ...t size must be manually entered in the control panel 1 Perform the document size detection while the copyboard is open Use this mode when you need to perform the document size detection automatically even when you cannot close the copyboard to make copies of a thick book etc Detection is performed when the start key is pressed Standard value 0 Remarks When SIZE DET is set to 0 the document size de...

Page 1087: ...method with non Canon PCL PRJOB CP Set the CCV count pulse when performing reception and report printing 2 Setting range 0 Do not provide a count pulse 1 Provide a count pulse Standard value 0 When using account managing device e g coin vendor non Canon control card it switches over on off the count pulse notice for every page at receipt print report print DPT ID 7 Make a setting for registration ...

Page 1088: ...does not assure the order of pages at the receiver In addition it may be possible that any other reception job steps between the pages When setting this mode explain the foregoing possibility to the user and gain the consent beforehand MEAPSAFE Make a setting to switch to the MEAP safe mode 2 Setting range 0 Normal mode 1 Safe mode Standard value 0 Safe mode works to stop the added MEAP applicatio...

Page 1089: ... as a condition for the machine to recover from sleep mode via network Because the existing network system applications e g Net Spot Accountant image WARE do not send such packet the machine fails to recover via network if it s shifted to sleep mode 3 When setting 1 the machine able to recover from sleep mode via network because it does not shift to sleep mode 3 1wsleep resulting the trade off wit...

Page 1090: ...he color counter only for the two color mode Set whether to use full color counter or mono color counter for the two color mode count up 2 Setting range 0 Perform count up to mono color counter 1 Perform count up to full color counter Standard value 1 Remarks 2 Color Print 1 color from R G B C M Y Bk Mono color 1 color only DOM ADD Switch a setting of domain complement for email transmission Set w...

Page 1091: ...s in manual feeding 2 Setting range 0 Do not display the button 1 Display the button Standard value 0 Remarks Pressing the button increases fixing operation and it extremely decreases printing performance CLR TIM Select the timing to perform a complete removal processing in the security kit When a complete removal processing is performed job processing performance sometimes decreases for certain d...

Page 1092: ... size is indicated as U4 paper size is Argentine LTR 2 U4 NAME 1 CST U4 29 size is indicated as LTR paper size is Argentine LTR 3 U4 NAME 0 CST U4 18 size is indicated as LTR paper size is LTR 4 U4 NAME 1 CST U4 18 size is indicated as LTR paper size is LTR CST U1 U2 U3 U4 Specify a name of the paper used for the paper size group When the following special size paper is specified for U1 U2 U3 and ...

Page 1093: ... the UI screen for a coin vendor Setting range 0 Coin 1 Card 2 Coin and card Standard value 0 1 SC TYPE Switching over of the type of the Self Copier type machine coin vender capable machine Available only when the Soft ID for the machine is set as a specific user This service mode is used to switch over the machine type to a specific user type machine or generic Self Copier type machine Generic S...

Page 1094: ... LCNS TR T 16 176 COPIER OPTION INT FACE Subheading Contents Level CNT TYPE Switch the EFI controller connection 1 Switching the EFI controller type Setting range 0 External Tower Type Controller 1 Back Mounting Type Controller AP OPT Set whether or not to permit printing from the PrintMe application installed in the PS print server unit 2 Setting range 0 Permit printing by the specified account 1...

Page 1095: ...D function is installed ST SPDF Display the installation status of the SEND searchable PDF transmission function in transfer invalidation 2 Setting range 0 Do not provide the SEND searchable PDF transmission function not installed 1 Provide the SEND searchable PDF transmission function installed Standard value 0 This mode is available only when the SEND function is installed TR SPDF Obtain a trans...

Page 1096: ...1 Provide the encryption secure printing installed Standard value 0 This mode is available only when the 3DES USH H board is mounted TR SCR Obtain a transfer license key of the encryption secure printing in transfer invalidation Obtain a transfer license key to use the encryption secure printing by other MFP machine 2 Standard value Transfer license key 24 digits This mode is available only when t...

Page 1097: ...stallation status of the highly compressed PDF in transfer invalidation 2 Setting range 0 Do not provide the highly compressed PDF not installed 1 Provide the highly compressed PDF installed Standard value 0 TR HRPDF Obtain a transfer license key of the highly compressed PDF in transfer invalidation Obtain a transfer license key to use the highly compressed PDF by other MFP machine 2 Standard valu...

Page 1098: ...ansfer license key 24 digits Remarks This mode is valid only when the SEND function is available ST DVPDF Display the installation status of the PDF transmission function with a device signature in transfer invalidation 2 Setting range 0 Unavailable not installed 1 Available installed Standard value 0 Remarks This mode is valid only when the SEND function is available TR DVPDF Obtain a transfer li...

Page 1099: ...dard value Transfer license key 24 digits ST PS Display the installation status of PS in transfer invalidation 2 Setting range 0 Unavailable not installed 1 Available installed Standard value 0 TR PS Obtain a transfer license key of PS in transfer invalidation Obtain a transfer license key to use PS by other MFP machine 2 Standard value Transfer license key 24 digits ST PCL Display the installatio...

Page 1100: ... Setting range 0 Unavailable not installed 1 Available installed Standard value 0 TR PSPCL Obtain a transfer license key of PS and PCL in transfer invalidation Obtain a transfer license key to use the combined options of PS and PCL by other MFP machine 2 Standard value Transfer license key 24 digits ST PCLUF Display the installation status of PCL and UFR in transfer invalidation Display the combin...

Page 1101: ...nsfer invalidation Obtain a transfer license key to use LIPS LX UFR II for overseas by other MFP machine 2 Standard value Transfer license key 24 digits COPIER OPTION BODY Subheading Contents Level PO CNT Set ON OFF of the electric potential control function 1 Setting range 0 OFF 1 ON Standard value 1 MODEL SZ Switch the fixed and variable display and ADF document size detection 1 Setting range 0 ...

Page 1102: ...ontrol Upon activation of this mode Temperature of the following increase by 5 deg C stand by temperature both of the 2 types copying temperature stand by last rotation temperature sheet to sheet temperature control for long sheets Temperature of the following does not increase by 5 deg C job last rotation temperature power save mode temperature error detection temperature Make adjustments to the ...

Page 1103: ...riod time or the environment changes in the ON OFF standby condition for automatic gradation correction control The setting value becomes valid after the main power switch is turned OFF ON 1 Setting range 0 Prohibited 1 Permitted default Standard value 1 ENVP INT Set the log acquisition interval for temperature humidity in the machine and fixing temperature Set the log acquisition interval for COP...

Page 1104: ...perated as a full model back to the base model 1 Use it when trouble attributable to MEAP application occurs By setting to 0 the operation of MEAP application can be controlled settings 0 off base model 1 on full model Default MEMO The change only from 1 to 0 is possible SC L CNT Use it to set the threshold for identifying large size paper for the scan counter 1 Settings 0 Count the paper larger t...

Page 1105: ...ze the difference An image is printed by error diffusion 3 For PDL character mode A black character is printed in a single black color An image is printed by screen processing IMGC ADJ Switch the hide or not hide of the image adjustment items Switch the hide or not hide of the image adjustment items executed by a system administrator When not hide is selected the following four items are displayed...

Page 1106: ...rging assembly 2 Setting range 50 to 10000 copies PRI FAN Select the primary fan drive mode Prevent the half tone unevenness due to the soiled primary charging assembly grid 2 Setting range 0 Half speed in the high temperature humidity environment 1 Full speed mainly in the low temperature low humidity environment Standard value 0 The setting value becomes valid after the main power switch is turn...

Page 1107: ...o restriction 0 to 999 Standard value 500 SMTPTXPN Change the port number for SMTP transmission 2 Setting range 0 to 65535 incremented by 1 Standard value 25 SMTPRXPN Change the port number of SMTP reception 2 Setting range 0 to 65535 incremented by 1 Standard value 25 POP3PN Change the port number of POP reception 2 Setting range 0 to 65535 incremented by 1 Standard value 110 UI BOX Restrict the ...

Page 1108: ...n image was not compressed to a specified compression ratio on the controller side image processing is performed based on the image area flag specified by this mode 2 Setting range 0 Character 1 Dot photo image 2 Film photo Standard value 0 T LW LVL Switch the timing to display the warning for toner level Switch the threshold of toner level to display the message Toner almost empty in the control ...

Page 1109: ... off default 1 on For service NAVI set the value as 1 when connecting the PC and main body by crossing cable MEMO T O T TUIF over TCP IP Communication protocol between embedded application presentation UI and applications within the device including COPY SEND BOX etc Canon original protocol UISW DSP Set hide or not hide of the SW to switch the display to the user screen Set hide or not hide of the...

Page 1110: ...ication Standard value 0 NS PLN Restrict the use of PLAIN LOGIN authentication plain text authentication in SMTP authentication Make this setting to restrict the use of PLAIN LOGIN authentication plain text authentication in SMTP authentication in the environment where encryption of communication packet is not performed 2 Setting range 0 Dependent on SMTP 1 Do not use the authentication Standard v...

Page 1111: ...ed at the occurrence of image line due to floating dust Settings 0 normal timing default 1 for each job When setting the value as 1 first copy time FCOT gets longer SVMD ENT Switch the method of entering the service mode 2 Setting range 0 Press the User Mode key Press 2 and 8 at the same time Press the User Mode key 1 Press the User Mode key Press 4 and 9 at the same time Press the User Mode key S...

Page 1112: ...ug console 2 Setting range 0 Do not permit remote login to the SSH server 1 Permit remote login to the SSH server Standard value 0 This item becomes available only when the setting value of SSH SW is 1 ON RE PKEY Set whether or not to recreate the SSH server pair keys Make this setting to specify whether or not to recreate the SSH server pair keys when activating the main unit 2 Setting range 0 Do...

Page 1113: ...rst power on development idling for the color developer YMC Adjust the ATR patch interval of the 1st limit When you increase the limit downtime interval increases but the density changes When you decrease the limit downtime interval decreases but the density becomes stabilized Trigger to start the patch detection 1 count by the number of copies which is reset when the patch detection is performed ...

Page 1114: ...et to COPIER OPTION BODY DA CNCT the following items are set to ON COPIER OPTION BODY STS PORT CMD PORT SSH SW DA PORT DA CNCT Use it to set WPGW Workplace Gateway connection 2 settings 0 off default 1 on MEMO This is used only inside Japan not outside Japan 1TR ATVC Set ON OFF of the primary transfer ATVC retries for initial multiple rotations Turn ON the primary transfer ATVC retries for initial...

Page 1115: ... screen display for jam alarm in MEAP application operation 2 Although setting the value as 1 in COPIER OPTION BODY MEAP DSP at the occurrence of error jam alarm the display transits to the standard screen for showing a warning When setting this value as 1 at the occurrence of error jam alarm Display transition to the standard screen is prohibited Warning is displayed on the MEAP screen to urge th...

Page 1116: ...AX into the PDF format and performing transmission by e mail or file Setting range 0 Convert the image into the PDF format but do not reduce it for reception transfer 1 Convert the image into the PDF format and reduce it for reception transfer Standard value 0 REDU CNT Control the switching of the density adjustment method Control whether or not to perform density adjustment considering toner volu...

Page 1117: ...de operation Set whether or not to provide a notice of the sleep mode operation to the DS application on network when the copier main unit entered the sleep mode or recovered from the sleep mode 2 Setting range 0 Provide a notice 1 Do not provide a notice Standard value 0 WUEV INT Set the interval to provide a notice of the sleep mode operation 2 Setting range 0 to 65535 Standard value 600 WUEV PO...

Page 1118: ...tandard value 1000 Reference In the current condition the starting number of the card is specified by COPIER FUNCTION INSTALL CARD and the fixed number of cards is specified starting from that number ex fixed at 1000 cards WUEN LIV Set the activation interval after a sleep notice was provided from network Set the interval from when sleep activation was performed to the copier main unit from networ...

Page 1119: ... Change the range of the thin line density correction REGM SEL REos GaMma SELect 2 Setting range 0 to 4 Standard value 2 ADJ BLNK Adjust the length of the developing bias blank Function to adjust the blank length of the developing bank pulse bias 2 Setting range 1 to 4 Standard value 3 2TR RVON Set ON OFF of the weak bias of the trail edge of paper Set this mode to ON when scattering occurred to t...

Page 1120: ... in the user mode WEB DISP Set whether or not to display the message web is almost empty in the user screen 1 Setting range 0 Do not display the message 1 Display the message Standard value 1 Display the message Remarks A Message on the UI Display a warning message default Whether or not to display the warning message can be set by this mode B Display in the service mode The message is always disp...

Page 1121: ...e display of the soft counter 6 in the control panel to meet a request from a user and dealer The counter contents can be changed to meet a request from a user and dealer 1 Setting range 0 to 999 Standard value 0 Valid or invalid Number Counter Details yes 002 Remote copy full color 1 yes 003 Remote copy full color 2 yes 004 Remote copy mono color 1 yes 005 Remote copy mono color 2 yes 006 Remote ...

Page 1122: ...Total A large yes 129 Total A small yes 130 Total A full color 1 yes 131 Total A full color 2 yes 132 Total A black and white 1 yes 133 Total A black and white 2 yes 134 Total A mono color large yes 135 Total A mono color small yes 136 Total A black and white large yes 137 Total A black and white small yes 138 Total A 1 double sided yes 139 Total A 2 double sided yes 140 large A double sided yes 1...

Page 1123: ...py Total 1 yes 210 Local copy Total 2 yes 211 Local copy large yes 212 Local copy small yes 213 Remote copy Total 1 yes 214 Remote copy Total 2 yes 215 Remote copy large yes 216 Remote copy small yes 217 Copy full color 1 yes 218 Copy full color 2 yes 219 Copy mono color 1 yes 220 Copy mono color 2 yes 221 Copy black and white 1 yes 222 Copy black and white 2 yes 223 Copy full color large yes 224 ...

Page 1124: ...ocal copy mono color large yes 282 Local copy mono color small yes 283 Local copy black and white large yes 284 Local copy black and white small yes 285 Local copy full color mono color large yes 286 Local copy full color mono color small yes 287 Local copy full color mono color 2 yes 288 Local copy full color mono color 1 yes 289 Local copy full color large double sided yes 290 Local copy full co...

Page 1125: ...ck and white large double sided yes 356 PDLPrint black and white small double sided Valid or invalid Number Counter Details yes 401 Copy print full color large yes 402 Copy print full color small yes 403 Copy print black and white large yes 404 Copy print black and white small yes 405 Copy print black and white2 yes 406 Copy print black and white1 yes 407 Copy print full color mono color large yes...

Page 1126: ...olor mono color 1 yes 621 Box print full color large double sided yes 622 Box print full color small double sided yes 623 Box print mono color large double sided yes 624 Box print mono color small double sided yes 625 Box print black and white large double sided yes 626 Box print black and white small double sided Valid or invalid Number Counter Details yes 701 Reception print Total 1 yes 702 Rece...

Page 1127: ...full color Gray scale 1 yes 821 Report print full color large double sided yes 822 Report print full color small double sided no 823 Report print Gray scale large double sided no 824 Report print Gray scale small double sided yes 825 Report print black and white large double sided yes 826 Report print black and white small double sided Valid or invalid Number Counter Details no 901 Copy scan total...

Page 1128: ... black and white no 955 Transmission scan Local print color no 956 Transmission scan Local print black and white no 957 Transmission scan Box color no 958 Transmission scan Box black and white COPIER OPTION USER Subheading Contents Level CONTROL enables disables the charging mechanism PDL job 1 When connecting with the account managing device e g coin vendor non Canon control card it switches over...

Page 1129: ... and white 2 133 2 The setting value 0 with mono color Counter 1 Total 1 101 Counter 2 Total black and white 1 108 Counter 3 Copy full color mono color 1 232 Counter 4 Print full color mono color 1 324 Counter 5 Total mono color 1 118 3 Counter 1 Total 1 101 Counter 2 Total full color mono color small 123 Counter 3 Total full color mono color large 122 Counter 4 Total black and white small 113 Cou...

Page 1130: ... Not displayed LDAP SW Set the switching of the searching condition for LDAP search Set a matching condition to search e mail addresses or FAX numbers from the LDAP server 1 Setting range 0 Include the specified keyword 1 Do not include the specified keyword 2 Equal to the specified keyword 3 Not equal to the specified keyword 4 Start with the specified keyword 5 End with the specified keyword Sta...

Page 1131: ...changing the setting from 0 to 1 while the e mail addresses are registered it is desirable to delete the e mail addresses manually Without deleting them they can be used In case the setting is 1 the import registration of the e mail addresses from RUI and machine information delivery is not accepted Thus if there are many e mail addresses set 1 for this mode to enable Overwrite import register the...

Page 1132: ...assist function wait time occurs before the temperature of the air heater is controlled For coated paper pickup cannot be performed until the air heater is turned on and warm air blows Furthermore when the machine is used in the environment near the ON OFF switching condition it is assumed that the ON OFF switching of the air heater is frequently performed and it increases the wait time When you r...

Page 1133: ...ed in the control panel 1 Perform the document size detection while the copyboard is open Use this mode when you need to perform the document size detection automatically even when you cannot close the copyboard to make copies of a thick book etc Detection is performed when the start key is pressed Standard value 0 Remarks When SIZE DET is set to 0 the document size detection is not performed even...

Page 1134: ... method with non Canon PCL PRJOB CP Set the CCV count pulse when performing reception and report printing 2 Setting range 0 Do not provide a count pulse 1 Provide a count pulse Standard value 0 When using account managing device e g coin vendor non Canon control card it switches over on off the count pulse notice for every page at receipt print report print DPT ID 7 Make a setting for registration...

Page 1135: ...e pages When setting this mode explain the foregoing possibility to the user and gain the consent beforehand MEAPSAFE Make a setting to switch to the MEAP safe mode 2 Setting range 0 Normal mode 1 Safe mode Standard value 0 Safe mode works to stop the added MEAP application and to startup the only system application that was activated at initial state to start up the system safely Set 1 to startup...

Page 1136: ...r the machine to recover from sleep mode via network Because the existing network system applications e g Net Spot Accountant image WARE do not send such packet the machine fails to recover via network if it s shifted to sleep mode 3 When setting 1 the machine able to recover from sleep mode via network because it does not shift to sleep mode 3 1wsleep resulting the trade off with the increase of ...

Page 1137: ...tion V1 0 This prohibits job interruption from other PC by performing group job transmission by sending multiple jobs in one cession Setting range 0 OFF Connection Serialize Function is OFF 1 ON Connection Serialize Function is ON Standard value 0 2C CT SW Switch a setting for the color counter only for the two color mode Set whether to use full color counter or mono color counter for the two colo...

Page 1138: ...ring job processing and it slows down the accessing process to CPU and HDD If the execution of this process is delayed so that the process is performed after the job is completed the job processing capability can be improved 2 Setting range 0 Remove data during job processing 1 Remove data after a job is completed Standard value 0 FX CLNLV Change the level of the fixing roller cleaning which is co...

Page 1139: ... size is indicated as U4 paper size is Argentine LTR 2 U4 NAME 1 CST U4 29 size is indicated as LTR paper size is Argentine LTR 3 U4 NAME 0 CST U4 18 size is indicated as LTR paper size is LTR 4 U4 NAME 1 CST U4 18 size is indicated as LTR paper size is LTR CST U1 U2 U3 U4 Specify a name of the paper used for the paper size group When the following special size paper is specified for U1 U2 U3 and ...

Page 1140: ... the UI screen for a coin vendor Setting range 0 Coin 1 Card 2 Coin and card Standard value 0 1 SC TYPE Switching over of the type of the Self Copier type machine coin vender capable machine Available only when the Soft ID for the machine is set as a specific user This service mode is used to switch over the machine type to a specific user type machine or generic Self Copier type machine Generic S...

Page 1141: ... LCNS TR T 16 194 COPIER OPTION INT FACE Subheading Contents Level CNT TYPE Switch the EFI controller connection 1 Switching the EFI controller type Setting range 0 External Tower Type Controller 1 Back Mounting Type Controller AP OPT Set whether or not to permit printing from the PrintMe application installed in the PS print server unit 2 Setting range 0 Permit printing by the specified account 1...

Page 1142: ...e key to use the SEND encryption PDF transmission function by other MFP machine 2 Standard value Transfer license key 24 digits This mode is available only when the SEND function is installed ST SPDF Display the installation status of the SEND searchable PDF transmission function in transfer invalidation 2 Setting range 0 Do not provide the SEND searchable PDF transmission function not installed 1...

Page 1143: ...DF direct in transfer invalidation Obtain a transfer license key to use the PDF direct by other MFP machine 2 Standard value Transfer license key 24 digits ST SCR Display the installation status of the encryption secure printing in transfer invalidation 2 Setting range 0 Do not provide the encryption secure printing not installed 1 Provide the encryption secure printing installed Standard value 0 ...

Page 1144: ...b browser in transfer invalidation 2 Setting range 0 Do not provide the Web browser not installed 1 Provide the Web browser installed Standard value 0 TR WEB Obtain a transfer license key of the Web browser in transfer invalidation Obtain a transfer license key to use the Web browser by other MFP machine 2 Standard value Transfer license key 24 digits ST HRPDF Display the installation status of th...

Page 1145: ...he installation status of the PDF transmission function with a user signature in transfer invalidation 2 Setting range 0 Unavailable not installed 1 Available installed Standard value 0 Remarks This mode is valid only when the SEND function is available TR USPDF Obtain a transfer license key of the PDF transmission function with a user signature in transfer invalidation Obtain a transfer license k...

Page 1146: ... in transfer invalidation Display the installation status of the third party expansion function the function which sends a charging counter to a third party s charging server for ERDS 2 Setting range 0 Unavailable not installed 1 Available installed Standard value 0 TR ERDS Obtain a transfer license key of the third party expansion function for ERDS in transfer invalidation Obtain a transfer licen...

Page 1147: ...key 24 digits ST LIPS4 Display the installation status of LIPS4 in transfer invalidation 2 Setting range 0 Unavailable not installed 1 Available installed Standard value 0 TR LIPS4 Obtain a transfer license key of LIPS4 in transfer invalidation Obtain a transfer license key to use LIPS4 by other MFP machine 2 Standard value Transfer license key 24 digits ST PSPCL Display the installation status of...

Page 1148: ... a transfer license key to use the combined options of PS PCL and UFR by other MFP machine 2 Standard value Transfer license key 24 digits ST LXUFR Display the installation status of LIPS LX UFR II for overseas in transfer invalidation 2 Setting range 0 Unavailable not installed 1 Available installed Standard value 0 TR LXUFR Obtain a transfer license key of LIPS LX UFR II for overseas in transfer...

Page 1149: ...erature sheet to sheet temperature control for long sheets Temperature of the following does not increase by 5 deg C job last rotation temperature power save mode temperature error detection temperature Make adjustments to the setting in the temperature control table The setting in the fixing assembly temperature control table is modified when certain properties of paper used in the field cause bl...

Page 1150: ...per 2 1 Setting range 0 Default 1 Fixing is prioritized 2 Productivity is prioritized Standard value 0 The setting value becomes valid after the main power switch is turned OFF ON CD IDL T Adjust the time to execute idling at first power on for the IDL T color developer YMC Set the time to execute idling at first power on for the color developer YMC which is sometimes executed by initial multiple ...

Page 1151: ...haracter mode Standard value 0 Reference 0 For SCAN photo mode A black character is printed in a black color which consists of four colors An image is printed by error diffusion The color tone is brighter than 2 1 For PDL photo mode A black character is printed in a black color which consists of four colors An image is printed by screen processing 2 For SCAN character mode A black character is pri...

Page 1152: ...N SENS CNF Set the display of the document detection sensor 2 Setting range 0 AB system 1 Inch system Standard value 0 Due to the reader controller PCB RAM clear the value is set as 0 Re define the value as 1 for inch configuration destination machines North America etc DM SW Switching over of the enabling disabling of the image density correction control or image gradation correction control 2 No...

Page 1153: ...ion screen in the control panel 2 Setting range 0 Hide 1 Do not hide Standard value 1 UI FAX Select hide or not hide of the FAX screen in the control panel 2 Setting range 0 Hide 1 Do not hide Standard value 1 TMC SLCT Switch the coefficient used for error diffusion Use this mode to increase dot stability and granularity so that pitch unevenness or course image that occurred on an image can be mad...

Page 1154: ... For service NAVI set the value as 1 when connecting the PC and main body by crossing cable MEMO T O T TUIF over TCP IP Communication protocol between embedded application presentation UI and applications within the device including COPY SEND BOX etc Canon original protocol CMD PORT Use it to turn off on the T O T TUIF over TCP IP sync type command communication port 2 Turns on off the inquiry res...

Page 1155: ...ment where encryption of communication packet is not performed 2 Setting range 0 Dependent on SMTP 1 Do not use the authentication Standard value 0 NS LGN Restrict the use of LOGIN authentication in SMTP authentication Make this setting to restrict the use of LOGIN authentication in SMTP authentication 2 Setting range 0 Dependent on SMTP 1 Do not use the authentication Standard value 0 MEAP PN Set...

Page 1156: ...nce In the case that the main item is set to 1 recreate SSH server host recreates the pair keys confidential disclosure key during task activation power OFF ON and implements the output to key file and storage into HDD Encryption algorithm DSA and the length of key 512bit are fixed It may take about three to four minutes more than usual to start the copier body due to this procedure U NAME Set a u...

Page 1157: ...nd connection in an TUIF over TCP IP environment This is used for changing the port No in service NAVI settings 1 to 65535 default 20000 MEMO T O T TUIF over TCP IP Communication protocol between embedded application presentation UI and applications within the device including COPY SEND BOX etc Canon original protocol MEAP DSP Use it to prohibit a switch over from the MEAP screen to the standard s...

Page 1158: ...ognized when the ADF is in use 2 With machines for INCH AB configuration image formation is executed correctly by setting the size of the special paper that fails to be recognized at original pickup from the ADF settings 0 Foolscap R default 1 Officio R 2 Folio R 3 Australian Foolscap R 4 Ecuadorian Officio R 5 Argentine Officio R 6 Argentine Legal R 7 Government Legal R 8 Mexican Officio R When d...

Page 1159: ...splay the screen in the control panel 2 Setting range 0 Do not display the screen 1 Display the screen Standard value 1 UI EPRNT Set whether or not to display the expansion printing screen in the control panel This mode is used to set whether or not to display the expansion printing screen EFI print screen in the control panel This is a specification for a user who does not desire to display the s...

Page 1160: ... the DCON fan control is terminated 1 Execute shutdown before the DCON fan control is terminated Standard value 0 ADJ VPP Adjust the developing bias Vpp Function to adjust Vpp for the developing AC bias 2 Setting range 4 to 2 Standard value 0 AST SEL Change the range of the advanced smoothing AST SEL AST level SELect 2 Setting range 0 to 3 Standard value 2 REGM SEL Change the range of the thin lin...

Page 1161: ...tory setting vaue 0 Amount of the change for 1 increment 0 01 MAG M 1 Specifying a material for correction of magnification for 2nd side printing 64 to 105g Specify a material for correction of magnification for 2nd side printing of large paper 1 sheet paper 0 No setting 1 High quality paper 2 Single sided coated paper 3 Double sided coated paper 4 Recycled paper 5 Emboss paper 6 Film 7 Label 8 Po...

Page 1162: ...nting 210 to 256g Specify a material for correction of magnification for 2nd side printing of large paper 1 sheet paper 0 No setting 1 High quality paper 2 Single sided coated paper 3 Double sided coated paper 4 Recycled paper 5 Emboss paper 6 Film 7 Label 8 Postcard 9 Vellum 10 Cotton 2 Setting range 0 to 10 Factory setting value 0 DEV VT L Set the condition for Clear Toner Consumption Enforcemen...

Page 1163: ...0 to 10 Factory setting value 0 0 1mm unit COPIER OPTION USER Subheading Contents Level COPY LIM Change the upper limit value of the number of copies 1 Setting range 1 to 9999 copies Standard value 9999 SLEEP Set ON OFF of the sleep function 1 Setting range 0 OFF 1 ON Standard value 1 The sleep function is set by the timer setting in the user mode WEB DISP Set whether or not to display the message...

Page 1164: ... 1 yes 005 Remote copy mono color 2 yes 006 Remote copy black and white 1 yes 007 Remote copy black and white 2 yes 008 Remote copy full color large yes 009 Remote copy full color small yes 010 Remote copy mono color large yes 011 Remote copy mono color small yes 012 Remote copy black and white large yes 013 Remote copy black and white small yes 014 Remote copy full color mono color large yes 015 ...

Page 1165: ...3 Total A black and white 2 yes 134 Total A mono color large yes 135 Total A mono color small yes 136 Total A black and white large yes 137 Total A black and white small yes 138 Total A 1 double sided yes 139 Total A 2 double sided yes 140 large A double sided yes 141 small A double sided yes 142 Total A mono color 1 yes 143 Total A mono color 2 yes 144 Total A full color large yes 145 Total A ful...

Page 1166: ...mote copy Total 2 yes 215 Remote copy large yes 216 Remote copy small yes 217 Copy full color 1 yes 218 Copy full color 2 yes 219 Copy mono color 1 yes 220 Copy mono color 2 yes 221 Copy black and white 1 yes 222 Copy black and white 2 yes 223 Copy full color large yes 224 Copy full color small yes 225 Copy mono color large yes 226 Copy mono color small yes 227 Copy black and white large yes 228 C...

Page 1167: ...l yes 285 Local copy full color mono color large yes 286 Local copy full color mono color small yes 287 Local copy full color mono color 2 yes 288 Local copy full color mono color 1 yes 289 Local copy full color large double sided yes 290 Local copy full color small double sided yes 291 Local copy mono color large double sided yes 292 Local copy mono color small double sided yes 293 Local copy bla...

Page 1168: ...nt black and white small yes 405 Copy print black and white2 yes 406 Copy print black and white1 yes 407 Copy print full color mono color large yes 408 Copy print full color mono color small yes 409 Copy print full color mono color 2 yes 410 Copy print full color mono color 1 yes 411 Copy print large yes 412 Copy print small yes 413 Copy print 2 yes 414 Copy print 1 yes 415 Copy print mono color l...

Page 1169: ... white Scan Total 2 yes 507 Black and white Scan large yes 508 Black and white Scan small yes 509 Color scan Total 1 yes 510 Color scan Total 2 yes 511 Color scan large yes 512 Color scan small Valid or invalid Number Counter Details yes 601 Box print Total 1 yes 602 Box print Total 2 yes 603 Box print large yes 604 Box print small yes 605 Box print full color 1 yes 606 Box print full color 2 yes ...

Page 1170: ...ray scale 1 yes 721 Reception print full color large double sided yes 722 Reception print full color small double sided no 723 Reception print Gray scale large double sided no 724 Reception print Gray scale small double sided yes 725 Reception print black and white large double sided yes 726 Reception print black and white small double sided Valid or invalid Number Counter Details yes 801 Report p...

Page 1171: ...nd white yes 929 Transmission scan total 6 color yes 930 Transmission scan total 6 black and white no 931 Transmission scan total 7 color no 932 Transmission scan total 7 black and white no 933 Transmission scan total 8 color no 934 Transmission scan total 8 black and white no 935 Universal transmission scan total color no 936 Universal transmission scan total black and white yes 937 Box scan colo...

Page 1172: ...he type of the count up job for the section control counter 1 Setting range 0 Count up BoxPrint ReporPrint SendLocalPrint and PDLPrint to the PRINT category 1 Count up ReporPrint SendLocalPrint and PDLPrint to the PRINT category Standard value 0 CPRT DSP Set whether or not to display the count print button in the sales counter confirmation screen 1 Setting range 0 Do not display the button 1 Displ...

Page 1173: ...or Counter 8 in the user mode Set a value for the 8th counter to be displayed in the user mode 1 Setting range 1 to 26 39 41 to 45 Standard value 0 Not displayed LDAP SW Set the switching of the searching condition for LDAP search Set a matching condition to search e mail addresses or FAX numbers from the LDAP server 1 Setting range 0 Include the specified keyword 1 Do not include the specified ke...

Page 1174: ... the setting is 1 the import registration of the e mail addresses from RUI and machine information delivery is not accepted Thus if there are many e mail addresses set 1 for this mode to enable Overwrite import register the imported addresses after deleting the current data by RUI and machine information delivery By doing so they can be deleted at once IFAX OF Set whether or not to prohibit transm...

Page 1175: ...ill deteriorate switch to 2 regardless to media and environment the Air Heat can always switch to On Steps of Operation 0 Check depends on the media and environment the Air Heater is switched to ON 1 Check only by the environment condition that the Air Heater is switched to ON 2 Check that the Air Heater is always switched to ON FX BC SW Set ON OFF of the wait mode control for cooling of the fixin...

Page 1176: ...CL COPY Binder control mode for COPIES command of PCL 2 This is the mode to unite the operations because the way to control the COPIES command of PCL is different between the Canon PCL and the non Canon PCL settings 0 default to control by page according to the value of COPIES command specified at each page 1 It regards the value of COPIES command specified at page 1 as the number of bind and inva...

Page 1177: ...rt up the system safely Set 1 to startup in safe mode in the case of system recovery processing when MEAP platform does not startup normally because of resource competition among MEAP applications or the order to register use the service MPSF is indicated in the control panel screen when in safe mode FXEX CNT Set a temperature control hysteresis width for the external heating roller The external h...

Page 1178: ... prohibit reception of multiple connections at a device so that the job grouping function is guaranteed In other words when you make a setting to prohibit reception of multiple connections at a device the device does not receive job data from a connection until reception of job data from another connection is completed This prevents jobs to queue in different order Connection refers to the connect...

Page 1179: ...When a complete removal processing is performed job processing performance sometimes decreases for certain data This is because the page data which has been already processed is being removed during job processing and it slows down the accessing process to CPU and HDD If the execution of this process is delayed so that the process is performed after the job is completed the job processing capabili...

Page 1180: ...rinted 0 When clear color is printed provide a notification to the external charging control device as color printing 1 When clear color is printed provide a notification to the external charging control device as clear color printing separately from a notification of color B W printing Setting range 0 to 10 Factory setting value 0 1 SC TYPE Switching over of the type of the Self Copier type machi...

Page 1181: ...S System administration setting Network setting NetWare setting Use of NetWare Since the items mentioned above do not recover even when you set the value back to 0 Normal mode make the setting again whenever necessary T 16 210 COPIER OPTION INT FACE Subheading Contents Level IMG CONT Connecting Setting of External PDL Controller 1 Setting range 0 Normal operation 1 Not used 2 Not used 3 EFI contro...

Page 1182: ...alled 1 Provide the SEND searchable PDF transmission function installed Standard value 0 This mode is available only when the SEND function is installed TR SPDF Obtain a transfer license key of the SEND searchable PDF transmission function in transfer invalidation Obtain a transfer license key to use the SEND searchable PDF transmission function by other MFP machine 2 Standard value Transfer licen...

Page 1183: ...ard value 0 TR BRDIM Obtain a transfer license key of BarDIMM in transfer invalidation Obtain a transfer license key to use BarDIMM by other MFP machine 2 Standard value Transfer license key 24 digits ST VNC Display the installation status of VNC in transfer invalidation 2 Setting range 0 Do not provide VNC not installed 1 Provide VNC installed Standard value 0 TR VNC Obtain a transfer license key...

Page 1184: ...value 0 Remarks This mode is valid only when the SEND function is available TR USPDF Obtain a transfer license key of the PDF transmission function with a user signature in transfer invalidation Obtain a transfer license key to use the PDF transmission function with a user signature by other MFP machine 2 Standard value Transfer license key 24 digits Remarks This mode is valid only when the SEND f...

Page 1185: ... Obtain a transfer license key to use PS by other MFP machine 2 Standard value Transfer license key 24 digits ST PCL Display the installation status of PCL in transfer invalidation 2 Setting range 0 Unavailable not installed 1 Available installed Standard value 0 TR PCL Obtain a transfer license key of PCL in transfer invalidation Obtain a transfer license key to use PCL by other MFP machine 2 Sta...

Page 1186: ... PCL and UFR by other MFP machine 2 Standard value Transfer license key 24 digits ST PSLIP Display the installation status of PS and LIPS in transfer invalidation Display the combined options of PS and LIPS 2 Setting range 0 Unavailable not installed 1 Available installed Standard value 0 TR PSLIP Obtain a transfer license key of PS and LIPS in transfer invalidation Obtain a transfer license key t...

Page 1187: ...his mode is used to switch the separation sequence to reduce a jam occurrence ratio 1 Setting range 0 Normal mode 1 Folded document mode Standard value 0 HS DBL Switch ON OFF of the ADF high speed reverse mode Provide a high speed reverse mode to meet the needs of users who emphasize productivity in the ADF double sided copy mode 1 Setting range 0 OFF Do not perform the high speed double sided cop...

Page 1188: ...n 1 Screen with small line number 133 to 190 lines 2 Screen with large line number 200 to 268 lines 3 Screen for COPY around 220 lines 4 Screen for REOS no screen structure This mode is only valid for test print Factory setting value Value after RAM clear 0 THRU Set whether or not to use the image correction table for test print 1 Setting value 0 ON Use the table 1 OFF Do not use the table Factory...

Page 1189: ... signal of a loopback address returns before reaching the NIC it can check the TCP IP setting of the machine 7 Select a service mode item COPIER TEST NETWORK PING enter a local host accress IP address of the machine and press the OK key When NG is displayed there may be a problem in the connection with NIC or in NIC itself so check the connection or replace the NIC When OK is displayed there seems...

Page 1190: ...r 0 THRU Set whether or not to use the image correction table for test print 1 Setting value 0 ON Use the table 1 OFF Do not use the table Factory setting value Value after RAM clear 0 DENS Y M C K Adjust the density of each color for test print TYPE 5 1 Setting range 0 to 255 When you increase the setting value the density becomes higher Factory setting value Value after RAM clear 128 COLOR Y M C...

Page 1191: ...etting of the machine 7 Select a service mode item COPIER TEST NETWORK PING enter a local host accress IP address of the machine and press the OK key When NG is displayed there may be a problem in the connection with NIC or in NIC itself so check the connection or replace the NIC When OK is displayed there seems no problem in the network setting of the machine and the NIC In this case there may be...

Page 1192: ...n double sided mode Count up is not performed when a blank sheet is output The counter value is incremented by 1 for each of large small size Clear operation is possible The counter value returns to 00000000 when it exceeds 99999999 1 BOX PRT BOX print counter Count up is performed for BOX printing according to the charging counter when printed paper is delivered from the machine or stacked in dou...

Page 1193: ...E Double sided pickup total counter Display the number of paper picked up in double sided mode The counter value returns to 00000000 when it exceeds 99999999 1 COPIER COUNTER FEEDER Subheading Contents Level FEED Total counter for document feed by ADF 1 DFOP CNT Display the number of times the ADF hinge is opened closed Function to count the number of times ADF is opened closed 1 Setting range 000...

Page 1194: ... B POT P Potential control plate counter Estimated life 120 000 images 30 000 prints Count type 1 BK S 1 L 2 CL S 4 L 8 This item requires cleaning 1 ITB SCLP ITB inner scraper counter Estimated life 120 000 images 30 000 prints Count type 1 BK S 1 L 2 CL S 4 L 8 This item requires cleaning 1 2TC BOX Secondary transfer leaner waste toner case counter Estimated life 50 000 images Count type 3 S 1 L...

Page 1195: ... 2 CL S 4 L 8 1 FIX TH1 Fixing assembly main thermistor TH1 counter Estimated life 500 000 print Count type Type 3 S 1 L 2 1 FIX TH2 Fixing assembly sub thermistor TH2 counter Estimated life 500 000 print Count type Type 3 S 1 L 2 1 FX TSW Fixing assembly thermo switch TP1 counter Estimated life 1 000 000 print Count type Type 3 S 1 L 2 1 FX EX TS Outside heating thermo switch TP2 counter Estimate...

Page 1196: ...r Estimated life 1 000 000 image 250 000 print Count type Type 1 BK S 1 L 2 CL S 4 L 8 1 AR FIL4 Air filter 2 host machine left counter Estimated life 1 000 000 image 250 000 print Count type Type 1 BK S 1 L 2 CL S 4 L 8 1 AR FIL5 Air filter 3 counter Estimated life 1 000 000 image 250 000 print Count type Type 1 BK S 1 L 2 CL S 4 L 8 1 TN FIL1 Toner filter left counter Estimated life 1 000 000 im...

Page 1197: ...ze S 1 count Full color Size S 1 count Size L 2 counts Size L 2 counts Type 4 B W Full color 1 count Type 5 B W Not counted Full color 1 count T 16 225 COPIER COUNTER DRBL 1 Subheading Contents Level T CLN BD Bias roller cleaning blade counter Estimated life 150 000 print Count type Type 3 S 1 L 2 1 TR BLT ITB counter Estimated life 300 000 image 75 000 print Count type Type 1 BK S 1 L 2 CL S 4 L ...

Page 1198: ...50 000 print Count type Type 3 S 1 L 2 1 C1 FD RL Cassette 1 feed roller counter Estimated life 250 000 print Count type Type 3 S 1 L 2 1 C2 PU RL Cassette 2 pickup roller counter Estimated life 250 000 print Count type Type 3 S 1 L 2 1 C2 SP RL Cassette 2 separation roller counter Estimated life 250 000 print Count type Type 3 S 1 L 2 1 C2 FD RL Cassette 2 feed roller counter Estimated life 250 0...

Page 1199: ...l feeder pickup roller counter Estimated life 120 000 print Count type Type 3 S 1 L 2 1 M SP RL Manual feeder separation roller counter Estimated life 120 000 print Count type Type 3 S 1 L 2 1 FX UP RL Fixing roller counter Estimated life 200 000 print Count type Type 2 BK S 1 L 2 CL S 3 L 6 1 COPIER COUNTER DRBL 1 Subheading Contents Level FX IN BS Fixing heat insulating bush counter Estimated li...

Page 1200: ...3 S 1 L 2 1 FX BL CT Fixing belt counter The frequency in the use of the durable parts of the copier indicates the estimated life Estimated life 100 000 print Count type Type 3 S 1 L 2 1 DEV CL Developing clutch counter Estimated life 2 000 000 image 500 000 print BK 1 S L CL 4 S L In case of 6C 6 1 BS SL F2 End seal front counter Estimated life 500 000 imgae 125 000 print Count type Type 1 BK S 1...

Page 1201: ...r Estimated life 80 000 print Large 1 count Small 2 counts 1 DF F BLT DF feeding belt counter Estimated life 200 000 print Pickup number 1 sided S 1 L 1 2 sided S 3 L 3 1 DF HNG L DF left hinge counter Estimated life 100 000 print 1 count with 1 set of DF opening closing 1 DF HNG R DF right hinge counter Estimated life 100 000 print 1 count with 1 set of DF opening closing 1 DF SP M Not used DF DL...

Page 1202: ...h of large small size Clear operation is possible The counter value returns to 00000000 when it exceeds 99999999 1 FAX PRT FAX reception print counter Count up is performed for FAX reception according to the charging counter when printed paper is delivered from the machine or stacked in double sided mode Count up is not performed when a blank sheet is output The counter value is incremented by 1 f...

Page 1203: ...t exceeds 99999999 1 DK Deck pickup total counter Display the number of paper fed from the deck pickup unit The counter value returns to 00000000 when it exceeds 99999999 1 2 SIDE Double sided pickup total counter Display the number of paper picked up in double sided mode The counter value returns to 00000000 when it exceeds 99999999 1 COPIER COUNTER FEEDER Subheading Contents Level FEED Total cou...

Page 1204: ...is item requires cleaning 1 ITB SCLP ITB inner scraper counter Estimated life 120 000 images 30 000 prints Count type 1 BK S 1 L 2 CL S 4 L 8 This item requires cleaning 1 2TC BOX Secondary transfer leaner waste toner case counter Estimated life 50 000 images Count type 3 S 1 L 2 This item requires cleaning 1 DV CAR K Starter of the Bk color developing unit Not used in this equipment Estimated lif...

Page 1205: ...FIX TH2 Fixing assembly sub thermistor TH2 counter Estimated life 500 000 print Count type Type 3 S 1 L 2 1 FX TSW Fixing assembly thermo switch TP1 counter Estimated life 1 000 000 print Count type Type 3 S 1 L 2 1 FX EX TS Outside heating thermo switch TP2 counter Estimated life 1 000 000 print Count type Type 3 S 1 L 2 1 OZ FIL1 Ozone filter left counter Estimated life 1 000 000 image 250 000 p...

Page 1206: ...P RL C3 FD RL C4 PU RL C4 SP RL C4 FD RL M PU RL M SP RL FX IN BS FX WEB FX EX RL FX EX BS DLV UCLW DLV LCLW FX LB ST FX LB PD FX LB PC FX LB OR FX EX C1 DEV CL BS SL F2 BS SL R2 DMR CLN 2TR BLD 2TR CLN AR FIL4 Air filter 2 host machine left counter Estimated life 1 000 000 image 250 000 print Count type Type 1 BK S 1 L 2 CL S 4 L 8 1 AR FIL5 Air filter 3 counter Estimated life 1 000 000 image 250...

Page 1207: ...Estimated life 150 000 print Count type Type 3 S 1 L 2 1 TR BLT ITB counter Estimated life 300 000 image 75 000 print Count type Type 1 BK S 1 L 2 CL S 4 L 8 1 TR ROLL Secondary transfer outer roller counter Estimated life 100 000 print Count type Type 3 S 1 L 2 1 1TR STC Primary transfer roller counter Estimated life 300 000 image 75 000 print Count type Type 1 BK S 1 L 2 CL S 4 L 8 1 2TR INRL Se...

Page 1208: ...up roller counter Estimated life 250 000 print Count type Type 3 S 1 L 2 1 C2 SP RL Cassette 2 separation roller counter Estimated life 250 000 print Count type Type 3 S 1 L 2 1 C2 FD RL Cassette 2 feed roller counter Estimated life 250 000 print Count type Type 3 S 1 L 2 1 C3 PU RL Cassette 3 pickup roller counter Estimated life 250 000 print Count type Type 3 S 1 L 2 1 C3 SP RL Cassette 3 separa...

Page 1209: ...xing roller counter Estimated life 200 000 print Count type Type 2 BK S 1 L 2 CL S 3 L 6 1 COPIER COUNTER DRBL 1 Subheading Contents Level FX IN BS Fixing heat insulating bush counter Estimated life 500 000 print Count type Type 3 S 1 L 2 1 FX WEB Fixing web counter Estimated life 100 000 print Count type Type 3 S 1 L 2 In case of replacing web reset in the following COPIER COUNTER MISC FIX WEB CO...

Page 1210: ... Estimated life 2 000 000 image 500 000 print BK 1 S L CL 4 S L In case of 6C 6 1 BS SL F2 End seal front counter Estimated life 500 000 imgae 125 000 print Count type Type 1 BK S 1 L 2 CL S 4 L 8 1 BS SL R2 End seal rear counter Estimated life 500 000 imgae 125 000 print Count type Type 1 BK S 1 L 2 CL S 4 L 8 1 ITB CLN2 ITB cleaner brush 18 mm dia counter Estimated life 150 000 print Count type ...

Page 1211: ...ounter value at the DC controller PCB 1 PUNCH Not used FN BFFRL Finisher buffer roller counter Estimated life 1 000 000 print Retain the counter value at the DC controller PCB 1 operation with 1 paper pass through the buffer roller 1 COPIER COUNTER TOTAL Subheading Contents Level SERVICE1 Total counter 1 for service Count up is performed when printed paper is delivered from the machine or stacked ...

Page 1212: ...ar operation is possible The counter value returns to 00000000 when it exceeds 99999999 1 2 SIDE Double sided copy print counter Count up is performed for the number of double sided copy print according to the charging counter when printed paper is delivered from the machine or stacked in double sided mode Count up is not performed when a blank sheet is output The counter value is incremented by 1...

Page 1213: ...r Cassette 1 2 3 4 1 DK Jam counter for the side paper deck 1 COPIER COUNTER MISC Subheading Contents Level DV CAR Y Starter of the Y color developing unit Not used in this equipment Estimated life 500 000 prints Count type 3 S 1 L 2 1 DV CAR M Starter of the M color developing unit Not used in this equipment Estimated life 500 000 prints Count type 3 S 1 L 2 1 DV CAR C Starter of the C color deve...

Page 1214: ...nter Estimated life 100 000 images 25 000 prints Count type 1 BK S 1 L 2 CL S 4 L 8 1 PRM CLN Pad holder primary counter Estimated life 100 000 images 25 000 prints Count type 1 BK S 1 L 2 CL S 4 L 8 1 PO CLN Pad holder pre transfer counter Estimated life 100 000 images 25 000 prints Count type 1 BK S 1 L 2 CL S 4 L 8 1 PRM CLN2 Primary charging wire cleaner 2 replacement volume Replacement timing...

Page 1215: ...0 image 250 000 print Count type Type 1 BK S 1 L 2 CL S 4 L 8 1 AR FIL3 Air filter 2 host machine rear counter Estimated life 1 000 000 image 250 000 print Count type Type 1 BK S 1 L 2 CL S 4 L 8 1 AR FIL4 Air filter 2 host machine left counter Estimated life 1 000 000 image 250 000 print Count type Type 1 BK S 1 L 2 CL S 4 L 8 1 AR FIL5 Air filter 3 counter Estimated life 1 000 000 image 250 000 ...

Page 1216: ...U RL C2 SP RL C2 FD RL C3 PU RL C3 SP RL C3 FD RL C4 PU RL C4 SP RL C4 FD RL M PU RL M SP RL FX IN BS FX WEB FX EX RL FX EX BS DLV UCLW DLV LCLW FX LB ST FX LB PD FX LB PC FX LB OR FX EX C1 DEV CL BS SL F2 BS SL R2 DMR CLN 2TR BLD 2TR CLN DC controller PCB DV UNT C DV UNT Y DV UNT M DV UNT K FX UP RL FX BL CT TB CLN2 ITB CLN1 When replacing the main controller PCB or DC controller PCB execute the ...

Page 1217: ...ge 125 000 print Count type Type 1 BK S 1 L 2 CL S 4 L 8 1 CL SUPS Scoop up sheet counter Estimated life 500 000 image 125 000 print Count type Type 1 BK S 1 L 2 CL S 4 L 8 1 BS SL F Seal support plate front counter Estimated life 500 000 image 125 000 print Count type Type 1 BK S 1 L 2 CL S 4 L 8 1 BS SL R Seal support plate rear counter Estimated life 500 000 image 125 000 print Count type Type ...

Page 1218: ...P RL Cassette 3 separation roller counter Estimated life 250 000 print Count type Type 3 S 1 L 2 1 C3 FD RL Cassette 3 feed roller counter Estimated life 250 000 print Count type Type 3 S 1 L 2 1 C4 PU RL Cassette 4 pickup roller counter Estimated life 250 000 print Count type Type 3 S 1 L 2 1 C4 SP RL Cassette 4 separation roller counter Estimated life 250 000 print Count type Type 3 S 1 L 2 1 C4...

Page 1219: ... in the following COPIER COUNTER MISC FIX WEB COPIER COUNTER DRBL 1 FX WEB 1 FX EX RL External heat roller counter Estimated life 250 000 print Count type Type 3 S 1 L 2 1 FX EX BS External heat roller heat insulating bush counter Estimated life 500 000 print Count type Type 3 S 1 L 2 1 DLV UCLW Delivery upper separation plate counter Estimated life 500 000 print Count type Type 3 S 1 L 2 1 DLV LC...

Page 1220: ... 500 000 imgae 125 000 print Count type Type 1 BK S 1 L 2 CL S 4 L 8 1 BS SL R2 End seal rear counter Estimated life 500 000 imgae 125 000 print Count type Type 1 BK S 1 L 2 CL S 4 L 8 1 ITB CLN2 ITB cleaner brush 18 mm dia counter Estimated life 150 000 print Count type Type 3 S 1 L 2 1 ITB CLN1 ITB cleaner brush 21 mm dia counter Estimated life 150 000 print Count type Type 3 S 1 L 2 1 DMR CLN D...

Page 1221: ...timated life 100 000 print 1 count with 1 set of DF opening closing 1 DF SP M Not used DF DL RL Not used DF DL M Not used DF TRL U Not used PD PU RL Paper deck pickup roller counter Estimated life 250 000 print Pickup number S 1 L 2 1 PD SP RL Paper deck separation roller counter Estimated life 250 000 print Deck pickup cumulated number Printed number S 1 L 2 1 PD FD RL Paper deck feeding roller c...

Page 1222: ...Chapter 17 Upgrading ...

Page 1223: ......

Page 1224: ... Partitions 17 13 17 4 Downloading System Software 17 14 17 4 1 Batch Downloading 17 14 17 4 1 1 Outline 17 14 17 4 1 2 Downloading Procedure 17 14 17 4 2 Downloading the System Software Single 17 17 17 4 2 1 Downloading Procedure 17 17 17 5 Uploading and Downloading Backup Data 17 20 17 5 1 Outline 17 20 17 5 2 Uploading Procedure 17 20 17 5 3 Downloading Procedure 17 22 17 6 Version Upgrade usin...

Page 1225: ......

Page 1226: ...roller RCON Downloading of RCON is performed by way of the main controller assembly As the BootROM is installed separately it can be re tried in the case of failure in downloading of reader controller PCB Downloading of Rcon is not available unless the DC controller is started properly Time Stamp Module TSTMP This is the module used for the function to send PDF with electronic signature This funct...

Page 1227: ... RUI Yes Yes BOOT Yes Yes Yes MEAPCONT Yes Yes TTS Yes Yes This is used when adding the voice guidance kit optional BROWSER Yes Yes This is used when adding the WEB Browser Expansion kit optional DCON Yes Yes RCON Yes Yes TSTMP Yes Yes This is used when adding the PDF Expansion Kit optional MEDIA Yes Yes HELP Yes Yes WebDAV Yes Yes G3FAX Yes Yes Yes This is used when adding the multi port FAX boar...

Page 1228: ...e these functions the machine must be in download mode which may be either of the following Safe Mode download mode A Turn on the main power while holding down the keys 2 8 Normal Mode download mode B Turn on the main power while holding down the keys 1 7 then make the following selections in service mode COPIER FUNCTION SYSTEM DOWN LOAD Initializing the HDD Downloading system software Uploading b...

Page 1229: ...HDD when the system fails to start up normally Main power switch ON on keypad 2 8 on keypad 1 7 Boot ROM Safe mode program Boot program Safe mode Download mode A Normal mode Download mode B Normal mode program HDD COPIER FUNCTION SYSTEM DOWNLOAD SYSTEM program In service mode ...

Page 1230: ...vice is in use Function Download mode Normal mode download mode B Safe mode download mode A Formatting the HDD ALL BOOTDEV Downloading the system software 1 System Language RUI Boot Dcon Rcon SDICT MEAPCONT KEY TTS BROWSER TSTMP MEDIA HELP WebDAV G3FAX System Language RUI Boot Dcon Rcon SDICT MEAPCONT KEY TTS BROWSER TSTMP MEDIA HELP WebDAV Uploading downloading of backup data 2 SramRCON SramDCON ...

Page 1231: ...you will be copying the system software found on the System CD to the SST Preparatory Work Requirements PC installed with SST version 3 22 or later System CD for this machine Installing the System Software Boot ROM FLASH ROM HDD System Software System Software Do Download Mode wnload Mode iR2270i JPjaxxxx MN dsh xx iR2270i JPjaxxxx MN dsh xx do download shell wnload shell SYSTEM JPja m SYSTEM JPja...

Page 1232: ... Click a button to execute Select a model to connect MFP USB c CONTROL Registerd Firms Regist Firm e Service Support Tool DLM0 Ver 3 22E Registered firmware Select a drive and folder Click a button to execute CONNECT CANCEL SEARCH EXIT REGISTER Register Firmware Delete Firmware Delete Backup Data System Management e iPRC1 XXen TTS iPRC1 USen iPRC1C XXxx BOOT iPRC1 XXenXXXX RUI iPRC1 XXen LANG iPRC...

Page 1233: ...16 FAT32 It must not be NTFS or HFS single partition There must not be multiple partitions CONTROL Registerd Firms Found Firm Registered firmware Firmware registration completed Batch Registration Results Click a button to execute CONNECT CANCEL EXIT O K Register Firmware Delete Firmware Delete Backup Data System Management Service Support Tool DLM0 Ver 3 22E iPR_C1 BOOT XXxxvXXXX USenvXXXX Regist...

Page 1234: ...vXXXX SDICT N XXxxvXXXX SYSTEM N USenvXXXX LANGUAGE Y XXenvXXXX N XXjavXXXX RUI Y XXenvXXXX N XXjavXXXX d Valid drive DriveType 1 FileSystem FAT TotalSize 1 001MB FreeSpace 1 001MB CANCEL EXIT START Register Firmware Export Firmware Delete Firmware Delete Backup Data System Management Select the target Click a button to execute Click the Star t button to star t file copy Series Version Firmware re...

Page 1235: ...rol panel screen so that the main power switch may be turned off The main power will go off automatically 4 Connect the PC to the machine with a cross cable F 17 13 5 Set the machine to the appropriate mode Normal Mode Turn on the main power switch while holding down the keys 1 and 7 When the machine has started make the following selections in service mode COPIER FUNCTION SYSTEM DOWNLOAD then cli...

Page 1236: ...ine has started up make the following selections in service mode and press OK COPIER FUNCTION SYSTEM DOWNLOAD Safe Mode Turn on the main power switch while holding down the keys 2 and 8 so that the machine will start up in safe mode 5 See the following menu appearing on the control panel screen indicating that the machine has recognized the presence of a USB device F 17 15 The machine may not reco...

Page 1237: ...der iRCXXXX F 17 16 1 HDD service part without partitions 2 Formatting for full partition only in safe mode 3 HDD after formatting 4 Partition settings information file 17 3 2 Formatting Selected Partitions 0013 8232 imagePRESS C1 P imagePRESS C1 imagePRESS C1 Printer imagePRESS C1 When formatting the HDD for selected partitions only those selected partitions will be initialized HDD 1 2 3 TMP_GEN ...

Page 1238: ...ss 172 16 1 100 CANCEL EXIT START Register Firmware CONNECT Delete Firmware Delete Backup Data System Management Select the target Click a button to execute REGISTER REMOVE Click the interface and click the START button Service Support Tool DLM0 Ver 3 22E iPR_C1 Single ALL ALL_HDF 1 2 SelectableFirmware SelectableFirmware Control 172 16 1 100 SAFE SYSTEM Firmware Version Active USenXXXXn Hold USen...

Page 1239: ...vely download all system software files that are found Use it as when upgrading the system software ALL_HDF for downloading in safe mode Use it to collectively download system software files other than the following BOOT DCON RCON Use it when reinstalling the system software as after formatting the HDD The foregoing 3 system software files may be downloaded using different steps 17 4 1 2 Downloadi...

Page 1240: ...rmware CONNECT Delete Firmware Delete Backup Data System Management Click a button to execute 1 Wait 2 iPR_C1_SYSTEM_USenXXXX 3 iPR_C1_LANGUAGE_XXenXXXX 4 iPR_C1_LANGUAGE_XXjaXXXX 5 iPR_C1_RUI_XXenXXXX 6 iPR_C1_RUI_XXjaXXXX 7 iPR_C1_MEAPCONT_XXxxXXXX 8 iPR_C1_SDICT_XXjaXXXX Not register 9 iPR_C1_TTS_XXenXXXX 10 iPR_C1_TTS_XXjaXXXX Not register 11 iRCXXXX_KEY_XXxcXXXX 12 iRCXXXX_KEY_XXxpXXXX 13 Wai...

Page 1241: ...m a t Finish Pause Batch Result Batch download results Results Resume Click RESUME button to restart batch download 1 Wait 2 iPR_C1_SYSTEM_USenXXXX 3 iPR_C1_LANGUAGE_XXenXXXX 4 iPR_C1_LANGUAGE_XXjaXXXX 5 iPR_C1_RUI_XXenXXXX 6 iPR_C1_RUI_XXjaXXXX 7 iPR_C1_MEAPCONT_XXxxXXXX 8 iPR_C1_SDICT_XXjaXXXX Not registered 9 iPR_C1_TTS_XXenXXXX 10 iPR_C1_TTS_XXjaXXXXNot registered 11 iRCXXXX_KEY_XXxcXXXX 12 iR...

Page 1242: ...NGUAGE_XXenXXXX_XXenvXXX 4 iPR_C1_LANGUAGE_XXjaXXXX_XXjavXXXX 5 iPR_C1_RUI_XXen0101_XXenvXXXX OK 6 iPR_C1_RUI_XXja0101_XXjavXXXX OK 7 iPR_C1_MEAPCONT_XXxxXXXX_XXxxvXXX 9 iPR_C1_TTS_XXenvXXXX OK 10 iPR_C1_TTS_XXjavXXXX OK 11 iRCXXXX_KEY_XXxcvXXXX OK 12 iRCXXXX_KEY_XXxpvXXXX OK 13 HDD 14 OFF1 7 Batch List Job Service Support Tool DLM0 Ver 3 22E Batch download list Same Ver Skip Ver down Comfirm Conf...

Page 1243: ...e Control 172 16 1 100 iPR_C1 NORMAL SYSTEM Firmware Version Active USenXXXXn Hold USenXXXXi RCON XXxxXXXX DCON XXxxXXXX MEAPCONT XXxxXXXX G3FAX XXxxXXXX BOOTROM XXxxXXXXC RUI XXjaXXXX XXenXXXX LANGUAGE XXjaXXXX XXenXXXX Downloading complete ServiceSupportTool DLM10 Ver 3 22E Clear Click the button of the task to be executed Download Firmware Upload Data Download Data Restore Backup System Format ...

Page 1244: ... stored in the temporary storage area of the HDD will be removed F 17 37 3 Click OK Return to the previous page F 17 38 MEMO After connecting the following device information 1 is displayed on the right upper area of the SST screen IP address Product name Download mode Message Follow the instructions shown on the machine for shutdown process Click OK button to return to Main Menu O K SelectableFir...

Page 1245: ...rited If you are planning to replace the DC controller PCB you can upload the SramDCON file in advance and download it after replacement so that the service mode and other settings may be inherited 17 5 2 Uploading Procedure 0013 8283 imagePRESS C1 P imagePRESS C1 imagePRESS C1 Printer imagePRESS C1 When uploading the data do not select SramImg bin or Sublog txt The machine must be in normal mode ...

Page 1246: ...XXn Hold USenXXXXi RCON XXxxXXXX DCON XXxxXXXX MEAPCONT XXxxXXXX BOOTROM XXxxXXXXC RUI XXjaXXXX XXenXXXX LANGUAGE XXjaXXXX XXenXXXX Select the firmware to be downloaded then click the Start button ServiceSupportTool DLM10 Ver 3 22E Clear Click the button of the task to be executed Download Firmware Upload Data Download Data Restore Backup System Format HDD Shutdown Return to Main Menu Start BOOT i...

Page 1247: ...gle then check the network settings and click START 172 16 1 100 iPR_C1 SAFE ServiceSupportTool DLM10 Ver 3 22E Clear Click the button of the task to be executed Download Firmware Upload Data Download Data Restore Backup System Format HDD Return to Main Menu Save Discard File Name MeapBack bin Enter desired file name then click the Save button Memo Memo c FileSave Control SramImg bin Uploading com...

Page 1248: ...n Service Support Tool DLM0 Ver 3 22E iPR_C1 Single ALL ALL_HDF 1 2 SelectableFirmware SelectableFirmware Control 172 16 1 100 iPR_C1 SAFE SYSTEM Firmware Version Active USenXXXXn Hold USenXXXXi RCON XXxxXXXX DCON XXxxXXXX MEAPCONT XXxxXXXX G3FAX XXxxXXXX BOOTROM XXxxXXXXC RUI XXjaXXXX XXenXXXX LANGUAGE XXjaXXXX XXenXXXX Select the firmware to be downloaded then click the Start button ServiceSuppo...

Page 1249: ...gePRESS C1 Turning Off the Power Do not turn off the machine while downloading or writing is under way Doing so could prevent the machine from starting up If this is the case execute HDD formatting menu 4 and download the system software If the machine fails to start up because of failed downloading of BOOT the DIMM ROM must be re placed Downgrading Be sure that the system software in the USB devi...

Page 1250: ...17 17 25 F 17 49 IF opening closing the decurler while the USB memory has been connected to the host machine the decurler may hit the USB memory Thus be sure to remove the USB memory before moving to next work ...

Page 1251: ...nder way the control panel screen shows its progress At the end of the downloading the machine restarts on its own to start writing to the system area of the HDD or the flash ROM Screen Showing the Progress of Downloading Screen Showing the Progress of Writing to the HDD F 17 51 6 At the end of writing to the HDD a message will appear asking you to turn off and then back on the power Turn off the ...

Page 1252: ...he appropriate key 0 overwrite other than 0 do not overwrite F 17 54 5 While downloading is under way the control panel screen shows its progress At the end of downloading a message will appear asking you to press a key Press the appropriate key If the machine is in normal mode it starts the shut down instructions F 17 55 6 When a message appears asking you to turn off the power turn off the main ...

Page 1253: ...g is under way the control panel screen shows its progress At the end of downloading a message will appear asking you to press a key Press the appropriate key If the machine is in normal mode the shut down sequence will start F 17 58 6 When a message appears asking you to turn off the power turn off the main power remove the USB device and turn the main power switch back on 7 Upon start up the mac...

Page 1254: ...ting a message will appear asking you to press a key Press any key to go back to the Men screen F 17 62 7 Start downloading the system software For instructions see Downloading the System Software 17 6 7 Other Functions 0013 8305 imagePRESS C1 P imagePRESS C1 imagePRESS C1 Printer imagePRESS C1 5 Backup This function is for R D purposes only Do not use it 6 Restore former version in the presence o...

Page 1255: ...u 2 and 3 Procedure 1 The power supply is turned off after the download of the system software by menu 2 or 3 is completed and it starts in a safe mode with the USB memory connected 2 Go through the instructions on the control panel and press an appropriate key 7 0 execute other than 0 go back to Menu screen Upon execution the Menu screen will return F 17 64 Stop Shutdown in normal mode only Use i...

Page 1256: ...Chapter 17 17 31 F 17 65 2 Turn off the main power switch and remove the USB device ...

Page 1257: ...Chapter 18 Service Tools ...

Page 1258: ...Contents Contents 18 1 Service Tools 18 1 18 1 1 Special Tools 18 1 18 1 2 Solvents and Oils 18 2 ...

Page 1259: ...tal multimeter FY9 2002 A Use for electrical checks for adjustment of laser power in combination with the laser power checker Cover switch TKN 0093 A Dropper FY9 1030 B Dropper for applying fixing belt oil Tester extension pin FY9 3038 A Used as a probe extension when making electrical checks Tester extension pin L shaped FY9 3039 A Used as a probe extension when making electrical checks CA7 test ...

Page 1260: ...drocarbon Alcohol Surface activating Water Do not bring near fire Procure locally Substitute IPA isopropy alcohol Solvent Cleaning e g metal oil or toner stain Fluoride family hydrocarbon Chlorine family hydrocarbon Alcohol Do not bring near fire Procure locally Substitute MEK Heat resisting grease Lubrication e g fixing drive areas Mineral oil family lithium soap Molybdenum disulfide MO 138S Tool...

Page 1261: ...e g scanner rail Silicone oil Tool No FY9 6011 50 cc Conducting grease Lubrication e g edge of secondary transfer roller drum heater sliding area Fluorine poly wthyl Polytetra fluorune ethylene Tool No FY9 6008 75 g Item Uses Composition Remarks ...

Page 1262: ......

Page 1263: ......

Page 1264: ...Oct 22 2008 ...

Page 1265: ......

Reviews: