background image

14

Network Settings

Follow the procedure below to confirm and configure the 
device name and IP address needed to connect the scanner to 
a network.

IMPORTANT

• The device name is the name used to identify the scanner on 

the network and is set to the 14 alphanumeric characters of 
the SF+MAC address by default. When changing this setting, 
make sure to select a unique name that is different from those 
of all other devices.

• Under default settings, the IP address is assigned 

automatically by the DHCP server. When a DHCP server is 
not used, clear the [DHCP server Enable] check box, and 
enter a fixed address. For details, contact your network 
administrator.

• The device name or IP address is used as the URL when 

accessing the Web Menu. Be sure to write down both the 
device name and IP address in case you forget them.

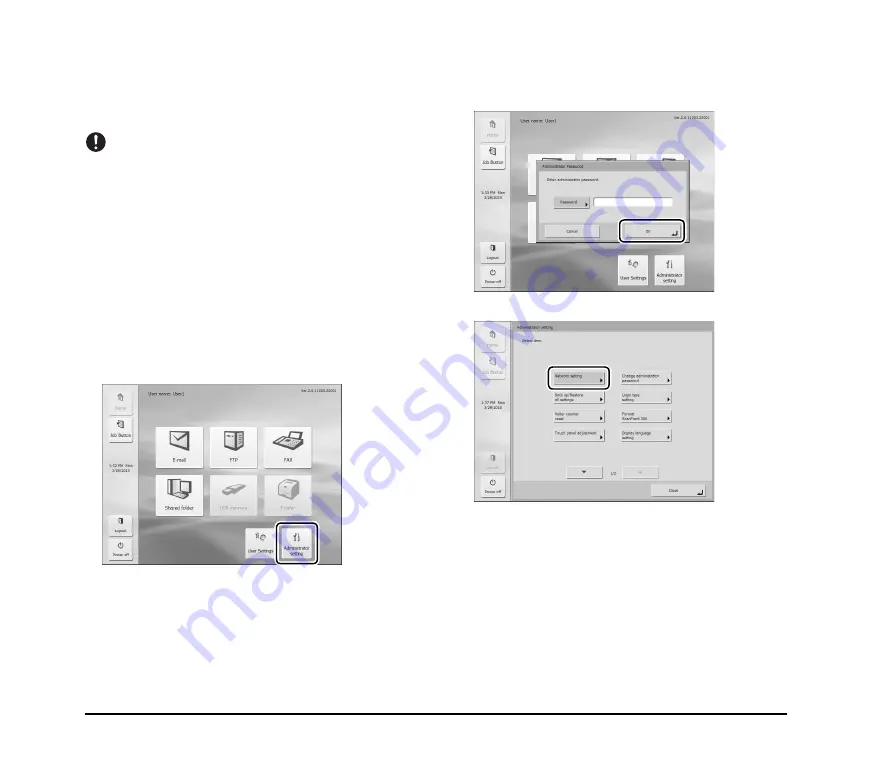
1.

Press [Administrator setting].

The [Administrator Password] input box appears.

2.

Press [OK] to display the [Administrator setting] 
screen.

No administrator password is set by default.

3.

Press [Network setting].

Summary of Contents for imageFORMULA ScanFront 300

Page 1: ...Setup Guide Read This First Please read this manual before using the scanner After you finish reading this manual keep it in a safe place for future reference...

Page 2: ...al installation This equipment generates uses and can radiate radio frequency energy and if not installed and used in accordance with the instructions may cause harmful interference to radio communica...

Page 3: ...Model M11 1051 Trademarks Canon and the Canon logo are registered trademarks of Canon Inc in the United States and may also be trademarks or registered trademarks in other countries imageFORMULA is a...

Page 4: ...DAMAGES WHATSOEVER RESULTING FROM LOSS OF USE DATA OR PROFITS WHETHER OR NOT ADVISED OF THE POSSIBILITY OF DAMAGE AND ON ANY THEORY OF LIABILITY ARISING OUT OF OR IN CONNECTION WITH THE USE OR PERFOR...

Page 5: ...SS INTERRUPTION HOWEVER CAUSED AND ON ANY THEORY OF LIABILITY WHETHER IN CONTRACT STRICT LIABILITY OR TORT INCLUDING NEGLIGENCE OR OTHERWISE ARISING IN ANY WAY OUT OF THE USE OF THIS SOFTWARE EVEN IF...

Page 6: ...2 Removing the Packing Materials and Attaching the Feed Roller 9 3 Installing the Scanner and Connecting to a Network 11 Connecting the AC Adapter 11 Connecting the Network Cable 11 4 Turning the Powe...

Page 7: ...er PC or client PC on the network or to an FTP server send it to a printer for printing or deliver it to a remote location via e mail or Internet fax service When using the scanner without a network e...

Page 8: ...ing the scanner settings as well as handling maintenance and troubleshooting information This manual is stored as a PDF file on the supplied INSTRUCTIONS AND UTILITIES CD ROM and requires Adobe Reader...

Page 9: ...ld but rapidly heated water droplets condensation may form inside the scanner This may result in a noticeable degradation in scanning quality The following conditions are recommended for optimal scann...

Page 10: ...ner Failure to do so may result in a fire or electric shock Never use alcohol benzene paint thinner aerosol sprays or any other highly flammable substance near the scanner Do not cut damage or modify...

Page 11: ...to have the unit serviced Do not install the scanner in a humid or dusty location Doing so may result in a fire or electric shock Do not place objects on top of the scanner as they may tip over and fa...

Page 12: ...ensor regulary When cleaning the fingerprint sensor use a soft dry cloth to wipe dirt off the surface Do not use a pointed object to remove any dirt that accumulates around the fingerprint sensor Doin...

Page 13: ...e time zone from the Web Menu and how to configure mail server settings for sending e mail For details on other settings refer to the Operation Guide and ScanFront 300 300P INSTRUCTIONS electronic man...

Page 14: ...ner during installation See p 9 INSTRUCTIONS AND UTILITIES CD ROM The following manuals are stored as PDF files on this CD ROM INSTURCTIONS Setup Guide Operation Guide AC Adapter Cord length 4 9 ft 1...

Page 15: ...ase 2 Gently open the document eject tray 3 Pull the lock lever toward you and then fully open the panel unit CAUTION The open close movement of the panel unit is linked to the up down movement of the...

Page 16: ...the direction of the arrow then insert it into the hole in the feed roller 9 Lower the roller lock lever to lock the feed roller into position 10 Close the roller cover Make sure you hear a click whi...

Page 17: ...AC Adapter Follow the procedure shown below to connect the AC adapter CAUTION Make sure to use only the AC adapter and power cord included with the scanner a Connect the power cord and AC adapter b I...

Page 18: ...he display Refer to Display Off on p 6 31 of the ScanFront 300 300P INSTRUCTIONS When the power indicator is flashing but nothing appears on the touch panel the Low Power mode has activated to tempora...

Page 19: ...ses to the Shared Address Book in addition to configuring the Network setting items Setting Item Description Administrator setting Web Menu Administrator Mode Network setting Set the Device Name and I...

Page 20: ...ll other devices Under default settings the IP address is assigned automatically by the DHCP server When a DHCP server is not used clear the DHCP server Enable check box and enter a fixed address For...

Page 21: ...ify the scanner on the network When changing this setting make sure to select a unique name that is different from those of all other devices The device name can be a combination of letters A Z a z nu...

Page 22: ...ON 2 Log in to Administrator setting open the network settings and confirm the IP address See Network Settings on p 14 3 Launch the Web browser on the computer 4 Enter the device name or the IP addres...

Page 23: ...time of e mail messages and for the saved image files will be incorrect When Enable daylight saving time is selected the correct time may not be reflected In this case set the correct time Mail Serve...

Page 24: ...ation by changing the Address type The following icons are used to indicate the types of address E mail Shared folder Fax FTP Group Pressing an address adds a checkmark to the icon and selects the add...

Page 25: ...ages and return to the Scan Delivery Options screen Press the Continue button to resume scanning Press Complete to go to the Send screen 7 Press Continue 8 Check the scanned image Display the image of...

Page 26: ...s Send An address confirmation message appears 10 Confirm the address and press OK to send the scanned image The scanner sends the image file and returns to the Home screen Hint The screen that appear...

Page 27: ...rive For details on operations refer to the separate ScanFront 300 300P INSTRUCTIONS electronic manual ScanFront Administration Tool ScanFront Administration Tool is software that allows you to manage...

Page 28: ...THERLANDS CANON LATIN AMERICA INC 703 WATERFORD WAY SUITE 400 MIAMI FLORIDA 33126 U S A CANON AUSTRALIA PTY LTD 1 THOMAS HOLT DRIVE NORTH RYDE SYDNEY N S W 2113 AUSTRALIA CANON SINGAPORE PTE LTD 1 HAR...

Reviews: