background image


Scanner Canon DR-C230 600dpi


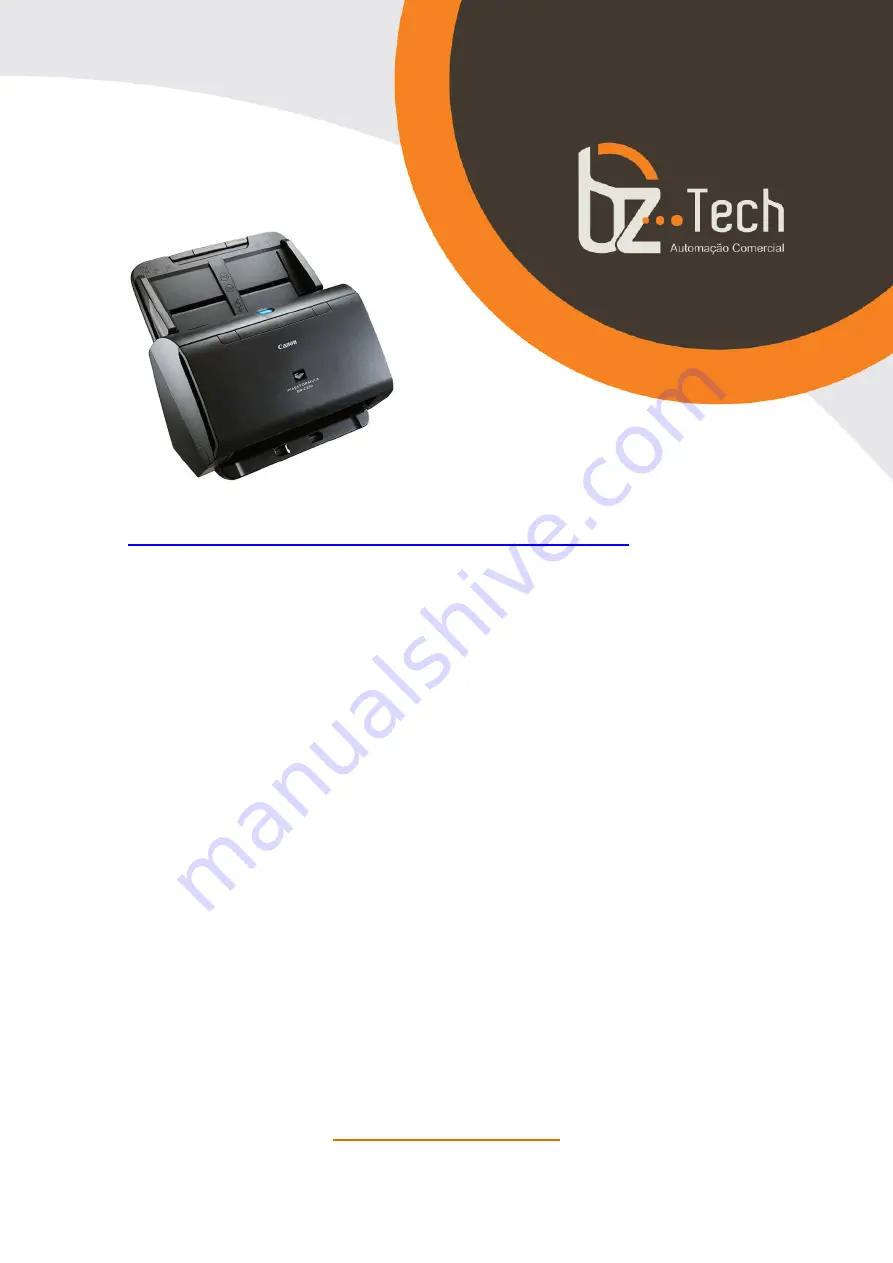
Estrutura compacta mas com grande performance, o Scanner 

Canon imageFORMULA DR-C230 oferece confiabilidade e 

produtividade suprema, a um preço acessível. Este robusto 

scanner de mesa captura vários formatos e tamanhos de 

documentos, tais como passaportes, com facilidade. Seu 

alimentador suporta até 60 folhas e documentos de até 210/gm². 

Pode digitalizar imagens de até 3m de comprimento, sendo capaz 

de realizar até 3500 digitalizações por dia. 


www.bztech.com.br 

Summary of Contents for imageFORMULA DR-C230

Page 1: ...utividade suprema a um preço acessível Este robusto scanner de mesa captura vários formatos e tamanhos de documentos tais como passaportes com facilidade Seu alimentador suporta até 60 folhas e documentos de até 210 gm Pode digitalizar imagens de até 3m de comprimento sendo capaz de realizar até 3500 digitalizações por dia www bztech com br ...

Page 2: ...User Manual Please read this manual before operating this scanner After you finish reading this manual store it in a safe place for future reference ...

Page 3: ...3 of the Industry Canada RÈGLEMENT SUR LE BROUILLAGE RADIOÉLECTRIQUE For 120 V models Cet appareil numérique respecte les limites de bruits radioélectriques applicables aux appareils numériques de Classe B prescrites dans la norme sur le matériel brouilleur Appareils Numériques NMB 003 édictée par l Industrie Canada International ENERGY STAR Office Equipment Program As an ENERGY STAR Partner CANON...

Page 4: ...d circumstances Trademarks Canon and the Canon logo are registered trademarks of Canon Inc in the United States and may also be trademarks or registered trademarks in other countries imageFORMULA is a trademark of CANON ELECTRONICS INC Microsoft Windows PowerPoint and SharePoint are registered trademarks or trademarks of Microsoft Corporation in the United States and other countries Microsoft prod...

Page 5: ...LIABLE FOR ANY DIRECT INCIDENTAL OR CONSEQUENTIAL DAMAGES OF ANY NATURE OR LOSSES OR EXPENSES RESULTING FROM THE USE OF THIS MATERIAL CANON ELECTRONICS INC IS NOT LIABLE FOR THE STORAGE AND HANDLING OF DOCUMENTS SCANNED WITH THIS PRODUCT OR THE STORAGE AND HANDLING OF RESULTING SCANNED IMAGE DATA IF YOU INTEND TO DISCARD THE ORIGINALS OF SCANNED DOCUMENTS YOU THE CUSTOMER ARE RESPONSIBLE FOR INSPE...

Page 6: ...eed Tray Carrier sheet for passports Included only in particular models Items included in this manual are subject to change without notice You must keep the machine s packaging and packing materials for storing or transporting the machine For Europe a print version of Reference Guide is supplied in English The content of the Reference Guide can be found in other languages in the User Manual on the...

Page 7: ...ions are also included on the supplied Setup Disc For details on installing these applications refer to the Readme txt file eCopy PDF Pro Office Windows only Nuance Communications PDF creation editing software The eCopy PDF Pro Office is supplied only with DR C240 IMPORTANT When scanning with third party software use the scanner driver of this scanner to configure scanning conditions For details o...

Page 8: ...your computer However normal operation is not guaranteed with all USB interfaces even if present as standard equipment on the computer For details consult your local authorized Canon dealer Scanning speeds are lower if your computer s standard USB interface is USB Full Speed equal to USB 1 1 The USB cable you are using should be the one originally included with the scanner If the CPU memory interf...

Page 9: ...nsert the disc into the drive If the menu does not start up execute setup exe from the disc If the following screen appears click Yes or Permissions 2 Click Typical Installation About Installation of the Third Party Software When installing the bundled software you can choose which of the bundled software to install if you select Custom Installation Hint If you want to reinstall only specific soft...

Page 10: ... to finish installing the software IMPORTANT Install the software before connecting the scanner to the computer Close all other applications before installing the software 1 Insert the Setup Disc into the DVD drive of the computer 2 Click DR C240 Installer DR C230 Series Installer ...

Page 11: ...10 3 Follow the instructions on the screen to complete installation 4 When the installation is complete click Log out ...

Page 12: ...PORTANT Do not connect the scanner to the computer before installing the software Before connecting the scanner to the computer verify that the power of the scanner is OFF If the power is ON turn it OFF To the power outlet AC adapter included with the scanner USB cable included with the scanner ...

Page 13: ...he status of the power switch and USB cable When the scanner is properly connected to the computer the CaptureOnTouch icon appears on the taskbar as follows If the taskbar icon appears as the scanner is not properly connected to the computer Check the status of the power switch and USB cable Turning Off the Power Press and hold the power button until the indicator goes out IMPORTANT After turning ...

Page 14: ... Documentation for this scanner consists of the following manuals Setup Guide This describes setup procedures for the scanner Read this manual when you first use the scanner User Manual this manual This manual contains the operating procedures of the scanner PDF electronic manual only Hint The manual User Manual for this scanner is stored on the Setup Disc as an electronic manual in PDF format If ...

Page 15: ...ys pay attention to these warnings CAUTION Indicates a caution concerning operations that may lead to injury to persons or damage to property if not performed correctly To use the scanner safely always pay attention to these cautions IMPORTANT Indicates operational requirements and restrictions Be sure to read these items carefully to operate the scanner correctly and avoid damaging the scanner Hi...

Page 16: ...t 44 Select document settings 51 Setting the Batch Separation 53 Setting the output 54 Setting the Index 55 Scanning Shortcut setting 55 About file formats 55 Environmental Settings 57 Scanning with CapturePerfect 61 Scanning with CapturePerfect 61 Setting the Scanner Driver 63 Configuration and Functions of the Scanner Driver 63 Setting Basic Scanning Conditions 66 More Advanced Scanning Methods ...

Page 17: ...result in a noticeable degradation in scanning quality The following conditions are recommended for optimal scanning quality Room temperature 10 C to 32 5 C 50 F to 90 5 F Humidity 20 to 80 RH Avoid installing the scanner near equipment that generates a magnetic field e g speakers televisions or radios AC Adapter Connect only to a power outlet of the rated voltage and power supply frequency 120 V ...

Page 18: ...the power supply Clean the scanner using a slightly dampened cloth which has been well wrung out Never use alcohol benzene paint thinner or any other flammable substances If the scanner makes strange noises or gives off smoke heat or strange odors or the scanner does not function or other abnormalities occur when you use the machine immediately push the power button to turn it off and disconnect t...

Page 19: ...en not using the scanner for a long period of time such as overnight Also push the power switch to turn it OFF and disconnect the power cord from the power outlet for safety when the machine will not be used for an extended period of time such as during consecutive holidays Do not wear loose clothing or jewelry that may get caught in the scanner while you are using it as this may result in persona...

Page 20: ...Detection When enabled in the CaptureOnTouch or scanner driver settings this function detects the content of documents and determines the scanning resolution automatically Folio Scan You can scan folded documents The scanner will scan both sides and combine the scanned images into a single image Deskew The scanner is equipped with a deskew function that straightens images before saving them when d...

Page 21: ...ng CaptureOnTouch with the operating panel buttons By default Job No 1 is assigned to Scanning Shortcut which allows you to easily scan a document by just following the instructions on the screen Auto Start The scanner is equipped with an auto start function which enables scanning to be automatically started when a document placed in the feeder is detected Sleep Mode The scanner is designed to sav...

Page 22: ...or scanning Scanned documents are output here D Eject Tray Support Open this when scanning multiple documents of varying sizes at one time Scanned documents are arranged in the tray by supporting and lifting up the document eject tray from the bottom E Document Feed Tray Place the document F Document Guides Align the document guides with both edges of the document to ensure that the document feeds...

Page 23: ...ocuments one at a time Normal mode See p 26 Push it up to feed scan documents that are fastened together such as invoices without separating them Bypass mode See p 28 K Front Unit Open this when cleaning the inside of the scanner or replacing rollers L Eject Support Open this when loading long documents M Document Eject Extension Support If required pull this out to match the length of loaded docu...

Page 24: ... Job No displayed in the Job No Indicator changes C Start Button This executes the job displayed in the Job No Indicator D Stop Button This stops active jobs E DFR Double Feed Release Button This is lit when a document double feed is detected Pressing this button cancels the double feed detection function allowing you to continue scanning Displayed Error Codes When a scanning error occurs the foll...

Page 25: ...ts of different sizes place the documents so that they cover the entire span of the feed rollers by aligning the centers and leading edges of the documents It is recommended that documents exceeding 356 mm 14 size are fed one sheet at a time Scanning documents before the ink is dry can cause problems with the scanner Always make sure that the ink on a document is dry before scanning it Scanning do...

Page 26: ...ng cards place them to be fed horizontally If you place cards to be fed vertically they may not be ejected properly and cards that get jammed may be damaged when you remove them Embossed cards may not be able to be scanned correctly depending on the type of embossment When scanning cards clear the Detect by Ultrasonic check box in the Feeding tab on the scanner driver settings screen See p 34 Pass...

Page 27: ...arating each page 1 Open the document eject tray 2 Pull out the eject support When placing long documents pull out the document eject extension support to match the length of those documents Also stand the eject stopper at the end of the eject support if necessary IMPORTANT Pull out the eject support and document eject extension support 3 Pull out the feed support Open the feed extension support w...

Page 28: ...that may get caught in the scanner while you are using it as this may result in personal injury Be extra careful of neckties and long hair If anything gets caught in the scanner immediately turn OFF the power switch and disconnect the power cord from the power outlet to stop scanning Always smooth out any folds or curls in your documents before placing them into the feeder If the leading edge of a...

Page 29: ...ltiple page documents that are fastened together such as invoices place the documents so that the edge that is fastened together is facing down If double feeding occurs press the scanner s DFR button to continue the scan or clear the Detect by Ultrasonic check box in the Feeding tab on the scanner driver settings screen See p 34 Loading passports To scan a passport insert the passport into the sep...

Page 30: ...carrier sheet a document jam may occur or the scanner s image correction may not function properly When scanning passports set Dots per inch to 300 dpi or less on the scanner driver settings screen See p 67 The maximum thickness that can be scanned is 4 mm with the passport inserted inside the carrier sheet If the thickness exceeds 4 mm the scanner may break down due to problems such as paper jam ...

Page 31: ... you to scan documents that are larger than LTR A4 and therefore do not fit in the feeder To use the function fold the document in half lengthwise and place it into the feeder The scanner will scan both sides and combine the scanned images into a single image 1 Sets the scanning conditions 2 Set the feed selection lever to Bypass mode 3 Fold the document in half Crease the document firmly down its...

Page 32: ... to scan A2 sized documents When scanning a folded document of a size other than the standard formats set Page Size on the scanner driver settings screen to Match original size See p 66 1 Opens the scanner driver s Detail Settings screen See p 63 2 Set Page Size on the Basic tab to a size that is half that of the paper to be actually scanned and set Scanning Side to Folio For example when scanning...

Page 33: ...Auto detection documents of up to 3 000 mm 118 1 in length can be scanned Note the following when using the Long Document mode When scanning in the Long Document mode if the document is placed on the scanner in a skewed position it may hit the edges of the feeding area and be damaged Be careful to place the document so that it is not skewed When scanning with the Long Document mode paper jam detec...

Page 34: ...ageFORMULA Utility starts Hint In Windows 8 1 it is registered at the following location 2 Click CANON DR C240 USB CANON DR C230 USB and click Properties Scanner properties are displayed 3 Click the Maintenance tab and then select a Long Document mode Select Long Document Mode 1000 mm or Long Document Mode 3000 mm depending on the length of the document 4 Click OK ...

Page 35: ...ds By using this function the scanner will automatically stop when it detects that multiple documents have been fed at the same time You can also specify whether to save the scanned image after scanning has finished and continue scanning the document double feed detection ignore function To use the double feed detection function you must first open the scanner driver settings screen and enable dou...

Page 36: ...ck the Feeding tab 3 Select either the Detect by Length or the Detect by Ultrasonic check box or both 4 To use the double feed detection ignore function open the Others tab and select the Rapid recovery system check box 5 Click the OK button and close the settings screen ...

Page 37: ...stem check box 5 Click to close the dialog box What to do when a double feed is detected When not using the double feed detection ignore function If a document double feed is detected during scanning document feeding stops when the double fed documents are ejected When this happens the following error code is displayed in the Job No Indicator of the operating panel Also a message screen is display...

Page 38: ...covery System screen appears to enable you to specify whether to continue scanning Double feed detection error code Buttons of Rapid Recovery System Screen Buttons of Operating Panel Description SAVE CONTINUE DFR button Saves the preview image as a scanned image and scans the rest of the document STOP Stop button Discards the preview image and stops scanning DISCARD CONTINUE Start button Discards ...

Page 39: ...ided with multiple scanning methods that can be selected according to the purpose and application CaptureOnTouch supports the following scanning methods Scanner Cloud Service Network Save to folder Save to a specified folder Print Print to a specified printer Send to application Open a scanned image with specified application Send by Attach to E mail start an e mail application and send a new e ma...

Page 40: ...aptureOnTouch V4 Pro The interval between the time you press the Start button on the scanner and the time scanning begins is shortened when the Make CaptureOnTouch resident check box is selected in the Basic settings tab of the Environmental settings dialog box For details see Environmental Settings on p 57 Click CaptureOnTouch icon in the menu bar and then click Launch CaptureOnTouch from the men...

Page 41: ... the system again Click Start All Programs CaptureOnTouch CaptureOnTouch V4 Pro Press the Start button on the scanner in this case the main screen of CaptureOnTouch will open and scanning will start using the scan method assigned to the Start button Hint In Windows 8 1 it is registered in the following location Open GO Applications folder from the Finder and double click CaptureOnTouch Selecting a...

Page 42: ...Descriptions There are two areas in the CaptureOnTouch main screen Scanning Shortcut and Standard Scanning Use the at the top right of the main window to move between sections Various panels have been prepared according to the scan types and outputs in each section Click the New document button and a New document panel will be added Standard Scanning Operations Selecting the Select document panel ...

Page 43: ...To edit scan images see Select document settings on p 51 3 Click the output panel for the scan image application from 2 Output The selected Output panel will be displayed in orange To edit the Output panel see Setting the output on p 54 4 Click the SCAN button The document is scanned While scanning is in progress the number of pages scanned is displayed in addition to the scanner settings ...

Page 44: ...ge the scanning conditions and then try scanning again A multiple page scan cannot be saved when it reaches the file size of 2 GB Change the save settings if an error message is displayed Hint If scanning continuously set the next document and click the Scan more pages button to start the document scan 5 To check the scanned image click the Finish button To edit scan images see Operations for the ...

Page 45: ...signed as a job you can run shortcut scans using these settings by pressing the scanner start button Scanning with Start Button See p 48 Registering and editing scanning shortcuts Multiple scanning shortcuts can be allocated to CaptureOnTouch 1 Either click the New shortcut button in Scanning shortcut or select the document scan and output in Standard Scanning and click the Save to Shortcut button...

Page 46: ...ct document settings See p 51 4 Click the Batch separation tab to set the batch separation Setting the Batch Separation See p 53 5 Click the Output tab to set the outputs Setting the output See p 54 6 Click the Index tab to set the index file Setting the Index See p 55 ...

Page 47: ...tional scan Check it on to display Scan more pages button in the Scan Editing screen to enable continuing scanning Job assignment You can assign a scanning shortcut as a job When a scanning shortcut is assigned as a job an icon for the assigned job No will be displayed in the scanning shortcuts panel Order of output You can add or delete the output and also change the order of output 8 Click the G...

Page 48: ...nt memory If an error message appears due to insufficient memory while scanning is in progress stop scanning change the scanning conditions and then try scanning again A multiple page scan cannot be saved when it reaches the file size of 2 GB Change the save settings if an error message is displayed Hint If scanning continuously set the next document and click the Scan more pages button to start t...

Page 49: ... by pressing the start button If you place the document use the Job Select button to select the job No to be run and press the Start button CaptureOnTouch starts and scanning starts Hint If the Do not display the main screen when the scan is started with the scanner button checkbox is enabled in the Environmental settings the main CaptureOnTouch window will not be displayed when a scan is started ...

Page 50: ... to discard the edit results and return to the previous scan image Hint If Edit after scanning is disabled in the scanning shortcut settings the edit window will not be displayed Color adjustment Easy settings Tools Description Switches the image selection for the thumbnail area These buttons mean All pages Odd pages and Even pages from the left Indicates the page of the image displayed on the pre...

Page 51: ...ust the brightness and contrast of the image checking the preview image Click the Grayscale button to render the image in grayscale Click the Black and White button to render the image using 2 values black and white When adjustment is finished click the OK button To cancel the adjustment click the Back button Image alignment Click Image alignment to display The preview image or the slider can be u...

Page 52: ...ink to open the save destination folder will be displayed Hint If Enable additional scan is disabled in the scanning shortcut settings the Scan more pages button will not be displayed Select document settings By default CaptureOnTouch enables the Full auto scan setting so scanning is implemented using the scan conditions that match the document To specify the document size color mode and other set...

Page 53: ...log box The settings in the advanced settings dialog box are applied for settings other than the basic items Enable Use advanced settings dialog box to implement advanced scanner settings other than the basic items using the advanced settings dialog box scanner driver To open the scanner driver enable this item and then click the Settings button Hint The driver settings dialog box includes setting...

Page 54: ...h separation Separation method Select the batch separation method and click the Detail settings button to display the Batch separation settings and you can set the details of separation method Select the batch separation method from the following No Separation Counter Barcode Zone OCR Patch code Blank Page Front of page IMPORTANT To use Barcode you will have to install a bar code module optional S...

Page 55: ...put tab in the shortcuts editing window Select output method File formats and save locations that can be selected depend on the output method selected Save to folder Saves the scanned image to the specified folder When this output method is specified set the save location folder Other output methods CaptureOnTouch supplies output methods other than Save to folder as plugins By installing the plug ...

Page 56: ...e are two ways as described below to create a new Scanning Shortcut panel Click the Save to Shortcut button in 3 select action in Standard Scanning to register the selected output and document scan to one of the scanning shortcut panels Click the New shortcut button to add New scanning shortcut panel Click to display the list of panel types The selected type of the panel is created Editing new Sca...

Page 57: ...ompression mode select either Standard or high compression If you click the Compression rate button you can specify the compression rate in the dialog box that appears The Add OCR information option allows you to specify whether to add OCR information to the scanned images In Multi pdf settings specify whether to save the scanned images as a multi page file Save all pages as one file or single pag...

Page 58: ... page file Save all pages as one file or single page files Create a file for each specified number of pages JPEG setting You can specify the compression rate of JPEG images PPTX settings You can specify whether to add OCR information to the scanned images Environmental Settings To configure the environmental settings of CaptureOnTouch open the Environmental settings dialog box Click CaptureOnTouch...

Page 59: ...n check box is selected the main screen of CaptureOnTouch is not displayed when the Scanning Shortcut scanning is started by pressing the scanner s Start button However dialogs and error messages during scanning and the pop up screen when the scan is completed will be displayed When this setting is enabled the Enable additional scan and Edit after scanning check boxes on the Edit Scanning Shortcut...

Page 60: ...he other computers so that all of the computers have the same settings Log settings The Log file settings screen opens when you click the Settings button Select the type of log file If you click the Execute button the Save File dialog is displayed The operation slows down if you select Full for Log file type Initialize A confirmation dialog box appears when you click the Initialize button All Capt...

Page 61: ...eck boxes on the Edit Scanning Shortcut settings screen are disabled Back Up Restore Use the Back Up and Restore buttons to back up the configuration file settings registered jobs etc of CaptureOnTouch and restore the settings from the backup data Back Up button Back up the settings of CaptureOnTouch to a backup file plist You can store the initial settings of CaptureOnTouch by performing a backup...

Page 62: ...ect Scanner in the Scan menu 3 Select the scanner you are using and click OK Hint If the scanner you are using does not appear reinstall the scanner driver See p 8 4 Set the default paper size and click OK Hint The Configure Device Settings dialog box appears when selecting the scanner and clicking OK for the first time in the Select Scanner dialog box and when Settings is clicked in the Select Sc...

Page 63: ...unt of the computer s memory scanning may stop because of insufficient memory If an error message appears due to insufficient memory while scanning is in progress exit the application and try scanning again using different scanning condition settings 10 If the placed document is removed the scan will be interrupted and the Continue Scanning dialog box appears To continue scanning add a document an...

Page 64: ...he scanner driver Configuration and Functions of the Scanner Driver The scanner driver consists of the following tabs Hint For details on the setting screen see the Help of the scanner driver Click the Help button of the driver to display help related to the corresponding tab or dialog box Basic tab Configure basic scanning conditions such as the mode page size resolution and scanning side In addi...

Page 65: ...o the functions provided by the scanner driver other than scanning conditions will be displayed on the Basic tab Brightness tab Adjust the brightness and contrast of scanned images In addition you can also click Gamma and set the gamma correction value for scanned images Image processing tab Set the processing method for scanned images Feeding tab Specify scanner operations related to document fee...

Page 66: ...settings When the scanner driver is opened from CaptureOnTouch the following settings screen of the scanner driver appears Hint When the Advanced Settings screen is called from some applications the Advanced Settings screen may have the Simple mode and Advanced mode ...

Page 67: ...ems that are the minimum requirements when configuring the scanner settings Confirming Basic Conditions for Scanning When you scan a document make sure you confirm the Color mode Page Size Dots per inch and Scanning Side basic conditions in the Basic settings dialog box Simple Mode Advanced Mode ...

Page 68: ...e detection method by clicking Setting For details see the Help Page Size Select the page size that matches the document to be scanned If Match original size is selected the edges of the document are detected and images that match the size of the document are saved Dots per inch Select the scanning resolution Higher resolutions provide clearer images but result in larger file sizes and slower scan...

Page 69: ...surrounding text to enhance the text for easy reading Detect automatically detects whether a document is color grayscale or black and white based on its content When this is selected you can configure detailed settings for the detection method Refer to the Help for details Dots per inch Select the scanning resolution Higher resolutions provide clearer images but result in larger file sizes and slo...

Page 70: ... are saved Scanning Documents of Unregistered Page Sizes You can register a non standard page size that has not been registered as a page size by naming and registering it as a custom page size in the Custom Paper Size dialog box which is opened from the Save button on the Basic tab Configuring the following settings allows you to scan a document of an unregistered page size When scanning a docume...

Page 71: ...when Check the image of the first page is selected only one page of the document is scanned and the corresponding scanned image is displayed in the preview window Configuring Scanner Settings According to Purpose Set the scanning conditions according to the scanning purpose When you want to delete the images of the blank pages in two sided documents Set the scanning side setting to Skip Blank Page...

Page 72: ... When you do not want to scan colored lines and text Specify the color red green blue all colors to be ignored dropped out in the color drop out settings on the Image processing tab and that color will be removed from the scanned image Click Image processing and when a dialog box opens specify the color red blue or green to be ignored dropped out in Color dropout and that color will not be scanned...

Page 73: ...ed image Click Image processing and when a dialog box opens specify Red Enhance for Color drop out This will enhance the red color part of the document When you want to enhance contours in images Adjust the edge emphasis setting on the Image processing tab Click Image processing and adjust the edge emphasis settings in the dialog box which appears ...

Page 74: ...removed or processed so that the text is emphasized for better readability Advanced Text Enhancement is suitable for a document with a light background color or a document with a non uniform background such as a pattern If the background is uniform it is removed where it surrounds the text and if the background is non uniform it is processed to enhance text readability Advanced Text Enhancement II...

Page 75: ...r processed so that the text is emphasized for better readability When you want to detect multiple pages fed at the same time Select the Double Feed Detection check box on the Feeding tab You can enable either one or both of Detect by Ultrasonic and Detect by Length Select the Double Feed Detection check box ...

Page 76: ...The text orientation on each page is detected and the scanned image is rotated in 90 degree increments to correct the orientation Select the Text Orientation Recognition check box The text orientation on each page is detected and the scanned image is rotated in 90 degree increments to correct the orientation Hint When the Text Orientation Recognition check box is selected Document Orientation is u...

Page 77: ...scan a document you can separate a batch at the timing with which each next document is placed and scanned Only enabled for applications that support batch separation In this case set the scanner driver as follows Set Feeding Option on the Feeding tab to Panel Feeding or Automatic Feeding Set Batch Separation on the Others tab to Auto When Batch Separation is set to Auto the batch is separated aft...

Page 78: ...ing conditions to apply in Stream count of Front Up to three can be specified C Select Front 1st and then open the other tabs and set the scanning conditions Depending on the value specified for Stream count of Front configure the remaining Front 2nd and Front 3rd in the same way D When specifying the scanning conditions of the back configure the settings in the same way as described in B to C In ...

Page 79: ... Dot check box to automatically remove isolated black dots 3 x 3 dot size from white backgrounds or white dots from black backgrounds Select the Erase Notch check box to remove notches that protrude from object outlines in scanned images Click Image processing and select ON for Erase Dot or Erase Notch in the dialog box that appears When ON is selected for Erase Dot the isolated 3x3 black dots on ...

Page 80: ...d to the list You can delete a setting from the list with the Delete button and save or load a configuration file with the Back Up or Restore button When you finish configuring a setting select Add Delete of Favorite Settings to save the setting Clicking the Add button registers the current setting to Favorite Setting List Use the Delete button to delete a setting from the list ...

Page 81: ... binary tab is set to Advanced Text Enhancement or Advanced Text Enhancement II Setting value Contrast Detect Automatically O Black and White O Error Diffusion O Advanced Text Enhancement X Advanced Text Enhancement II O 256 level Gray O 24 bit Color O Setting value Prescan Detect Automatically X Black and White O Error Diffusion O Advanced Text Enhancement O Advanced Text Enhancement II O 256 lev...

Page 82: ...lows depending on the setting for Color Mode in the settings screen of the scanner driver Simple Mode O Available for setting X Not available for setting Advanced Mode O Available for setting X Not available for setting Setting value Check the image of the first page Detect automatically X Black and White O Error Diffusion O Advanced Text Enhancement II O 256 level Gray O 24 bit Color O Setting va...

Page 83: ...ction Mode is not set to Color or Gray Setting value Edge emphasis Background smoothing Character Emphasis Prevent Bleed Through Remove Background Color drop out Erase Dot Erase Notch Detect automatically O 1 O1 X X X X X Black and White O X O O O O O Error Diffusion O X O O O O O Advanced Text Enhancement II X X O X O O O 256 level Gray O O X O O X X 24 bit Color O O X O O X X ...

Page 84: ...eparators will not be saved Batch separation using patch code sheets This scanner supports batch separation automatic file separation functions by using patchcodes By tucking patchcode sheets supplied with this scanner into a document and scanning it the scanner can automatically separate files by images of documents containing patchcode sheets or documents after the patchcode sheet Hint This func...

Page 85: ...cation and print a patchcode that is the same size as the document to be scanned Type of Patchcode Pattern Description PATCH T FILE A Files are separated from the page after the page printed with this patchcode You specify in the application whether to include the page printed with the patchcode in the scanned image PATCH II FILE B Files are separated from the page printed with this patchcode The ...

Page 86: ... following diagram Also when copying patchcodes ensure that they are the same size and shade as the original Keep the patchcode sheet clean Take particular care to keep the patchcode detection range area clean Also do not bend fold or crease the sheet 2 Place the documents in the scanner after inserting the patchcode sheet in front of the page that separates the files Patchcode effective range for...

Page 87: ... a type of batch separation When using CapturePerfect select Patchcode in the Batch Separator settings When using other ISIS compatible applications open the scanner driver settings screen and select Patchcode in Batch Separation on the Others tab ...

Page 88: ...anner To clean the outside of the scanner wipe off any dirt with a cloth that has been dampened with water and thoroughly wrung out and then wipe the scanner dry with a clean dry cloth Cleaning the Inside of the Scanner Dust or paper particles inside the scanner may cause lines or smudges to appear on scanned images Use compressed air to periodically clean dust and paper particles from the documen...

Page 89: ...lass dry with a clean dry and soft cloth CAUTION Do not spray water or neutral detergent directly on the scanner Precision mechanisms such as the light source may get wet and cause a malfunction IMPORTANT Scratches on the sensor glass may cause marks on the images as well as feeding errors If there are scratches on the sensor glass contact your local authorized Canon dealer or service representati...

Page 90: ...Remove the retard roller and feed roller from the scanner to clean them and be sure to reattach them to the scanner when cleaning is finished 7 Wipe the removed rollers with a cloth that has been dampened with water and thoroughly wrung out 8 Reattach the retard roller and feeding roller See p 93 p 94 9 Close the front unit by gently pushing it up on both sides until it clicks into place Make sure...

Page 91: ...T Log on to Windows as an Administrator 1 Click the Start button and then click All Programs Canon DR C240 Canon DR C230 and Canon imageFORMULA Utility imageFORMULA Utility starts Hint In Windows 8 1 it is registered at the following location 2 Click Canon DR C240 USB Canon DR C230 USB and click Properties Scanner properties are displayed 3 Click the Maintenance tab and then change the value of Re...

Page 92: ...Settings screen See p 65 2 Click to display the Scanner Information dialog box 3 Click Maintenance to display the Maintenance dialog box 4 Change the value of Reduction ratio adjustment The adjustment value can be set within the range from 3 0 to 3 0 5 Click to close the dialog box ...

Page 93: ...e begins to be displayed at startup purchase an exchange roller kit and replace the worn parts with the consumable parts included in the kit feed roller and retard roller See p 109 for details about the exchange roller kit Furthermore the counter in the scanner that records the number of pages fed also needs to be reset when you replace the rollers See p 95 Hint Even before it becomes time to repl...

Page 94: ...closing the front unit make sure that it is completely closed by gently pressing the left and right until you hear a click 4 Close the document eject tray Replacing the Feed Roller 1 Open the roller cover 2 Remove the feed roller Retard roller inside the front unit Feed Roller ...

Page 95: ...94 3 Install the new feed roller 4 Close the roller cover Replacing the Retard Roller 1 Open the roller cover 2 Pull the left lever that secures the retard roller to the scanner and remove the roller ...

Page 96: ...ure it to the scanner 5 Close the roller cover Resetting the counter IMPORTANT Log on to Windows as an Administrator 1 Click the Start button and then click All Programs Canon DR C240 Canon DR C230 and Canon imageFORMULA Utility imageFORMULA Utility starts Hint In Windows 8 1 it is registered at the following location ...

Page 97: ...the Maintenance tab and then select Reset The counter for Current Rollers resets 4 Click OK to close the scanner properties 1 Opens the scanner driver s Detail Settings screen See p 65 2 Click to display the Scanner Information dialog box 3 Click Maintenance to display the Maintenance dialog box 4 Click Reset ...

Page 98: ...g on to Windows as an Administrator 1 Click the Start button and then click All Programs Canon DR C240 Canon DR C230 and Canon imageFORMULA Utility imageFORMULA Utility starts Hint In Windows 8 1 it is registered at the following location 2 Click Canon DR C240 USB Canon DR C230 USB and click Properties Scanner properties are displayed 3 Click the Maintenance tab and then clear the Turn off automat...

Page 99: ...98 4 Click OK to close the scanner properties Removing the Document Feed Tray When you will store or otherwise not use the scanner for a long period of time remove the document feed tray ...

Page 100: ... the document guides to fit the documents as closely as possible and load the documents so that they feed straightly 2 Open the document feed extension support and place the document 3 Enable Automatically straightens skewed in the scanner driver settings 4 If many pages have been scanned since roller cleaning clean the rollers If documents still feed askew roller replacement or other maintenance ...

Page 101: ... you want to save all images in JPEG format change the scanning Color Mode to either 24 bit Color or 256 level Gray Problem 9 Multiple pages of scanned images cannot be saved to a single file Solutions Depending on the file format multiple scanned image pages cannot be saved as a single file with CaptureOnTouch When you select Scan Batch to File from the Scan menu in CapturePerfect a dialog box ap...

Page 102: ...nner s DFR button to continue the scan or clear the Detect by Ultrasonic check box on the scanner driver settings screen See p 34 Problem 13 Passport cannot be scanned as intended Solutions Depending on the condition of the carrier sheet or passport the image may not be scanned completely or the scanner s image correction may not function properly Configure the settings as shown below 1 Set Page S...

Page 103: ...ce the cable with the supplied compliant cable 6 When the scanner is connected to the computer via a USB hub that is not Hi Speed USB 2 0 compliant remove the hub and connect the scanner directly to the computer If scanned image files cannot be opened in an application 1 Scanned images saved as multi page TIFF files can be opened only by programs that support this file format 2 Images saved as com...

Page 104: ...ns CaptureOnTouch The setting configurations can be backed up and restored using Back Up Restore on the Basic settings tab on the Environmental settings dialog box CapturePerfect Scanner setting configurations cannot be copied or backed up in CapturePerfect What rules apply to scanned image file names For both Standard Scanning and Scanning Shortcut the file names of scanned images are set based o...

Page 105: ...lug in can be installed by selecting its checkbox when installing CaptureOnTouch CapturePerfect Scan using the Scan Batch to Printer function Alternatively register a job with a printer selected as the output destination I want to save to other folders CaptureOnTouch In CaptureOnTouch destinations other than Save to folder are provided as a plug in By installing the plug in the scanned image can b...

Page 106: ...ring scanning use the following procedures to clear them CAUTION Be careful when removing jammed paper take care not to cut your hand on the edges of the paper 1 Remove any documents that have been left in the feed Tray 2 Pull the OPEN lever and pull open the front unit toward you Hint The C error code appears in the operating panel when the front unit is open 3 Remove the jammed document Paper ja...

Page 107: ...a click After removing the jammed paper check to see if the last page was scanned correctly and then continue scanning Hint When the Rapid recovery system check box is enabled in the scanner driver settings screen you can resume a scanning operation even if it is interrupted by a paper jam by removing the document and resuming from the document that was being fed when the interruption occurred As ...

Page 108: ...n and then Control Panel 2 Click Uninstall a program The Uninstall or change a program dialog box appears 3 From the Programs list select the software you want to remove and then click Remove The delete confirmation screen appears 4 Click Yes Uninstallation of the software is now complete No uninstaller is provided for OS X drivers To uninstall use Finder to delete the following files Library Imag...

Page 109: ...mm x 125 mm 3 464 x 4 921 ISO standard When scanning the passport open the passport and insert it in the optional carrier sheet before feeding Thickness 4 mm 0 157 or less including carrier sheet Scanning Sensor Contact image sensor Light source LED Scanning Side Simplex duplex Scanning modes Black and White Error Diffusion 256 level Grayscale Advanced Text Enhancement Advanced Text Enhancement II...

Page 110: ...bout the replacement parts Option Barcode module product code 1922B001 2D code module product code 1922B003 Add on module to recognize barcodes printed on documents during scanning Carrier sheet for passports Product code 0697C002 This is a carrier sheet for scanning passports Flatbed scanner unit102 product code 2152Cxxx Flatbed scanner unit that can be connected to and used with a DR scanner Con...

Page 111: ...e start button on Flatbed Scanner Unit after you end CaptureOnTouch About Setting up the Scanner Driver When functions of this scanner cannot be selected with the Flatbed Scanner Unit settings dialog box click Option in the dialog box to open the scanner driver and make the required settings Dimensions 231 mm 9 09 291 mm 11 46 603 mm 23 74 363 mm 14 29 ...

Page 112: ... Document 24 Card 29 Folio 30 Loading method 26 Double Feed Detection 34 F Feed roller 92 93 Flatbed scanner unit 102 109 Flatbed scanner unit 201 109 Folio 30 Front unit 92 I Install 8 Bundled software 8 J Job No display 23 Job Select button 23 L Long Document Mode 32 M Multi stream setting 77 O Operating environment 7 Operating Panel 23 Output method 54 P Paper jam 105 Power supply 12 R Resettin...

Page 113: ...112 Start Button 23 Stop Button 23 T Third party Software 6 U Uninstall 107 ...

Page 114: ...utsch Schalter Aus Español Interruptor apagado Nederlands Schakelaar Off Türkçe Anahtar Kapalı Power off no standby current Hors tension pas de courant de veille Alimentazione assente nessuna corrente di standby Ausgeschaltet ohne Ruhestromaufnahme Máquina apagada sin corriente en espera Uit geen stand byverbruik Güç kapalı bekleme akımı yok English Switch Standby Français Commutateur Veille Sous ...

Page 115: ...ançais Italiano Apparecchio classe II Deutsch Gerät der Schutzklasse II Español Equipo de clase II Nederlands KlasseII apparatuur Türkçe Sınıf II ekipman Équipement de classe II Indicates this is Class II equipment Indica che questo è un apparecchio di classe II Gibt an dass das Gerät der Schutzklasse II entspricht Indica que se trata de un equipo de clase II Geeft aan dat deze apparatuur in Klass...

Page 116: ...k önlemi English Français Symbole CC DC symbol Indicates direct current Italiano Simbolo corrente continua C C Indica la corrente continua Deutsch Gleichstrom Symbol Español Símbolo CC Nederlands DC pictogram Türkçe DC sembolü Indique qu il s agit de courant continu Kennzeichnet Gleichstrom Indica corriente continua Geeft gelijkstroom aan Düz akımı gösterir English Français Italiano Deutsch Españo...

Page 117: ...85 XB AMSTELVEEN THE NETHERLANDS CANON AUSTRALIA PTY LTD BUILDING A THE PARK ESTATE 5 TALAVERA ROAD MACQUARIE PARK NSW 2113 AUSTRALIA CANON SINGAPORE PTE LTD 1 FUSIONOPOLIS PLACE 15 10 GALAXIS SINGAPORE 138522 CANON KOREA BUSINESS SOLUTIONS INC BS TOWER 607 TEHERAN RO GANGNAM GU SEOUL KOREA CANON INDIA PVT LTD 7TH FLOOR TOWER B DLF CYBER TERRACES DLF PHASE III GURGAON 122002 HARYANA INDIA CE IM 09...

Reviews: