background image

Using the Scanner

45

Chapter 2

Before using Adobe Acrobat 9.0

There are two methods for scanning a document from the scanner using the 
bundled Adobe Acrobat 9.0 software. One method is Presets (Black & White 
Document, Grayscale Document, Color Document or Color Image), in which 
the scanning parameters are set beforehand, and the other method is Custom 
Scan, which allows you to select the parameters used for scanning. The 
Custom Scan method also provides the option of either showing or hiding the 
scanner’s Native Interface (the machine’s own scanner settings screen) while 
scanning.

If you use Adobe Acrobat 9.0 with this machine and scan using the 
Custom Scan method, you should display the scanner’s Native Interface 
for the following reasons.

• If you make scans without showing the Native Interface, it may 

not be possible to scan correctly at the specified Paper Size.

• If you use Presets to scan without showing the Native Interface, 

it may not be possible to scan correctly at the specified Paper 
Size.

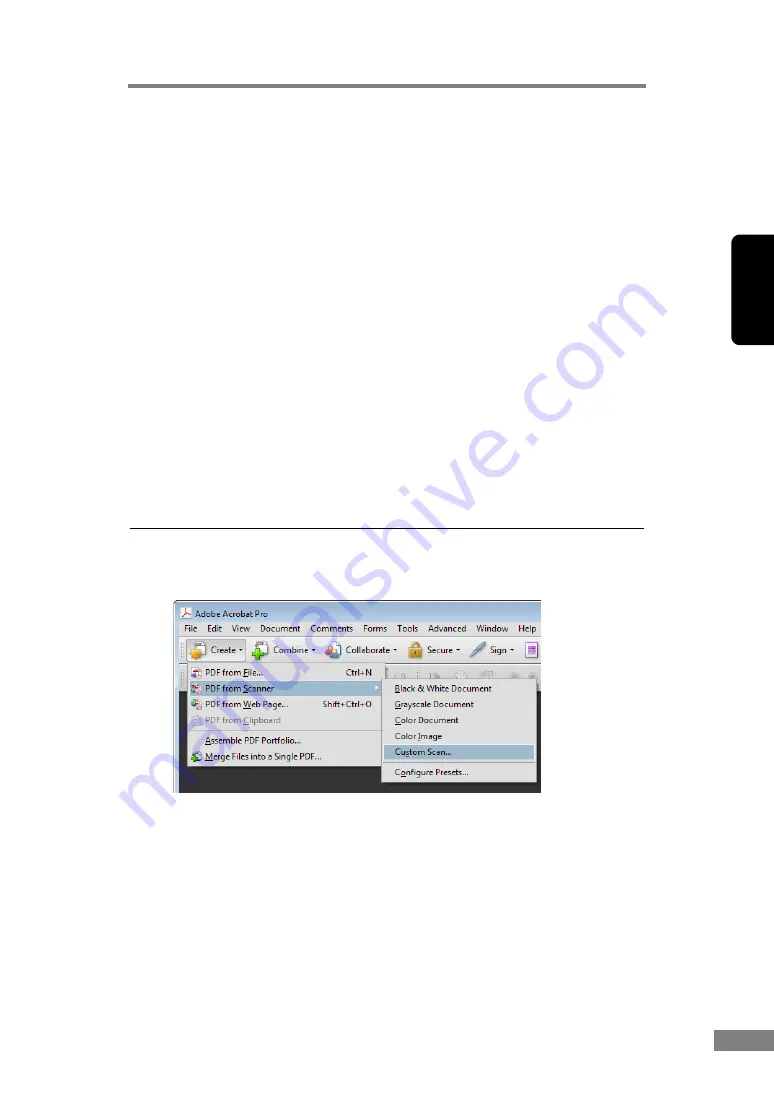
Procedure for Showing the Native Interface in Custom Scan

1.

On the [Create] menu, select [PDF from Scanner] 

Æ

 [Custom Scan].

2.

Click [Options] in the Custom Scan dialog box to open the [Scanner Options] 
dialog box.

Summary of Contents for imageFORMULA DR-6030C

Page 1: ...Document Scanner User s Guide Please read this manual before using this unit After you finish reading this manual keep it in a safe place for future reference ...

Page 2: ...A N A D A I N C 6 3 9 0 D I X I E R D M I S S I S S A U G A O N L 5 T 9 Z 9 0880281099 L5T1P7 BR01 DR 6030C Power Cord Document Eject Guide USB Cable User s Guide This Manual DR 6030C Setup Disc Adobe Acrobat Setup Disc Registration Card U S A and Canada only This setup disc is inserted in this manual For details on the disc refer to About the Setup Disc See p 17 Warranty Card U S A and Canada onl...

Page 3: ...connecting by USB 5 SCSI cable when connecting by SCSI Type B Type A Power cord Do not use both a USB connection and an SCSI connection at the same time Use only the supplied power cord SCSI cable is not supplied Acquire an SCSI cable beforehand that matches the shape of the connectors on your SCSI card and the scanner When using the scanner in a daisy chain connection with other SCSI devices pay ...

Page 4: ...eceiving antenna Increase the separation between the equipment and receiver Connect the equipment into an outlet on a circuit different from that to which the receiver is connected Consult the dealer or an experienced radio TV technician for help Use of shielded cable is required to comply with class B limits in Subpart B of Part 15 of FCC Rules Do not make any changes or modifications to the equi...

Page 5: ...s from the date you purchased the same as evidenced by a receipt or otherwise The limited warranty does not apply if the failure of the diskette resulted from accident abuse or misapplication of the SOFTWARE and shall not extend to anyone other than the original user of the SOFTWARE CANON CANON S AFFILIATE THEIR DISTRIBUTOR OR DEALER DISCLAIMS ALL IMPLIED WARRANTIES INCLUDING ANY WARRANTY OF MERCH...

Page 6: ... registered trademarks of Microsoft Corporation in the United States and other countries ISIS is a trademark of EMC Corporation in the United States Intel and Pentium are registered trademarks of Intel Corporation ENERGY STAR is a U S registered mark Adobe is the registered trademark of Adobe Systems Incorporated in the United States and or other countries Adaptec is registered trademark of Adapte...

Page 7: ...n foldout page in this manual For details on preparing the scanner and details on scanning and how to handle the scanner see the User s Guide The following describes the manuals packaged with the scanner Before you start using the scanner be sure to read this User s Guide Easy Start Guide foldout page in this manual This manual describes the procedure for removing the scanner from its box through ...

Page 8: ... always pay attention to these warnings CAUTION Indicates a caution concerning operations that may lead to injury to persons or damage to property if not performed correctly To use the machine safely always pay attention to these cautions IMPORTANT Indicates operational requirements and restrictions Be sure to read these items carefully to operate the machine correctly and avoid damage to the mach...

Page 9: ...aring the Trays 22 Setting Up the Document Feed Tray 22 Document Eject Tray 23 Installing the Document Eject Guide 25 3 Placing Documents 27 How to Feed with the Page Separation Mode 27 How to Feed with the Bypass Mode 30 4 Scanning Documents 32 Using CapturePerfect 3 0 32 Starting CapturePerfect 3 0 with the Start Button 40 Before using Adobe Acrobat 9 0 45 5 Using Patchcode Sheets 47 About Patch...

Page 10: ...ving Your Settings 99 Chapter 4 Appendices 101 1 Regular Maintenance 102 Cleaning the Scanner 102 Cleaning the feed path 102 Cleaning the Sensor Glass Shading Boards and the Rollers 103 Cleaning the Shading Boards 106 2 Removing and Attaching the Rollers 108 Roller Replacement Cycle 108 Resetting the Counter 109 Removing and Attaching the Pickup Roller 113 Removing and Attaching the Feed Roller 11...

Page 11: ...ortant Safety Instructions 6 Installation Location 6 Power 7 Moving the Scanner 7 Handling 8 Disposal 9 2 Features of the DR 6030C Document Scanner 10 3 Names and Functions of Parts 13 4 Installation Requirements 15 5 About the Setup Disc 17 ...

Page 12: ...hade the scanner Avoid locations where a considerable amount of dust accumulates Avoid warm or humid locations such as in the vicinity of a water faucet water heater or humidifier and avoid locations where the fumes from ammonia paint thinner or other volatile chemicals may be present Avoid locations where ammonia gas is emitted Avoid locations near volatile or flammable materials such as alcohol ...

Page 13: ...he scanner The power cord may become damaged if they are often stepped on or if heavy objects are placed on them Continued use of a damaged power cord can lead to an accident such as a fire or electrical shock Do not use the power cord while it is coiled Do not pull directly on the power cord When disconnecting the power cord grasp the plug and remove it from the outlet Keep the area around the po...

Page 14: ...urn the power switch OFF and disconnect the power cord from the power supply Clean the scanner using a slightly dampened cloth which has been well wrung out Never use alcohol benzene paint thinner or any other flammable substances If the scanner makes strange noises or gives off smoke heat or strange odors or the scanner does not function or other abnormalities occur when you use the machine immed...

Page 15: ... around the power plug so that it can be unplugged easily If objects are placed around the power plug you will be unable to unplug it in an emergency Do not allow water or flammable substances alcohol paint thinner benzene etc to spill into the scanner as this may result in a fire or electric shock Turn OFF the power switch for safety when not using the scanner for a long period of time such as ov...

Page 16: ...ment type Single sided double sided mode Single sheet dual feeding path U Turn Path Documents are fed and ejected from the front of the scanner See Document Eject Tray on p 23 Straight Path Documents are ejected to the back of the scanner Note the ejected documents are stacked in reverse order to how they were fed See Document Eject Tray on p 23 Paper Size Detection The scanner automatically detec...

Page 17: ...a Dropout Color function that allows you to specify a color for the scanner to omit from scanned images See Color Drop Out on p 80 Auto Start The scanner is equipped with an Auto Start function that automatically initiates scanning when a document is placed in the document feed tray See Feeding Option on p 83 Skip Blank Page Function The scanner is equipped with a Skip Blank Page function that all...

Page 18: ... by setting the scanner in the Long document mode See Long Document Mode on p 55 Compatible with Carbonless Duplicating Paper The scanner is able to scan carbonless duplicating paper Energy Saving Mode This scanner is compatible with the International Energy Star Program and is designed to save power by using the energy saving feature except when scanning is being performed See Standby Mode Settin...

Page 19: ...tension Open if the document extends beyond the edge of the eject tray See p 24 Document Eject Guide Attach it to prevent thin or long documents from jamming when being scanned See p 25 Document Eject Tray 1 Scanned documents are ejected here See p 23 Stop Button Push it to stop scanning Start Button Push it to start scanning Feed Selection Lever Use it to change the way the documents are fed Move...

Page 20: ...ing so may cause a malfunction Document Eject Tray 2 Switch the direction documents are eject by opening or closing this tray See p 23 and p 24 Interface Ventilation Openings Power Connector Connect to the power cord Ventilation Openings USB Connector Connect the USB cable DIP Switches Set the SCSI ID See Step 4 Connecting the Scanner to your PC in the Easy Start Guide SCSI Connector Connect to a ...

Page 21: ...ter Memory 512 MB or more Hard disk 1 GB or more available space USB interface or SCSI board Monitor Resolution of 1024 768 XGA or better recommended USB interface complies with the following Hi Speed USB 2 0 USB Full Speed equal to USB 1 1 Use the following recommended SCSI cards with the scanner SCSI cards made by Adaptec for PCI bus AVA 2915LP AVA 2930LP SCSI card made by RATOC Systems for Card...

Page 22: ...ptec Web site if necessary If the CPU memory interface card and other specifications do not satisfy the installation requirements the scanning speed may be greatly reduced and transmission may take a long time Even if the computer satisfies the recommended specifications the scanning speed may vary depending on the scan settings The ISIS TWAIN Drivers provided with the scanner do not necessarily o...

Page 23: ... Canon document scanners Note The following shows how the DR 6030C setup disc is configured For instructions on how to install the software included on the setup disc see the Easy Start Guide Menu screen Typical Installation Read the manual Custom Installation All of the indicated software is installed Only the software selected in the checkboxes is installed The Easy Start Guide User s Guide and ...

Page 24: ...18 Before Using the Scanner ...

Page 25: ... the Bypass Mode 30 4 Scanning Documents 32 Using CapturePerfect 3 0 32 Starting CapturePerfect 3 0 with the Start Button 40 Before using Adobe Acrobat 9 0 45 5 Using Patchcode Sheets 47 About Patchcode Sheets 48 Patchcode Pattern Function 49 How to Use Patchcode Sheets 49 6 Clearing a Paper Jam 51 7 Other Functions 54 Double Feed Detection Function 54 Skew Detection Function 55 Long Document Mode...

Page 26: ...ckness and weight Scanning different types of paper at one time can cause the scanner to jam Scanning documents before the ink is dry can cause problems with the scanner Always make sure that the ink on a document is dry before scanning it Eject Direction 1 U Turn Path Straight Path Width 2 08 to 11 8 53 mm to 300 mm 2 08 to 11 8 53 mm to 300 mm Length 2 2 75 to 17 70 mm to 432 mm 2 75 to 17 70 mm...

Page 27: ...tion To scan such a document make a photocopy of the document and then scan the photocopy When you scan a batch of NCR documents make sure that they are not stuck together Note that glossy documents or business card sometimes cannot be scanned correctly or functions such as paper size detection and deskew do not function properly due to reflected light When scanning business cards make sure to sel...

Page 28: ...p the Document Feed Tray 1 Hold the middle of the document feed tray and slowly open it toward you CAUTION Do not place anything other than documents on the Document feed tray Doing so may damage the scanner reduce scanning quality or cause the feed tray to fall off and injure someone 2 Pull out the document feed tray extension when scanning large documents ...

Page 29: ...o do Note The U turn path is used to scan documents on paper of normal thickness Scanned documents are ejected to the document eject tray The straight path is used to scan documents on thin paper base paper and business cards that cannot be scanned through the U turn path Scanned documents are ejected to the back of the scanner Using the U Turn Path 1 If document eject tray 2 is open close it Note...

Page 30: ...t Path 1 Open document eject tray 2 Note When using the straight path the ejected documents are stacked in reverse order to how they were fed IMPORTANT Be sure there is enough space for documents that are ejected behind the scanner when using the straight path If there is not enough space for ejected documents the documents may be damaged or a paper jam may occur Open or close document eject tray ...

Page 31: ...could droop down over the edge of the document eject tray extension and become jammed in the scanner Avoid this problem by attaching the document eject guide 1 Open the document eject tray extention toward you 2 Attach the document eject guide in the order as shown 3 Press the document eject guide to attach it to document eject tray extention ...

Page 32: ... the Scanner 4 To remove the document eject guide lift the document eject tray extension a little and unhook the document eject guide 5 Reverse the procedure for attaching the document eject guide to remove it ...

Page 33: ...ause a paper jam or scanner malfunction Do not wear loose clothing or jewelry that may get caught in the scanner while you are using it This may result in personal injury Be extra careful of neckties and long hair If anything becomes caught in the scanner immediately disconnect the power cord to stop scanning Always smooth out any folds or curls in your documents before placing them into the feede...

Page 34: ... Be careful when placing a document in the scanner It is possible to cut your hand on the edge of a sheet of paper 3 Set the document guides so they are wider than the document to be scanned IMPORTANT When scanning small or short documents adjust the document guides 2 to the edges of the documents 4 Place the documents face up into the feed tray so that they touch the document stoppers ...

Page 35: ...curled document or a creased document can damage the document 6 Start scanning from the application IMPORTANT If the paper feed operation stops due to a system error or a paper jam while the scanner is scanning resolve the problem make sure that the scanned image of the last page that was fed has been stored and then resume the scanning operation Note that documents that are printed on thin paper ...

Page 36: ...The ISIS TWAIN driver settings change to the manual feed mode automatically when the feed selection lever is lowered See Feeding Option on p 83 2 Place the document into the document feed tray one sheet at a time and adjust the position of the document guides IMPORTANT When scanning small or short documents adjust the document guides 2 to the edges of the documents 3 Start scanning from the applic...

Page 37: ...you place several documents that are not fastened together on the feed tray at one time they will be fed together In particular very thin or curled documents will not be fed very well In this case lightly press on the leading edge of the documents as you feed them When doing this take care that your fingers do not go under the pickup roller After you finish scanning close the document feed tray an...

Page 38: ...application and change the scanning condition then try scanning again Using CapturePerfect 3 0 CapturePerfect 3 0 is an ISIS compatible application developed for Canon document scanners CapturePerfect 3 0 includes the following modes Select the desired scan mode from the scan menu to perform scanning Scan Batch to File Documents are scanned with the preset scanning conditions and the image file is...

Page 39: ... document in black and white simplex at 200 dpi resolution and save the file in the folder Pictures under the folder Libraries Scan to Presentation Mode This mode is handy when the scanner is used in environments such as conference halls where it can be connected to large displays or projectors CapturePerfect 3 0 is switched to full screen display the document is scanned and the scanned image is d...

Page 40: ...rePerfect 3 0 select the scanner and the procedure up to scanning with Scan Batch to File For details see the CapturePerfect 3 0 Operation Guide and CapturePerfect Help 1 Click the Windows Start button and then click All Programs Æ CapturePerfect 3 0 Æ CapturePerfect 3 0 CapturePerfect 3 0 Operation Guide ...

Page 41: ...hapter 2 CapturePerfect 3 0 starts up 2 Follow the procedure below to select the Canon DR 6030C document scanner as the scanner to be used 1 On the Scan menu click Select Scanner 2 Select CANON DR 6030C Æ click the OK button ...

Page 42: ... See Step 3 Installing the Software in the Easy Start Guide 3 Set the Default Page Size and click the OK button Note This dialog box is displayed only when you select CANON DR 6030C for the first time and you click the OK button or when you click Settings on the Select Scanner 3 On the Scan menu click Scanner Setting ...

Page 43: ...IS Driver basic setup dialog box opens 4 Set the scan settings For details setting the scanning settings see ISIS TWAIN Driver Properties Dialog Box on p 64 and ISIS TWAIN Driver Help 5 Place your document See Placing Documents on p 27 ...

Page 44: ...w to scan documents see the CapturePerfect 3 0 operation guide and CapturePerfect Help 7 Specify the file name and the file type for saving the image data and click Save to start scanning For details on the available settings in the Scan Batch to File Setting dialog box see the CapturePerfect 3 0 operation guide and CapturePerfect Help ...

Page 45: ...ontinue scanning to resume scanning Or click Stop Scanning to end scanning When Feeding Option is set to Automatic Feeding Place the next document Scanning resumes when the scanner detects the document Or press the stop button to end scanning When Feeding Option is set to Panel Feeding Place the next document and press the start button to resume scanning Or press the stop button to end scanning 9 ...

Page 46: ...unctions are enabled in the initial status immediately after setting up the DR 6030C Because of this the following dialog box appears if the event settings are not changed and the start button is pressed When this dialog box appears either select an application and start it or click the Cancel button and change the event settings Setting the Event Function Follow the procedure below to set an even...

Page 47: ... Vista Switch the Control Panel to Classic View or select Hardware and sound in the working field Windows 7 Click View by at the upper right of the Control Panel and then select Large icons or Small icons from the list or select Hardware and Sound in the category view Printers and Other Hardware Control Panel category view Control Panel classic view ...

Page 48: ...ws XP and Windows Vista click Scanners and Cameras 4 Select CANON DR 6030C or CANON DR 6030C SCSI and then click the right mouse button and select Properties For Windows XP and Windows Vista select CANON DR 6030C USB or CANON DR 6030C SCSI and then click Properties ...

Page 49: ...Using the Scanner 43 Chapter 2 CANON DR 6030C USB Properties or CANON DR 6030C SCSI Properties is displayed 5 Click the Events tab ...

Page 50: ...on to be started with the start button and uncheck the checkboxes for the other applications and then click OK For Windows XP Apply IMPORTANT Check Disable device events to not start applications from the start button 3 Click OK to close CANON DR 6030C USB Properties 4 Restart Windows to enable the new settings for the event function ...

Page 51: ...r s Native Interface the machine s own scanner settings screen while scanning If you use Adobe Acrobat 9 0 with this machine and scan using the Custom Scan method you should display the scanner s Native Interface for the following reasons If you make scans without showing the Native Interface it may not be possible to scan correctly at the specified Paper Size If you use Presets to scan without sh...

Page 52: ...alog box 4 When you click OK in the Custom Scan dialog box the scanner runs the Custom Scan and the Native Interface the machine s own scanner settings screen is displayed Note In the installer screen Portuguese Brasil and Portuguese are offered as options for Portuguese but only Portuguese Brasil can actually be used ...

Page 53: ... scanner recognizes a patchcode sheet during scanning the files are automatically separated at the patchcode sheet or at the image of the next document Note Access ISIS TWAIN Driver Help for information about using patchcode sheets The TWAIN driver does not support patchcode sheets Patchcode sheets can be used only when the ISIS compatible application supports separating files by patchcode pattern...

Page 54: ...tern Click on the Windows start button open All Programs Canon DR 6030C PATCH X XX Print the patchcode sheet to use it Note To open patchcode sheets you need CapturePerfect 3 0 which is provided with the scanner or an application associated with PDF format files Patchcode sheets must be printed in their original size The scanner may not recognize them as patchcode sheets if they are enlarged or re...

Page 55: ...kled If this happens the scanner will not be able to read them 2 Insert the patchcode sheet so it is in front of the document that is to be saved to a separate file before loading the documents on the scanner 3 In the ISIS driver set the batch separation setting to Patchcode and then scan the documents When the scanner recognizes this patchcode printed on a patchcode sheet it creates a separate fi...

Page 56: ...atchcode pattern the copy should be the same size and density as the pattern on the original Extremely dark or light copies may not be scanned correctly Adjust the patchcode so that it fits into the effective area for detecting patchcode patterns Effective area for detecting patchcode patterns 0 2 5 mm 0 2 5 mm Patchcode Patterns 0 2 5 mm 3 7 94 mm ...

Page 57: ...ent eject tray IMPORTANT If document ejection is stopped part way perform this operation with the document eject tray extention open Attempting to force the document eject tray extension closed can crease the document 3 Hold the Upper unit as shown in the diagram and open it to the point where you can remove the jammed document CAUTION The pickup roller is located in the middle of the upper unit D...

Page 58: ...ll the document out carefully without applying too much force Should the document tear be sure to remove any part remaining in the scanner 5 Close the upper unit slowly Be sure that the upper unit is completely closed by pushing on both edges with both hands until you hear a click IMPORTANT Do not force the upper unit to close Doing so may damage the scanner ...

Page 59: ...ontinue scanning If a paper jam happens when Rapid recover system is enabled in the ISIS TWAIN driver settings the image of the document is not saved and scanning stops This allows you to continue scanning from the document that caused the paper jam after the paper jam is fixed See Rapid Recovery System Check Box on p 81 ...

Page 60: ... detection method is effective when scanning a document on pages that are all the same size The length of the first page scanned is used as a standard against which the rest of the pages are compared If any page is 1 96 50 mm longer or shorter than the first page it is considered a double feed and scanning stops Detecting Double Feed with Ultrasonic Waves This detection method is effective when sc...

Page 61: ...Document mode change the scanner s settings to the Long Document mode in scanner properties Set the paper size in the ISIS TWAIN driver to Automatic Detection to allow the scanner to detect documents up to 118 1 3 000 mm long and to scan them See Page Size on p 68 IMPORTANT Note the following points when using the Long Document mode Documents may be scanned more slowly when the scanner is scanning...

Page 62: ...he procedure below to set the long document mode 1 Use the following procedure to open the CANON DR 6030C USB Properties or CANON DR 6030C SCSI Properties 1 Click the Start button and then click Control Panel 2 This operation depends on your operating system ...

Page 63: ... Vista Switch the Control Panel to Classic View or select Hardware and sound in the working field Windows 7 Click View by at the upper right of the Control Panel and then select Large icons or Small icons from the list or select Hardware and Sound in the category view Printers and Other Hardware Control Panel category view Control Panel classic view ...

Page 64: ...ws XP and Windows Vista click Scanners and Cameras 4 Select CANON DR 6030C or CANON DR 6030C SCSI and then click the right mouse button and select Properties For Windows XP and Windows Vista select CANON DR 6030C USB or CANON DR 6030C SCSI and then click Properties ...

Page 65: ...Using the Scanner 59 Chapter 2 CANON DR 6030C USB Properties or CANON DR 6030C SCSI Properties is displayed 2 Click the Maintenance tab ...

Page 66: ...hange the scanner s settings and close Scanners and Cameras Properties 5 Turn the scanner OFF and then ON again IMPORTANT If you are using a SCSI connection turn off the computer and then turn the scanner off and then on again Wait at least 10 seconds before tuming the scanner ON after it has been turned OFF ...

Page 67: ... if it is not used for a certain period of time This time period can be set to After 10 secs factory set default After 10 mins After 1 hour or After 4 hours You can change the Standby mode settings on the maintenance screen of CANON DR 6030C USB properties in the same way as the long document mode described previously ...

Page 68: ...nner supports the MultiStream function so the following settings are possible You can set the Primary or Secondary image and Front or Back for the Image Type mode Resolution or Drop Out Color You can change the File Type for the Primary image and the Secondary image However you cannot change Front or Back with File Type Note When using the MultiStream function with CapturePerfect 3 0 Skip blank pa...

Page 69: ...o the online help 1 ISIS TWAIN Driver Properties Dialog Box 64 Basic Tab Sheet 65 Brightness Tab Sheet 74 Image processing Tab Sheet 78 Others Tab Sheet 81 Addon Dialog Box 85 2 Practical Examples 92 Scanning Both Sides of Pages 92 Scanning Non Standard Size Documents 93 Adjusting the Scan Area 93 Scanning Multiple Documents 94 Image Adjustments for Scanning 96 Prescan 99 Preserving Your Settings ...

Page 70: ...Others tab sheet See p 81 See p 78 OK Button ISIS driver Applies settings and closes the dialog box Scan Button TWAIN driver To control scanning from the properties dialog box when using a TWAIN compatible application program the Scan button is displayed instead of the OK button to scan with the current settings Cancel Button Rejects changes to settings and closes the dialog box Default Button Ret...

Page 71: ...called directly and not from another settings dialog box The driver is called directly when using applications that do not have their own scanner setting or scanning dialog boxes such as CapturePerfect and Job Registration Tool ISIS driver TWAIN driver Basic Tab Sheet Extended Version ISIS driver only This Basic tab sheet is displayed when the DR 6030C ISIS Driver is called from a scanner setting ...

Page 72: ...ers with double byte characters Mode Select the mode for scanned images Some functionality is limited depending on the mode setting See Mode Dependent Function Limitations on p 68 The Text Enhancement modes are good for scanning documents with a background color or design behind text by removing or processing the surrounding background to enhance the text for easy reading Three text enhancement mo...

Page 73: ...ackground in tight spaces around text may not be removed Documents with low contrast text can be made more readable by adjusting Contrast on the Brightness tab sheet If the background is non uniform such a pattern the background remains visible in the image and text may be hard to read High Speed Text Enhancement This mode optimizes processing speed by performing background processing within the s...

Page 74: ...on p 55 When Auto detection is selected area settings in the Scan Area dialog box are disabled The Auto detection process may malfunction in the following situations If this occurs select a standard size such as A4 or Letter or click the Area button to create a custom page size See Scan Area Dialog Box on p 73 Tab sheet Scanning mode Basic Image processing Others Deskew Moire Reduction Edge enphas...

Page 75: ...n is 300 dpi or less the Moire Reduction setting is enabled to allow reduction of Moire patterns in scanned images When the selected resolution is 400 or 600 dpi the Image Quality setting is enabled Scanning Side Select which page side s to scan Simplex Scan only the front top side of documents loaded at the feeder inlet Duplex Scan both sides of documents Skip Blank Page As each document page is ...

Page 76: ... setting is selected in the Gamma Settings dialog box Note that in other cases depending on the document the slant of the image may not be corrected properly or part of the image may be omitted Moire Reduction When 300 dpi or lower resolution is selected you can enable Moire reduction if Moire patterns appear in scanned images None No Moire processing is performed High Speed Moire Reduction This m...

Page 77: ...ngs changed Scan Options TWAIN driver only Specify operation when scanning continuously with a TWAIN compatible application Standard image Eject a scanned page before scanning the next page Scan Ahead Scan pages continuously so scanning speed is faster than Standard image Scan Single Page The Scanning Side setting on the Basic tab sheet becomes Simplex and one page is scanned When High Quality Moi...

Page 78: ...ou want to force the scanner to recognize a heavily colored document as a black and white document If a color document is detected as a black and white document with the default settings select 24 bit Color When Auto Color Detection is selected Hi Speed Text Enhancement cannot be selected Mode in case of binary Select the scanning mode when a page is judged to be black and white High Speed Text En...

Page 79: ...e Scan Area dialog box is different for ISIS and TWAIN drivers Scan Area Dialog Box ISIS Driver Scan Area Dialog Box TWAIN Driver Page Size This setting is linked to the Page Size setting for selecting the size of document pages to scan Clicking the Custom button opens the Custom Page Size dialog box where non standard page sizes can be registered as custom page sizes Area window Area window ...

Page 80: ... include the edges of a document or reduce it to avoid black frames around scanned images If the edges of documents are missing from scanned images move the slider to the right to expand the scanning area To eliminate the black frame around scanned images reduce the scanning area by moving the slider to the left The measurement units for margins are determined by the Unit setting However changing ...

Page 81: ...g the slider to the right to increase the setting If images are too light drag the slider to the left to decrease the setting When the Auto check box is selected the slider selects a brightness level to be used for automatic adjustment Contrast Adjusts the contrast of images to be scanned Enable Back Side Brightness Check Box If the brightness of the front and back of the document pages is differe...

Page 82: ...back side Gamma Button This button opens the Gamma Settings dialog box where you can adjust the gamma curve Gamma Settings Dialog Box Use the Gamma Settings dialog box to adjust the gamma correction value Custom Check Box Select this check box to set custom gamma correction When Custom gamma setting is selected all settings on the Brightness tab sheet are made automatically ...

Page 83: ... Gamma Curve Graph with your mouse changes the gamma curve and color of the sample image to match that point You can also move the gamma curve by dragging it with the mouse Freehand The output value for a particular input value in the gamma table can be specified with the mouse Click any point in the Gamma Curve Graph to set that point as an output value Drag the mouse on the Gamma Curve Graph to ...

Page 84: ...gs as a gamma table file pxg Image processing Tab Sheet The Image processing tab sheet provides settings affecting processing of scanned images Some settings may be disabled depending on the mode settings on the Basic tab sheet Refer to Mode Dependent Function Limitations on p 68 for details ...

Page 85: ...malize orientation When Text Orientation Recognition is selected Image Rotation and area settings in the Scan Area dialog box are disabled Some application programs do not support Text Orientation Recognition Please disable Text Orientation Recognition if your application program behaves abnormally when it is enabled Erase Dot Check Box Select this to remove isolated black pixels 3 3 dots or small...

Page 86: ...move Background Setting dialog box Reverse Image Check Box TWAIN driver only Select this check box to reverse swap black and white when scanning documents as black and white binary images Color Drop Out These selections are enabled for scanning modes other than 24 bit Color so that you can select a primary color red green blue or gray to be ignored dropped out or enhanced The Setting buttons are e...

Page 87: ... be disabled depending on the mode settings on the Basic tab sheet Refer to Mode Dependent Function Limitations on p 68 for details ISIS driver TWAIN driver Reverse side Scanning occurs as follows depending on the scanning side settings When this check box is selected and the scanning side is set to Simplex only the back of each page is scanned When this check box is selected and the scanning side...

Page 88: ... setting is ignored if the application program requests a JPEG transfer Of course application program requests depend on the specifications of the particular program Double Feed Detection This function stops document transport when double feeding of document pages is detected and provides selection of the detection method to suit the documents to be scanned See Double Feed Detection Function on p ...

Page 89: ...osition Automatic Feeding This feeding method is good for scanning batches of same size documents scanning starts when the scanner detects loaded documents and stops when you press the Stop button When Automatic Feeding is selected the Setting button is enabled to allow setting the delay time from when a loaded document is detected until scanning starts See Scanning Multiple Documents on p 94 When...

Page 90: ...ages are as follows Prescan Check Box When this check box is selected the first document page is prescanned and displayed in the Prescan panel when scanning is first started Continue scanning after you confirm or adjust brightness and contrast of the scanned image in the Prescan window See Prescan on p 99 Barcodes Button This is enabled when the optional barcode module is installed click it to ope...

Page 91: ...he Addon dialog box opens when you click the Addon button on the Others tab This dialog box allows you to add text strings or bitmap images to scanned images Addon Dialog Box Here you can make settings for adding text or bitmaps onto scanned images ...

Page 92: ...erted into the text string Single counter abbreviation C Inserts one 9 digit counter Double counter abbreviation CC Inserts two 9 digit counters Single counter with number of characters abbreviation Cx A dialog box appears in which to specify the number of characters of the single counter The specified number of characters of the single counter will be inserted into scanned images Double counter w...

Page 93: ... abbreviation D Inserts a down arrow symbol Left arrow abbreviation L Inserts a left arrow symbol Right arrow abbreviation R Inserts a right arrow symbol Special text can only be entered for one type of counter If entered for two counter types the Preview panel displays an error message A maximum of 96 characters can be added but this maximum decreases as the Font size setting is increased When an...

Page 94: ...tmap Settings Enable Check Box Select this check box to enable application of bitmap images to scanned images When adding a bitmap image it is processed when scanning is started This can cause some delay before scanning actually begins depending on the size and settings of the bitmap image When adding a bitmap image a message is displayed until scanning begins File name Specify the file name of th...

Page 95: ...th the right mouse button Show preview button Click this button to activate the Preview panel Text Bitmap Settings Dialog Boxes These dialog boxes open when you click the respective More button for text or bitmap in the Addon dialog box Here you can make settings for text or bitmaps to be added onto scanned images Character String Settings for the Addon Dialog Box Bitmap Settings for the Addon Dia...

Page 96: ... the bitmap image to be applied The bitmap image will be rotated 90 clockwise and compressed to the specified width before it is applied An error message may appear depending on the size of the image file If this happens reduce the Print width First Counter This is the current setting for the single counter or for the first counter if double counters are selected Settings can be changed in the Fir...

Page 97: ...rs a counter increment New File ISIS driver only The counter increments when a batch separation occurs according to the Batch Separation settings on the Others tab sheet See Batch Separation ISIS driver only on p 83 Every Page Increments once per page None No counter increment occurs Reset Value Select the initial value when the counter is reset Reset Trigger Specifies the type of event that reset...

Page 98: ...or the Scanning Side setting on the Basic tab sheet Duplex scanning is performed and pages images detected as blank are not saved See Scanning Side on p 69 If blank pages are not skipped even when Skip blank page is selected Increase the Content density in the Blank Skip Setting dialog box If the Content density is set too low for documents with a light background they may not be detected as blank...

Page 99: ...o Long Document mode and select Auto detection as the Page Size in the Properties dialog box Document pages may be up to three meter long See Long Document Mode on p 55 and Page Size on p 68 To register a non standard page size A non standard page size not already registered as a page size selection can be saved as a custom page size by selecting the Custom button in the Scan Area dialog box See U...

Page 100: ...ocument page or to remove black frames from around images Adjust the scan area using the Margin slider in the Scan Area dialog box If the edges are missing from the image move the slider to the right to expand the scanning area Alternatively to eliminate the black frame around scanned images move the slider to the left to reduce the scanning area Scanning Multiple Documents To scan a document that...

Page 101: ...the Basic tab sheet to either Automatic Feeding or Panel Feeding and set Batch Separation to Auto Each batch of documents is saved with different file names See Batch Separation ISIS driver only on p 83 To scan a batch of documents one page at a time Set the Feeding Option to either Automatic Feeding or Panel Feeding and scan each page After scanning each page the scanner returns to the waiting st...

Page 102: ...ss cannot be adjusted See Brightness Tab Sheet on p 74 To reduce the moire that appears when scanning photos from magazines etc Select High Speed Moire Reduction or High Quality Moire Reduction from the moire reduction options on the Basic tab sheet However High Speed Moire Reduction is not available when the resolution setting is 300 dpi See Moire Reduction on p 70 To rotate scanned images Select...

Page 103: ...IN driver only Select Reverse Image on the Image processing tab sheet Black and white are reversed in scanned images See Reverse Image Check Box TWAIN driver only on p 80 To ignore a particular color when scanning Select a color to be ignored dropped out in Color drop out on the Image processing tab sheet and that color will be eliminated from scanned images See Color Drop Out on p 80 To enhance a...

Page 104: ...e background from scanned images Select Prevent Bleed Through Remove Background on the Image processing tab sheet Bleed through on thin paper and backgrounds are removed from scanned images See Prevent Bleed Through Remove Background Check Box on p 80 To remove black areas around images Select the Border Removal check box on the Image processing tab sheet The black areas around images are removed ...

Page 105: ...n panel can be magnified for confirmation with the mouse over the preview image left click to magnify and right click to reduce Brightness and contrast adjustments are reflected in the prescan panel image After confirming the image click the Start button to resume scanning with the adjusted settings Click the Stop button to stop scanning Preserving Your Settings To preserve your settings for futur...

Page 106: ...100 Software Setup ...

Page 107: ...ards 106 2 Removing and Attaching the Rollers 108 Roller Replacement Cycle 108 Resetting the Counter 109 Removing and Attaching the Pickup Roller 113 Removing and Attaching the Feed Roller 116 Removing and Attaching the Retard Roller 119 3 Troubleshooting 123 4 Uninstalling Software 131 5 Specifications 134 Specifications 134 Options 136 Replacement parts 136 External Dimensions 137 ...

Page 108: ...wet which will cause a malfunction Never use paint thinner alcohol or other organic solvents to clean the scanner Such solvents can damage or discolor the exterior of the scanner They also create a risk of fire or electrical shock Cleaning the Scanner To clean the exterior of the scanner dampen a cloth with water or a mild detergent wring the cloth out thoroughly and then wipe the dirt away Then u...

Page 109: ...knob from both sides raise the upper unit CAUTION The pickup roller is located in the middle of the upper unit Do not hold the protrusion on the upper unit when you open it Doing so may deform the pickup roller or cause a feeding error Note The location of the sensor glass and various rollers are shown below 2 Use a blower to keep the interior of the scanner free of dust and paper particles Roller...

Page 110: ...th moistened with water IMPORTANT Do not use detergent to clean the rollers since any detergent on the rollers could cause a feeding error If you cannot freely rotate the rollers do not force them to rotate Just clean the part that you can see Forcing the rollers to rotate may cause a feeding error Be careful not to bend the guide boards that are against the rollers on the upper unit 5 Remove the ...

Page 111: ...rs could cause a feeding error 7 Attach the rollers that werw removed See Attaching the Pickup Roller on p 115 See Attaching the Feed Roller on p 118 See Attaching the Retard Roller on p 121 8 Be sure that the upper unit is completely closed by pushing on both edges with both hands until you hear a click IMPORTANT Do not force the upper unit to close Doing so may damage the scanner ...

Page 112: ...iddle of the upper unit Do not hold the protrusion on the upper unit when you open it Doing so may deform the pickup roller or cause a feeding error IMPORTANT Be sure to open the upper unit until it stops If it is not opened all the way the shading boards cannot come out 3 Press the start button for about two seconds The shading boards come out above the platen rollers upper and lower 4 Wipe the o...

Page 113: ...he shading board goes back in 6 Close the upper unit slowly Be sure that the upper unit is completely closed by pushing on both edges with both hands until you hear a click IMPORTANT Do not force the upper unit to close Doing so may damage the scanner ...

Page 114: ...anner when the power is ON Do not use excessive force when removing or attaching the rollers Doing so may damage them Roller Replacement Cycle When the rollers being used have fed more than 250 000 pages a roller replacement message is displayed on the computer Buy a roller replacement kit and change the pickup roller feed rollers and the retard roller IMPORTANT If misfeeds happen often check the ...

Page 115: ...rs open the Counter setup dialog box and reset the counter 1 Follow the procedure below to open the CANON DR 6030C USB Properties or CANON DR 6030C SCSI Properties dialog box 1 Click the Start button and then click Control Panel 2 This operation depends on your operating system ...

Page 116: ...witch the Control Panel to Classic View or select Hardware and sound in the working field Windows 7 Click View by at the upper right of the Control Panel and then select Large icons or Small icons from the list or select Hardware and Sound in the category view Printers and Other Hardware Control Panel category view Control Panel classic view ...

Page 117: ...dows XP and Windows Vista click Scanners and Cameras 4 Select CANON DR 6030C or CANON DR 6030C SCSI and then click the right mouse button and select Properties For Windows XP and Windows Vista select CANON DR 6030C USB or CANON DR 6030C SCSI and then click Properties ...

Page 118: ...112 Appendices CANON DR 6030C USB Properties or CANON DR 6030C SCSI Properties is displayed 2 Click the Maintenance tab ...

Page 119: ...hen cleaning or replacing the pickup roller feed rollers or retard roller use the appropriate procedure to remove and replace the rollers CAUTION Turn ON the power to the scanner to remove or attach the pickup roller Be careful when working on the scanner when the power is ON Do not use excessive force when removing or attaching the rollers Doing so may damage them ...

Page 120: ... upper unit as shown in the diagram and open it slowly until it stops CAUTION The pickup roller is located in the middle of the upper unit Do not hold the protrusion on the upper unit when you open it Doing so may deform the pickup roller or cause a feeding error 3 Push up on the pickup roller to open the hook and then remove the pickup roller When the power is ON When the power is OFF ...

Page 121: ...ides of its shaft and place it on the hooks IMPORTANT Take note of the orientation of the pickup roller Putting it in backward and forcing it may damage the scanner 2 Place the shaft of the pickup roller on the hooks and then press it into place 3 Make sure that the shaft of the pickup roller is correctly inserted ...

Page 122: ... procedure below to remove and attach the feed roller unit for cleaning or replacement CAUTION Do not use excessive force when removing or attaching the rollers Doing so may damage them Removing the Feed Roller 1 Hold the upper unit as shown in the diagram and open it slowly until it stops CAUTION The pickup roller is located in the middle of the upper unit Do not hold the protrusion on the upper ...

Page 123: ...Appendices 117 Chapter 4 2 Remove the roller cover 3 Move the roller lock lever down and forward and then slide it to the right 4 Shift the feed roller to the right to remove it ...

Page 124: ...osition the feed roller so the notch in the roller is facing the scanner s shaft 2 Slide the roller lock lever to the left and insert it into the feed roller hole 3 Lift up the roller lock lever and lock the feed roller 4 Attach the roller cover ...

Page 125: ...Follow the procedure below to remove and attach the retard roller for cleaning or replacement CAUTION Do not use excessive force when removing or attaching the rollers Doing so may damage them Removing the Retard Roller 1 Hold the upper unit as shown in the diagram and open it slowly until it stops CAUTION The pickup roller is located in the middle of the upper unit Do not hold the protrusion on t...

Page 126: ...120 Appendices 2 Remove the roller cover 3 Move the roller lock lever upward and then slide it to the right 4 Shift the retard roller to the right to remove it ...

Page 127: ...ition the retard roller so the notch in the roller is facing the scanner s shaft 2 Slide the roller lock lever to the left and insert it into the retard roller hole 3 Push the roller lock lever towards the back of the scanner to lock the retard roller in place ...

Page 128: ...ver in order of Æ 5 Close the upper unit slowly Be sure that the upper unit is completely closed by pushing on both edges with both hands until you hear a click IMPORTANT Do not force the upper unit to close Doing so may damage the scanner ...

Page 129: ...The Scanner Does Not Turn ON Check the following if the scanner does not turn on Is the power cord connected correctly Is the power cord inserted into the power outlet For details on connecting the power cord see Step 4 Connecting the Scanner to Your PC in the Easy Start Guide The Scanner Is Not Recognized Connecting via USB The following are possible causes of the PC failing to recognize the scan...

Page 130: ...the computer are correctly connected See Step 4 Connecting the Scanner to Your PC in the Easy Start Guide Problem The SCSI card is not correctly installed in the PC Solution Refer to the manual for the SCSI card and the computer and install the SCSI card to the computer correctly Alternatively check the following things depending on your operating system Windows XP Click Start Control Panel System...

Page 131: ...See Step 4 Connecting the Scanner to Your PC in the Easy Start Guide Problem There is a problem with another SCSI device that is connected in the daisy chain Solution Do not use the daisy chain connection configuration See Step 4 Connecting the Scanner to Your PC in the Easy Start Guide Problem The PC was turned ON before the scanner Solution Shut down both the PC and the scanner and then turn the...

Page 132: ... make sure that the last document scanned was scanned correctly Slow Scanning Speed Connecting via USB The following problems might cause the scanning speed to be slow Problem Other applications are running in the background on your PC Solution Quit all other applications that are running Problem Resident applications such as anti virus software are draining memory resources Solution Quit all resi...

Page 133: ...roblem Attempting to scan a document of a size thickness or weight that the scanner cannot scan Solution Check the size thickness and weight of the document For precautions concerning documents see Documents on p 20 Problem The rollers inside the scanner are dirty or worn Solution Refer to p 103 and clean the rollers If the rollers are worn then they need to be replaced Contact your local authoriz...

Page 134: ... page TIFF files Solution Open the file with an application that supports multi page TIFF files Symptoms A TIFF file saved in CapturePerfect 3 0 cannot be opened by other applications Problem If the TIFF file saved in CapturePerfect 3 0 has been compressed the application you are using to open the TIFF file does not support the compression type that was used to save the file in CapturePerfect 3 0 ...

Page 135: ...ms Text or images on the rear side of your document appear in the scanned image Problem The Brightness setting is too low or the paper is too thin Solution Set a higher Brightness setting If the paper is too thin make a copy of the documents and then scan the copy See Brightness on p 72 Symptoms Double sided scanning is not possible Problem Scanning Side is set to Simplex Solution Set Scanning Sid...

Page 136: ...n off functions such as Auto detection Deskew or Border Removal when scanning documents containing text or photos up to their edges Symptoms The scanned image is abnormal in some applications Problem A function not supported by the application was used Solution Some applications do not support functions such as auto detection of the paper size Scanning documents with an application such as this wi...

Page 137: ...from the DR 6030C setup disc See Step 3 Installing the Software in the Easy Start Guide IMPORTANT Be sure to log on as an administrator when using Windows XP or Windows Vista 1 Click the Start button Æ click Control Panel The Control Panel window appears 2 Click Uninstall a program Note If you are using Windows XP double click the Add or Remove Programs For Windows Vista click Uninstall a program ...

Page 138: ...m window appears Note For Windows XP the Add or Remove Programs dialog box appears 3 From the list in the dialog box select the application you want to delete Canon DR 6030C Driver or CapturePerfect 3 0 and then click Uninstall For Windows XP Remove ...

Page 139: ...Appendices 133 Chapter 4 4 The file delete confirmation screen appears Click the Yes button Uninstallation starts 5 After uninstallation is complete click the Finish button to exit the uninstaller ...

Page 140: ...to 0 66 mm Business cards are supported However scanning embossed cards is not guaranteed Size Thickness 2 12 3 37 53 9 mm 85 5 mm 0 03 0 003 0 76 0 08 mm Document Feeding Method Automatic Manual Scanning Method Contact image sensor Light Source LED Scanning Side Simplex Duplex Scanning Modes Auto Color Detection Black and white Advanced text enhancement Advanced Text Enhancement II Highspeed text...

Page 141: ...ages minute 120 pages minute 80 pages minute 23 pages minute Amount of paper that can be stacked in automatic feeder 10 mm stack maximum 100 sheets of 20 lb bond 80 g m2 Interface SCSI III Hi Speed USB 2 0 Other Functions Double feed detection skew detection Dimensions with trays closed 15 6 12 3 7 5 W D H 398 4 mm 312 mm 191 4 mm W D H Dimensions with trays open 15 6 26 3 7 6 W D H 398 4 mm 668 m...

Page 142: ...our local authorized Canon dealer or service representative for detailed information about the options and replacement parts Bar code module product code 0434B003 Additional software to allow the ISIS TWAIN driver to recognize bar codes Exchange roller kit product code 1922B001 Kit to replace the feed rollers pickup roller feed roller and retard roller ...

Page 143: ... 3 668 mm Document Feed Tray Extension is open 15 6 398 4 mm 7 6 194 mm 21 3 541 mm Document Feed Tray is open 7 4 188 mm 12 3 312 mm 7 5 191 4 mm 17 3 440 mm Document Eject Guide is open 3 7 95 mm Document Eject Tray 2 is open 6 9 176 mm 3 2 82 mm ...

Page 144: ...imit Mark 29 Long Document Mode 55 Settings 56 M Moving the Scanner 7 Multistream Function 62 N Names and Functions of Parts 13 O Operating Systems 15 P Paper Jam 51 Patchcode Sheets 47 Placing Documents 27 Bypass Mode 30 Page Separation Mode 27 Power 7 Practical Examples 92 R Regular Maintenance 102 Feed Path 102 Rollers 103 Scanner 102 Sensor Glass 103 Shading Boards 103 Roller Replacement Feed ...

Page 145: ...NADA CANON EUROPA N V BOVENKERKERWEG 59 61 P O BOX 2262 1180 EG AMSTELVEEN THE NETHERLANDS CANON LATIN AMERICA INC 703 WATERFORD WAY SUITE 400 MIAMI FLORIDA 33126 U S A CANON AUSTRALIA PTY LTD 1 THOMAS HOLT DRIVE NORTH RYDE SYDNEY N S W 2113 AUSTRALIA CANON SINGAPORE PTE LTD 1 HARBOUR FRONT AVENUE 04 01 KEPPEL BAY TOWER SINGAPORE 098632 CANON HONGKONG COMPANY LTD 19TH FLOOR THE METROPOLIS TOWER 10...

Reviews: