Fax
6-12
Introduction to Using Fax Functions
4
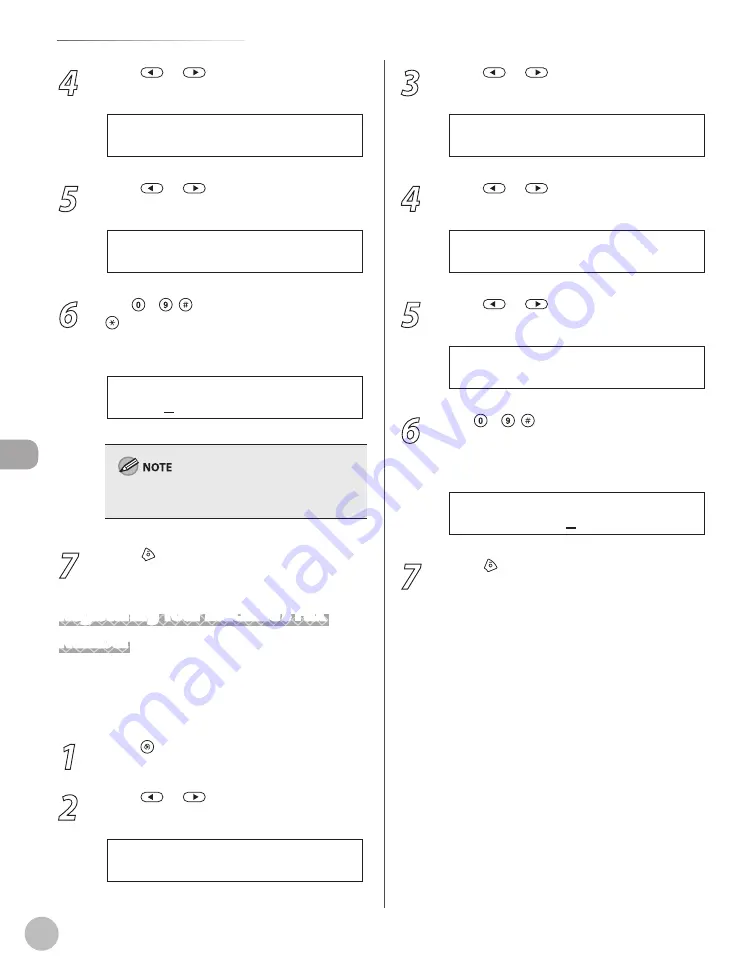
Press
or
to select <TX SETTINGS>,
then press [OK].
1 . T X S E T T I N G S
T X / R X C O M M O N S E T .
5
Press
or
to select <UNIT NAME>,
then press [OK].
1 . U N I T N A M E
T X S E T T I N G S
6
Use – , [numeric keys] and
[Tone] to enter the unit name (up to 24
characters), then press [OK].
C A N O N
U N I T N A M E : a
Ex.
(For information on how to enter characters, see
“Entering Characters,” on p. 1-15.)
7
Press [Stop/Reset] to return to the
standby mode.
Registering Your Machine’s Fax
Number
Your machine’s fax number must be registered.
When you send a document, the number that you
registered is printed on the recipient’s paper.
1
Press [Menu].
2
Press
or
to select <TX/RX
SETTINGS>, then press [OK].
4 . T X / R X S E T T I N G S
M E N U
3
Press
or
to select <FAX
SETTINGS>, then press [OK].
3 . F A X S E T T I N G S
T X / R X S E T T I N G S
4
Press
or
to select <USER
SETTINGS>, then press [OK].
2 . U S E R S E T T I N G S
F A X S E T T I N G S
5
Press
or
to select <UNIT
TELEPHONE #>, then press [OK].
1 . U N I T T E L E P H O N E #
U S E R S E T T I N G S
6
Use – , [numeric keys] to enter
your fax/telephone number (up to 20
digits, including spaces), then press [OK].
1 2 X X X X X X X
U N I T T E L E P H O N E #
Ex.
7
Press [Stop/Reset] to return to the
standby mode.
Summary of Contents for imageCLASS MF5850dn
Page 34: ...Before Using the Machine 1 9 Operation Panel Send Operation Panel MF5880dn MF5850dn ...
Page 68: ...Copying 3 3 Overview of Copy Functions p 3 17 p 3 25 p 3 22 ...
Page 99: ...Copying 3 34 ...
Page 102: ...Printing 4 3 Overview of the Print Functions p 4 9 ...
Page 134: ...Fax 6 3 Overview of Fax Functions p 6 19 p 6 59 p 6 55 ...
Page 198: ...E Mail MF5880dn only 7 3 Overview of E Mail Functions ...
Page 203: ...E Mail MF5880dn only 7 8 ...
Page 206: ...Scanning 8 3 Overview of the Scanner Functions ...
Page 217: ...Scanning 8 14 ...


