0FR4-00L
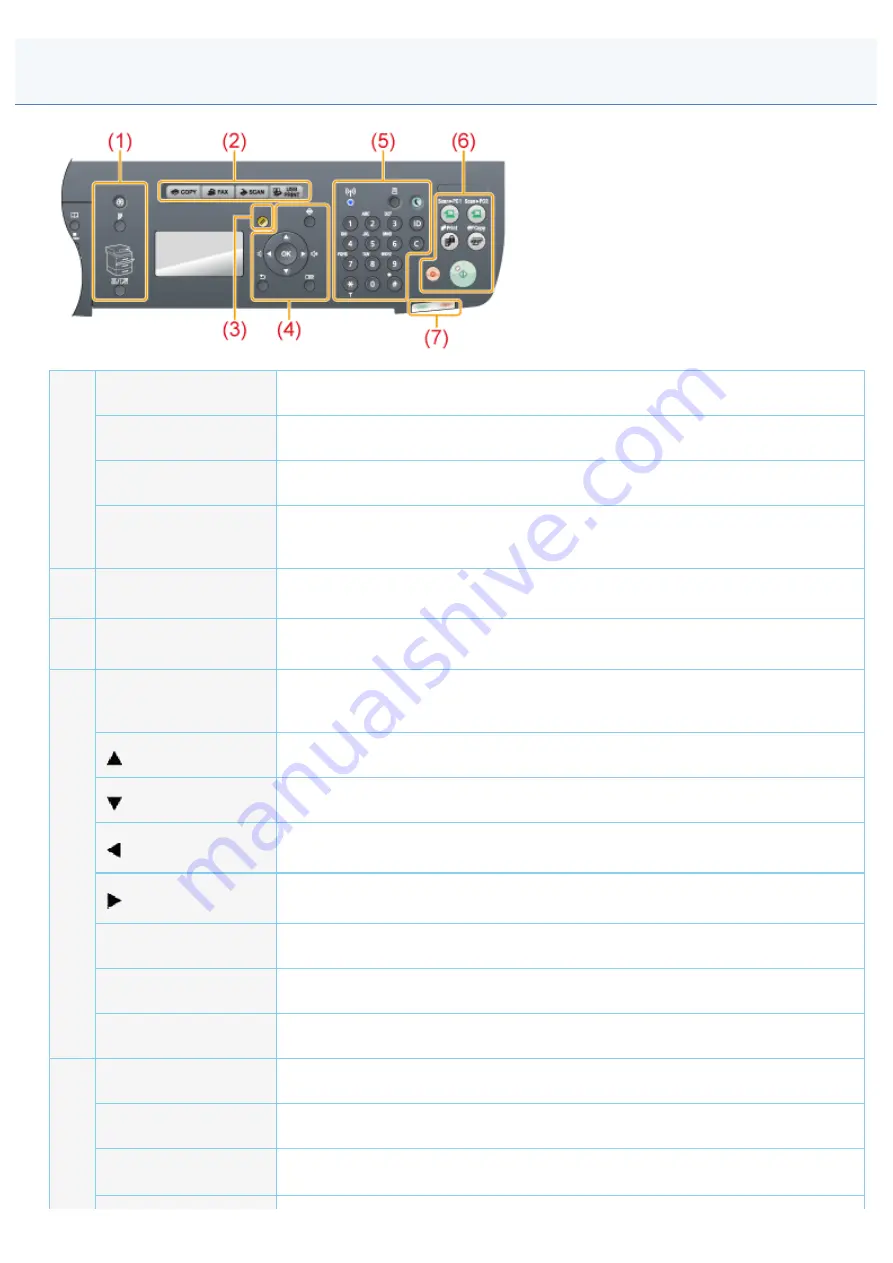
(1)
[Menu] key
Press to specify or register various settings.
[2-Sided] key
You can set 2-sided printing.
[Select Paper] indicator
Selected paper source turns on.
[Select Paper/Settings]
key
Press to specify the paper size and type to load in the paper drawer or multi-purpose
tray.
(2)
Mode switch keys
Press to switch the mode to copy, fax, scan or USB direct print.
(3)
[Reset] key
Resets the settings. (Resets the copy/scan/fax/USB direct print mode.)
(4)
[Status Monitor/Cancel]
key
Press to check the status of jobs or cancel jobs. You can also check the status of the
network and machine.
[
] Key
Press to scroll up or to increase the value.
[
] Key
Press to scroll down or to decrease the value.
[
] Key
Press to return to the previous screen or move the cursor to the left.
Press to decrease the volume while the fax ring tone sounds.
[
] Key
Press to proceed to the next screen or move the cursor to the right.
Press to increase the volume while the fax ring tone sounds.
[OK] Key
Press to confirm an action or setting.
[Back] key
Press to return to the previous screen.
[View Settings] key
You can check the settings.
[Wi-Fi] indicator*
Turns on when the machine is connected to Wireless LAN.
Numeric keys ([0]-[9])
Enter characters and numbers.
[*] key
Press to switch the character entry mode, and press to switch between pulse and
tone dialing to send a fax.
Operation Panel
㻟㻥㻌㻛㻌㻥㻢㻠
Summary of Contents for i-SENSYS MF6180dw
Page 1: ......
Page 46: ...NOTE If you press Menu before you press OK The changes made to the settings are not saved...
Page 49: ...The entry is complete...
Page 57: ......
Page 64: ......
Page 75: ...8 Make sure that the destination you registered is displayed in Members List and click OK...
Page 106: ...6 Press Select Paper Settings to close the Select Paper screen...
Page 118: ...5 Press Menu to close the menu screen...
Page 121: ...5 Press Menu to close the menu screen...
Page 124: ...5 Press Menu to close the menu screen...
Page 129: ...6 Press Menu to close the menu screen...
Page 135: ...6 Press Menu to close the menu screen...
Page 137: ...6 Press Menu to close the menu screen...
Page 147: ...5 Press Menu to close the menu screen...
Page 149: ...Press Menu to close the Menu screen...
Page 151: ...5 Press Menu to close the menu screen...
Page 153: ...5 Press Menu to close the menu screen...
Page 170: ...5 Select Yes using and press OK Printing starts 6 Press Report to close Print Report screen...
Page 176: ...5 Select Yes and press OK Printing begins 6 Press Report to close the Print Reports screen...
Page 178: ...5 Select Yes using and press OK Printing starts 6 Press Report to close Print Report screen...
Page 183: ...0FR4 03J Note that specifications are subject to change without notice Specifications...
Page 194: ...0FR4 041 Supported Document Types Scan Area Document Type...
Page 197: ...0FR4 044 Supported Paper Types Printable Area Paper...
Page 210: ...Check the details 7 Press Status Monitor Cancel to close the screen...
Page 229: ...0FR4 04Y 2 on 1 4 on 1 Copying an ID Card Copying Multiple Documents onto One Sheet N on 1...
Page 242: ...6 Select the size of the original document using or and press OK 7 Press Start...
Page 244: ...5 Press Start...
Page 249: ...Select Yes using and press OK...
Page 277: ...6 Press Start to receive fax es...
Page 315: ...5 Select Apply using or and press OK The changes are saved...
Page 333: ...6 Press Status Monitor Cancel to close the screen...
Page 366: ...To print documents using AirPrint...
Page 372: ...9 Click Finish 10 Click Close 11 Click Apply...
Page 378: ...Printing begins...
Page 388: ...Check the details 7 Press Status Monitor Cancel to close the screen...
Page 390: ...Press Menu to close the menu screen The setup is complete...
Page 395: ...5 Remove the USB memory media 6 Press Status Monitor Cancel to close the screen...
Page 484: ...9 Select Start Sending with or and then press OK The E mail is sent...
Page 502: ...6 Select Apply using or and press OK 7 Press Menu to close the menu screen...
Page 509: ...The scanned file is sent...
Page 523: ...Checking the MAC address of the machine See Checking the MAC Address...
Page 558: ...4 Click Edit in IPv6 Settings 5 Select the IPv6 check box...
Page 565: ...Check the information 6 Press Status Monitor Cancel to close the screen...
Page 577: ...6 Click OK 7 Click Close...
Page 581: ...2 Click Start Software Programs 3 Click Start for Send Function Setting Tool 4 Click Next...
Page 587: ......
Page 589: ...4 Click Edit 5 Specify the required settings as needed and click OK...
Page 594: ...3 Click Store to Shared Folder Settings 4 Register the file server that you use...
Page 596: ...6 Make sure the settings and click Register...
Page 604: ...4 Click Edit in IPv4 Settings 5 Specify DNS settings...
Page 607: ...8 Click OK...
Page 609: ...4 Click Edit in IPv6 Settings 5 Specify DNS settings...
Page 614: ...4 Click Edit in WINS Configuration 5 Specify the WINS settings...
Page 617: ...4 Click Edit in SMB Settings 5 Set NetBIOS Name and Workgroup Name...
Page 624: ...Select MTU Size using or and then press OK 6 Press Menu to close the menu screen...
Page 628: ......
Page 639: ...Press Menu to close the menu screen...
Page 643: ...5 Press Menu to close the menu screen...
Page 661: ...2 Click OK...
Page 664: ...4 Click Generate Key 5 Specify the keys...
Page 668: ...4 Click Register Key and Certificate or Register CA Certificate 5 Click Install...
Page 669: ...6 Click Browse and then specify a file to install 7 Click Start Installation...
Page 673: ......
Page 675: ...4 Click Register Key and Certificate 5 Click Register...
Page 676: ...6 Enter a key name and a password 7 Click OK...
Page 678: ...3 Click Security Settings CA Certificate Settings 4 Click Register CA Certificate 5...
Page 679: ...Click Register...
Page 690: ...4 Click Edit 5 Select the Use IEEE802 1X check box...
Page 691: ...6 Enter a login name 7 Select the Use TLS check box...
Page 695: ...4 Click Edit 5 Select the Use IEEE802 1X check box...
Page 696: ...6 Enter a login name 7 Select either the Use TTLS or the Use PEAP check box...
Page 708: ...3 Select OK enter a user name and PIN and then click OK 4 Click OK 5 Click OK or Print...
Page 734: ...4 Click Edit 5 Specify SNMPv3...
Page 832: ...13 Close the feeder or the platen glass cover gently 14 Place documents in the feeder...
Page 834: ...The machine is ready to print...
Page 861: ...0FR4 0L4 Sending Problems Receiving Problems Fax Problems...
Page 884: ...0FR4 0LR Wired LAN Troubles Wireless LAN Troubles MF6180dw Only Network Problems...
Page 911: ...4 Close the feeder 5 Connect the power cord and turn ON the power switch...
Page 943: ...0FR4 0S6 Basic Windows Operations For Macintosh Users Appendix...
Page 959: ...15 Office Locations Display the contact information for inquiries...
Page 965: ......
Page 1004: ...8 Close the dialog box...
Page 1013: ...The icon is added to the printer folder...
Page 1018: ......
Page 1020: ......