0FR4-04U
See "
Attention (Combination of Copy Settings)
" before you start copying.
You can make 2-sided copies from 2-sided documents.
IMPORTANT
Precautions on 2-Sided Copying
Do not touch your document when making 2-sided copying until the process is complete. After copying on the front
side is complete, the document is partially output, reserved, and fed into the machine again for copying on the back
side.
Be sure to close the sub-output tray before making 2-sided copying.
Copying on the back side of a printed document (Manual 2-sided copying)
Two-sided copying can be performed manually using a printed document. Place a printed document in the multi-purpose
tray to copy on the back side
*
.
To copy on the back side of a printed document, smooth out the curling edges of the sheets and place them one by one
in the multi-purpose tray.
*
This feature is supported only for sheets printed from this machine. You cannot make a copy on the printed side.
1
According to the paper size for 2-sided copying, ensure to set the paper size switch lever accurately.
If not securely attached, documents may not be fed properly, or may result in paper jams.
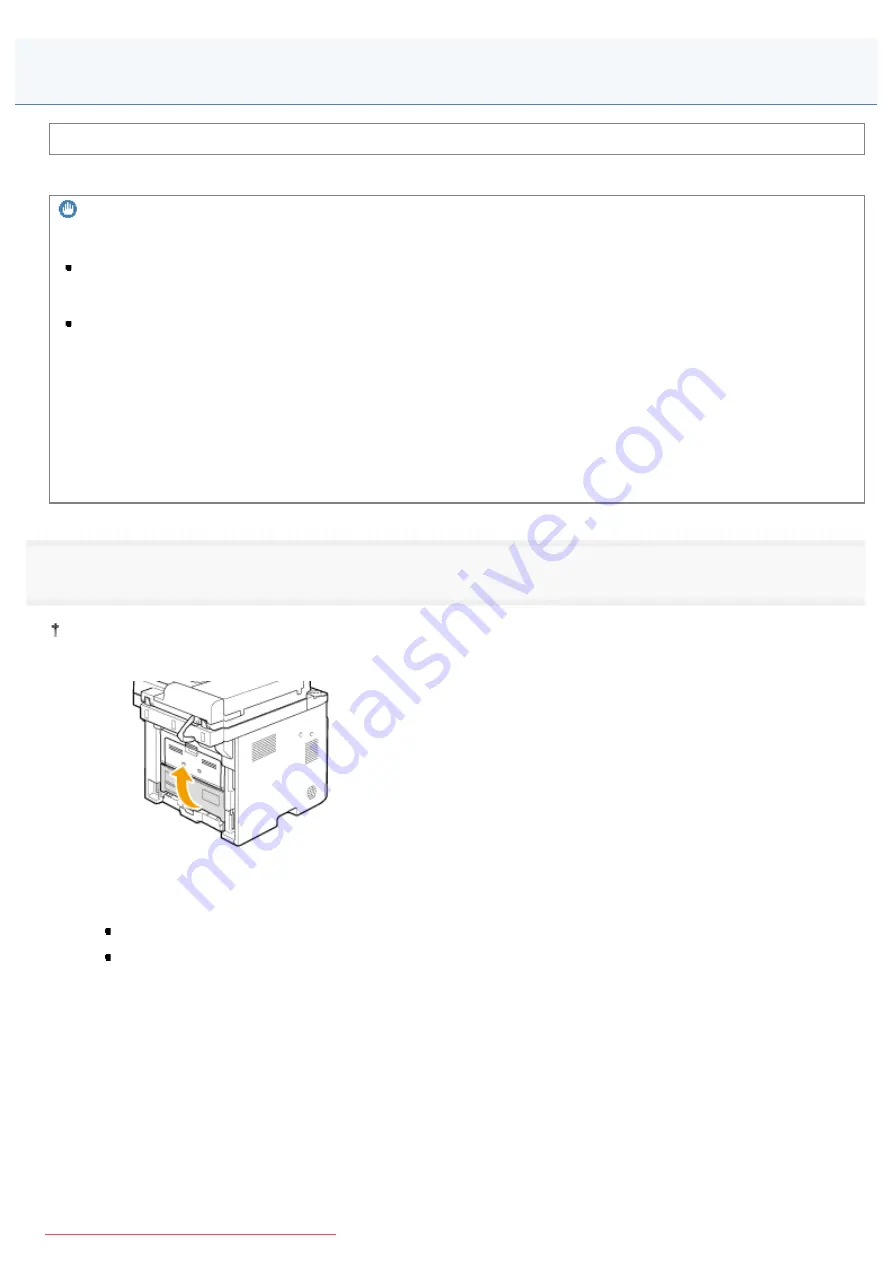
1. Open the lower rear cover.
2. Securely place the blue color paper size switch lever (A).
A4:
Pull
Letter, Legal:
Push
Copying 2-Sided Document to 2 Sides
㻞㻞㻞㻌㻛㻌㻥㻢㻠
Summary of Contents for i-SENSYS MF6140dn
Page 1: ...㻝㻌㻛㻌㻥㻢㻠 Downloaded from ManualsPrinter com Manuals ...
Page 49: ...The entry is complete 㻠㻥㻌㻛㻌㻥㻢㻠 Downloaded from ManualsPrinter com Manuals ...
Page 57: ...㻡㻣㻌㻛㻌㻥㻢㻠 Downloaded from ManualsPrinter com Manuals ...
Page 64: ...㻢㻠㻌㻛㻌㻥㻢㻠 Downloaded from ManualsPrinter com Manuals ...
Page 118: ...5 Press Menu to close the menu screen 㻝㻝㻤㻌㻛㻌㻥㻢㻠 Downloaded from ManualsPrinter com Manuals ...
Page 121: ...5 Press Menu to close the menu screen 㻝㻞㻝㻌㻛㻌㻥㻢㻠 Downloaded from ManualsPrinter com Manuals ...
Page 124: ...5 Press Menu to close the menu screen 㻝㻞㻠㻌㻛㻌㻥㻢㻠 Downloaded from ManualsPrinter com Manuals ...
Page 129: ...6 Press Menu to close the menu screen 㻝㻞㻥㻌㻛㻌㻥㻢㻠 Downloaded from ManualsPrinter com Manuals ...
Page 135: ...6 Press Menu to close the menu screen 㻝㻟㻡㻌㻛㻌㻥㻢㻠 Downloaded from ManualsPrinter com Manuals ...
Page 137: ...6 Press Menu to close the menu screen 㻝㻟㻣㻌㻛㻌㻥㻢㻠 Downloaded from ManualsPrinter com Manuals ...
Page 147: ...5 Press Menu to close the menu screen 㻝㻠㻣㻌㻛㻌㻥㻢㻠 Downloaded from ManualsPrinter com Manuals ...
Page 149: ...Press Menu to close the Menu screen 㻝㻠㻥㻌㻛㻌㻥㻢㻠 Downloaded from ManualsPrinter com Manuals ...
Page 151: ...5 Press Menu to close the menu screen 㻝㻡㻝㻌㻛㻌㻥㻢㻠 Downloaded from ManualsPrinter com Manuals ...
Page 153: ...5 Press Menu to close the menu screen 㻝㻡㻟㻌㻛㻌㻥㻢㻠 Downloaded from ManualsPrinter com Manuals ...
Page 244: ...5 Press Start 㻞㻠㻠㻌㻛㻌㻥㻢㻠 Downloaded from ManualsPrinter com Manuals ...
Page 249: ...Select Yes using and press OK 㻞㻠㻥㻌㻛㻌㻥㻢㻠 Downloaded from ManualsPrinter com Manuals ...
Page 277: ...6 Press Start to receive fax es 㻞㻣㻣㻌㻛㻌㻥㻢㻠 Downloaded from ManualsPrinter com Manuals ...
Page 366: ...To print documents using AirPrint 㻟㻢㻢㻌㻛㻌㻥㻢㻠 Downloaded from ManualsPrinter com Manuals ...
Page 378: ...Printing begins 㻟㻣㻤㻌㻛㻌㻥㻢㻠 Downloaded from ManualsPrinter com Manuals ...
Page 509: ...The scanned file is sent 㻡㻜㻥㻌㻛㻌㻥㻢㻠 Downloaded from ManualsPrinter com Manuals ...
Page 577: ...6 Click OK 7 Click Close 㻡㻣㻣㻌㻛㻌㻥㻢㻠 Downloaded from ManualsPrinter com Manuals ...
Page 587: ...㻡㻤㻣㻌㻛㻌㻥㻢㻠 Downloaded from ManualsPrinter com Manuals ...
Page 607: ...8 Click OK 㻢㻜㻣㻌㻛㻌㻥㻢㻠 Downloaded from ManualsPrinter com Manuals ...
Page 628: ...㻢㻞㻤㻌㻛㻌㻥㻢㻠 Downloaded from ManualsPrinter com Manuals ...
Page 639: ...Press Menu to close the menu screen 㻢㻟㻥㻌㻛㻌㻥㻢㻠 Downloaded from ManualsPrinter com Manuals ...
Page 643: ...5 Press Menu to close the menu screen 㻢㻠㻟㻌㻛㻌㻥㻢㻠 Downloaded from ManualsPrinter com Manuals ...
Page 661: ... 2 Click OK 㻢㻢㻝㻌㻛㻌㻥㻢㻠 Downloaded from ManualsPrinter com Manuals ...
Page 664: ...4 Click Generate Key 5 Specify the keys 㻢㻢㻠㻌㻛㻌㻥㻢㻠 Downloaded from ManualsPrinter com Manuals ...
Page 673: ...㻢㻣㻟㻌㻛㻌㻥㻢㻠 Downloaded from ManualsPrinter com Manuals ...
Page 679: ...Click Register 㻢㻣㻥㻌㻛㻌㻥㻢㻠 Downloaded from ManualsPrinter com Manuals ...
Page 734: ...4 Click Edit 5 Specify SNMPv3 㻣㻟㻠㻌㻛㻌㻥㻢㻠 Downloaded from ManualsPrinter com Manuals ...
Page 834: ...The machine is ready to print 㻤㻟㻠㻌㻛㻌㻥㻢㻠 Downloaded from ManualsPrinter com Manuals ...
Page 965: ...㻝㻌㻛㻌㻣㻢 Downloaded from ManualsPrinter com Manuals ...
Page 1004: ...8 Close the dialog box 㻠㻜㻌㻛㻌㻣㻢 Downloaded from ManualsPrinter com Manuals ...
Page 1013: ...The icon is added to the printer folder 㻠㻥㻌㻛㻌㻣㻢 Downloaded from ManualsPrinter com Manuals ...
Page 1018: ...㻡㻠㻌㻛㻌㻣㻢 Downloaded from ManualsPrinter com Manuals ...
Page 1020: ...㻡㻢㻌㻛㻌㻣㻢 Downloaded from ManualsPrinter com Manuals ...
Page 1031: ... Installing the MF Drivers and MF Toolbox 㻢㻣㻌㻛㻌㻣㻢 Downloaded from ManualsPrinter com Manuals ...


