Canon GX5500 Series Online Manual Download Page 141

Opening the Maintenance Tool (Canon IJ Printer Assistant
Tool)

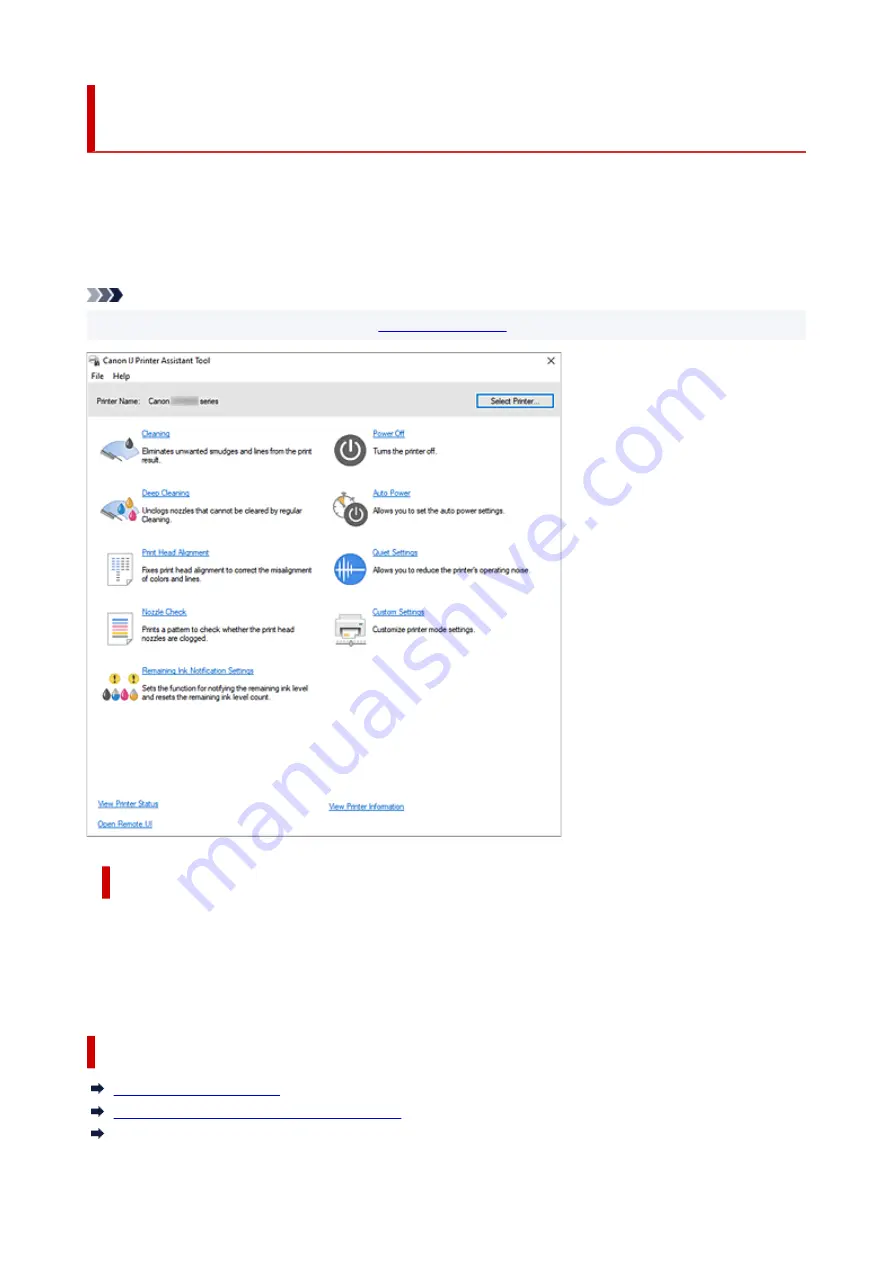
Canon IJ Printer Assistant Tool is an application software to perform printer maintenance or change the
settings of the printer.

When printer driver is installed, Canon IJ Printer Assistant Tool is also installed.
To install only Canon IJ Printer Assistant Tool, access the Canon web site and download the software.

Note

• For details on installing the Driver, see "

Installing the Driver

."

How to start the Canon IJ Printer Assistant Tool

Canon IJ Printer Assistant Tool can be started in the following ways.

• Click 

Maintenance and Preferences

 icon in the 

Maintenance

 tab of the printer driver.

• From Windows 

Start

 menu, click (

All apps

Apps

, or 

All Programs

 ->) 

Canon Utilities

 -> 

IJ Printer

Assistant Tool

.

Related Topics

Cleaning the Print Heads
Adjusting Print Head Position Automatically

Printing a Nozzle Check Pattern

141

Summary of Contents for GX5500 Series

Page 1: ...GX5500 series Online Manual English...

Page 2: ...urces 58 Loading Photo Paper Plain Paper in Rear Tray 60 Loading Plain Paper and Delivery Slips in Cassette 65 Loading Envelopes Medicine Envelopes and Delivery Slips in Rear Tray 71 Loading Medicine...

Page 3: ...stant 122 Diagnosing and Repairing Network Settings 123 List of Models Which Does Not Support Diagnosis and Repair Function 124 Performing Maintenance Functions from the Printer 125 Maintenance Proced...

Page 4: ...puter macOS 173 Managing the Printer Power 174 Changing the Printer Operation Mode 175 Changing Settings from Operation Panel 176 Changing Settings from Operation Panel 177 Setting Items on Operation...

Page 5: ...50 Printing 251 Printing Photos and Documents 252 Printing from Computer 253 Printing from Application Software Windows Printer Driver 254 Basic Printing Setup 255 Main Controls Basic Settings Tab 257...

Page 6: ...pen Printer Settings Screen 318 Displaying the Printing Status Screen 319 Deleting the Undesired Print Job 320 Removing Printer That Is No Longer Required from List of Printers 321 Printing Using Cano...

Page 7: ...ality Problems 393 Ink Does Not Come Out Blurry or Fuzzy Inaccurate or Bleeding Colors Streaks 396 Printed in Black and White 398 Lines Are Misaligned Distorted 399 Paper Is Smudged Printed Surface Is...

Page 8: ...en Paper Is Jammed 436 Removing Jammed Paper inside Printer 440 Removing Jammed Paper from Rear Side 445 1000 451 1007 452 1008 453 1200 454 1401 455 1496 456 Shipping Tape etc Are Still Attached 15A3...

Page 9: ...Appendix Online Manual Symbols Used in This Document Trademarks and Licenses 9...

Page 10: ...onal injury or property damage caused by incorrect operation of the equipment These must be observed for safe operation Important Instructions including important information that must be observed to...

Page 11: ...Trademarks and Licenses Trademarks Licenses 11...

Page 12: ...lash Photoshop Illustrator Adobe RGB and Adobe RGB 1998 are either registered trademarks or trademarks of Adobe Systems Incorporated in the United States and or other countries Adobe Acrobat Flash Pho...

Page 13: ...ATA OR PROFITS OR BUSINESS INTERRUPTION HOWEVER CAUSED AND ON ANY THEORY OF LIABILITY WHETHER IN CONTRACT STRICT LIABILITY OR TORT INCLUDING NEGLIGENCE OR OTHERWISE ARISING IN ANY WAY OUT OF THE USE O...

Page 14: ...ght owner as Not a Contribution Contributor shall mean Licensor and any individual or Legal Entity on behalf of whom a Contribution has been received by Licensor and subsequently incorporated within t...

Page 15: ...r regarding such Contributions 6 Trademarks This License does not grant permission to use the trade names trademarks service marks or product names of the Licensor except as required for reasonable an...

Page 16: ...hnology Inc copyright notice BSD Copyright c 2001 2003 Networks Associates Technology Inc All rights reserved Redistribution and use in source and binary forms with or without modification are permitt...

Page 17: ...HE USE OF THIS SOFTWARE EVEN IF ADVISED OF THE POSSIBILITY OF SUCH DAMAGE Part 4 Sun Microsystems Inc copyright notice BSD Copyright c 2003 Sun Microsystems Inc 4150 Network Circle Santa Clara Califor...

Page 18: ...FOR ANY DIRECT INDIRECT INCIDENTAL SPECIAL EXEMPLARY OR CONSEQUENTIAL DAMAGES INCLUDING BUT NOT LIMITED TO PROCUREMENT OF SUBSTITUTE GOODS OR SERVICES LOSS OF USE DATA OR PROFITS OR BUSINESS INTERRUP...

Page 19: ...IS PROVIDED BY THE COPYRIGHT HOLDER AS IS AND ANY EXPRESS OR IMPLIED WARRANTIES INCLUDING BUT NOT LIMITED TO THE IMPLIED WARRANTIES OF MERCHANTABILITY AND FITNESS FOR A PARTICULAR PURPOSE ARE DISCLAI...

Page 20: ...of its contributors may be used to endorse or promote products derived from this software without specific prior written permission THIS SOFTWARE IS PROVIDED BY THE COPYRIGHT HOLDERS AND CONTRIBUTORS...

Page 21: ...ing disclaimer Redistributions in binary form must reproduce the above copyright notice this list of conditions and the following disclaimer in the documentation and or other materials provided with t...

Page 22: ...S AS IS AND ANY EXPRESS OR IMPLIED WARRANTIES INCLUDING BUT NOT LIMITED TO THE IMPLIED WARRANTIES OF MERCHANTABILITY AND FITNESS FOR A PARTICULAR PURPOSE ARE DISCLAIMED IN NO EVENT SHALL THE COPYRIGHT...

Page 23: ...EVEN IF ADVISED OF THE POSSIBILITY OF SUCH DAMAGE Part 14 USC Information Sciences Institute copyright notice BSD Copyright c 2017 2018 Information Sciences Institute All rights reserved Redistributi...

Page 24: ...AGES OR OTHER LIABILITY WHETHER IN AN ACTION OF CONTRACT TORT OR OTHERWISE ARISING FROM OUT OF OR IN CONNECTION WITH THE SOFTWARE OR THE USE OR OTHER DEALINGS IN THE SOFTWARE Copyright 2000 Computing...

Page 25: ...fornia All rights reserved Redistribution and use in source and binary forms with or without modification are permitted provided that the following conditions are met Redistributions of source code mu...

Page 26: ...of it in a program you must acknowledge somewhere in your documentation that you have used the FreeType code credits We specifically permit and encourage the inclusion of this software with or withou...

Page 27: ...e FTL TXT unaltered any additions deletions or changes to the original files must be clearly indicated in accompanying documentation The copyright notices of the unaltered original files must be prese...

Page 28: ...ranted free of charge to any person obtaining a copy of this software and associated documentation files the Software to deal in the Software without restriction including without limitation the right...

Page 29: ...ary form must reproduce the above copyright notice this list of conditions and the following disclaimer in the documentation and or other materials provided with the distribution THIS SOFTWARE IS PROV...

Page 30: ...ce appear in all copies THE SOFTWARE IS PROVIDED AS IS AND THE AUTHOR DISCLAIMS ALL WARRANTIES WITH REGARD TO THIS SOFTWARE INCLUDING ALL IMPLIED WARRANTIES OF MERCHANTABILITY AND FITNESS IN NO EVENT...

Page 31: ...butors may be used to endorse or promote products derived from this software without specific prior written permission THIS SOFTWARE IS PROVIDED BY THE COPYRIGHT HOLDERS AND CONTRIBUTORS AS IS AND ANY...

Page 32: ...ished to do so subject to the following conditions The above copyright notice and this permission notice shall be included in all copies or substantial portions of the Software THE SOFTWARE IS PROVIDE...

Page 33: ...terials provided with the distribution 3 Neither the name s of the above listed copyright holder s nor the names of its contributors may be used to endorse or promote products derived from this softwa...

Page 34: ...the name CryptoJS nor the names of its contributors may be used to endorse or promote products derived from this software without specific prior written permission THIS SOFTWARE IS PROVIDED BY THE COP...

Page 35: ...This Apple software is supplied to you by Apple Inc Apple in your capacity as a current and in good standing Licensee in the MFi Licensing Program Use of this Apple software is governed by and subject...

Page 36: ...ARRANTIES OF NON INFRINGEMENT MERCHANTABILITY AND FITNESS FOR A PARTICULAR PURPOSE REGARDING THE APPLE SOFTWARE OR ITS USE AND OPERATION ALONE OR IN COMBINATION WITH YOUR PRODUCTS IN NO EVENT SHALL AP...

Page 37: ...rce code must retain the above copyright notice this list of conditions and the following disclaimer Redistributions in binary form must reproduce the above copyright notice this list of conditions an...

Page 38: ...S LOSS OF USE DATA OR PROFITS OR BUSINESS INTERRUPTION HOWEVER CAUSED AND ON ANY THEORY OF LIABILITY WHETHER IN CONTRACT STRICT LIABILITY OR TORT INCLUDING NEGLIGENCE OR OTHERWISE ARISING IN ANY WAY O...

Page 39: ...Main Components and Their Use Main Components Power Supply Loading Paper 39...

Page 40: ...Main Components Front View Rear View Inside View Operation Panel 40...

Page 41: ...eration Panel D Paper Output Tray Printed paper is ejected Pull out it before printing E Rear Tray Two or more sheets of the same size and type of paper can be loaded at the same time and fed automati...

Page 42: ...ette Loading Medicine Envelopes in Cassette H Resizing Tab Use to load legal size paper into the cassette I Cassette 2 Load A4 B5 A5 Letter sized or Executive plain paper into the cassette 2 and inser...

Page 43: ...D Rear Cover Detach when removing jammed paper E Power Cord Connector Plug in the supplied power cord F USB Port Plug in the USB cable to connect the printer with a computer G Wired LAN Connector Plu...

Page 44: ...ks E Ink Tanks The black ink tank is on the left and the color ink tanks cyan magenta and yellow are on the right If any ink levels are low refill the low tanks Refilling Ink Tanks F Ink Valve Lever O...

Page 45: ...I Lower Limit Line Indicates the lower limit of the sufficient amount of ink to print Refill the ink tank before the amount of ink is below this line 45...

Page 46: ...lay the HOME screen Using Touch Screen D Back button Returns to the previous screen E Alarm lamp Lights or flashes when an error occurs F Touch Screen Displays messages menu items and operating status...

Page 47: ...the rear tray and cassette B Ink information Check the ink tank model numbers and other ink information C Troubleshooting Displays details on how to solve common problems D Maintenance Select to perf...

Page 48: ...over Wi Fi through Easy wireless connect Tap this button to display a confirmation screen for starting a connection Easy wireless connect The printer has been already put into the standby mode for ea...

Page 49: ...d tips such as on ballpoint pens pencils or nails Touching the touch screen with wet or dirty hands Placing any objects on the touch screen Do not attach a protective sheet on the touch screen Removin...

Page 50: ...Drag While lightly touching the screen move your finger up down left or right Use to view lists of items or move sliders Entering Numbers Letters and Symbols 50...

Page 51: ...to each key displayed on the screen Tap the key to enter the character After entry is completed tap for determination Switch the character entry mode Switch the upper lower case letters on a keyboard...

Page 52: ...the position where you want to insert the character To delete the character move the cursor to the character you want to delete Note Only the input modes or characters available for input appear in th...

Page 53: ...Power Supply Turning the Printer On and Off 53...

Page 54: ...will turn off if the printer is not operated for about five minutes To restore the display touch the touch screen The display is also activated again when an original is printed from a computer Turnin...

Page 55: ...settings From the computer For Windows Managing the Printer Power For macOS Managing the Printer Power Turning off the printer 1 Press the ON button to turn the printer off 1 Note You can set the pri...

Page 56: ...lug the power cord press the ON button then confirm that the ON lamp is off Unplugging the power cord while the ON lamp is lit or flashing may cause drying or clogging of the print head and print qual...

Page 57: ...er Sources Loading Photo Paper Plain Paper in Rear Tray Loading Plain Paper and Delivery Slips in Cassette Loading Envelopes Medicine Envelopes and Delivery Slips in Rear Tray Loading Medicine Envelop...

Page 58: ...er loaded in a cassette you can also load paper on the rear tray to make prints Rear tray Cassette Rear tray You can load all supported paper such as photo paper and plain paper on the rear tray Loadi...

Page 59: ...Delivery Slips in Cassette Loading Medicine Envelopes in Cassette Note For details on paper that can be used in this printer Supported Media Types Your model used may differ from a product series name...

Page 60: ...e curled corners and gently bend them in the opposite direction until the paper becomes completely flat For details on how to flatten curled paper see Check3 in Paper Is Smudged Printed Surface Is Scr...

Page 61: ...that the leading edge of the paper does not rise such as by holding the part that protrudes from the rear tray 3 Slide right paper guide C to open both paper guides 3 4 Load paper stack in portrait o...

Page 62: ...orientation E can cause paper jams 5 Slide right paper guide to align with both sides of paper stack 5 Do not slide the paper guides too hard against the paper The paper may not be fed properly The pa...

Page 63: ...reen match size and type of paper loaded in rear 6 tray select Yes If not select Change to change the settings in accordance with the size and type of the loaded paper Note See Check paper replacement...

Page 64: ...even colors increase the print quality setting and try printing again To prevent incorrect printing this printer has a function that detects whether the settings for the paper loaded on the rear tray...

Page 65: ...paper jams If paper is curled hold the curled corners and gently bend them in the opposite direction until the paper becomes completely flat For details on how to flatten curled paper see Check3 in P...

Page 66: ...tion D Loading paper in landscape orientation E can cause paper jams Note Align the paper stack with the edge of the cassette as shown in the figure below If the paper stack is in contact with the pro...

Page 67: ...te To load paper sizes other than Legal use the cassette in its condensed state To condense the cassette pull the resizing tab J forward 5 Slide paper guides B and C to align them with paper stack 5 D...

Page 68: ...ot load sheets of paper higher than the load limit mark G Keep the paper stack height below the tabs H of the paper guides 6 Insert cassette into printer 6 Push the cassette into the printer until it...

Page 69: ...oaded the cassette is extended and thus stops in a protruding position from the printer Forcefully pushing it in may cause damage to the printer or the cassette 2 If page size and media type on touch...

Page 70: ...e of printed materials may come off or smudge when touched immediately after printing If this happens use the ink reduction feature in Print settings to reduce ink volume To prevent incorrect printing...

Page 71: ...nsupported Media Types Handling Paper 1 Prepare paper 1 Align the edges of paper Note To load envelopes or medicine envelopes follow the procedures below Loosen the stiff portions of the corners If pa...

Page 72: ...ot aligned Make sure that no curl or puff exceeds 0 12 in 3 mm If paper is not fed correctly into the printer despite these instructions reduce the number of sheets 2 Open the rear tray cover A and th...

Page 73: ...edicine envelopes Load medicine envelopes vertically with the side that opens facing up Delivery slips Load delivery slips vertically with print side facing up 5 Slide right paper guide to align with...

Page 74: ...the load limit mark D 6 If page size and media type on touch screen match size and type of paper loaded in rear 6 tray select Yes If not select Change to change the settings in accordance with the si...

Page 75: ...of printed materials may come off or smudge when touched immediately after printing If this happens use the ink reduction feature in Print settings to reduce ink volume To prevent incorrect printing t...

Page 76: ...the opposite direction Press down on all four corners and edges of paper to flatten them Use a pen to press the leading edge in the inserting direction flat and sharpen the crease The figures above s...

Page 77: ...from the printer 2 3 Slide paper guides B in front and C on right to open guides 3 4 Load paper stack in portrait orientation WITH PRINT SIDE FACING DOWN and place it in 4 center of cassette Medicine...

Page 78: ...edge of the cassette as shown in the figure below If the paper stack is in contact with the protrusion D the paper may not be fed properly 5 Slide paper guides B and C to align them with paper stack 5...

Page 79: ...uides 6 Insert cassette into printer 6 Push the cassette into the printer until it stops 7 If page size and media type on touch screen match size and type of medicine envelopes 7 loaded in cassette se...

Page 80: ...aper settings Before printing make print settings in accordance with the paper settings Depending on the characteristics of the paper it may make a sound If this sound bothers you using a different fe...

Page 81: ...Refilling Ink Tanks Refilling Ink Tanks Checking Ink Level 81...

Page 82: ...limit line A refill the ink tank Note If print results become faint or streaks appear despite sufficient ink levels see Maintenance Procedure For precautionary notes on handling ink bottles see Notes...

Page 83: ...not touch tubes or other parts inside the printer This can cause trouble with the printer 3 Open the ink tank cover C of the ink tank to be refilled 3 D Yellow E Magenta F Cyan G Black 4 Open the tan...

Page 84: ...tly twist the bottle cap I to remove 5 Important Do not shake the ink bottle Ink may spatter when opening the cap 6 Refill the ink tank 6 Aligning the ink bottle s tip with the ink tank s inlet J slow...

Page 85: ...K on the ink tank 7 Once ink reaches the upper limit line remove the ink bottle from the inlet 7 Hold up the ink bottle slightly and remove the bottle from the inlet while slowly tilting it Important...

Page 86: ...hold it up once then take it down gently Note If the error message appears on the touch screen after the top cover is closed take appropriate action When Error Occurred Notes on ink bottles Important...

Page 87: ...ure such as near fire or a heater or in a car Bottles may warp and cause ink leakage or ink may become poor quality Do not subject ink bottles to impacts Ink bottles may be damaged or bottle caps may...

Page 88: ...If a remaining ink error occurs the error message appears on the touch screen When Error Occurred To ensure you receive premium print quality and to help protect your print head a certain amount of in...

Page 89: ...a security protocol Change the setting to something that includes 20 MHz For improved security we recommend that you set to AES together with WPA2 or higher security The connection between your devic...

Page 90: ...t the same time If you try to connect a sixth device while five devices are already connected an error will appear If an error appears disconnect a device that does not use the printer and then redo t...

Page 91: ...e printer names appear with the MAC address added at the end or as the printer name specified by Bonjour Check identifiers such as the MAC address the printer name specified by Bonjour and the printer...

Page 92: ...LAN Connection To connect an additional computer to the printer via LAN or to change from USB to LAN connection refer to Setup Guide to setup 2 Switching LAN Connection Method If you want to switch th...

Page 93: ...X EAP WPA WPA2 WPA3 Enterprise they can be not used together Connecting with Wireless Direct Switching to a Wi Fi connection when using the printer Wireless Direct If you connect the printer to your c...

Page 94: ...Network Connection Tips Windows macOS Detect Same Printer Name Switching Printer s Connection to Network or Devices 94...

Page 95: ...e printer names appear with the MAC address added at the end or as the printer name specified by Bonjour Check identifiers such as the MAC address the printer name specified by Bonjour and the printer...

Page 96: ...LAN Connection To connect an additional computer to the printer via LAN or to change from USB to LAN connection refer to Setup Guide to setup 2 Switching LAN Connection Method If you want to switch th...

Page 97: ...X EAP WPA WPA2 WPA3 Enterprise they can be not used together Connecting with Wireless Direct Switching to a Wi Fi connection when using the printer Wireless Direct If you connect the printer to your c...

Page 98: ...ng and Repairing Network Settings Performing Changing Network Settings List of Models Which Does Not Support Diagnosis and Repair Function List of Models Which Does Not Support IPv6 Configuration via...

Page 99: ...Wi Fi Connection Assistant repairs the status of the printer and computer Not available for some models Important Depending on the printer you are using an administrator password is already specified...

Page 100: ...In Windows 7 click Start and select All Programs Canon Utilities Wi Fi Connection Assistant and then Wi Fi Connection Assistant When you start up Wi Fi Connection Assistant a message appears Check th...

Page 101: ...ollow the procedure below 1 Start up Wi Fi Connection Assistant 1 2 Check the displayed message and select Yes 2 3 Select Diagnose and Repair on the displayed screen 3 Perform operations following the...

Page 102: ...Performing Changing Network Settings Canon Wi Fi Connection Assistant Screen Performing Network Settings 102...

Page 103: ...ter The icon below appears on the left if the printer cannot be used Appears when the printer requires setup or has not been configured Appears when the IP address is duplicated to another printer App...

Page 104: ...up Note If USB is selected from the pulldown menu on the toolbar is displayed E Location Displays the printer location if it is registered Nothing is displayed if the printer status is Requires Setup...

Page 105: ...pulldown menu on the toolbar nothing is displayed The printer with Requires Setup displayed on Status is not displayed Assigning Printer Information J IPv6 On appears when an IPv6 address is assigned...

Page 106: ...rinters Note This item has the same function as Update in the View menu C Stops detecting printers Note This item has the same function as Cancel in the View menu D Switches the printer list IPv4 IPv6...

Page 107: ...Performing Network Settings Performing Changing Wired LAN Connection Ethernet Cable Settings Performing Changing Wi Fi Settings Assigning Printer Information 107...

Page 108: ...rinter with Wired LAN displayed on Connection Method and Available displayed on Status to perform settings You can perform settings for a printer with Available not displayed on Status via USB connect...

Page 109: ...P server functionality must be enabled on your router C Use next IP address Select this option if no DHCP server functionality is available in your setup where you use the printer or you want to use a...

Page 110: ...e using C Use Manual Address Select this option if no DHCP server functionality is available in your setup where you use the printer or you want to use a fixed IP address Enter the IP address and IP a...

Page 111: ...on the displayed screen 3 Detected printers are listed 4 Select printer to perform change settings from printer list 4 Select the printer with Wi Fi displayed on Connection Method and Available or Req...

Page 112: ...nects the printer to wireless communication devices smartphone or tablet without a wireless router Note If Wi Fi is enabled on the computer and if you select a USB connected printer on step 4 you can...

Page 113: ...n Appears D Encryption Type Displays the encryption method used over the Wi Fi IPv4 settings Note The setting items below are available only when Infrastructure is selected for Network Type If Direct...

Page 114: ...in a gray out status and you cannot perform any settings A Use IPv6 address Select when you use the printer with IPv6 environment B Use Stateless Address Select when you use an IP address assigned au...

Page 115: ...D Use DHCPv6 Select when you obtain an IP address using DHCPv6 Note This setting item is not available depending on the printer you are using 8 Click Set 8 115...

Page 116: ...ect Printer Network Setup on the displayed screen 3 Detected printers are listed 4 Select printer to assign location name and device name 4 Select the printer with Available displayed on Status 5 Sele...

Page 117: ...unction of Wi Fi Connection Assistant G4000 series PRO 500 series PRO 1000 series MB2100 series MB2700 series MB5100 series MB5400 series iB4100 series PRO 520 PRO 540 PRO 540S PRO 560 PRO 560S PRO 20...

Page 118: ...ries TS8000 series TS9000 series TR8500 series TR7500 series TS9100 series TS8100 series TS6100 series TS5100 series TS3100 series E3100 series TS300 series E300 series TR8580 series TS9180 series TS8...

Page 119: ...TR9530 series TS3300 series E3300 series 119...

Page 120: ...sistant Starting Up Wi Fi Connection Assistant Diagnosing and Repairing Network Settings List of Models Which Does Not Support Diagnosis and Repair Function Important Some functions may not be availab...

Page 121: ...uter on which it is installed In addition Wi Fi Connection Assistant restores the status of the printer and computer Important To use the printer over LAN make sure you have the equipment necessary fo...

Page 122: ...select Wi Fi Connection Assistant When you start up Wi Fi Connection Assistant the screen below appears Enter the password specified for your computer and select Install Helper Wi Fi Connection Assis...

Page 123: ...st of Models Which Does Not Support Diagnosis and Repair Function Wi Fi Connection Assistant starts checking the computer settings when it starts up Perform operations following the instructions on th...

Page 124: ...unction of Wi Fi Connection Assistant G4000 series PRO 500 series PRO 1000 series MB2100 series MB2700 series MB5100 series MB5400 series iB4000 series PRO 520 PRO 540 PRO 560 PRO 540S PRO 560S PRO 20...

Page 125: ...nctions from the Printer Maintenance Procedure Printing the Nozzle Check Pattern Examining the Nozzle Check Pattern Cleaning the Print Head Deep Print Head Cleaning Aligning the Print Head Aligning th...

Page 126: ...t result Set Media Type Quality etc Media Quality Tab When the Print Results Are Blurred or Uneven Step 1 Print the nozzle check pattern From the printer Printing the Nozzle Check Pattern From the com...

Page 127: ...ning off the power If the problem is still not resolved replace ink in print head Important Replace ink in print head consumes a great amount of ink Frequent replace ink in print head can rapidly cons...

Page 128: ...per 1 Check that printer is turned on 1 2 Load a sheet of A4 or Letter sized plain paper in the cassette 2 Loading Plain Paper and Delivery Slips in Cassette 3 Select Setup on HOME screen 3 Using Touc...

Page 129: ...cessary 1 Check if there are missing lines in the pattern C or horizontal streaks in the pattern D 1 A No missing lines No horizontal streaks B Lines are missing Horizontal streaks are present 2 Selec...

Page 130: ...n the pattern C or pattern D or in both patterns The cleaning is required Select Also B then select Yes on the cleaning confirmation screen The printer starts cleaning the print head Cleaning the Prin...

Page 131: ...ortage of free space in the maintenance cartridge a message is displayed and the cleaning cannot be performed You need to prepare a sheet of A4 or Letter sized plain paper 1 Check that printer is turn...

Page 132: ...rmation screen will appear 7 Select Yes 7 The nozzle check pattern will be printed 8 Examine the nozzle check pattern 8 Note If the problem is not resolved after cleaning the print head twice clean th...

Page 133: ...ee space in the maintenance cartridge a message is displayed and the cleaning cannot be performed You need to prepare a sheet of A4 or Letter sized plain paper 1 Check that printer is turned on 1 2 Lo...

Page 134: ...check pattern will be printed 8 When the completion message appears tap OK 8 9 Examine the nozzle check pattern 9 If the problem is not resolved turn off the power and clean the print head deeply agai...

Page 135: ...h screen When Error Occurred You need to prepare a sheet of A4 or Letter sized plain paper 1 Check that printer is turned on 1 2 Load a sheet of A4 or Letter sized plain paper in cassette 2 Loading Pl...

Page 136: ...results are still not satisfactory after adjusting the print head position as described above adjust the print head position manually For Windows You can also align the print head manually from a comp...

Page 137: ...Plain Paper and Delivery Slips in Cassette 3 Select Setup on HOME screen 3 Using Touch Screen The setup menu screen will appear 4 Select Maintenance 4 The Maintenance screen will appear 5 Select Prin...

Page 138: ...amine first patterns and select A In column A find pattern in which stripes are least 9 noticeable and then select the number of that pattern Note If all patterns look different choose the pattern in...

Page 139: ...mbers for columns B to N 10 and then tap OK 11 Check message and tap OK 11 The second set of patterns is printed 12 Examine second patterns and select O In column O find pattern in which stripes are l...

Page 140: ...enance Functions from Your Computer Windows Opening the Maintenance Tool Canon IJ Printer Assistant Tool Cleaning the Print Heads Adjusting Print Head Position Automatically Adjusting Print Head Posit...

Page 141: ...anon web site and download the software Note For details on installing the Driver see Installing the Driver How to start the Canon IJ Printer Assistant Tool Canon IJ Printer Assistant Tool can be star...

Page 142: ...Managing the Printer Power Reducing the Printer Noise Changing the Printer Operation Mode 142...

Page 143: ...t the printer is on and then click Start Print Head Cleaning starts 4 Complete Cleaning 4 Click OK when the confirmation message is displayed The Nozzle Check dialog box will open 5 Check the results...

Page 144: ...appears Print head Deep Cleaning starts 4 Complete Deep Cleaning 4 Click OK when the confirmation message is displayed The Nozzle Check dialog box will open 5 Check the results 5 To check whether the...

Page 145: ...progress Print Head Alignment 1 Open Canon IJ Printer Assistant Tool 1 2 Click Print Head Alignment 2 The Print Head Alignment dialog box opens 3 Load paper in printer 3 Load one sheet of A4 size or...

Page 146: ...ignment 1 Open Canon IJ Printer Assistant Tool 1 2 Check that the printer power is on and then click Custom Settings 2 The Custom Settings dialog box opens Note If the printer is off or if communicati...

Page 147: ...by clicking relevant pattern in the preview After completing the entries click OK Note If the patterns are not uniform select the pattern with the least prominent vertical streaks A Less prominent ver...

Page 148: ...not uniform select the pattern with the least prominent horizontal stripes A Less prominent horizontal stripes B More prominent horizontal stripes If the patterns are not uniform select the pattern w...

Page 149: ...Performing Maintenance Functions from Your Computer macOS Opening Remote UI for Maintenance Cleaning the Print Heads Adjusting Print Head Position 149...

Page 150: ...and click Options Supplies 2 3 Click Show Printer Webpage in General tab 3 Remote UI starts Note The password may have to be entered after Remote UI starts In such a case enter the password and click...

Page 151: ...Cleaning starts 4 Complete Cleaning 4 Next the message for Nozzle Check pattern printing is displayed 5 Check the results 5 To check whether the print quality has improved click Yes To cancel the chec...

Page 152: ...of ink than Cleaning Cleaning the print head frequently will rapidly deplete your printer s ink supply Perform Deep Cleaning only when necessary Note If there is no sign of improvement after Deep Clea...

Page 153: ...ars 3 Load paper in printer 3 Load one sheet of A4 size or Letter size plain paper into the cassette 1 4 Run head position adjustment 4 Check that the printer power is on and then click Yes Head align...

Page 154: ...Cleaning Cleaning Exterior Surfaces Cleaning Paper Feed Rollers Cleaning Inside the Printer Bottom Plate Cleaning Cleaning Cassette Pads 154...

Page 155: ...tenance 3 The Maintenance screen will appear 4 Select Roller Cleaning 4 The confirmation screen will appear 5 Select Yes 5 6 Select the paper source to use for cleaning 6 7 Follow the message to remov...

Page 156: ...on described above follow the operation below 1 Turn off the power and then unplug the power cord 1 2 While rotating the paper feed roller A located inside the rear tray more than two full turns wipe...

Page 157: ...at printer is turned on 1 2 Select Setup on HOME screen 2 Using Touch Screen The setup menu screen will appear 3 Select Maintenance 3 The Maintenance screen will appear 4 Select Bottom Plate Cleaning...

Page 158: ...inter as it feeds through the printer Check the folded parts of the ejected paper If they are smudged with ink perform Bottom Plate Cleaning again 11 When the completion message appears tap OK 11 Note...

Page 159: ...forming cleaning again the protrusions inside the printer may be stained Wipe off any ink from the protrusions using a cotton swab or the like Important Be sure to turn off the power and unplug the po...

Page 160: ...Replacing the Maintenance Cartridge Replacing the Maintenance Cartridge Checking Maintenance Cartridge Status on Touch Screen 160...

Page 161: ...e cartridge becomes full an error message is displayed and the printer stops working until it is replaced with a new one Do not touch the terminal A or opening B of the maintenance cartridge Note When...

Page 162: ...r place the removed maintenance cartridge on a desk or something Dirt on the bottom may adhere to it or the ink inside may be scattered Do not turn the removed maintenance cartridge upside down to pre...

Page 163: ...5 Insert the new maintenance cartridge straight until it stops 5 6 Attach the maintenance cover 6 Align the tab on the back of the maintenance cover with the hole on the printer and close it 7 Insert...

Page 164: ...164...

Page 165: ...A if there is any information about the used space of the maintenance cartridge The maintenance cartridge is almost full Replace the maintenance cartridge as soon as possible Note The above screen sh...

Page 166: ...Changing Settings Changing Printer Settings from Your Computer Windows Changing Printer Settings from Your Computer macOS Changing Settings from Operation Panel 166...

Page 167: ...Changing Printer Settings from Your Computer Windows Changing the Print Options Managing the Printer Power Changing the Printer Operation Mode 167...

Page 168: ...e image data is cut off the paper source during printing differs from the driver settings or printing fails 1 Open the printer driver setup window 1 2 Click Print Options on the Page Setup tab 2 The P...

Page 169: ...specified period of time 1 Open the Canon IJ Printer Assistant Tool 1 2 Check that the printer is on and then click Auto Power 2 The Auto Power Settings dialog box will open Note If the printer is of...

Page 170: ...disable this function select Disable from the list according to the same procedure Note When the printer is turned off the Canon IJ Status Monitor message varies depending on the Auto Power On settin...

Page 171: ...omputer is disabled an error message may appear because the computer cannot collect the printer status If this happens click OK to display the most recent settings specified on your computer 3 Configu...

Page 172: ...ecessary switch between various modes of printer operation 4 Apply the settings 4 Click OK and when the confirmation message appears click OK The printer operates with the modified settings hereafter...

Page 173: ...Changing Printer Settings from Your Computer macOS Managing the Printer Power Changing the Printer Operation Mode 173...

Page 174: ...ta is received 1 Selecting Printer settings from Remote UI 1 2 Click Power control settings 2 3 Select Use auto power control and then click OK 3 4 Check the displayed message and click OK 4 5 Complet...

Page 175: ...ismatch If the check box is deselected at the time of printing from PC you can continue to print without the message display even if the paper settings set in the Print dialog differs from the paper i...

Page 176: ...nel Security settings Print settings LAN settings Other printer settings Language selection Firmware update Administrator password settings User management settings Reset settings Feed settings Web se...

Page 177: ...abrasion as an example 1 Check that printer is turned on 1 2 Select Setup on the HOME screen 2 Using Touch Screen 3 Select Printer settings 3 The Printer settings screen is displayed 4 Select a settin...

Page 178: ...For more on setting items on the operation panel Setting Items on Operation Panel 178...

Page 179: ...nter Other printer settings Language selection Web service setup ECO Quiet setting Items for Paper Printing Print settings Feed settings Items for Maintenance Management Security settings LAN settings...

Page 180: ...Enable disable lockout Enable or disable the lockout setting Lockout threshold times Set the number of attempts before input is locked Lockout period Set the length of time to lock input for Use of R...

Page 181: ...een 0 12 in 3 mm and 0 12 in 3 mm centered on the horizontal center of the paper Important When using A4 Letter sized paper the amount of adjustment that can be made is limited You cannot make adjustm...

Page 182: ...defined size within the range of a template size The feature may not be implemented even when the above settings are selected depending on other setting details Processing may differ depending on sett...

Page 183: ...is connected by Wi Fi Some setting items are not displayed depending on the printer settings Items Setting Connection Enabled connected Enabled disconnected Disable Network name SSID XXXXXXXXXXXXXXXX...

Page 184: ...sing a wireless router supporting a Wi Fi Protected Setup WPS push button method Follow the on screen instructions during setup Other connection types WPS PIN code method Select when you perform setti...

Page 185: ...k name and password Enable disable Wireless Direct Enables disables Wireless Direct Change network name SSID Changes the identifier SSID the printer s name displayed on a Wi Fi Direct compatible devic...

Page 186: ...dvanced For details on each setting item Advanced setup Advanced setup Set printer name Specifies the printer name You can use up to 15 characters for the name Note You cannot use the same printer nam...

Page 187: ...IP address from the printer name without a DNS server IPP settings Selecting Enable allows you to print via the network with the IPP protocol Wi Fi DRX settings Selecting Enable allows you to activate...

Page 188: ...tication result Displays the latest authentication result of IEEE802 1X EAP setting Easy wireless connect When set to Auto start ON the device will automatically put into the standby mode for easy wir...

Page 189: ...h Week Specify the week DOW Specify the day of the week The screen to set the shift time to start summer time will be displayed after specifying the items above and selecting OK After specifying the s...

Page 190: ...nter automatically Time zone Specifies the time zone according to a country or region you live in Specifying the time zone to the printer allows you to display the correct time an e mail was sent from...

Page 191: ...the screen to prevent the panel operation by someone other than the administrator External server connection Set external server connections Notification settings All notification screens are not disp...

Page 192: ...ministrator password may be required to change the settings Japanese English German French Italian Spanish Portuguese Dutch Danish Norwegian Swedish Finnish Russian Ukrainian Polish Czech Slovene Hung...

Page 193: ...ctions to perform update Check current version You can check the current firmware version Update notification settings You can set the printer to display the firmware update information on the touch s...

Page 194: ...ter a password 5 then select OK When the administrator password is not set the registration confirmation message is displayed Select Yes The message is displayed again Then select OK and proceed to st...

Page 195: ...sword again 10 11 Select Apply 11 The administrator password is available Note When the administrator password is canceled or the effective range of the administrator password is set to Remote UI and...

Page 196: ...The setup menu screen will appear 3 Select Printer settings 3 The Printer settings screen is displayed 4 Select User management settings 4 Enable disable user management Set the valid invalid of the a...

Page 197: ...ecified by Remote UI or Wi Fi Connection Assistant reverts to the default setting Note You cannot set the following setting items back to the default Security policy The language displayed on the touc...

Page 198: ...e cassette 2 Detect paper setting mismatch If you select Enable the printer detects whether the paper size and the media type are identical with those registered in Feed settings If printing starts wi...

Page 199: ...For AirPrint of iOS iPadOS paper may be printed based on the paper size set during paper loading It is recommended to set to ON when making prints using an AirPrint function 199...

Page 200: ...tes the printer to from Canon Inkjet Cloud Printing Center and sets the history saving Check Web service setup Make sure whether the printer is registered to Canon Inkjet Cloud Printing Center Issue r...

Page 201: ...ned on 1 2 Select Setup on the HOME screen 2 Using Touch Screen 3 Select ECO 3 4 Select Power control 4 5 Select Use auto power control 5 6 Specify settings as necessary 6 A Specify the length of time...

Page 202: ...Selecting Do not use power control disables all settings of the power control and scheduling 202...

Page 203: ...gs Set the current date and time in advance Follow the procedure below to perform setting 1 Check that printer is turned on 1 2 Select Setup on the HOME screen 2 Using Touch Screen 3 Select Quiet sett...

Page 204: ...irmation screen is displayed and the icon appears as the Quiet setting menu icon Important Operating speed is reduced compared to when OFF is selected This function may not be so effective depending o...

Page 205: ...e printer serial number Head information Displays the serial number of the print head MAC address Wi Fi Displays the MAC address for Wi Fi MAC address Wired LAN Displays the MAC address for wired LAN...

Page 206: ...tant The administrator password may be required to change the settings Display job history Displays the job history of printing Print job history Prints the job history of printing Restrict job histor...

Page 207: ...ouch Screen The hint menu screen will appear 3 Select Usage stats 3 4 Select item to check 4 Total sheets used on the device Displays the total number of printing Print usage statistics The total numb...

Page 208: ...nt Jobs Legal Restrictions on Printing Printer Handling Precautions Transporting Your Printer When Repairing Lending or Disposing of the Printer Keeping Print Quality High Ink Tips Specifications Prod...

Page 209: ...Safety Safety Precautions Regulatory Information WEEE 209...

Page 210: ...ot place product close to the flammable solvents such as alcohol or thinner Do not open or modify the printer Use only the power cord cables that came with your printer Do not use these cables with ot...

Page 211: ...mpletely and place bottles in standing position If the ink bottles are laid down ink may leak When refilling ink tanks take sufficient care to prevent ink from spattering onto surroundings Ink may sta...

Page 212: ...the power outlet clear at all times so you can easily unplug the power cord if necessary Never remove the plug by pulling on the cord General Notices Do not tilt the printer stand it on end or turn i...

Page 213: ...o try to correct the interference by one or more of the following measures Reorient or relocate the receiving antenna Increase the separation between the equipment and receiver Connect the equipment i...

Page 214: ...Interference Do not use the printer around medical equipment or other electronic devices Signals from the printer may interfere with the correct operation of these devices 214...

Page 215: ...or your household waste disposal service or visit www canon europe com sustainability approach Only for European Union and EEA Norway Iceland and Liechtenstein These symbols indicate that this product...

Page 216: ...ses Produkts tragen Sie zu einer effektiven Nutzung nat rlicher Ressourcen bei Um weitere Informationen ber die Wiederverwertung dieses Produkts zu erhalten wenden Sie sich an Ihre Stadtverwaltung den...

Page 217: ...site www canon europe com weee ou www canon europe com battery Uitsluitend bestemd voor de Europese Unie en EER Noorwegen IJsland en Liechtenstein Met deze symbolen wordt aangegeven dat dit product i...

Page 218: ...cipio el servicio o el organismo encargado de la gesti n de residuos dom sticos o visite www canon europe com weee o www canon europe com battery Nom s per a la Uni Europea i a l Espai Econ mic Europe...

Page 219: ...rrere in sanzioni amministrative ai sensi dell art 255 e successivi del Decreto Legislativo n 152 06 Per ulteriori informazioni sul riciclaggio di questo prodotto contattare le autorit locali l ente r...

Page 220: ...koncentration som ligger over de gr nsev rdier der er beskrevet i batteridirektivet Produktet skal afleveres p et godkendt indsamlingssted f eks i overensstemmelse med en godkendt n til n procedure n...

Page 221: ...ktet ved kontakte lokale myndigheter avfallsadministrasjonen et godkjent program eller husholdningens renovasjonsselskap eller g til www canon europe com weee eller www canon europe com battery Vain E...

Page 222: ...er f retag f r avfallshantering eller se www canon europe com weee eller www canon europe com battery Pouze Evropsk unie a EHP Norsko Island a Lichten tejnsko Tento symbol znamen e podle sm rnice OEEZ...

Page 223: ...en inform l djon a helyi polg rmesteri hivataln l a helyi k zter let fenntart v llalatn l a hivatalos hullad klerak telephelyen vagy a h ztart si hullad k begy jt s t v gz szolg ltat n l illetve l to...

Page 224: ...iit ja EMP Norra Island ja Liechtenstein Antud s mbolid viitavad sellele et vastavalt elektri ja elektroonikaseadmete j tmeid k sitlevale direktiivile 2012 19 EL patareisid ja akusid ning patarei ja a...

Page 225: ...s atbild go dienestu pilnvaroto organiz ciju vai iest di kas veic sadz ves atkritumu apsaimnieko anu vai apmekl jiet t mek a vietni www canon europe com weee vai www canon europe com battery Tik Europ...

Page 226: ...b nakupu novega podobnega izdelka vrnete starega ali na poobla eno zbirno mesto za ponovno uporabo odpadne elektri ne in elektronske opreme EEO ter baterij in akumulatorjev Neustrezno ravnanje s to vr...

Page 227: ...rope com weee sau www canon europe com battery Samo za Europsku uniju i EEA Norve ka Island i Lihten tajn Oznaka pokazuje da se ovaj proizvod ne smije odlagati s komunalnim i ostalim vrstama otpada u...

Page 228: ...ikupljanje npr po principu jedan za jedan kada kupujete sli an novi proizvod ili ovla enom centru za prikupljanje za recikla u istro ene elektri ne i elektronske opreme EEE baterija i akumulatora Nepr...

Page 229: ...Precautions Canceling Print Jobs Legal Restrictions on Printing Printer Handling Precautions Transporting Your Printer When Repairing Lending or Disposing of the Printer Keeping Print Quality High Ink...

Page 230: ...it Postage stamps canceled or uncanceled Identification badges or insignia Selective service or draft papers Checks or drafts issued by governmental agencies Motor vehicle licenses and certificates of...

Page 231: ...place any object on the top cover Do not place any object on the top cover It will fall into the rear tray when the top cover is opened and cause the printer to malfunction Also place the printer whe...

Page 232: ...in a plastic bag so that ink does not leak Pack the printer in a sturdy box so that it is placed with its bottom facing down using sufficient protective material to ensure safe transport Do not tilt t...

Page 233: ...the rear tray cover 7 8 Unplug the printer cable from the computer and from the printer then unplug the power 8 cord from the printer 9 Use adhesive tape to secure all the covers on the printer to kee...

Page 234: ...234...

Page 235: ...her security settings on the printer such information may be stored in the printer To keep your personal information safe please be sure to reset all printer settings when sending the printer for repa...

Page 236: ...press the ON button to turn off the power the printer caps the print head nozzles automatically to prevent from drying If you unplug the power cord from the wall outlet before the ON lamp is turned o...

Page 237: ...aning function helps the printer to suck air bubbles or ink itself from the nozzle and thus prevents print quality degradation or nozzle clogging Important The used ink is ejected into the maintenance...

Page 238: ...Specifications Product Specifications Supported Paper Sizes and Weights Print Area Paper Load Limit 238...

Page 239: ...ions Recommended conditions Temperature 59 to 86 F 15 to 30 C Humidity 10 to 80 RH no condensation For the temperature and humidity conditions of papers such as photo paper medicine envelopes or deliv...

Page 240: ...ctive range varies depending on the installation environment and location Security WPA PSK TKIP AES WPA2 PSK TKIP AES WPA3 SAE AES WPA EAP AES WPA2 EAP AES WPA3 EAP AES Compatible with IEEE802 1X EAP...

Page 241: ...10 15 7 macOS Ventura 13 Other Supported OS iOS iPadOS Android Chrome OS Some functions may not be available with the supported OS Refer to the Canon web site for details Information in this manual is...

Page 242: ...er supports differ depending on the OS you are using Standard sizes Letter Legal Executive A6 A5 A4 B6 B6 Half B5 B Oficio M Oficio Foolscap Legal India KG 4 x6 10x15 5 x7 13x18cm 7 x10 18x25cm 8 x10...

Page 243: ...pe C5 Envelope Monarch Special sizes Minimum size 2 52 x 5 00 in 64 0 x 127 0 mm Maximum size 8 50 x 47 24 in 216 0 x 1200 0 mm Paper Weight You can use paper in the following weight range Plain paper...

Page 244: ...pprox 80 sheets Approx 200 sheets High Resolution Paper HR 101N 1 Approx 80 sheets N A Paper for printing photos Media Name Model No Rear Tray Glossy Photo Paper Everyday Use GP 501 GP 508 2 Photo Pap...

Page 245: ...ess 2 Feeding from a loaded stack of paper may leave marks on the printed side or prevent efficient feeding In this case load one sheet at a time 3 The number of sheets that can be loaded depends on t...

Page 246: ...paper is not sold by model number Instead purchase paper by name Recommended Genuine Canon Paper According to Purpose Paper for printing documents Canon Red Label Superior WOP111 Canon Oc Office Colo...

Page 247: ...an Genuine Canon paper Plain Paper including recycled paper Thin Paper Thick Paper Envelopes Label Paper Glossy Label Medicine Envelopes Delivery Slips Paper Settings on the Printer Driver and the Pri...

Page 248: ...notepad paper cut to a small size when printing on paper smaller than A5 Picture postcards Postcards affixed with photos or stickers Envelopes with a double flap Envelopes with an embossed or treated...

Page 249: ...its edges and try not to touch the printing surface The print quality may be degraded if the printing surface is smudged with sweat or oil that comes from your hands Do not touch the printed surface u...

Page 250: ...ts per pigment color ink bottle Standard mode 14 000 sheets Economy mode 21 000 sheets Measurement conditions Measurement images Color printing A4 color document ISO IEC24712 Measurement method Canon...

Page 251: ...Printing Printing Photos and Documents Printing Hagaki and Envelopes 251...

Page 252: ...Printing Photos and Documents Printing from Computer Printing from Smartphone Tablet Using PIXMA MAXIFY Cloud Link 252...

Page 253: ...Printing from Computer Printing from Application Software Windows Printer Driver Printing from Application Software macOS AirPrint Printing Using Canon Application Software Printing from Chrome OS 253...

Page 254: ...Windows Printer Driver Basic Printing Setup Basic Main Controls Basic Settings Tab Set Media Type Quality etc Media Quality Tab Set the Layout of Printed Documents Page Setup Tab Overview of the Prin...

Page 255: ...ur purpose in Profiles on the Basic Settings tab If you select a print setting Paper Size and Media Type will change automatically Note When the paper size to be printed is selected from Printer Paper...

Page 256: ...paper information to be registered to the printer driver and on the printer see the following Paper Settings on the Printer Driver and the Printer Media Type Paper Settings on the Printer Driver and...

Page 257: ...Main Controls Basic Settings Tab Basic Settings Tab Description Paper Settings on the Printer Driver and the Printer Media Type Paper Settings on the Printer Driver and the Printer Paper Size 257...

Page 258: ...efore printing Always print with current settings Page Size Printer Paper Size Media Type Quality Paper Source Copies Collate Orientation Grayscale Printing Page Layout Zoom 1 sided 2 sided Booklet Pr...

Page 259: ...the information that you set on the Basic Settings Media Quality and Page Setup tabs to Profiles Delete Deletes a registered printing profile Select the name of the setting to be deleted from Profile...

Page 260: ...r the paper size Media Type Selects a type of printing paper Select a media type that matches the paper that is loaded in the printer This ensures that printing is carried out properly for the specifi...

Page 261: ...copies may be multiplied numbers of the two settings or the specified printing order may not be enabled Orientation Selects the printing orientation If the application used to create your document ha...

Page 262: ...stapled at the center Automatic Selects whether duplex printing is to be performed automatically or manually To perform duplex printing manually uncheck this check box Preferences Opens the Booklet Pr...

Page 263: ...plication software Save the orientation setting Saves the Orientation to the printing profile in Profiles To apply the saved print orientation when the printing profile is selected check this check bo...

Page 264: ...ngs preview on the printer driver Print Cut Paste in margins Specifies whether to print the words Cut and Paste in the margins These words serve as guidelines for pasting together the pages into a pos...

Page 265: ...margin The specified width becomes the stapling margin from the center of the sheet Page Border Prints a page border line around each document page Check this check box to print the page border line...

Page 266: ...dia name Model No Media Type in the printer driver Paper information regis tered on the printer Photo Paper Plus Glossy II PP 201 PP 208 PP 301 Photo Paper Plus Glossy II Plus Glossy II Photo Paper Pr...

Page 267: ...elope Envelope Medicine Envelope Medicine Envelope Medicine Envelope Delivery Slip Delivery Slip Delivery Slip Kraft Paper High Resolution Paper High Res Paper Embossed Paper High Resolution Paper Hig...

Page 268: ...2x36cm Legal Executive 7 25 x10 5 184 2x266 7mm Executive A5 A5 A4 A4 B6 B6 B6 Half B6 Half B5 B5 B Oficio 8 5 x14 216 0x355 0mm B Oficio M Oficio 8 50 x13 43 216 0x341 0mm M Oficio Foolscap F4 Oficio...

Page 269: ...gagata 4 Yougata 4 4 13 x9 25 Yougata 4 Yougata 6 3 86 x7 48 Yougata 6 Kakugata 3 8 50 x10 91 Kakugata 3 Kakugata 4 7 76 x10 51 Kakugata 4 Kakugata 5 7 48 x9 45 Kakugata 5 Kakugata 6 6 38 x9 02 Kakuga...

Page 270: ...type 5 Select the Hagaki you want to use from Hagaki in Media Type Important This printer cannot print on postcards that have photos or stickers attached You will get cleaner printing if you print the...

Page 271: ...elected for Printer Paper Size the printer rotates the paper 90 degrees to the left to print regardless of the Rotate 90 degrees left when orientation is Landscape setting for Custom Settings in the M...

Page 272: ...eleted at any time Registering a Printing Profile 1 Open the printer driver setup window 1 2 Set the necessary items 2 From Profiles on the Basic Settings tab select the printing profile to be used an...

Page 273: ...driver or upgrade the printer driver version the print settings that are already registered will be deleted from Profiles Registered print settings cannot be saved and preserved If a profile is delete...

Page 274: ...e Quality etc Media Quality Tab Media Quality Tab Description Adjust Colors Specifying Color Correction Optimal Photo Printing of Image Data Adjusting Colors with the Printer Driver Printing with ICC...

Page 275: ...a sheet of paper You can check an overall image of the layout The printer illustration shows how to load paper to match the printer driver settings Check whether the printer is set up correctly by loo...

Page 276: ...Economy Reduces the amount of ink used when printing Note Selecting Economy in Quality reduces ink consumption This means that you can print more than if you have Standard selected For details on Eco...

Page 277: ...usts the strengths of Cyan Magenta and Yellow Moving the slider to the right makes a color stronger and moving the slider to the left makes a color weaker You can also directly enter a value linked to...

Page 278: ...int sRGB data with color tints that most people prefer ICM Adjusts the colors by using an ICC profile when printing Important If the application software is set so that ICM is disabled ICM is unavaila...

Page 279: ...Set the Layout of Printed Documents Page Setup Tab Page Setup Tab Description Setting the Number of Copies and Printing Order 279...

Page 280: ...Paper Size Copies Print from Last Page Collate Orientation Rotate 180 degrees Page Layout Zoom 1 sided 2 sided Booklet Printing Binding Location Specify Margin Print Options Stamp Background Settings...

Page 281: ...heck box to print your document in normal order starting from the first page Collate Check this check box to group together the pages of each copy when you want to print multiple copies Uncheck this c...

Page 282: ...he document you want to print 1 sided 2 sided Booklet Printing 1 sided Printing Select when performing single sided printing 2 sided Printing Select when performing duplex printing Automatic Selects w...

Page 283: ...the custom paper Measurement is shown according to the units specified in Units Page Layout Printing dialog box This dialog box allows you to select the number of document pages to be placed on one sh...

Page 284: ...n on the screen will be printed this time Booklet Printing dialog box This dialog box allows you to set how to bind the document as a booklet Printing only on one side and printing a page border can a...

Page 285: ...or profile setting of the application software Checking this check box disables information in the color profile that was set on the application software When the information in the color profile set...

Page 286: ...u can reduce the size of the print data that was created with the application software and then print the data Depending on the application software being used the image data may be cut off or may not...

Page 287: ...he sections of the stamp that are overlapped by the document may be hidden Stamp first page only Selects whether the stamp is to be printed on the first page only or on all pages when the document has...

Page 288: ...p Type is Text or Date Time User Name Stamp Text Specifies the stamp text string Up to 64 characters can be entered For Date Time User Name the creation date time and user name of the printed object a...

Page 289: ...You can also change the stamp position by dragging the stamp in the preview window Rotation Specifies the angle of rotation for the stamp The angle can be set by entering the number of degrees Negativ...

Page 290: ...Intensity Adjusts the intensity of the bitmap to be used as a background Moving the slider to the right increases the intensity and moving the slider to the left decreases the intensity To print the...

Page 291: ...Delete Deletes an unnecessary background Specify the title of an unnecessary background from the Backgrounds list and then click this button 291...

Page 292: ...rint from the last page in order and uncheck the check box when you want to print from the first page Check the Collate check box when you are printing multiple copies of a document and want to print...

Page 293: ...s on the application software When you specify the number of copies and the printing order with both the application software and this printer driver the number of copies may be multiplied numbers of...

Page 294: ...ist 4 Set the number of pages to be printed on one sheet and the page order 4 If necessary click Preferences specify the following settings in the Page Layout Printing dialog box and click OK Page Ord...

Page 295: ...you want to use from the Page Layout list 4 Specify the side to be stapled 4 The best Binding Location is selected automatically from the Orientation and Page Layout settings To change the setting sel...

Page 296: ...t the margin width and then click OK 6 Complete the setup 6 Click OK on the Page Setup tab When you perform print the document is first printed on one side of a sheet of paper After one side is printe...

Page 297: ...Overview of the Printer Driver Canon IJ Printer Driver Opening Printer Driver s Setup Screen Canon IJ Status Monitor Instructions for Use Printer Driver 297...

Page 298: ...ent print data formats you need a printer driver for the specific model you are using Installing the Printer Driver To install the printer driver install the driver from the Setup CD ROM or our websit...

Page 299: ...erform printer maintenance operations such as print head cleaning or set print settings to be shared by all application software The following instructions are shown using screens displayed in Windows...

Page 300: ...or displayed on the task bar The Canon IJ Status Monitor appears Note To open the Canon IJ Status Monitor when the printer is not printing open the printer driver setup window and click View Printer S...

Page 301: ...Printing is selected from 1 sided 2 sided Booklet Printing on the Page Setup tab Booklet Printing in 1 sided 2 sided Booklet Printing on the Page Setup tab Print from Last Page Collate Specify Margin...

Page 302: ...ng according to your requirements 4 Click OK to close the window 5 Without starting printing close the Print dialog box 6 Open Word s Print dialog box again 7 Open the printer driver setup window and...

Page 303: ...function to change the settings of this printer Note If the printer is off or if communication between the printer and the computer is disabled an error message may appear because the computer cannot...

Page 304: ...ch 3 88 x7 5 98 4x190 5mm is selected for Page Size on the Page Setup tab the printer rotates the paper 90 degrees to the left to print regardless of the Rotate 90 degrees left when orientation is Lan...

Page 305: ...ics to send information To stop sending information uncheck this check box The check box appears only if a user with administrator privileges is logged on If information is not provided the check box...

Page 306: ...ion on any errors that occur on the printer You can then immediately check what sort of action to perform Overview of the Canon IJ Status Monitor The Canon IJ Status Monitor displays icons and message...

Page 307: ...tus Monitor Select Enable Status Monitor to use the following commands Always Display Current Job Displays the Canon IJ Status Monitor whenever a document is being printed Always Display on Top Displa...

Page 308: ...tarts the Canon IJ Status Monitor when Windows is started Remote UI menu You are able to open the printer s Remote User Interface You are able to check the printer status and run maintenance functions...

Page 309: ...he installation program starts 3 Install the driver 3 Take the appropriate action as described on the screen 4 Complete the installation 4 Click Exit Depending on the environment you are using a messa...

Page 310: ...2 Perform the uninstaller 2 Click Start When the confirmation message appears click Yes When all the files have been deleted click Complete The deletion of the Driver is complete 310...

Page 311: ...S AirPrint Printing Basic Printing on Postcards Adding Printer How to Open Printer Settings Screen Displaying the Printing Status Screen Deleting the Undesired Print Job Removing Printer That Is No Lo...

Page 312: ...onnected to the same network over a LAN Connected directly without wireless router Direct Connection Connected by USB Print from a Mac 1 Check that printer is turned on 1 Note If Auto power on is enab...

Page 313: ...6 Check print settings 6 Set items such as Paper Size to the appropriate size as well as Media Type from Media Quality Set Double sided to Off if you are not printing on both sides of the paper 313...

Page 314: ...If you are performing large format printing make sure that there is plenty of remaining ink If you set a custom paper size in Paper Size and set it to a length longer than the specified length the da...

Page 315: ...Load the envelope in vertically with the address side facing up so that the folded flap of the envelope will be faced down on the right side 315...

Page 316: ...3 Select Postcard for Paper Size from the print dialog Select Hagaki Hagaki A Hagaki K Hagaki K A Ink Jet Hagaki Ink Jet Hagaki A for Media Type from the print dialog Important This printer cannot pr...

Page 317: ...r Default is selected in the displayed dialog 1 Note It may take a little time for your printer to appear 2 Select the printer 2 Select the printer listed as Bonjour Multifunction Note Check the follo...

Page 318: ...alog Use this procedure to set the page paper settings before printing 1 Select Page Setup from the File menu of the application software 1 The Page Setup dialog opens Opening the Print Dialog Use thi...

Page 319: ...eck the printing status 2 You can check the name of the file being printed or ready for being printed Deletes the specified print job Stops printing the specified document Resumes printing the specifi...

Page 320: ...emaining Delete unnecessary print jobs from the print status check screen 1 Open System Settings and select Printers Scanners 1 2 Select your model and then click Printer Queue 2 The print status chec...

Page 321: ...and PC You cannot remove the printer if you are not logged on as the administrator For information about an administrative user see Users Groups from System Settings 1 Open System Settings and select...

Page 322: ...Printing Using Canon Application Software Easy PhotoPrint Editor Guide 322...

Page 323: ...Printing from Smartphone Tablet Printing from iPhone iPad iPod touch iOS Printing from Smartphone Tablet Android 323...

Page 324: ...Printing Hagaki and Envelopes For Windows Printing on Postcards Setting Up Envelope Printing For macOS Printing on Postcards 324...

Page 325: ...type 5 Select the Hagaki you want to use from Hagaki in Media Type Important This printer cannot print on postcards that have photos or stickers attached You will get cleaner printing if you print the...

Page 326: ...3 Select Postcard for Paper Size from the print dialog Select Hagaki Hagaki A Hagaki K Hagaki K A Ink Jet Hagaki Ink Jet Hagaki A for Media Type from the print dialog Important This printer cannot pr...

Page 327: ...elected for Printer Paper Size the printer rotates the paper 90 degrees to the left to print regardless of the Rotate 90 degrees left when orientation is Landscape setting for Custom Settings in the M...

Page 328: ...g paper When you loading paper in the rear tray The screen to register the rear tray paper information is displayed If the page size on the touch screen matches the size of the paper loaded in the rea...

Page 329: ...ze of the loaded paper Note For more on the proper combination of paper settings you can specify by the printer driver Windows or on the touch screen Paper Settings on the Printer Driver and the Print...

Page 330: ...aper size setting for printing Replace the paper and print Select if you want to print after replacing the paper of the rear tray or the cassette For example when the paper size setting for printing i...

Page 331: ...etwork Easy Understanding Network Connections Solve Network Troubles with The Printer s Diagnostic Functions Cannot Find Printer on Network Windows macOS Cannot Proceed Beyond Printer Connection Scree...

Page 332: ...Driver in Network Environment Windows Perform Replace Ink in Print Head Refilling Ink Tanks Questions not Listed Above Error Cannot Use Previous Applications Network Switching Printer s Connection to...

Page 333: ...tic 2 sided Printing Problems Paper Does Not Feed from Paper Source Specified in Printer Driver Windows Printed Barcodes Are Not Recognized The Print Position Shifts Security Other Printer Does Not Tu...

Page 334: ...Cannot Connect Smartphone Tablet to Wireless Router WPS Router Button Connection Switching Printer s Connection to Network or Devices Cannot Find Printer on Network Windows macOS LAN Setting Tips Chan...

Page 335: ...inter s Connection to Network or Devices Checking Status Code Printing Scanning from Smartphone Tablet Cannot Print Scan from Smartphone Tablet Downloading Canon PRINT Problems while Using Printer Mes...

Page 336: ...Printing Network Settings Checking Status Code Problems while Using Printer Message Appears on Computer During Setup Cannot Find Printer on Network Windows macOS 336...

Page 337: ...Network Communication Problems Cannot Find Printer on Network Windows macOS Wireless Router Problems Printer Settings Smartphone Tablet Troubles for Network 337...

Page 338: ...Printer on Network Windows macOS Cannot Find Printer on Network Cannot Proceed Beyond Printer Connection Screen Cannot Find Printer Connected via USB Searching Printer by IP Address or Host Name Durin...

Page 339: ...nnection Assistant After the condition improves redo the setup of the printer Wi Fi Connection Assistant is a powerful solution tool for network problems Step 1 Check Basic Items for Network Step 2 So...

Page 340: ...Settings Note Depending on the wireless router note that different network name SSID is assigned for a bandwidth 2 4 GHz or 5 GHz or its usage for PC or game machine using alphanumeric characters at t...

Page 341: ...e printer cannot be found on the setup screen using LAN connection setup make sure that all the network devices are connected to the router and the hub via LAN cables and that all the devices are turn...

Page 342: ...ave oven that emits radio waves of the same frequency bandwidth as a wireless router is nearby it may cause interference Place the wireless router as far away from interference sources as possible Ste...

Page 343: ...ection is not established properly Change the network SSID to use only single byte alphanumeric characters Check 3 Solve network troubles with the printer s diagnostic functions See below Solve Networ...

Page 344: ...ion of the Type B connector and connect to the printer For details refer to the instruction manual supplied with the USB cable Check 2 Follow procedure below to connect printer and computer again 1 Un...

Page 345: ...Important When installing the MP Drivers Printer Driver make sure you select the correct printer name For Windows To restart your computer choose Restart instead of Shut down 345...

Page 346: ...Key Password Unknown Checking Wireless Router SSID Key Printer Cannot Be Used After Replacing Wireless Router or Changed Router Settings WPS Router Button Connection Privacy Separator SSID Separator...

Page 347: ...A2 WPA3 Key Set for wireless router Unknown Cannot Connect Check the wireless router settings For more on setting up a wireless router see the instruction manual provided with the wireless router or c...

Page 348: ...AE WPA3 Personal Some printers support IEEE802 1X EAP WPA WPA2 WPA3 Enterprise To configure IEEE802 1X EAP WPA WPA2 WPA3 Enterprise you also need to configure the authentication Radius server Contact...

Page 349: ...Note Wi Fi Connection Assistant allows you to diagnose and repair the network status Select the link below to download Wi Fi Connection Assistant and install it Checking Printer Connection Status Usin...

Page 350: ...Some printers support IEEE802 1X EAP WPA WPA2 WPA3 Enterprise To configure IEEE802 1X EAP WPA WPA2 WPA3 Enterprise you also need to configure the authentication Radius server Contact the network admi...

Page 351: ...Solve Network Troubles with The Printer s Diagnostic Functions Checking Network Information of Printer Checking Status Code Printing Network Settings Restoring Printer s LAN Settings to Defaults Defau...

Page 352: ...LAN Follow the procedure below to print out the network settings information Step 1 Check that printer and wireless router are turned on Turn the wireless router back on Wait about five minutes and th...

Page 353: ...ou that Canon software is attempting to access the network If this warning message appears set the security software to always allow access Quit the security software and make sure that the printer is...

Page 354: ...the wireless router connect it to the LAN port of the wireless router C 3 No IP address is assigned You can also check that the item 3 2 12 in the printed network settings information is blank Check...

Page 355: ...ss communication can be impeded by building materials containing metal or concrete If the printer cannot communicate with the computer over a Wi Fi due to a wall place the printer and the computer in...

Page 356: ...7 There may be a problem with the signal Check the following items Check Monitor signal status and move printer and wireless router as necessary Place the printer and wireless router where there are n...

Page 357: ...the following items Check 1 Password on your wireless router may not match password you entered Passwords are case sensitive Enter the password correctly Check 2 Set up printer again and reconnect to...

Page 358: ...rs is too many Wireless Direct does not allow more than 5 devices to be connected When you want to connect additional devices disconnect any devices that are not in use before adding them Check 4 Chec...

Page 359: ...placed too far away from device If the distance between the printer and the device is too far wireless communication becomes poor Place the printer and the device close to each other Note Wireless Di...

Page 360: ...indows you can check the network setting information on the computer screen Canon Wi Fi Connection Assistant Screen Checking Computer IP Address or MAC Address To check the IP Address or MAC Address o...

Page 361: ...macOS 1 Start Terminal as shown below 1 Select Computer from Go menu of Finder double click Macintosh HD Applications Utilities Terminal 2 Type ping c3 XXX XXX XXX XXX and press Enter 2 XXX XXX XXX X...

Page 362: ...rmation To check the printer s network settings information display it using the operation panel of the printer or print it out Display on the operation panel LAN settings Print the network settings P...

Page 363: ...the HOME screen is displayed 4 Select Printer settings 4 5 Select LAN settings 5 6 Select Print details 6 7 Check message and select Yes 7 8 When the confirmation screen for printing passwords appear...

Page 364: ...reless LAN network name SSID 3 2 7 Channel Channel XXX 1 to 13 36 40 44 48 52 56 60 64 100 104 108 112 116 120 124 128 132 136 140 149 153 157 161 165 3 2 8 Encryption Encryption method none TKIP AES...

Page 365: ...XXX XXXX XXXX XXXX 3 2 28 Default Gateway3 Default gateway 3 XXXX XXXX XXXX XXXX XXXX XXXX XXXX XXXX 3 2 29 Default Gateway4 Default gateway 4 XXXX XXXX XXXX XXXX XXXX XXXX XXXX XXXX 3 2 33 IPsec IPse...

Page 366: ...sable 3 3 18 Frequency Wireless Direct fre quency 2 4 5 GHz 4 Wired LAN Wired LAN Enable Disable 4 1 MAC Address MAC address XX XX XX XX XX XX 4 2 Connection Wired LAN status Active Inactive 4 3 TCP I...

Page 367: ...XXXX XXXX XXXX XXXX XXXX XXXX 4 21 Default Gateway4 Default gateway 4 XXXX XXXX XXXX XXXX XXXX XXXX XXXX XXXX 4 25 IPsec IPsec setting Active Inactive 4 26 Security Protocol Security method ESP ESP A...

Page 368: ...xxxxxxxx xxxxxxxx xxxxxxxx 7 Web Services Web Services 7 1 Unsent Usage Logs Number of unsent us age logs 0 to 200 7 2 Usage Log Last Sent Last date when usage log was sent XXXXXXXX 7 3 Web Service St...

Page 369: ...SNMPv1 Prohibit use of SNMPv1 Enable Disable 9 3 2 Port usage policy Port Usage Policy Restrict LPD port Restrict LPD port Enable Disable Restrict RAW port Restrict RAW port Enable Disable Restrict F...

Page 370: ...Disable Prohibit use of default password for remote access Prohibit use of default password for remote access Enable Disable 9 4 3 Password settings poli cy Password settings poli cy Minimum number of...

Page 371: ...yption Enable Disable Use TPM to store pass word and key Use TPM to store pass word and key Enable Disable 9 6 Log Log function Force recording of audit log Force recording of audit log Enable Disable...

Page 372: ...9 7 3 Storage Storage policy Force complete dele tion of data Force complete dele tion of data Enable Disable XX represents alphanumeric characters 372...

Page 373: ...le To use the printer over a network again after restoring it to the factory defaults refer to Setup Guide and redo setup If User management settings is enabled or LCD Remote UI and other tools is set...

Page 374: ...Enable disable IPv6 Enable Enable disable WSD Enable Timeout settings WSD 15 minutes Enable disable Bonjour Enable Bonjour service name Canon ModelName LPR protocol settings Enable RAW protocol Enabl...

Page 375: ...5GHz Switch 2 4GHz 1 Default value depends on printer To check value use operation panel 2 ab is specified at random and XX represents last two digits of printer s MAC address The value is specified w...

Page 376: ...the printer to the Wireless Direct Restrictions Some printers support IEEE802 1X EAP WPA WPA2 WPA3 Enterprise If you enable Wireless Direct while IEEE802 1X EAP WPA WPA2 WPA3 Enterprise is enabled IE...

Page 377: ...yed QR code and connect the printer from Connect to smartphone Others Android device 1 Select QR Code 1 2 Scan the displayed QR code with the Android device in one of the following ways 2 Select netwo...

Page 378: ...e printer Note If the printer is set to display a confirmation screen in Connection request confirmation of Changing Wireless Direct Setting when the wireless direct compatible device connects to the...

Page 379: ...re displayed Change network name SSID Change the identifier SSID for Wireless Direct The identifier SSID is the printer s name device name displayed on a Wi Fi Direct compatible device Follow the proc...

Page 380: ...ing to the printer If you want the printer to display the screen to inform you a Wi Fi Direct compatible device is connecting to the printer select ON Important To prevent an unauthorized access we re...

Page 381: ...Problems While Printing Scanning from Smartphone Tablet Cannot Print Scan from Smartphone Tablet 381...

Page 382: ...the power is already turned on cycle the power switch It may be necessary to resolve wireless router problems e g update interval of a key problems of DHCP update interval energy saving mode or to upd...

Page 383: ...network settings of your smartphone tablet are not identical with those of the wireless router change the network settings of it to match with those of the wireless router Check 5 Make sure the printe...

Page 384: ...our device For details refer to your device s instruction manual Check 4 Check that printer is selected as connection for devices e g smartphone tablet Select the network name SSID for Wireless Direct...

Page 385: ...k that 5 devices are already connected Wireless Direct does not allow more than 5 devices to be connected Note Some printers support IEEE802 1X EAP WPA WPA2 WPA3 Enterprise Note that when IEEE802 1X E...

Page 386: ...Problems Printer Does Not Print Printer Does Not Pick Up or Feed the Paper No Paper Error Resolving Print Quality Problems Change to Offline Windows No Ink Level Appears in Canon IJ Status Monitor Win...

Page 387: ...properly connected to computer If you are using a USB cable make sure it is securely connected to both the printer and the computer When the USB cable is securely plugged in check the following If yo...

Page 388: ...dows Deleting the Undesired Print Job For macOS Deleting the Undesired Print Job Check 6 Are your printer s Printer Driver selected when printing The printer will not print properly if you are using a...

Page 389: ...e Setup Tab Description Important Selecting On for Prevention of Print Data Loss may reduce print quality After printing is completed select Off for Prevention of Print Data Loss Check 8 If printing f...

Page 390: ...tation regardless of the printing orientation When you load the paper on the rear tray place the print side facing UP and align the right and left paper guides with the paper stack Loading Paper In th...

Page 391: ...outlet 1 2 Fold one A4 sheet in half and insert it horizontally into the rear tray 2 Insert the paper so that your hand does not directly touch the part in the center of the rear tray when removing th...

Page 392: ...Check 9 If two or more sheets of paper feed from cassette at once clean inside of cassette Cleaning Cassette Pads Check 10 Are transport unit attached properly See Rear View for the positions of the...

Page 393: ...t is not possible to obtain the proper result If you are printing a photograph or an illustration an incorrect paper type setting may reduce the quality of the printout color Also if you print with an...

Page 394: ...k Does Not Come Out Blurry or Fuzzy Inaccurate or Bleeding Colors Streaks Printed in Black and White Lines Are Misaligned Distorted Paper Is Smudged Printed Surface Is Scratched Ink Blots Paper Curl 3...

Page 395: ...Smudged Uneven Colors Streaked Colors Printed Barcodes Are Not Recognized The Print Position Shifts Note Depending on the specifications of the printer you are using some of the features described co...

Page 396: ...he ink ejects properly from the print head nozzles Step 1 Printing a Nozzle Check Pattern After printing the nozzle check pattern examine the pattern From the printer Printing the Nozzle Check Pattern...

Page 397: ...ep cleaning see If Printing Is Faint or Uneven Check 3 When using paper with one printable surface check the correct printable side of the paper Printing on the wrong side of such paper may cause uncl...

Page 398: ...ect Setup on HOME screen Printer settings Other printer settings and set Force ink tank selection to All ink tanks Note If User management settings is enabled the user selection screen is displayed be...

Page 399: ...isaligned distorted or print results are otherwise unsatisfactory adjust the print head position Aligning the Print Head Note If the problem is not resolved after performing the print head alignment p...

Page 400: ...ed Media Types Check 3 Correct curl before loading paper When using Photo Paper Plus Semi gloss even if the sheet is curled load one sheet at a time as it is Rolling this paper in the opposite directi...

Page 401: ...to prevent paper abrasion Adjusting the setting to prevent paper abrasion will widen the clearance between the print head and the paper If you notice abrasion even with the media type set correctly to...

Page 402: ...Check the brightness setting in the Printer Driver Adjusting Brightness Check 7 Is paper feed roller dirty Clean paper feed roller Cleaning Paper Feed Rollers Note Cleaning the paper feed roller abra...

Page 403: ...If you specify the administrator password enter the password 3 Select Printer settings 3 4 Select Ink drying wait time 4 For macOS Set the waiting time using Remote UI Opening Remote UI for Maintenanc...

Page 404: ...olving Print Quality Problems Note The direction or pattern of the vertical lines A may vary depending on the image data or the print setting This printer performs automatic cleaning when necessary to...

Page 405: ...ss print data check box and click OK Important Clear the check box once printing is complete Check 2 Are you trying to print a large data file Windows If you are trying to print a large data file prin...

Page 406: ...u trying to print a large data file Windows If you are trying to print a large data file printing may not be performed properly due to missing print data Select On for Prevention of Print Data Loss on...

Page 407: ...ality settings Resolving Print Quality Problems Check 2 Perform bottom plate cleaning to clean inside of printer Cleaning Inside the Printer Bottom Plate Cleaning Note During 2 sided printing or too m...

Page 408: ...ality using operation panel of the printer or from computer may improve the print result Check 2 Perform print head alignment Aligning the Print Head Note If the problem is not resolved after performi...

Page 409: ...fline proceed to the next step 3 Check the name of the MP Drivers Printer Driver 3 Check the names of the printer and MP Drivers Printer Driver match Set the using printer as default Default Printer K...

Page 410: ...ion Assistant to change settings 5 Diagnose and repair the network connections using Wi Fi Connection Assistant Download Wi Fi Connection Assistant from the below page and install it on your computer...

Page 411: ...Mechanical Problems Printer Does Not Turn On Printer Turns Off Unexpectedly or Repeatedly USB Connection Problems Switching Printer s Connection to Network or Devices Wrong Language Appears in LCD 411...

Page 412: ...eck 2 Make sure power cord is securely connected to printer and then turn on again Check 3 Unplug printer leave it for at least 2 minutes and then plug it back in and turn on again If this does not so...

Page 413: ...1 Check that printer is turned on 1 2 Select Setup on HOME screen 2 Note If User management settings is enabled the user selection screen is displayed before the HOME screen is displayed 3 Select ECO...

Page 414: ...rly Note If your system environment does not support Hi Speed USB the printer operates at the slower speed of Full Speed or Low Speed In this case the printer works properly but printing scanning spee...

Page 415: ...d USB connection The types of USB cables that can be used differ depending on your printer Check the shape of the USB cable connection of the printer What Is USB cable Does the USB port on your comput...

Page 416: ...Select Setup 2 Using Touch Screen Note If User management settings is enabled the user selection screen is displayed before the HOME screen is displayed 3 Select 3 4 Select fifth setting item from to...

Page 417: ...vers Printer Driver Installation Windows Cannot Proceed Beyond Printer Connection Screen Cannot Find Printer Connected via USB Updating MP Drivers Printer Driver in Network Environment Windows Disable...

Page 418: ...iver 1 For Windows 11 Select Settings Apps Select Apps features For Windows 10 Select Settings Apps For Windows 8 1 Windows 7 Select Control Panel Programs and Features 2 Check if there is Canon XXX s...

Page 419: ...ion of the Type B connector and connect to the printer For details refer to the instruction manual supplied with the USB cable Check 2 Follow procedure below to connect printer and computer again 1 Un...

Page 420: ...Important When installing the MP Drivers Printer Driver make sure you select the correct printer name For Windows To restart your computer choose Restart instead of Shut down 420...

Page 421: ...Printer Driver for your model on the download page of the Canon website After the download is completed overwrite and install the new version of the MP Drivers Printer Driver according to the specifie...

Page 422: ...Errors and Messages When Error Occurred Message Is Displayed 422...

Page 423: ...paper runs out or jams a troubleshooting message is displayed automatically For some errors a support code error number is also displayed Take the appropriate action described in the message When a Su...

Page 424: ...are displayed on the Printer s Touch Screen For details on how to resolve errors with Support Codes see List of Support Codes for Printer Errors For details on how to resolve errors without Support C...

Page 425: ...the correct way to turn the power off Cannot connect to the server Please wait a while and try again The printer cannot connect to the server due to a communication error Select OK on the printer s t...

Page 426: ...re below to check the device status 1 Select Control Panel Hardware and Sound Device Manager 1 Note If the User Account Control screen is displayed select Yes 2 Open USB Printing Support Properties 2...

Page 427: ...Refer to Updating the Driver to uninstall unnecessary drivers and install the latest drivers Could not print Application name File name Try printing again once the current job is complete 427...

Page 428: ...h a soft cloth that gets wet with water and squeezed firmly When transporting the printer pack the printer in a plastic bag so that ink does not leak Pack the printer in a sturdy box so that it is pla...

Page 429: ...e printer unable to print 2 Open top cover 2 3 Close ink valve 3 Close the ink valve by tilting the ink valve lever tightly to the left Important If you pack the printer without closing the ink valve...

Page 430: ...act paper output tray 1 2 Retract paper support and then close it 2 3 Unplug cable and power cord 3 4 Use adhesive tape to secure all covers on the printer to keep them from opening 4 5 Pack printer i...

Page 431: ...ttach the protective material to the printer to pack it securely in the box Important Carry the printer as shown in the illustration below If you hold the cassette when carrying the cassette may come...

Page 432: ...paper runs out or jams a troubleshooting message is displayed automatically For some errors a support code error number is also displayed Take the appropriate action described in the message When a Su...

Page 433: ...are displayed on the Printer s Touch Screen For details on how to resolve errors with Support Codes see List of Support Codes for Printer Errors For details on how to resolve errors without Support C...

Page 434: ...to 1ZZZ 1000 1007 1008 1070 1200 1215 1262 1300 1303 1304 1309 1310 1313 1337 1369 136A 1401 1403 1405 140B 1434 147C 147D 1496 15A1 15A2 15A3 1643 1723 1724 1725 1726 1727 1872 1873 1876 2000 to 2ZZ...

Page 435: ...to 7ZZZ 7500 7600 7700 7800 A000 to ZZZZ B506 B508 B509 C000 C100 C101 Note If no support code is displayed but the paper is not fed or output normally see What to Do If Paper Is Not Fed Output Normal...

Page 436: ...print on a small paper size such as 4 x6 10x15cm size What to Do When Small Paper Sizes Are Jammed Check 2 Is the jammed paper visible in the paper output slot A Removing Jammed Paper through Paper O...

Page 437: ...e ejected automatically Press the printer s Stop button to stop printing and then turn off the printer If the paper cannot be pulled out or is torn open the printer s top cover and remove jammed paper...

Page 438: ...y Removing Jammed Paper from Rear Side 2 Load paper in rear tray 2 Loading Photo Paper Plain Paper in Rear Tray Loading Envelopes Medicine Envelopes Delivery Slips in Rear Tray Note Make sure you are...

Page 439: ...mmed Paper from Rear Side 2 Load paper in cassette 2 Loading Plain Paper Delivery Slips in Cassette Loading Medicine Envelopes in Cassette Note Make sure you are using suitable paper and loading it co...

Page 440: ...or scratch this part by touching it with paper or your hand it could damage the printer 4 Check if jammed paper is under print head holder 4 If the jammed paper is under the print head holder move the...

Page 441: ...5 Hold jammed paper firmly with both hands 5 If the paper is rolled up pull it out and grasp the edges of the paper 441...

Page 442: ...ll jammed paper is removed 7 If the paper tears when you pull out it a bit of paper may remain in the printer Check the following and remove any remaining paper Any paper left under the print head hol...

Page 443: ...the rear cover and remove the jammed paper from the rear side Removing Jammed Paper from Rear Side 8 Close top cover 8 To close the top cover lift it up slightly and then lower it gently 9 Plug printe...

Page 444: ...s in Cassette Loading Medicine Envelopes in Cassette Note Make sure you are using suitable paper and loading it correctly We recommend using paper sizes other than A5 to print documents with photos or...

Page 445: ...unplug it 2 3 Retract rear tray and paper output tray 3 4 Turn printer so that rear side of printer faces toward you 4 Important When changing the orientation of the printer do not turn the printer up...

Page 446: ...p pull it out and grasp the edges of the paper Note Do not touch the inner parts of the printer If you are unable to remove the jammed paper follow the steps below to detach the transport unit and the...

Page 447: ...not touch the inner parts of the printer 3 Make sure all jammed paper is removed 3 4 If parts A are raised tip them toward you 4 Important If you replace the transport unit without lowering parts A to...

Page 448: ...5 Replace transport unit 5 Insert the transport unit until it reaches the back of the printer 7 Attach rear cover 7 448...

Page 449: ...recommend using paper sizes other than A5 to print documents with photos or graphics A5 paper may curl and jam as it leaves the printer 10 Redo printing 10 All jobs in the print queue are canceled Re...

Page 450: ...Important Do not tilt the printer when moving it since the ink may leak out When transporting the printer for repairing it see Repairing Your Printer 450...

Page 451: ...ay What to Do After loading the paper in the rear tray correctly follow the messages displayed on the printer s touch screen Loading Photo Paper Plain Paper in Rear Tray Loading Envelopes Medicine Env...

Page 452: ...the paper in the cassette 1 correctly follow the messages displayed on the printer s touch screen Loading Plain Paper Delivery Slips in Cassette Loading Medicine Envelopes in Cassette Note This error...

Page 453: ...the paper in the cassette 2 correctly follow the messages displayed on the printer s touch screen Loading Plain Paper Delivery Slips in Cassette Loading Medicine Envelopes in Cassette Note This error...

Page 454: ...1200 Cause Top cover is open What to Do Close the top cover and wait for a while Always close the top cover after opening it for ink refilling or any other reason 454...

Page 455: ...nd turn it back on If this does not solve the problem contact your nearest Canon service center to request a repair Important Do not tilt the printer when moving it since the ink may leak out When tra...

Page 456: ...stalled properly or may not be compatible with this printer What to Do Remove the maintenance cartridge and then reinstall it correctly Refer to Replacing the Maintenance Cartridge for details on remo...

Page 457: ...e attached What to Do Open the top cover and make sure the tape for securing the print head holder during transportation has been removed If the tape is still there remove it and close the top cover W...

Page 458: ...1723 Cause The maintenance cartridge is not installed What to Do Install the maintenance cartridge Refer to Replacing the Maintenance Cartridge for details on installing the maintenance cartridge 458...

Page 459: ...stalled maintenance cartridge cannot be used This printer cannot use maintenance cartridges that have been installed in other printers What to Do Replace with a new maintenance cartridge Replacing the...

Page 460: ...stalled properly or may not be compatible with this printer What to Do Remove the maintenance cartridge and then reinstall it correctly Refer to Replacing the Maintenance Cartridge for details on remo...

Page 461: ...e the maintenance cartridge Replacing the Maintenance Cartridge The condition of the maintenance cartridge when this error is displayed will depend on where and how the printer is used When this messa...

Page 462: ...to Do The printer will not be able to print with a full maintenance cartridge Tap the printer s OK button to cancel the error and then prepare a new maintenance cartridge For details on the maintenan...

Page 463: ...g the paper in the cassette 1 and installing the cassette in the printer follow the messages displayed on the printer s touch screen Important Align the paper guides of the cassette 1 with both edges...

Page 464: ...disable notifications for this error disable the function to detect paper setting mismatch What to Do To specify the appropriate print settings for the paper loaded in the printer and retry printing...

Page 465: ...e 4 Check paper information paper size and media type 4 The paper information is used to specify the print settings in step 5 When using paper from the rear tray Check the paper information paper size...

Page 466: ...type see below Paper Settings on the Printer Driver and the Printer Paper Size Paper Settings on the Printer Driver and the Printer Media Type Other Measures Load paper specified in print settings To...

Page 467: ...2 Select Replace the paper and print 2 3 Load paper specified in print settings into rear tray cassette 3 When changing the paper in the rear tray When changing the paper in the cassette 467...

Page 468: ...assette is changed Confirm that the paper information displayed matches the print settings and then select Yes Print without changing paper and print settings For example to continue printing with a m...

Page 469: ...ur printer s settings Print with the loaded paper may not be displayed Disable notifications for 2113 error To disable the function to detect paper setting mismatch follow the steps below 1 Select Set...

Page 470: ...3 Select Detect paper setting mismatch 3 4 Select Disable 4 470...

Page 471: ...y Note To disable notifications for this error disable the function to detect paper setting mismatch What to Do To specify the appropriate print settings for the paper loaded in the rear tray and retr...

Page 472: ...ttings in step 5 Check the paper information paper size and media type and select Yes 5 Redo printing 5 Note For the proper combination of paper size and media type see below Paper Settings on the Pri...

Page 473: ...ace the paper in the rear tray with paper suitable for the print settings and continue printing follow the steps below 1 Check print settings and select Next 1 2 Select Replace the paper and print 2 3...

Page 474: ...gs and then select Yes Print without changing paper and print settings For example to continue printing with a mismatch between the paper loaded in the rear tray and the paper information registered i...

Page 475: ...ur printer s settings Print with the loaded paper may not be displayed Disable notifications for 2114 error To disable the function to detect paper setting mismatch follow the steps below 1 Select Set...

Page 476: ...3 Select Detect paper setting mismatch 3 4 Select Disable 4 476...

Page 477: ...ancel the error You cannot replace the internal parts of the printer yourself Contact your nearest Canon service center to request a repair as soon as possible Important Do not tilt the printer when m...

Page 478: ...3252 Cause The maintenance cartridge is almost full What to Do The printer will not be able to print with a full maintenance cartridge Tap the printer s OK button to clear the error message 478...

Page 479: ...ting with current print settings What to Do Press the printer s Stop button to cancel printing Change the print settings specified when printing and retry printing Important B6 Half size paper does no...

Page 480: ...print head holder motion be careful not to touch clear film A white belt B or tubes C If you soil or scratch this part by touching it with paper or your hand it could damage the printer Turn the prin...

Page 481: ...back on 2 3 Perform Replace Ink in Print Head 3 Perform Replace Ink in Print Head If the error recurs after taking the above actions contact your nearest Canon service center to request a repair Impo...

Page 482: ...n the printer again and turn it back on If this does not solve the problem contact your nearest Canon service center to request a repair Important Do not tilt the printer when moving it since the ink...

Page 483: ...the correct way to turn the power off Cannot connect to the server Please wait a while and try again The printer cannot connect to the server due to a communication error Select OK on the printer s t...

Page 484: ...re below to check the device status 1 Select Control Panel Hardware and Sound Device Manager 1 Note If the User Account Control screen is displayed select Yes 2 Open USB Printing Support Properties 2...

Page 485: ...Refer to Updating the Driver to uninstall unnecessary drivers and install the latest drivers Could not print Application name File name Try printing again once the current job is complete 485...

Reviews: