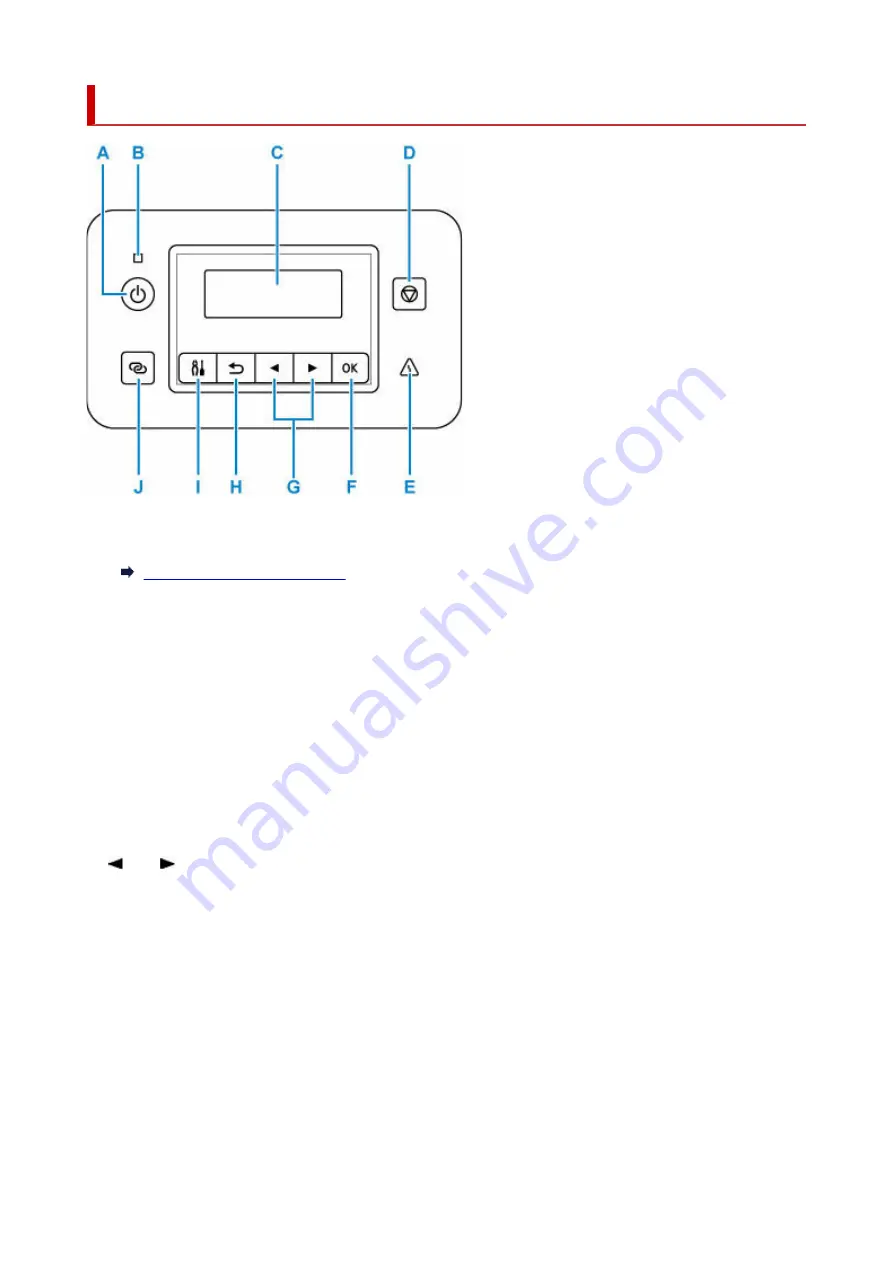
Operation Panel
A: ON button
Turns the power on or off.
Turning the Printer On and Off
B: ON lamp
Lights after flashing when the power is turned on.
C: LCD (Liquid Crystal Display)
Displays messages, menu items, and the operational status.
D: Stop button
Cancels operation when printing is in progress or when selecting a menu item.
E: Alarm lamp
Lights or flashes when an error occurs.
F: OK button
Finalizes your selection of items. Also used to resolve errors.
G:
and
buttons
Used to select a setting item. These buttons are also used for entering characters.
H: Back button
Returns the LCD to the previous screen.
I: Setup button
Displays the
Setup menu
screen. With this menu, you can perform printer maintenance and change
printer settings. Also used for selecting the input mode.
J: Wireless connect button
To set wireless router information in the printer directly from a smartphone or other such device (without
having to do any procedures at the router), hold down this button.
160
Summary of Contents for GX5050
Page 1: ...GX5000 series Online Manual English...
Page 44: ...For macOS Refer to Changing the Connection Mode in Setup Guide 44...
Page 47: ...Restrictions Notices when printing using web service Notice for Web Service Printing 47...
Page 53: ...For macOS Refer to Changing the Connection Mode in Setup Guide 53...
Page 57: ...4 If you see a message other than the above follow the instructions 4 57...
Page 79: ...TR9530 series TS3300 series E3300 series 79...
Page 80: ...Handling Paper Ink Tanks etc Loading Paper Refilling Ink Tanks 80...
Page 97: ...Refilling Ink Tanks Refilling Ink Tanks Checking Ink Level Ink Tips 97...
Page 109: ...Adjusting Print Head Position 109...
Page 120: ...120...
Page 124: ...124...
Page 127: ...Safety Safety Precautions Regulatory Information WEEE 127...
Page 151: ...151...
Page 155: ...Main Components Front View Rear View Inside View Operation Panel 155...
Page 159: ...Repairing Your Printer I Print Head Holder The print head is pre installed 159...
Page 168: ...Note When Wi Fi wired LAN or both are disabled the icon icon or both are not displayed 168...
Page 197: ...6 Select ON and then press the OK button 6 197...
Page 275: ...Printing Using Canon Application Software Easy PhotoPrint Editor Guide 275...
Page 315: ...For details about the functions of your printer see Specifications 315...
Page 347: ...Try printing again once the current job is complete 347...
Page 367: ...When transporting the printer for repairing it see Repairing Your Printer 367...


