background image

25

1

2

3

4

Introduction

Table of 

Contents

Basic 

Operation

Advanced 
Operation

High-Level 

Functions

Reference

Preferences

Contents 

Lookup

Index

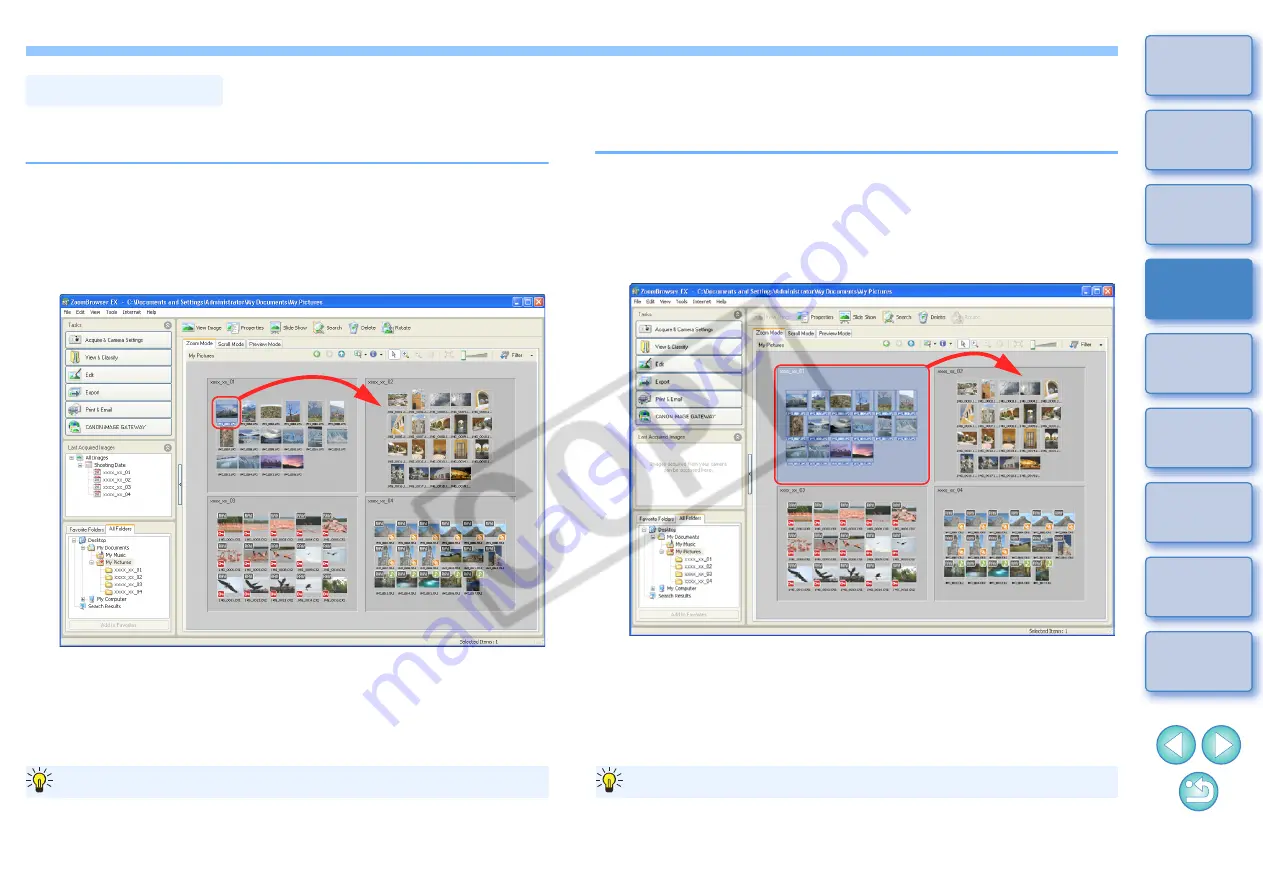
You can move or copy images to separate folders and organize them 
according to shot date or theme.

Drag the image to be moved or copied.

To move:Drag the image and release when the image is in the 

destination folder.

To copy: Drag the image while holding down the < Ctrl > key and 

release when the image is in the destination folder.

The image is moved or copied to the folder it was dragged to.

Moving Images

Drag an image in the main window to a folder in the folder area on the 
bottom left of the window in the same way as described above to move 
or copy the image.

Moving images to a folder in the folder area

Moving Images in Folders

You can move or copy folders that contain images, and organize images 
in folders.

Drag the folder to be moved or copied.

To move:Drag the folder and release when the folder is in the 

destination folder.

To copy: Drag the folder while holding down the < Ctrl > key and 

release when the folder is in the destination folder.

The folder is moved or copied to the folder it was dragged to.

Drag a folder in the main window to a folder in the folder area on the 
bottom left of the window in the same way as described above to move 
or copy a folder.

Moving folders in the folder area

Summary of Contents for EOS Rebel XS 18-55IS Kit

Page 1: ...nual In this manual ZB is used for ZoomBrowser EX In this manual the windows used in the examples are from Windows XP Click on the icons below on the bottom right of the screen to switch between pages Go to next page Go to previous page Return to a page you had previously displayed Click on the chapter headings on the right side of the screen to switch to the contents page of each chapter CANON IN...

Page 2: ...LAIM ALL WARRANTIES EXPRESS OR IMPLIED INCLUDING ANY WARRANTY OF MERCHANTABILITY OR FITNESS FOR A PARTICULAR PURPOSE WITH RESPECT TO THE SOFTWARE NEITHER CANON NOR ANY OF CANON S SUBSIDIARIES DISTRIBUTORS OR DEALERS IS LIABLE FOR ANY DAMAGES HOWSOEVER CAUSED INCLUDING WITHOUT LIMITATION DIRECT CONSEQUENTIAL OR INCIDENTAL LOSS OR DAMAGE INCLUDING LOSS OF PROFITS EXPENSE OR INCONVENIENCE HOWSOEVER C...

Page 3: ...he computer screen Camera switch name or icon or a keyboard key name p Reference page jump to page by clicking Help Tip Important information Helpful information Makeup of Each Chapter Chapter 1 Basic Operation Starting up and exiting ZB Downloading images to your computer Checking images Printing images Chapter 2 Advanced Operation Efficient checking of images Organizing images Editing images Uti...

Page 4: ...20 Enlarging a Specific Part of an Image 21 Sorting Images 21 Arranging Images in the Main Window 22 Extracting Images You Want to Display Filter Display 22 Efficiently Checking Sorting Images 23 Organizing Images 24 Creating a Folder for Saving Images 24 Moving Images 25 Moving Images in Folders 25 Changing Image File Names or Folder Names 26 Deleting Images 26 Deleting Folders 27 Registering Fre...

Page 5: ...ng for Images 53 Performing Advanced Editing 54 Adjusting the Color of an Image in RGB 54 Adjusting the Brightness Level 55 Adjusting the Tone Curve 55 Unsharpening an Image 56 Transferring Images to Other Image Editing Software 57 Merging Images to Create Panorama Images 57 Adjusting RAW Images 59 Applying Picture Style Files 61 White Balance Files and Tone Curve Files 62 Saving White Balance Fil...

Page 6: ...are Uninstalling 71 System Requirements 72 Supported Images 72 List of Main Window Functions 73 Zoom Mode 73 Scroll Mode 74 Preview Mode 75 List of Viewer Window Functions 76 List of Photo Print Window Functions 77 List of Index Print Window Functions 78 List of RAW Image Task Main Window Functions 79 Contents Lookup 80 Index 81 About This Instruction Manual 83 Trademark Acknowledgments 83 ...

Page 7: ... Downloading Images Using Your Card Reader 9 Viewing an Image 11 View Images as Thumbnails in the Main Window 11 Enlarging a Selected Folder 12 Changing the Display Magnification 13 Enlarging and Viewing Images One at a Time 13 Displaying an Image Across the Whole Window Full View Display 14 Printing an Image 15 Printing One Image on One Sheet of Paper 15 Printing an Image Using Easy PhotoPrint EX...

Page 8: ...he CANON iMAGE GATEWAY button may not be displayed depending on the area you are in Downloading an Image to Your Computer Connect the camera and computer with the cable provided and download the images saved on the memory card inside the camera For downloading images start up the camera software EOS Utility from ZB and use 1 Select the save destination for the images When creating a folder refer t...

Page 9: ...mera EOS Utility starts up EOS Utility 3 Connect your camera and computer and turn the camera on Connect the camera and your computer with the interface cable provided with the camera and turn the camera on For detailed instructions on connecting your camera and computer refer to the EOS Utility Instruction Manual PDF electronic manual When the dialog box below appears select Canon EOS Utility and...

Page 10: ...to exit EOS Utility and turn the camera s power switch to OFF Click Using EOS Utility to download images makes it easier to organize your images as they are downloaded sorted and saved into folders by date Advantages of using EOS Utility to download images You can also download images to the computer using a third party card reader 1 Select the save destination for the images p 7 2Load the memory ...

Page 11: ...wnload images Downloading of images begins The downloaded images are saved in the folder selected in step 1 and are displayed in the main window of ZB The downloaded images are sorted into folders by date and saved Click the Exit button to exit Download images window Click Download images window Using ZB to download images makes it easier to organize your images as they are downloaded sorted and s...

Page 12: ...le holding down the Ctrl key on the keyboard View Images as Thumbnails in the Main Window Main window Click to select the image Display thumbnails of all the images inside the folder selected in the folder area on the left Move the cursor over the image with the mouse and you can check images that are displayed in the simple display window mouse over window To deactivate simple display click on on...

Page 13: ...displayed in folders in the main window Double click on an empty part of the folder you want to enlarge to zoom in and display the images inside that folder at a larger size Enlarge folders The folder you have double clicked zooms in Double click on an empty part of the folder To revert to the folder size before enlarging click on the top of the window You can change the speed at which a folder zo...

Page 14: ...o change the display magnification by clicking or The display magnification of the images changes The Navigator window appears and you can check and move the enlargement display position You can also move the enlargement display position by clicking on the top of the window and dragging over the window To return to full view click on the top of the window Drag to the right Navigator window Enlarge...

Page 15: ...utton appears at the bottom of the window Click this button to display the processed image When you display RAW images in the viewer window For a list of viewer window functions refer to p 76 Displaying an Image Across the Whole Window Full View Display Double click on the image you want to display across the whole window You can also display the image across the whole window by clicking on the to...

Page 16: ...he image to be printed To select multiple images click on the images while holding down the Ctrl key on the keyboard You can select all the images inside a folder by clicking on an empty part of the folder Printing One Image on One Sheet of Paper Click 2Display the print settings window Click the buttons Print Email X Photo Print The Photo Print window appears 3 Set the paper size and other settin...

Page 17: ...or later on your computer Also Easy PhotoPrint users can select Easy PhotoPrint in step 2 and print following the same steps 1 Select the image to be printed To select multiple images click on the images while holding down the Ctrl key on the keyboard You can select all the images inside a folder by clicking on an empty part of the folder Printing an Image Using Easy PhotoPrint EX Click 2Start up ...

Page 18: ...el Functions Reference Preferences Contents Lookup Index 4Specify the paper size and then click Layout Print 5 Specify the layout and then click the Print button Printing begins You can also create an album with EPP EX by clicking the Create and Print Album button in the menu in step 2 ...

Page 19: ...1 2 3 4 Introduction Table of Contents Basic Operation Advanced Operation High Level Functions Reference Preferences Contents Lookup Index Exiting ZB In the main window select the File menu X Exit ZB exits ...

Page 20: ...ages 25 Moving Images in Folders 25 Changing Image File Names or Folder Names 26 Deleting Images 26 Deleting Folders 27 Registering Frequently Used Folders as Favorite Folders 27 Deleting Favorite Folders 28 Editing an Image 29 Automatic Adjustment Using ZB 29 Adjusting Brightness Color and Contrast 31 Trimming an Image 32 Inserting Text into Images 33 Adjusting Sharpness 34 Correcting Red Eye Aut...

Page 21: ...f the main window The viewer window appears Enlarging and Checking Images One at a Time Double click 2Click or to switch to the image you want to display The shooting information is displayed by clicking on the top of the window To exit the viewer window click on the top right of the window Viewer window Select multiple images in the main window p 11 and then click on on the top left of the main w...

Page 22: ...osition by clicking on the top left of the window and dragging over the window To return to full view click on the top left of the window Drag to the right Navigator window Enlargement display position Drag to move the enlargement display position Enlargement ratio RAW images cannot be enlarged before they are processed By clicking the Display Original Image button on the bottom of the window the ...

Page 23: ...e Images are arranged in the order of most recently shot Modification Date Images are arranged in the order of most recently updated Type Images are arranged in the order of BMP images J RAW images J JPEG images J TIFF images Ascending Images are arranged from top to bottom in order of sorting criteria Descending Images are arranged from bottom to top in order of sorting criteria Extracting Images...

Page 24: ...e The main window display switches to Preview Mode Click 2Click the or the button to switch to the image you want to check and then sort with the number of You can also click on the image in the thumbnail image display area to display the image enlarged in the center of the window The selected image is enlarged in the center of the window Thumbnail image display area Click to increase or decrease ...

Page 25: ...s creating new folders for saving sorted images moving and copying images and deleting unwanted images You can create a folder to save sorted images 1 In the folder area select the location where the new folder is to be created Creating a Folder for Saving Images 2Select the File menu X New Folder The New Folder dialog box appears 3 Enter a folder name and click the OK button The new folder is cre...

Page 26: ...n window to a folder in the folder area on the bottom left of the window in the same way as described above to move or copy the image Moving images to a folder in the folder area Moving Images in Folders You can move or copy folders that contain images and organize images in folders Drag the folder to be moved or copied To move Drag the folder and release when the folder is in the destination fold...

Page 27: ...or folder name changes to the new name Changing Image File Names or Folder Names You can also change the file names in the Properties window p 47 or the image display area in Preview Mode p 75 You can also change the folder names in the Properties window p 47 Please take care as deleted images cannot be recovered 1 Select the unwanted image in the main window 2Click Delete The Confirm File Delete ...

Page 28: ...o the Recycle Bin and is deleted from ZB Right click Recycle Bin on the desktop and select Empty Recycle Bin from the menu that appears to delete the folder from your computer You can register shortcuts for frequently used folders in the Favorite Folders tab sheet in the folder area to make images easier to find Please note that because the My Pictures folder is registered as a favorite folder by ...

Page 29: ... be aware that by editing or deleting images inside registered folders you are in fact editing or deleting the original images If you have edited or deleted images in folders you have registered as favorites Deleting Favorite Folders If you no longer need a folder you have registered in the Favorite Folders tab sheet you can delete it from this tab sheet Please note that as registered folders are ...

Page 30: ...ing text into images adjustment of sharpness and red eye correction JPEG images deteriorate slightly when edited and saved and the image before editing cannot be recovered For this reason an edited JPEG image should be saved as a separate image from the original image Chapter 3 explains about high level editing functions other than those described above and adjustment of RAW images The brightness ...

Page 31: ...nt display position Auto Adjustment window Drag right to enlarge Fits the image to the window size Moves the enlargement display position Zooms in Zooms out To revert to full view click on the bottom left of the window 6Click the Save As button and save as a separate image The Save As window appears 7 Specify the save destination and then click the Save button The edited image is saved as a separa...

Page 32: ... The Color Brightness Adjustment window appears 3 Adjust the image Move the slider to the right to make the Brightness of an image appear brighter the Saturation to appear more vivid and the Contrast stronger Move the slider to the left to make the image appear darker and the saturation and the contrast weaker The image is adjusted Adjusting Brightness Color and Contrast Drag to the left or right ...

Page 33: ...l 1 Select the image you want to edit and display the Edit Image window p 29 2Select Trim and then click the Finish button The Trim Image window appears 3 Drag the trimming range The trimming range can be moved by dragging You can change the trimming range by dragging the four corners and the four sides of the trimming range Trimming an Image Trim Image window Drag 4Click the Trim Image button The...

Page 34: ... 29 2Select Insert Text and then click the Finish button The Insert Text window appears 3 Drag the range for inserting text The text insertion range can be moved by dragging You can change the text insertion range by dragging the four corners and the four sides of the text insertion range Inserting Text into Images Insert Text window Drag 4Using the keyboard enter the text you want to insert The t...

Page 35: ...nt to edit and display the Edit Image window p 29 2Select Sharpness and then click the Finish button The Sharpness window appears 3 Adjust the image Move the slider to the right to make an image harder and to the left to make an image softer The image is adjusted Adjusting Sharpness Sharpness window Drag right to adjust 4Enlarge the window and check the adjustments p 30 5 Click the Save As button ...

Page 36: ...ears 3 Click the Start button The image is corrected 4Click the Save As button and save as a separate image p 30 Correcting Red Eye Automatically Red Eye Correction window Correcting Red Eye Manually You can manually correct red eye that cannot be corrected automatically 1 Display the Red Eye Correction window Description on the left 2Enlarge the image p 30 3 Select Manual Mode and then click 4Cli...

Page 37: ...in an e mail or use them as wallpaper or screen savers for your computer You can display selected images across the whole window and switch between them as a slide show 1 Select images 2Click Slide Show The View as a Slide Show window appears Viewing Images as a Slide Show 3 Set the slide show style and then click the Finish button The Slide Show window appears and the slide show begins View as a ...

Page 38: ... way through click Slide Show window File name Rating setting Selects the image 1 Prints the image 2 Switches to the previous image Pauses the slide show Switches to the next image Ends the slide show You can attach a selected image to an e mail and send it The attached image to be sent is a copy of the original image and therefore the original image remains unaffected on your computer Please note...

Page 39: ... up and the image is attached to an e mail Enter the address and a message and send the e mail Email Images window You can make a selected image wallpaper for your computer The bitmap image for the wallpaper extension BMP is created using a copy of an image and therefore the original image remains unaffected 1 Select an image 2Click the buttons Export X Export as a Wallpaper The Export as a Wallpa...

Page 40: ...Wallpaper window 1 On the desktop right click with the mouse and in the menu that appears select Properties 2 Select the Desktop tab sheet 3 Select the file to become the wallpaper and then click the OK button To revert to the original wallpaper You can make a selected image a screen saver for your computer The data for the screen saver extension SCR is created using a copy of an image and therefo...

Page 41: ...erties Display the Screen Saver tab sheet in the Display Properties dialog box Applies the selected screen saver data Select the saved screen saver data When you checkmark Include images in the screen saver in step 3 the original image is copied to create the data for the screen saver This means that even if the original image is deleted or the file name is changed it does not affect the screen sa...

Page 42: ...indows Vista or Windows XP preinstalled and is equipped with a standard CD R RW drive 1 Insert a CD R RW disk in the CD R RW drive When the dialog box below appears select the Cancel to close the dialog box 2Select the images you want to write to the CD 3 Click the buttons Export X Backup to CD The Backup to CD window appears 4Specify the settings for writing to the CD R RW disk and then click the...

Page 43: ... Printing You can arrange multiple images in index format and print them on one sheet of paper 1 Select the images 2Click the buttons Print Email X Index Print The Index Print window appears 3 Specify settings such as the paper type and the number of prints and then click the Print button Printing begins Print preview Index Print window For a list of index print window functions refer to p 78 ...

Page 44: ... Images 50 Saving Multiple Images with New File Names 51 Classifying Images by Shot Date 52 Searching for Images 53 Performing Advanced Editing 54 Adjusting the Color of an Image in RGB 54 Adjusting the Brightness Level 55 Adjusting the Tone Curve 55 Unsharpening an Image 56 Transferring Images to Other Image Editing Software 57 Merging Images to Create Panorama Images 57 Adjusting RAW Images 59 A...

Page 45: ...window is split and the multiple images are displayed at the same time Example of display when is clicked 4Click Synchronize and then enlarge the image The synchronize display appears and all the images are displayed at the same display magnification and in the same position The Navigator window that displays the enlargement display position appears and you can check and move the enlargement displ...

Page 46: ...lay to Scroll Mode that displays in folder levels and simultaneously view multiple folders and images inside the folders 1 Click the Scroll Mode tab sheet The display in the main window switches to Scroll Mode 2Check the images inside the folders The images inside the folder are displayed Click Number of images inside the folder and number of folders For a list of Scroll Mode window functions refe...

Page 47: ...rences The Preferences window appears 2Change the depth of the folder level to be displayed Changing the Levels of the Displayed Folders 3 Click the OK button The main window is displayed at the folder depth you set Folders up to the third level and images inside the folders are displayed in the window Folders at or higher than the fourth level are displayed as folder icons Double click these fold...

Page 48: ...wing Shooting Information for an Image 1 Enable Zoom Mode p 73 or Scroll Mode p 74 2Select the image for which you want to view the information 3 Click Properties The Properties window image information window appears Properties window In Preview Mode the same information as the Properties window is displayed on the information display area p 75 ...

Page 49: ...convert it to a TIFF image extension TIFF or a bitmap image extension BMP and save it Because the image is saved as a separate image the original image remains unaffected 1 Select an image 2Click the buttons Export X Export Still Images The Export Still Images window appears 3 Specify the image size type file name and save destination and then click the Finish button The image is saved as an image...

Page 50: ...formation You can export as a text file the shooting information recorded to the image 1 Select an image 2Click the buttons Export X Export Shooting Properties The Export Shooting Properties window appears 3 Specify the export shooting information and save destination and then click the Finish button The shooting information is saved as a text file extension TXT ...

Page 51: ... keywords are also useful when searching for images p 53 1 Display the Properties window p 47 2Click the button in Keywords and then click the View Modify Keywords The View Modify Keywords dialog box appears 3 Select the keyword s and then click the OK button The keyword is set in the image Setting Keywords in Images You can enter information relating to images as comments The entered comments are...

Page 52: ...mes p 11 2Click the buttons View Classify X Rename Multiple Files The Rename Multiple Files window appears Saving Multiple Images with New File Names 3 Checkmark Make copies of files enter the file name and then click the Finish button Images separate from the original images are saved with the new names In step 3 if you remove the check mark from Make copies of files in the window please be aware...

Page 53: ... window appears Classifying Images by Shot Date Settings for Folder Structure 3 Specify the folder structure and save destination and then click the Finish button Images are classified by shot date Setting Item Description YearMonthDate Classifies images by creating a first level folder according to shot year month date Year YearMonthDate Classifies images by creating a second level folder for the...

Page 54: ...e the search results window The display returns to the main window 4Check the searched images in the main window The searched images are displayed as Search Results in the folder area in the main window If you select this folder the searched images are displayed The images inside the Search Results folder are stored until you either perform another search or exit ZB Any work you do on images insid...

Page 55: ...nnot be recovered For this reason an edited JPEG image should be saved as a separate image from the original image You can adjust the color of an image in RGB red green blue 1 Select an image and display the Edit Image window p 29 2Select Color Brightness Adjustment and then click the Finish button The Color Brightness Adjustment window appears 3 From the list box select RGB Adjustment The window ...

Page 56: ...window switches to the Level Adjustment window 4Adjust the image The image is adjusted 5 Click the Save As button and save as a separate image p 30 Adjusting the Brightness Level Drag to the left or right to adjust You can adjust the brightness contrast and color of a specific area by changing the tone curve 1 Select an image and display the Edit Image window p 29 2Select Color Brightness Adjustme...

Page 57: ...or double click on the 5 Click the Save As button and save as a separate image p 30 Click to add a point Adjust by dragging You can set amount radius and threshold values and adjust sharpness 1 Select an image and display the Edit Image window p 29 2Select Sharpness and then click the Finish button The Sharpness window appears 3 Select the Unsharp Mask tab sheet and adjust The image is adjusted 4E...

Page 58: ...tware in the window that appears 4In the Edit with external image editor list box select the registered image editing software 5 Click the Finish button The software selected in step 4 starts up and the image selected in step 1 is displayed Transferring Images to Other Image Editing Software You can merge up to four JPEG images to create panorama images For merging images start up the image mergin...

Page 59: ...ck the arrangement of the images to be merged and click the 2 Merge tab sheet If the arrangement of the images to be merged is not correct drag the images to rearrange them The window switches to the 2 Merge tab sheet 4Click Start to merge The images are merged and displayed 5 Click the 3 Save tab sheet The display switches to the 3 Save tab sheet ...

Page 60: ...s Adjusting RAW Images You can make the same adjustments reset processing conditions to RAW images as the functions that are available on the camera such as brightness and white balance adjustment You can also convert edited RAW images to JPEG or TIFF images and save them Because only the image processing conditions are changed when a RAW image is adjusted the original image data remains totally u...

Page 61: ...r shooting the RAW image 4Click the Save button The Save dialog box appears RAW Image Task main window 5 Specify the type for the image to be saved and the save destination and then click the Save button The processing dialog box appears and the JPEG image or TIFF image that has been converted from a RAW image is saved in the specified place The RAW image remains unaffected 6Select the File menu X...

Page 62: ...onds until the adjusted image is redisplayed undergone development processing when using the following OS Windows XP CPU 2 2 GHz Pentium 4 RAM 512MB However the time it takes to redisplay an image varies greatly depending on the camera model used to shoot the image computer type and the subject of the image A Picture Style file is an extended function of Picture Style It is a file that offers effe...

Page 63: ...ne curve EOS 1D series cameras excluding EOS 1Ds Mark III and EOS 1D Mark III adjustments made to RAW images can be saved as a file as explained below and then registered to a camera and used For information on registering cameras see the two related pages below in Chapter 2 Setting the Camera from Your Computer in the EOS Utility Instruction Manual PDF electronic manual For details on white balan...

Page 64: ...1D are compatible White balance files and tone curve files are compatible with Windows and Macintosh computers Adding Sound to Images Playing Back You can add sound to images and play back sound which you have added to images with a camera that has a sound record function You can add WAVE sound files to images extension WAV You can play back sound files that are attached to images 1 Select an imag...

Page 65: ...ant to print 2Click the buttons Print X Print Using Other Software The Print Using Other Software window appears 3 Select the printing software and then click the Launch button The printing software starts up and the image you selected in step 1 is displayed 4Make the necessary settings in the printing software and print Printing software that is incompatible with ZB does not appear in the Print U...

Page 66: ... Operation High Level Functions Reference Preferences Contents Lookup Index Preferences Preferences 66 General Settings 66 Selection Settings 67 Rotation Settings 67 Printing Settings 68 Shooting Information Settings 68 Themes Settings 69 Showing Hiding Task Buttons 69 ...

Page 67: ...he settings displayed for each window before making changes 1 Select the Tools menu X Preferences 2Select the tab sheet to be set make changes to the settings and then click the OK button You can make settings such as adjusting the minimum size of thumbnail images that are displayed in the main window the speed of Zoom Mode p 73 the levels of image and folder display in Scroll Mode p 74 and color ...

Page 68: ...ents Basic Operation Advanced Operation High Level Functions Reference Preferences Contents Lookup Index You can make settings related to image selection Selection Settings You can make settings related to image rotation Rotation Settings ...

Page 69: ...Index If you are printing with the Photo Print window p 15 you can set whether to trim the image and print with no borders around the paper or to print as is without trimming Printing Settings You can set the information that is displayed when you click shooting information display in the viewer window p 76 Shooting Information Settings ...

Page 70: ...ings Showing Hiding Task Buttons You can show or hide task buttons displayed on the left of the main window according to your requirements Hiding buttons you do not use makes operating ZB easier 1 Select the Tools menu X Customize The Customize dialog box appears 2Remove the check mark from the buttons you want to hide 3 Click the OK button to apply your changes 4Restart ZB for the settings to be ...

Page 71: ...re Uninstalling 71 System Requirements 72 Supported Images 72 List of Main Window Functions 73 Zoom Mode 73 Scroll Mode 74 Preview Mode 75 List of Viewer Window Functions 76 List of Photo Print Window Functions 77 List of Index Print Window Functions 78 List of RAW Image Task Main Window Functions 79 Contents Lookup 80 Index 81 About This Instruction Manual 83 Trademark Acknowledgments 83 ...

Page 72: ...d by ZB p 72 do not display There are various types of JPEG and TIFF images so JPEG images other than Exif 2 2 and 2 21 compatible images and TIFF images other than Exif compatible images may not display properly With initial settings the color of images that have been shot in Adobe RGB appear weak In this case check the General tab sheet in preferences and checkmark Adjust color of images using m...

Page 73: ...er Windows XP 2000 500MHz Pentium or higher RAM Windows Vista Minimum 512MB Windows XP 2000 Minimum 256MB Display Screen resolution 1024 768 pixels or more Color quality Medium 16 bit or more Supported Images Image type Camera used Extension JPEG images JPEG images shot with a Canon digital camera Exif 2 2 or 2 21 compatible JPEG images JPG JPEG RAW images EOS 1Ds Mark III EOS 1D Mark III EOS 1D M...

Page 74: ...ed Returns to the display of the folder previously displayed Image display area Bracketing icon Protect icon Audio recording icon Number of selected images RAW image icon Shows hides the task buttons and folder area 1 The CANON iMAGE GATEWAY button may not be displayed depending on the area you are in 2 Images in folders and folders selected here are displayed on the image display area Task button...

Page 75: ...rns to the display of the folder before is clicked Returns to the display of the folder previously displayed Image display area Number of selected images Shows hides the task buttons and folder area 1 The CANON iMAGE GATEWAY button may not be displayed depending on the area you are in 2 Images in folders and folders selected here are displayed on the image display area Task buttons 1 Viewer window...

Page 76: ...formation display area Number of selected images Shows hides the task buttons and folder area 1 The CANON iMAGE GATEWAY button may not be displayed depending on the area you are in 2 Images in folders and folders selected here are displayed on the thumbnail image display area 3 Images selected here are displayed on the image display area Task buttons 1 Viewer window p 76 Slide show p 36 Image disp...

Page 77: ...e name Rating p 21 Full view display p 14 Folder path Switches between images Fit to window view p 21 100 actual pixel size view Display magnification p 21 Enlargement display p 21 Reduction display p 21 Moves the enlargement display position p 21 Photo print window p 77 Edits p 29 to p 35 p 54 to p 57 Shows hides the AF point Shows hides the shooting information p 14 p 20 Split displays p 44 ...

Page 78: ...tion High Level Functions Reference Preferences Contents Lookup Index List of Photo Print Window Functions Trims the image Print preview Number of prints Switches the printing image Shot date and time printing Printer selection and settings Inserts text Borderless printing ...

Page 79: ...ced Operation High Level Functions Reference Preferences Contents Lookup Index List of Index Print Window Functions Layout settings Print preview Switches the printing page Print information settings Printer selection and settings Number of prints Paper orientation ...

Page 80: ...mage to image editing software Saves the image Cancels or Zooms in Zooms out Moves the enlargement display position Brightness adjustment Click white balance Saves the set white balance as a white balance file Loads a Picture Style file and applies it to the image Applies and redisplays multiple adjustment settings in a single operation Cancels all settings and reverts to the status at the time of...

Page 81: ...d print p 42 Organizing Images Sort by rating p 21 Move to a different location p 25 Move by entire folder to a different location p 25 Change the file name p 26 Delete p 26 Classify by shot date p 52 Search p 53 Image Editing Use automatic adjustment p 29 Adjust brightness darkness p 31 Make colors more vivid p 31 Raise the contrast p 31 Trim parts of an image p 32 Specify an aspect ratio that ma...

Page 82: ...he Saturation 31 Adjusting the Sharpness 34 Adjusting the Tone Curve 55 Attach an Image to an E mail 37 Automatic Adjustment 29 B Batch Change the File Name of Images 51 C Change File Name 26 Change Folder Name 26 Change the Display Magnification 13 Changing the Folder Level Settings 46 Changing the Size and Type of an Image and Saving 48 Checking the Shooting Information 47 Classifying the Images...

Page 83: ...indow 23 75 Printing Index Printing 42 Printing an Image Using Easy PhotoPrint EX 16 Printing One Image on One Sheet of Paper 15 Printing with Printing Software other than EPP EX 64 Printing an Image Using Easy PhotoPrint EX 16 Printing One Image on One Sheet of Paper 15 Printing Settings Preferences 68 R Ratings 21 RAW Image Task 60 79 Rotate images 73 74 75 Rotation Settings Preferences 67 S Sav...

Page 84: ...ations and contents of this Instruction Manual The software screens and displays printed in this Instruction Manual may differ slightly from the actual software The content of this Instruction Manual has been reviewed thoroughly However if you should notice any errors or omissions please contact a Canon Service Center Please note that irrespective of the above mentioned Canon does not take respons...

Reviews: