Subject
Background
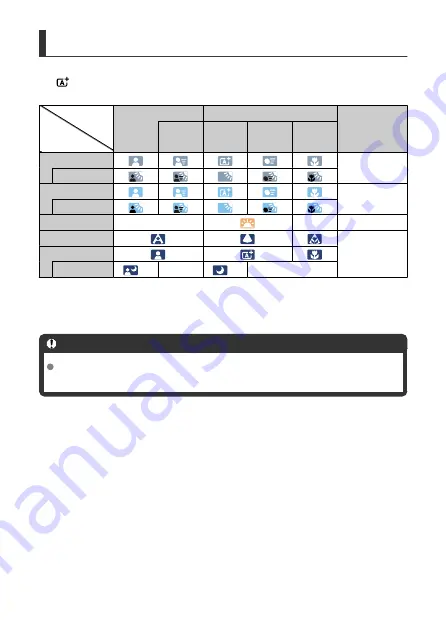
Scene Icons
In <
> shooting mode, the camera detects the type of scene and sets all settings
accordingly. The detected scene type is indicated on the upper left of the screen.
Portrait
Non-Portrait
Background
Color
In
Motion
*1
Nature/
Outdoor
Scene
In
Motion
*1
Close
*2
Bright
Gray
Backlit
Blue Sky Included
Light blue
Backlit
Sunset
*3
*3
Orange
Spotlight
Dark blue
Dark
With Tripod
*1
*4*5
*3
*4*5
*3
* 1: Not displayed during movie recording.
* 2: Displayed when the attached lens has distance information. With an extension tube or close-up
lens, the icon displayed may not match the actual scene.
* 3: The icon of the scene selected from the detectable scenes will be displayed.
Warning
For certain scenes or shooting conditions, the icon displayed may not match the
actual scene.
* 4: Displayed when all the following conditions apply:
The shooting scene is dark, it is a night scene, and the camera is mounted on a tripod.
* 5: Displayed with any of the lenses below:
• EF-S18-55mm f/3.5-5.6 IS II
• EF-S55-250mm f/4-5.6 IS II
• EF300mm f/2.8L IS II USM
• EF400mm f/2.8L IS II USM
• EF500mm f/4L IS II USM
• EF600mm f/4L IS II USM
• Image Stabilizer lenses released in and after 2012.
* 4+*5: If the conditions in both *4 and *5 are met, the shutter speed will slow down.
740
Summary of Contents for EOS REBEL T8i
Page 1: ...Advanced User Guide E CT2 D027 A CANON INC 2020 ...
Page 26: ... 19 18 20 21 22 25 26 24 23 10 11 17 1 9 8 7 6 4 5 2 3 1 15 16 14 13 12 26 ...
Page 29: ... 10 9 11 13 12 14 15 3 2 1 5 4 7 6 8 29 ...
Page 70: ...In Live View shooting 70 ...
Page 98: ...Dragging Sample screen Menu screen Slide your finger while touching the screen 98 ...
Page 172: ...Selecting the AF Point or Zone Manually 1 Press the or button 172 ...
Page 212: ...2 Select an option 212 ...
Page 250: ... All and A B 250 ...
Page 258: ...Shooting 2 1 Retain Creative Assist data 2 Live View shoot 3 AF assist beam firing 258 ...
Page 317: ...Dust Delete Data Acquisition 1 Select Dust Delete Data 317 ...
Page 396: ... AF Point Display Resuming from Previous Playback HDMI HDR Output 396 ...
Page 399: ...Playback 4 1 Histogram disp 2 AF point disp 3 View from last seen 4 HDMI HDR output 399 ...
Page 404: ...404 ...
Page 407: ...Note You can also magnify display by double tapping with one finger 407 ...
Page 433: ...4 Erase the image Press the button then press OK 433 ...
Page 435: ...4 Erase the images Select OK 435 ...
Page 523: ...4 Set Size to send 5 Take the picture 523 ...
Page 526: ... 2 Sending multiple selected images 1 Press 2 Select Send selected 526 ...
Page 531: ... 4 Sending all images on the card 1 Press 2 Select Send all card 531 ...
Page 548: ...Steps on the camera 3 10 Establish a Wi Fi connection Select OK 548 ...
Page 572: ...Steps on the camera 2 9 Add image canon as a destination Select image canon is now added 572 ...
Page 579: ...Sending all images on the card 1 Press 2 Select Send all card 579 ...
Page 595: ...4 Select OK 595 ...
Page 634: ...In Basic Zone modes the following screen is displayed for 5 1 Manual software URL 634 ...
Page 636: ...3 Select OK 636 ...
Page 656: ...Note Auto power off time may be extended while the Date Time Zone screen is displayed 656 ...
Page 657: ...Language 1 Select Language 2 Set the desired language 657 ...


