


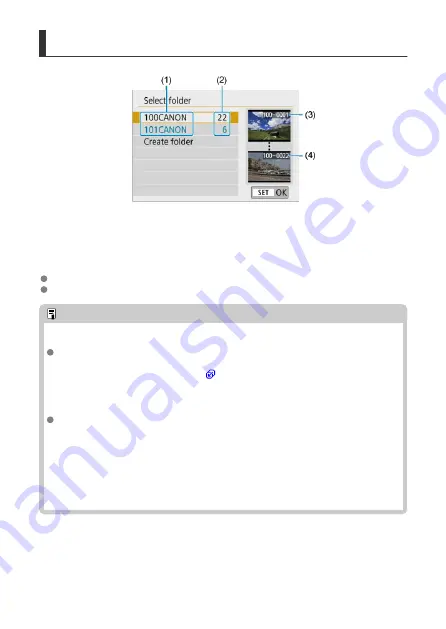
Selecting a Folder
(1) Folder name
(2) Number of images in folder
(3) Lowest file number
(4) Highest file number
Select a folder on the folder selection screen.
Captured images are stored in your selected folder.
Note
Folders
A folder can contain up to 9999 images (file number 0001–9999). When a folder
becomes full, a new folder with the folder number increased by one is created
automatically. Also, if manual reset (
) is executed, a new folder will be created
automatically. Folders numbered from 100 to 999 can be created.
Creating folders with a computer
With the card open on the screen, create a new folder named “
DCIM
”. Open the
DCIM folder and create as many folders as necessary to save and organize your
images. The folder name must follow the format “
100ABC_D
”. The first three digits
are always the folder number from 100 to 999. The last five characters can be any
combination of upper- and lower-case letters from A to Z, numerals, and the
underscore “_”. The space cannot be used. Also note that two folder names cannot
share the same three-digit folder number (for example, “100ABC_D” and
“100W_XYZ”) even if the remaining five characters in each name are different.
637
Summary of Contents for EOS REBEL T8i
Page 1: ...Advanced User Guide E CT2 D027 A CANON INC 2020 ...
Page 26: ... 19 18 20 21 22 25 26 24 23 10 11 17 1 9 8 7 6 4 5 2 3 1 15 16 14 13 12 26 ...
Page 29: ... 10 9 11 13 12 14 15 3 2 1 5 4 7 6 8 29 ...
Page 70: ...In Live View shooting 70 ...
Page 98: ...Dragging Sample screen Menu screen Slide your finger while touching the screen 98 ...
Page 172: ...Selecting the AF Point or Zone Manually 1 Press the or button 172 ...
Page 212: ...2 Select an option 212 ...
Page 250: ... All and A B 250 ...
Page 258: ...Shooting 2 1 Retain Creative Assist data 2 Live View shoot 3 AF assist beam firing 258 ...
Page 317: ...Dust Delete Data Acquisition 1 Select Dust Delete Data 317 ...
Page 396: ... AF Point Display Resuming from Previous Playback HDMI HDR Output 396 ...
Page 399: ...Playback 4 1 Histogram disp 2 AF point disp 3 View from last seen 4 HDMI HDR output 399 ...
Page 404: ...404 ...
Page 407: ...Note You can also magnify display by double tapping with one finger 407 ...
Page 433: ...4 Erase the image Press the button then press OK 433 ...
Page 435: ...4 Erase the images Select OK 435 ...
Page 523: ...4 Set Size to send 5 Take the picture 523 ...
Page 526: ... 2 Sending multiple selected images 1 Press 2 Select Send selected 526 ...
Page 531: ... 4 Sending all images on the card 1 Press 2 Select Send all card 531 ...
Page 548: ...Steps on the camera 3 10 Establish a Wi Fi connection Select OK 548 ...
Page 572: ...Steps on the camera 2 9 Add image canon as a destination Select image canon is now added 572 ...
Page 579: ...Sending all images on the card 1 Press 2 Select Send all card 579 ...
Page 595: ...4 Select OK 595 ...
Page 634: ...In Basic Zone modes the following screen is displayed for 5 1 Manual software URL 634 ...
Page 636: ...3 Select OK 636 ...
Page 656: ...Note Auto power off time may be extended while the Date Time Zone screen is displayed 656 ...
Page 657: ...Language 1 Select Language 2 Set the desired language 657 ...


