background image

75

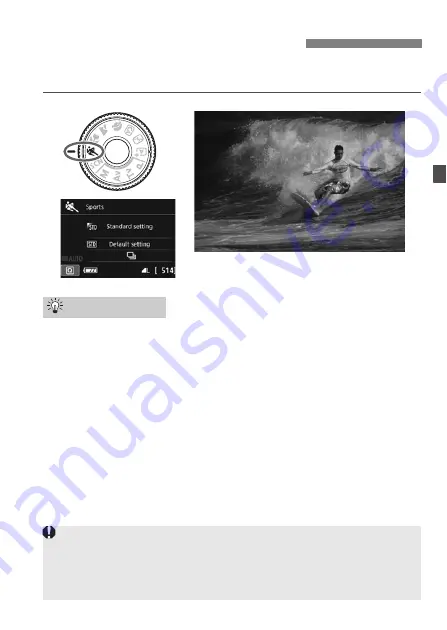
Use the <

5

> (Sports) mode to shoot a moving subject, such as a 

running person or a moving vehicle.

Use a telephoto lens.

The use of a telephoto lens is recommended for shooting from a 
distance.

Track the subject with the Area AF frame.

Aim the center AF point over the subject, then press the shutter 
button halfway to start autofocusing in Area AF frame. During 
autofocusing, the beeper will continue beeping softly. If focus cannot 
be achieved, the focus indicator <

o

> will blink.

The default setting is <

i

> (Continuous shooting). When you want 

to take the picture, press the shutter button completely. If you hold 
down the shutter button, you will be able to maintain autofocusing 
during continuous shooting of the subject’s movement (max. approx. 
5.0 shots per sec.).

5

 Shooting Moving Subjects

Shooting Tips

Under low light when camera shake is prone to occur, the viewfinder’s 
shutter speed display on the bottom left will blink. Hold the camera 
steady and shoot.

During Live View shooting, One-Shot AF will apply (p.91).

If you are using an external Speedlite, the Speedlite will fire.

Summary of Contents for EOS REBEL T6i

Page 1: ...unction This manual is the Basic Instruction Manual For more detailed instructions refer to the Instruction Manuals included in the Camera Instruction Manual CD ROM Basic Instruction Manual EOS REBEL...

Page 2: ......

Page 3: ...The Camera Basic Instruction Manual covers the most basic operations Camera Basic Instruction Manual EOS REBEL T6i W EOS 750D W...

Page 4: ...ther Familiarize Yourself with the Camera While reading this manual take a few test shots and see how they come out You can then better understand the camera Testing the Camera Before Use and Liabilit...

Page 5: ...The Instruction Manuals and CD ROMs provided are listed on the next page If you purchased a Lens Kit check that the lenses are included Depending on the Lens Kit type lens instruction manuals may als...

Page 6: ...FC Function Instruction Manual Quick Reference Guide Instructions for viewing the Camera Instruction Manual CD ROM are on pages 152 153 EOS DIGITAL Solution Disk Software CD ROM Contains software such...

Page 7: ...when shooting movies the movie may not be recorded properly Also if you play back a movie on a card with a slow reading speed the movie may not play back properly If you want to shoot still photos wh...

Page 8: ...amera insert it into the card slot 3 Attach the lens p 41 Align the lens s white or red mount index with the camera s mount index of the same color 4 Set the lens focus mode switch to f p 41 5 Set the...

Page 9: ...camera will focus on the subject If necessary the built in flash will be raised 8 Take the picture p 46 Press the shutter button completely to take the picture 9 Review the picture The captured image...

Page 10: ...pressing the M button to change its settings J When shown on the upper right of a page it indicates that the function is available only in the Creative Zone modes p 26 p Reference page numbers for mo...

Page 11: ...yback 61 Setting the AF and Drive Modes 89 Image Settings 101 Advanced Operations 113 Shooting with the LCD Monitor Live View Shooting 123 Shooting Movies 135 Image Playback 143 Viewing the CD ROM Ins...

Page 12: ...Installing and Removing the Battery 32 Installing and Removing the Card 33 Using the LCD Monitor 35 Turning on the Power 36 Setting the Date Time and Zone 38 Selecting the Interface Language 40 Attac...

Page 13: ...ng Moving Subjects 75 8 Special Scene Mode 76 C Shooting Children 77 P Shooting Food 78 x Shooting Candlelight Portraits 79 6 Shooting Night Portraits With a Tripod 80 F Shooting Night Scenes Handheld...

Page 14: ...ng Flicker 112 Advanced Operations 113 d Program AE 114 s Conveying the Subject s Movement Shutter priority AE 115 f Changing the Depth of Field Aperture priority AE 116 a Manual Exposure 117 q Changi...

Page 15: ...ing Images 150 Viewing the CD ROM Instruction Manuals Downloading Images to Your Computer 151 Viewing the Camera Instruction Manual CD ROM 152 Downloading Images to a Computer 154 Software Overview 15...

Page 16: ...er metallic objects or batteries This is to prevent a fire or an explosion If excessive heat smoke or fumes are emitted when recharging the battery immediately unplug the battery charger from the powe...

Page 17: ...plane s instruments or the hospital s medical equipment To prevent a fire and electrical shock follow the safeguards below Always insert the power plug all the way in Do not handle a power plug with...

Page 18: ...make sure the tripod is sturdy enough to support the camera and lens Do not leave the product in a low temperature environment for an extended period of time The product will become cold and may cause...

Page 19: ...lfunction Use a blower to blow away dust on the lens viewfinder reflex mirror and focusing screen Do not use cleaners that contain organic solvents to clean the camera body or lens For stubborn dirt t...

Page 20: ...red etc among the remaining 0 01 or less pixels Dead pixels are not a malfunction They do not affect the images recorded If the LCD monitor is left on for a prolonged period screen burn in may occur...

Page 21: ...amera s internal parts may adhere to the front of the sensor If visible spots remain on the image having the sensor cleaned by a Canon Service Center is recommended Lens After detaching the lens from...

Page 22: ...nal q C Audio video OUT Digital terminal p 154 D HDMI mini OUT terminal Depth of field preview button Lens release button p 42 Red eye reduction Self timer lamp p 99 EF Lens mount index p 41 Built in...

Page 23: ...90 Q Quick Control button p 47 Dioptric adjustment knob p 45 A Live View shooting Movie shooting button p 124 136 A I AE lock FE lock button Index Reduce button p 121 144 145 S u AF point selection Ma...

Page 24: ...ooting BSilent single shooting MSilent continuous shooting Q Self timer 10 sec Remote control l Self timer 2 sec q Self timer Continuous u White balance correction B White balance bracketing Multi Sho...

Page 25: ...e p 93 A AE lock AEB in progress D Flash ready Improper FE lock warning e High speed sync d FE lock FEB in progress y Flash exposure compensation Aperture p 116 Exposure level indicator Exposure compe...

Page 26: ...ing Creative Zone These modes give you more control for shooting various subjects as desired d Program AE p 114 s Shutter priority AE p 115 f Aperture priority AE p 116 a Manual exposure p 117 A Scene...

Page 27: ...without a Distance Scale Focusing ring p 97 132 Focus mode switch p 41 Zoom position index p 42 Hood mount p 43 Filter thread front of lens Zoom ring p 42 Image Stabilizer switch p 44 Lens mount inde...

Page 28: ...amp Battery pack slot IMPORTANT SAFETY INSTRUCTIONS SAVE THESE INSTRUCTIONS DANGER TO REDUCE THE RISK OF FIRE OR ELECTRIC SHOCK CAREFULLY FOLLOW THESE INSTRUCTIONS For connection to a supply not in th...

Page 29: ...the Provided Strap Pass the end of the strap through the camera s strap mount eyelet from the bottom Then pass it through the strap s buckle as shown in the illustration Pull the strap to take up any...

Page 30: ...the charger and insert the plug into a power outlet Recharging starts automatically and the charge lamp lights up in orange When the battery is fully recharged the full charge lamp will light up in g...

Page 31: ...arger can also be used in foreign countries The battery charger is compatible with a 100 V AC to 240 V AC 50 60 Hz power source If necessary attach a commercially available plug adapter for the respec...

Page 32: ...ry until it locks in place 3 Close the cover Press the cover until it snaps shut Open the cover and remove the battery Press the battery release lever as shown by the arrow and remove the battery To p...

Page 33: ...rd s label side toward you and insert it until it clicks in place 3 Close the cover Close the cover and slide it in the direction shown by the arrows until it snaps shut When you set the power switch...

Page 34: ...amage the image data card or camera Removing the card Removing the battery Shaking or banging the camera around Unplugging and connecting a power cord when the AC Adapter Kit is used If the card alrea...

Page 35: ...e 3 Face it toward you Normally use the camera with the LCD monitor facing you Using the LCD Monitor 175 180 90 Be careful not to force and break the hinge when rotating the LCD monitor When Remote Sw...

Page 36: ...shoot during sensor cleaning by pressing the shutter button halfway p 46 to stop cleaning and take a picture If you repeatedly turn the power switch 1 2 at a short interval the f icon may not be disp...

Page 37: ...ox twice the shots without the battery grip z Checking the Battery Level Temperature Room Temperature 23 C 73 F Low Temperatures 0 C 32 F No Flash 550 470 50 Flash Use 440 400 Doing any of the followi...

Page 38: ...rrect date time 1 Display the menu screen Press the M button to display the menu screen 2 Under the 52 tab select Date Time Zone Press the Y Z keys to select the 52 tab Press the W X keys to select Da...

Page 39: ...daylight saving time will be canceled and the time will go back by 1 hour 6 Exit the setting Press the Y Z keys to select OK then press 0 The date time zone and daylight saving time will be set and t...

Page 40: ...Under the 52 tab select LanguageK Press the Y Z keys to select the 52 tab Press the W X keys to select LanguageK then press 0 3 Set the desired language Press the W X keys to select the language then...

Page 41: ...g the same color Turn the lens as shown by the arrow until it clicks in place 3 Set the lens s focus mode switch to AF AF stands for autofocus MF stands for manual focus 4 Remove the front lens cap At...

Page 42: ...o the 18mm wide angle end then slide the zoom ring lock lever to LOCK The zoom ring can be locked only at the wide angle end Zooming Detaching the Lens Do not look at the sun directly through any lens...

Page 43: ...ood 1 Align the red dots on the hood and lens edges then turn the hood as shown by the arrow 2 Turn the hood as shown in the illustration Turn the hood clockwise until it attaches securely Attaching a...

Page 44: ...if the subject moves during the exposure For bulb exposures set the IS switch to 2 If 1 is set Image Stabilizer misoperation may occur The Image Stabilizer may not be effective for excessive shaking s...

Page 45: ...e shutter button 4 Press your arms and elbows lightly against the front of your body 5 To maintain a stable stance place one foot slightly ahead of the other 6 Press the camera against your face and l...

Page 46: ...eventing Camera Shake Hand held camera movement during the moment of exposure is called camera shake It can cause blurred pictures To prevent camera shake note the following Hold and steady the camera...

Page 47: ...ion The selected function and Feature guide p 59 will appear Turn the 6 dial to change the setting 3 Take the picture Press the shutter button completely to take the picture The captured image will be...

Page 48: ...screen will reappear Sample Quick Control Screen Function Setting Screen Shutter speed p 115 AF operation p 90 White balance correction Shooting mode p 26 Highlight tone priority Auto Lighting Optimi...

Page 49: ...me etc 3 Menu Operations Tab Menu items zShooting LCD monitor 5Set up 9My Menu 0 button 3Playback The menu tabs and items displayed will differ depending on the shooting mode Menu Screen Creative Zone...

Page 50: ...t t is selected 3 Select the desired item Press the W X keys of the cross keys to select the item then press 0 4 Select the setting Press the W X or Y Z keys of the cross keys to select the desired se...

Page 51: ...e dimmed menu item will become settable Dimmed Menu Items In step 2 you can also turn the 6 dial to select a menu tab In steps 2 to 5 you can also use the LCD monitor s touch screen p 52 The explanati...

Page 52: ...e will appear around the icon except on menu screens For example when you tap on Q the Quick Control screen appears By tapping on 2 you can return to the preceding screen Operations possible by tappin...

Page 53: ...ging your finger on the screen Selecting a menu tab or item after pressing the M button Setting a scale control Quick Control Setting functions during Live View shooting Setting functions during movie...

Page 54: ...Operations Since the LCD monitor is not pressure sensitive do not use any sharp objects such as your fingernail or a ballpoint pen for touch operations Do not use wet fingers for touch screen operati...

Page 55: ...ere is nothing you need to keep If necessary transfer the images and data to a computer etc before formatting the card 1 Select Format card Under the 51 tab select Format card then press 0 2 Format th...

Page 56: ...tting by selecting Cancel Even in this case normal formatting will be completed and you can use the card as usual When the card is formatted or data is erased only the file management information is c...

Page 57: ...ressing the B button you can toggle the LCD monitor display between the shooting settings p 24 and the camera settings Switching the LCD Monitor Display Shooting Settings Appears when you press the M...

Page 58: ...the 52 tab select Viewfinder display then press 0 2 Select Grid display Select Grid display then press 0 3 Select Show Select Show then press 0 When you exit the menu the grid will appear in the viewf...

Page 59: ...It also displays a description when you select a function or option on the Quick Control screen The Feature guide turns off when you tap on the description or proceed with the operation Shooting mode...

Page 60: ......

Page 61: ...With Basic Zone modes all you do is point and shoot while the camera sets everything automatically p 85 Also to prevent botched pictures due to mistaken operations advanced shooting function settings...

Page 62: ...est object Aiming the center of the Area AF frame over the subject will make focusing easier 3 Focus on the subject Press the shutter button halfway The lens focusing ring will rotate to focus The AF...

Page 63: ...If you are too close to the subject move away and try again When focus is achieved the AF points do not light up in red The AF points light up in red only when focus is achieved in low light conditio...

Page 64: ...he 7 Flash Off mode and shoot p 67 The flash fired and the picture came out extremely bright Move further from the subject and shoot When shooting flash photography if the subject is too close to the...

Page 65: ...called focus lock Focus lock is also possible in other Basic Zone modes except 5 C In the A mode if the subject moves distance to camera changes while or after you focus AI Servo AF will take effect...

Page 66: ...Press the shutter button halfway to focus When focus is achieved the AF point will turn green and the beeper will sound 3 Take the picture Press the shutter button completely The picture is taken and...

Page 67: ...mera shake is prone to occur the viewfinder s shutter speed display will blink Hold the camera steady or use a tripod When using a zoom lens use the wide angle end to reduce blur caused by camera shak...

Page 68: ...eative Auto 1 Set the Mode Dial to C 2 Press the Q button 7 The Quick Control screen will appear 3 Set the desired function Press the S cross keys to select a function The selected function and Featur...

Page 69: ...effect on the right Registering your favorite shooting effects During the image review immediately after shooting and during playback the image applied with the effect will have the s icon After you...

Page 70: ...adjustments may not be selectable If you use Live View shooting you can see how the image is blurred in front of and behind the point of focus When you turn the 6 dial Simulating blur will be display...

Page 71: ...e shutter button A remote controller can also be used l Self timer 2 sec The picture is taken 2 seconds after you press the shutter button q Self timer Continuous Press the W X keys to set the number...

Page 72: ...out better against an uncluttered dark background Use a telephoto lens If you have a zoom lens use the telephoto end to fill the frame with the subject from the waist up Move in closer if necessary Fo...

Page 73: ...ects near and far will be in focus better than at the telephoto end It also adds breadth to landscapes Shooting night scenes The 3 mode is also good for night scenes because it disables the built in f...

Page 74: ...nimum focusing distance Some lenses have indications such as MACRO 0 25m 0 8ft on them The lens minimum focusing distance is measured from the V focal plane mark on the top of the camera to the subjec...

Page 75: ...chieved the focus indicator o will blink The default setting is i Continuous shooting When you want to take the picture press the shutter button completely If you hold down the shutter button you will...

Page 76: ...S cross keys to select the desired shooting mode s icon Turn the 6 dial to select a shooting mode You can also select the shooting mode icon and press 0 to display a selection of shooting modes from w...

Page 77: ...t setting is i Continuous shooting When you want to take the picture press the shutter button completely If you hold down the shutter button you will be able to maintain autofocusing during continuous...

Page 78: ...n close up If you have a zoom lens use the telephoto end to shoot the food in close up Avoid using flash If you use flash the light may reflect off the dish or food and results in unnatural shadows By...

Page 79: ...speed display will blink Hold the camera steady or use a tripod When using a zoom lens use the wide angle end to reduce blur caused by camera shake even while handholding the camera Change the color t...

Page 80: ...matically to obtain a good exposure of the subject It is recommended to play back the image after shooting to check the image brightness If the subject looks dark move nearer and shoot again Also shoo...

Page 81: ...rmly and steadily In this mode four shots are aligned and merged into a single image However if there is significant misalignment in any of the four shots due to camera shake they may not align proper...

Page 82: ...caused by backlighting Hold the camera firmly While shooting hold the camera firmly and steadily In this mode three shots are aligned and merged into a single image However if there is significant mis...

Page 83: ...wide end regardless of the lens s zoom position If you have to set the flash coverage manually set the light emitting unit flash head to the wide angle end before shooting Cautions for 6 Night Portra...

Page 84: ...ecessary in the 7 mode The selected function and Feature guide p 59 will appear Press the Y Z keys or turn the 6 dial to change the setting You can also select from a list by selecting a function and...

Page 85: ...k k Flash firing a Automatic firing o o o o D Flash on Fires at all times k k k k b Flash off k o k k o k o Ambience based shots k k k k k Light scene based shots k k k k Background blur p 70 k Color...

Page 86: ...k will appear 2 Select an image To play back images starting with the last image captured press the Y key To play back images starting with the first captured image press the Z key Each time you press...

Page 87: ...isplayed at the screen s bottom as follows Shooting Information Display Detailed information GPS information Lens aberration correction information Color space Noise reduction information Lens Histogr...

Page 88: ......

Page 89: ...ect the AF operation and drive mode that best match the shooting conditions and subject The J icon at the upper right of the page title indicates that the function is available only in Creative Zone m...

Page 90: ...e shooting mode 1 Set the lens s focus mode switch to AF 2 Press the Zf button AF operation will appear 3 Select the AF operation Press the Y Z keys to select the desired AF operation then press 0 4 F...

Page 91: ...used on continuously The exposure is set at the moment the picture is taken When the AF area selection mode is set to 19 point automatic selection AF p 93 the camera first uses the manually selected A...

Page 92: ...ive Zone modes you can set whether to have the AF points light up in red when focus is achieved Under low light conditions when you press the shutter button halfway the built in flash may fire a brief...

Page 93: ...page for the selection procedure h Single point AF Manual selection Select one AF point to focus q Zone AF Manual selection of zone The 19 AF points are divided into five zones for focusing r 19 poin...

Page 94: ...ss the B button Each time you press the B button the AF area selection mode changes The AF area selection mode currently set is indicated on the top of the viewfinder h Single point AF Manual selectio...

Page 95: ...F mode the selected zone will be displayed 2 Select an AF point You can select an AF point by shifting horizontally with the 6 dial or vertically with the 6 dial while holding down the g button If you...

Page 96: ...t s achieving focus is displayed as S All the AF points are used to focus This mode is set automatically in Basic Zone modes except x With One Shot AF pressing the shutter button halfway will display...

Page 97: ...97 1 Set the lens focus mode switch to MF 2 Focus on the subject Focus by turning the lens focusing ring until the subject looks sharp in the viewfinder MF Manual Focus Focusing ring...

Page 98: ...will be taken i Continuous shooting Max approx 5 0 shots sec While you hold down the shutter button completely shots will be taken continuously B Silent single shooting Single shooting with less shoot...

Page 99: ...Press the W X keys to set the number of multiple shots 2 to 10 to be taken with the self timer 3 Take the picture Look through the viewfinder focus on the subject then press the shutter button comple...

Page 100: ......

Page 101: ...ording quality ISO speed Picture Style white balance Auto Lighting Optimizer noise reduction lens aberration correction anti flicker shooting and other functions The J icon at the upper right of the p...

Page 102: ...mage recording quality Under the z1 tab select Image quality then press 0 Image quality will appear 2 Set the image recording quality The respective quality s pixel count and number of possible shots...

Page 103: ...Figures in parentheses apply to an UHS I compatible 8 GB card based on Canon s testing standards Guide to Image recording Quality Settings Approx Image Quality Pixels Recorded megapixels File Size MB...

Page 104: ...or turn the 6 dial to select the desired ISO speed then press 0 Select AUTO to set the ISO speed automatically ISO Speed Guide High ISO speeds will result in grainier images g Changing the ISO Speed t...

Page 105: ...or the subject In Basic Zone modes D Auto is set automatically 1 Press the XA button The Picture Style selection screen will appear 2 Select a Picture Style Select a Picture Style then press 0 The Pic...

Page 106: ...colors cannot be obtained with Q you can select the white balance to match the light source or set it manually by shooting a white object 1 Press the WB button White balance will appear 2 Select a wh...

Page 107: ...es the correction is applied when the image is captured In Basic Zone modes Standard is set automatically 1 Select Auto Lighting Optimizer Under the z2 tab select Auto Lighting Optimizer then press 0...

Page 108: ...l 1 Select High ISO speed NR Under the z3 tab select High ISO speed NR then press 0 2 Set the level Select the desired noise reduction level then press 0 M Multi Shot Noise Reduction This applies nois...

Page 109: ...then press 0 Auto For exposures of 1 sec or longer noise reduction is performed automatically if noise typical of long exposures is detected This Auto setting is effective in most cases Enable Noise...

Page 110: ...o Disable 1 Select Lens aberration correction Under the z1 tab select Lens aberration correction then press 0 2 Select the setting Check that Correction data available is displayed for the attached le...

Page 111: ...rration correction and distortion correction for approx 30 lenses If you select Enable the peripheral illumination correction chromatic aberration correction and distortion correction will be applied...

Page 112: ...or colors across the images may result With anti flicker shooting the camera detects the frequency of the light source s blinking and takes the picture when the flicker causes less effect on exposure...

Page 113: ...of the page title indicates that the function is available only in Creative Zone modes After you press the shutter button halfway and let go the exposure values will remain displayed in the viewfinde...

Page 114: ...over the subject Then press the shutter button halfway When focus is achieved the focus indicator o on the viewfinder s bottom right will light up when in One Shot AF mode The shutter speed and apertu...

Page 115: ...red shutter speed Turning the 6 dial to the right sets a faster shutter speed and turning it to the left sets a slower one 3 Take the picture When you focus and press the shutter button completely the...

Page 116: ...r the wider the depth of field where sharper focus is obtained in both the foreground and background Turning the 6 dial to the right will set a higher f number smaller aperture opening and turning it...

Page 117: ...us on the subject Press the shutter button halfway The exposure setting will be displayed in the viewfinder The exposure level mark h indicates how far the current exposure level is from the standard...

Page 118: ...tically to suit the scene w Partial metering Effective where there are much brighter lights around the subject due to backlight etc The gray area in the left figure is where the brightness is metered...

Page 119: ...e level indicator in the viewfinder or on the LCD monitor 2 Set the compensation amount If the exposure is too dark hold down the g button and turn the 6 dial to the right for increased exposure If th...

Page 120: ...the Y Z keys to set the exposure compensation amount If AEB is combined with exposure compensation AEB will be applied centering on level of exposure compensation Press 0 to set it When you press the...

Page 121: ...lit subjects etc 1 Focus on the subject Press the shutter button halfway The exposure setting will be displayed 2 Press the A button 0 The A icon lights up in the viewfinder to indicate that the expos...

Page 122: ...that the D icon is lit 3 Take the picture When focus is achieved and you press the shutter button completely the flash will fire for the picture Effective Range of Built in Flash Approx in meters fee...

Page 123: ...old the camera and shoot while viewing the LCD monitor camera shake can cause blurred images Using a tripod is recommended Remote Live View Shooting With EOS Utility EOS software p 156 installed on yo...

Page 124: ...t the brightness level of the actual image you capture 2 Focus on the subject When you press the shutter button halfway the camera will focus with the current AF method p 127 3 Take the picture Press...

Page 125: ...mperature Room Temperature 23 C 73 F Low Temperatures 0 C 32 F No Flash 200 170 50 Flash Use 180 150 Do not hold the camera in the same position for long periods of time Even if the camera does not fe...

Page 126: ...Drive mode AE lock Flash ready Flash off Auto Lighting Optimizer GPS connection indicator Eye Fi card transmission status Shooting mode Exposure level indicator AEB range Magnified view Switch to aut...

Page 127: ...View image is displayed you can also press the Q button to select the AF method on the Quick Control screen The camera detects and focuses on human faces If a face moves the AF point p also moves to...

Page 128: ...shutter button halfway to focus When focus is achieved the AF point will turn green and the beeper will sound If focus is not achieved the AF point will turn orange 4 Take the picture Check the focus...

Page 129: ...ton again You can also tap on the LCD monitor screen to select a zone When a zone is selected tap n on the screen to switch to automatic selection 3 Focus on the subject Aim the AF point over the subj...

Page 130: ...ss keys to move the AF point to where you want to focus It cannot go to the edge of the screen Pressing 0 or the L button will return the AF point to the screen s center You can also tap on the LCD mo...

Page 131: ...shoot y Touch shutter Disable You can tap on the spot to select where you want to focus Press the shutter button completely to take the picture 3 Tap on the screen to shoot Tap on the face or subject...

Page 132: ...p s on the screen to magnify the image 3 Move the magnifying frame Press the S cross keys to move the magnifying frame to the position where you want to focus To return to the screen s center press 0...

Page 133: ...le looking at the magnified image turn the lens focusing ring to focus After achieving focus press the u button to return to the normal view 6 Take the picture Check the focus and exposure then press...

Page 134: ......

Page 135: ...or cards that can record movies see page 7 If you handhold the camera and shoot movies camera shake can cause blurred movies Using a tripod is recommended To shoot while handholding the camera see pag...

Page 136: ...r 2 Set any shooting mode except a 3 Focus on the subject Before shooting a movie focus with AF or manual focus p 127 130 132 By default Movie Servo AF Enable is set so that the camera will always foc...

Page 137: ...age will appear on the LCD monitor 2 Set the Mode Dial to a 3 Set the ISO speed Press the g button and press the Y Z keys or turn the 6 dial to select the ISO speed 4 Set the shutter speed and apertur...

Page 138: ...k Shooting Movies 138 5 Focus and shoot the movie The procedure is the same as steps 3 and 4 for Autoexposure Shooting p 136...

Page 139: ...recording size Shutter speed AF method c u Tracking o FlexiZone Multi d FlexiZone Single Battery check AE lock Recording level Manual Highlight tone priority LED light Quick Control White balance Pict...

Page 140: ...Rate fps frames per second D 29 97 fps F 59 94 fps For areas where the TV format is NTSC North America Japan South Korea Mexico etc C 25 00 fps E 50 00 fps For areas where the TV format is PAL Europe...

Page 141: ...time of one movie clip is 29 min 59 sec If the movie shooting time reaches 29 min 59 sec the movie shooting will stop automatically You can start shooting a movie again by pressing the A button A new...

Page 142: ......

Page 143: ...basic procedures to play back images and movies Images shot and saved with another device The camera may not be able to properly display images captured with a different camera edited with a computer...

Page 144: ...essing the I button will switch the display as follows 9 images 9 36 images 9 100 images Pressing the u button will switch the display as follows 100 images 9 36 images 9 9 images 9 4 images 9 1 image...

Page 145: ...gnified until it reaches the maximum magnification Press the I button to reduce the magnification If you hold down the button the magnification will be reduced to the single image display 2 Scroll aro...

Page 146: ...er image With index display also touch the LCD monitor with one finger You can browse to the next or previous screen by swiping your finger up or down Swipe up to see the next newer images or swipe do...

Page 147: ...r Tap on the image again to display it as a single image Spread two fingers apart Touch the screen with two fingers together then spread your fingers apart on the screen As you spread your fingers the...

Page 148: ...ge of a thumbnail indicate a movie As movies cannot be played back from the index display press 0 to switch to the single image display 3 In the single image display press 0 The movie playback panel w...

Page 149: ...w motion speed is indicated on the upper right of the screen 5 First frame Displays the movie s first frame 3 Previous frame Each time you press 0 the previous frame is displayed If you hold down 0 it...

Page 150: ...you no longer need the image before erasing it To prevent important images from being erased accidentally protect them Erasing a RAW JPEG image will erase both the RAW and JPEG images 1 Play back the...

Page 151: ...n your computer download images from the camera to your computer gives an overview of the software in the EOS DIGITAL Solution Disk CD ROM and explains how to install the software on your computer It...

Page 152: ...procedure below 1 Insert the CAMERA INSTRUCTION MANUAL CD ROM into your computer 2 Double click the CD ROM With Windows double click on the CD ROM icon in My Computer With Macintosh double click on th...

Page 153: ...tion Manual CD ROM 4 Click your language 5 Click the instruction manual you want to read The manual will be displayed You can save the PDF file to your computer To learn how to use Adobe Reader refer...

Page 154: ...the camera s digital terminal with the cable plug s D icon facing the front of the camera Connect the cord s plug to the computer s USB terminal 3 Use EOS Utility to download the images Refer to the...

Page 155: ...the card into the card reader 3 Use Digital Photo Professional to download the images Refer to the Digital Photo Professional Instruction Manual p 158 Downloading Images with a Card Reader When downlo...

Page 156: ...ample Music to the card You can use the background music as the soundtrack for a video snapshot album movie or slide show played back with your camera This software is recommended for users who shoot...

Page 157: ...erlight is displayed during installation install Microsoft Silverlight 3 Click Restart and remove the CD ROM after the computer restarts When the computer has restarted the installation is complete In...

Page 158: ...install screen 3 Open the CD ROM 4 Open the Manual folder 5 Copy the English folder to your computer Instruction Manual PDFs with the names below are copied 6 Double click the copied PDF file Adobe Re...

Page 159: ...ce are trademarks or registered trademarks of HDMI Licensing LLC All other trademarks are the property of their respective owners About MPEG 4 Licensing This product is licensed under AT T patents for...

Page 160: ...t be liable for any damage to this product and or accidents such as fire etc caused by the malfunction of non genuine Canon accessories e g a leakage and or explosion of a battery pack Please note tha...

Page 161: ...ch can be determined by turning the equipment off and on the user is encouraged to try to correct the interference by one or more of the following measures Reorient or relocate the receiving antenna I...

Page 162: ...information on how to recycle this battery For CA USA only Included lithium battery contains Perchlorate Material special handling may apply See www dtsc ca gov hazardouswaste perchlorate for details...

Page 163: ...truction Manual basic operation procedures for easy to use Connect to a smartphone Transfer images between cameras and Save images to Connect Station are explained Wi Fi NFC Function Basic Instruction...

Page 164: ...Do Using the Wireless LAN Functions CANON iMAGE GATEWAY 6 Send images to a Web service Save and share images 1 Connect to a smartphone View images using a smartphone Shoot remotely with a smartphone 3...

Page 165: ...LAN to print images wirelessly 4 Save images to Connect Station p W 43 Connect the camera to Connect Station sold separately via a wireless LAN to save images 5 o View images using a media player CD R...

Page 166: ...ot be held liable for any other loss or damage caused by use of the camera When using Wi Fi functions establish appropriate security at your own risk and discretion Canon cannot be held liable for any...

Page 167: ...ers Introduction W 2 Basic Operation and Settings W 7 Registering a Nickname W 13 Easy Connection to a Smartphone W 17 Transferring Images Between Cameras W 35 Easy Connection to Connect Station W 43...

Page 168: ...tion to a Smartphone W 17 Preparation W 18 Connecting with the NFC Function W 20 Using Camera Access Point Mode to Establish a Connection W 23 Operating the Camera Using a Smartphone W 27 Reconnecting...

Page 169: ...W 7 1 Basic Operation and Settings This chapter describes the basic operation and settings necessary for using the camera s wireless LAN functions...

Page 170: ...ess 0 When this setting is selected for the first time a screen to register a nickname for identification is displayed See page W 14 to register a nickname Wi Fi function under the 51 tab is now selec...

Page 171: ...utton to add or remove X When the use of electronic devices and wireless devices is prohibited such as on board airplanes or in hospitals set it to Disable When it is set to Enable you cannot use the...

Page 172: ...connection the connection will be terminated Wireless LAN connection status can be checked with the camera s k lamp Auto Power Off Wireless LAN Connection Status k lamp Connection Status k Lamp Connec...

Page 173: ...a to send a captured image to the smartphone p W 31 Hold the camera close to the Canon Connect Station sold separately to connect them easily via a wireless LAN p W 44 Touch Control What You Can Do Us...

Page 174: ...eiver TV set or any other device with an interface cable settings for Wi Fi NFC cannot be changed Disconnect the interface cable before changing any settings Cards If there is no card in the camera it...

Page 175: ...W 13 2 Registering a Nickname This chapter describes how to set the camera s nickname for identification...

Page 176: ...the device Be sure to set a nickname as otherwise you cannot go to the wireless LAN settings screen 1 Select Wi Fi NFC Under the 51 tab select Wi Fi NFC then press 0 2 Select Enable Press the Z key t...

Page 177: ...l Keyboard Operation on the next page Enter any characters between 1 to 14 characters in length 4 Exit the setting When you are finished press the M button Select OK on the confirmation dialog and pre...

Page 178: ...ng the entry mode Select E at the bottom right of the bottom entry area Each time you press 0 the entry mode will change as follows Lower case 9 Numerals Symbols 1 9 Numerals Symbols 2 9 Upper case Wh...

Page 179: ...s you to do the following View or manage images stored in the camera with the smartphone Receive images stored in the camera with the smartphone Operate the camera with the smartphone and take a pictu...

Page 180: ...talled is necessary For information on supported operating systems refer to the download site of Camera Connect When an NFC enabled smartphone on which Camera Connect is not installed is touched to th...

Page 181: ...ction using the NFC function When the smartphone is not NFC enabled See p W 23 Set up a connection in camera access point mode Smartphones labeled with the p mark are NFC enabled Some smartphones are...

Page 182: ...smartphone s instruction manual For the camera s NFC setting follow the steps below 1 Select Wi Fi NFC Under the 51 tab select Wi Fi NFC then press 0 2 Add X to Allow NFC connections Displayed when W...

Page 183: ...tablishes a connection When the operation on the camera is completed in step 2 the Camera Connect Main window will appear 2 Save the settings When a connection is established the screen on the left wi...

Page 184: ...en touch again A connection cannot be established via the NFC function while shooting with the camera when the power switch is set to k when there is no card or when the LCD monitor is closed with the...

Page 185: ...1 Select Wi Fi function Under the 51 tab set Wi Fi NFC to Enable then select Wi Fi function 2 Select q Select q Connect to smartphone and press 0 The camera s k lamp will blink 3 Select Camera access...

Page 186: ...phone s Wi Fi function then select the SSID network name displayed on the camera s LCD monitor For the password enter the encryption key displayed on the camera s LCD monitor The next screen may be au...

Page 187: ...e s Wi Fi settings are completed start Camera Connect 7 Select the camera to connect to on the smartphone Select and touch the camera to connect to from Cameras on Camera Connect to establish a connec...

Page 188: ...t up in blue After a message is displayed the camera s LCD monitor will turn off 9 Operate the camera using Camera Connect Perform further operations using Camera Connect For the operation procedure s...

Page 189: ...amera can be viewed Images stored in the camera can be saved on a smartphone Operations such as deletion can be performed on images stored in the camera Remote Shooting The camera s Live View image ca...

Page 190: ...ending on the connection status image display or shutter release may become slower than usual The connection will also be terminated if you set the power switch to k turn the Mode Dial or open the car...

Page 191: ...NFC to Enable then select Wi Fi function 2 Select q Select q Connect to smartphone and press 0 3 Establish a connection Select Connect and press 0 On the confirmation dialog select OK When settings f...

Page 192: ...o the camera 5 Start Camera Connect on the smartphone A connection will be established If you do not know the SSID of the camera when reconnecting select Review change settings in step 3 to check it W...

Page 193: ...advance p W 20 1 Play back the image Press the x button to play back an image in the single image display 2 Touch a smartphone to the camera Touch the p mark on the smartphone to that on the camera Wh...

Page 194: ...elected the screen in step 2 on page W 33 is displayed The displayed image will be sent When the transfer is complete the screen for step 3 will reappear To send another image select an image and pres...

Page 195: ...he index display See step 2 on page W 31 to touch the smartphone to the camera and establish a connection The image selection screen will appear 2 Select the images to send Press the Y Z keys to selec...

Page 196: ...s shutter button is pressed Images cannot be sent using the NFC function while the camera is connected to another device via a wireless LAN In addition the camera cannot be connected to multiple smar...

Page 197: ...ected to Canon camcorders even if they have built in wireless LAN functions The camera cannot be connected to Canon cameras without built in wireless LAN functions even if they support Eye Fi cards St...

Page 198: ...cameras then press 0 The camera s k lamp will blink 3 Start the connection on the target camera When the screen on the left is displayed on the camera start the connection on the target camera as wel...

Page 199: ...e that GPS information is not displayed on the camera s playback screen even if GPS information is appended to the received image Shooting locations can be viewed on a virtual map using Map Utility EO...

Page 200: ...select Resize image and press 0 Press the Y Z keys to select Send img shown then press 0 The transfer progress screen will appear When the transfer is complete the screen for step 1 will reappear To...

Page 201: ...ze image and press 0 Press the Y Z keys to select Send selected then press 0 3 Select the images to send Press the Y Z keys to select an image to send then add X Press 0 to add or remove X By pressing...

Page 202: ...lect Send then press 0 to send the images The transfer progress screen will appear When the transfer is complete the screen for step 1 will reappear To send another image repeat steps 1 to 5 6 Termina...

Page 203: ...ransfer may take longer than usual RAW images cannot be sent You can select up to 50 files at a time When you reduce the image size all images to be sent at the same time are resized except for movies...

Page 204: ...a connection Select Connect and press 0 On the confirmation dialog select OK Perform the reconnection procedure on the target camera as well The images on the card are displayed and the images to send...

Page 205: ...arately is a device that allows you to import captured still photos and movies for viewing on your TV set smartphone etc or sharing them over a network You can easily save still photos and movies to C...

Page 206: ...ct Station Turn on the camera and Connect Station then hold the camera s p mark close to the Connect Station s NFC connect point A message indicating the connection is displayed on the camera s LCD mo...

Page 207: ...ing between the camera and Connect Station In addition when a case is attached to the camera communication may not be possible via NFC function When Battery Grip BG E18 sold separately is attached a c...

Page 208: ...W 46 MEMO...

Page 209: ...antenna or transmitter except Canon accessories supplied or designated for this product The available scientific evidence does not show that any health problems are associated with using low power wir...

Page 210: ...al requirements and other relevant provisions of Directive 1999 5 EC Please contact the following address for the original Declaration of Conformity CANON EUROPA N V Bovenkerkerweg 59 1185 XB Amstelve...

Page 211: ...W 49 MEMO...

Page 212: ...are current as of January 2015 For information on the compatibility with any products introduced after this date contact any Canon Service Center For the latest version Instruction Manual refer to the...

Reviews: