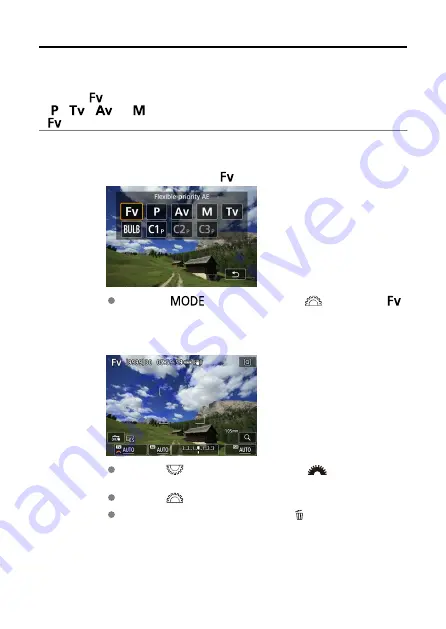
Fv: Flexible-Priority AE
In this mode, you can set shutter speed, aperture value, and ISO speed manually or
automatically and combine these settings with your choice of exposure compensation.
Shooting in [
] mode, with control over each of these parameters, is equivalent to shooting
in [ ], [
], [
], or [
] mode.
* [
] stands for Flexible value.
1.
Set the shooting mode to [
].
Press the <
> button, then turn the <
> dial to select [
].
2.
Set the shutter speed, aperture value, and ISO speed.
Turn the <
> dial to select an item to set. [
] appears to the left
of the selected item.
Turn the <
> dial to set the option.
To reset the setting to [
AUTO
], press the <
> button.
123
Summary of Contents for EOS R3
Page 1: ...Advanced User Guide E CT2 D147 A CANON INC 2021 ...
Page 29: ... 18 13 11 10 30 29 28 27 26 24 23 25 22 21 20 19 14 12 9 17 16 31 15 33 32 8 7 6 5 4 3 2 1 29 ...
Page 31: ... 1 4 5 2 3 12 11 10 13 14 19 24 23 17 18 20 21 15 22 16 9 8 6 7 31 ...
Page 78: ...3 To remove Eyecup ER hE Hold the eyecup as shown in step 2 and lift straight up 78 ...
Page 92: ...Display format Choose or as the style of pointer displayed 92 ...
Page 121: ...Dragging Sample screen Menu screen Slide your finger while touching the screen 121 ...
Page 187: ...3 Select HF anti flicker shooting 4 Select On 187 ...
Page 188: ...5 Select an option Manual setting Auto detecting 188 ...
Page 301: ...Note Not available when the camera is set to shoot multiple exposures 301 ...
Page 315: ...Clearing Settings 1 Select Shooting info disp 2 Select Reset 3 Select OK 315 ...
Page 342: ...ISO Speed in Mode ISO speed is set automatically See ISO Speed in Movie Recording 342 ...
Page 356: ...Total Movie Recording Time and File Size Per Minute For details see Movie recording 356 ...
Page 368: ...3 Select On 4 Set the options as desired Set View Assist Characteristics and Color space 368 ...
Page 492: ...Magnified view Note You can also magnify display by double tapping with one finger 492 ...
Page 502: ...502 ...
Page 527: ...4 Erase the images Press the button then press OK 527 ...
Page 529: ...4 Erase the images Select OK 529 ...
Page 536: ...Note During playback you can rate images by pressing the button 536 ...
Page 609: ...Note To check the camera s Bluetooth address select Bluetooth address 609 ...
Page 611: ...5 Select SET Unspecified 6 Select Create with wizard 7 Select Configure online Select OK 611 ...
Page 613: ...11 Select Camera access point mode 12 Select Easy connection Select OK 13 Select OK 613 ...
Page 622: ...Sending multiple selected images 1 Press 2 Select Send selected 622 ...
Page 624: ...4 Select Size to send On the displayed screen select an image size 5 Select Send 624 ...
Page 632: ...4 Select Smartphone 5 Select Change 6 Select Viewable imgs 632 ...
Page 637: ...3 In Network select Enable 4 Select Connection settings 5 Select SET Unspecified 637 ...
Page 639: ...9 Select Wi Fi Select OK 10 Select New settings Select OK 11 Select Connect with WPS 639 ...
Page 641: ...15 Select Auto setting Select OK 16 Select Disable Select OK 17 Press 641 ...
Page 699: ...6 Select Transfer 7 Select OK The selected images are transferred to the FTP server 699 ...
Page 702: ...Select OK to register the selected images to Images to transfer 702 ...
Page 712: ...3 In Network select Enable 4 Select Upload to Web service 5 Select I Agree 712 ...
Page 716: ...Steps on the camera 2 10 Select Upload to Web service 11 Select OK The icon changes to 716 ...
Page 726: ...7 Select OK The selected images are transferred to the computer 726 ...
Page 729: ...Select OK to register to Images to transfer 729 ...
Page 765: ...3 Select Disconnect 4 Select OK The devices are disconnected 765 ...
Page 770: ...3 Select SET In the saved settings select settings to use for the connection 770 ...
Page 802: ...GPS Settings 1 Select GPS settings 2 Configure GPS details 802 ...
Page 813: ...4 Select OK 813 ...
Page 815: ...3 Select OK 815 ...
Page 818: ...4 Select the communication settings that will use IPv6 5 Select Change 6 Select TCP IPv6 818 ...
Page 853: ...3 Select Create folder 4 Select OK To rename the folder select Change folder name 853 ...
Page 874: ...Note Auto power off time may be extended while the Date Time Zone screen is displayed 874 ...
Page 875: ...Language 1 Select Language 2 Set the desired language 875 ...
Page 878: ...Example Multi function lock 878 ...
Page 879: ...Changing the Help Text Size 1 Select Help text size 2 Select an option 879 ...
Page 945: ...Operation 945 ...
Page 953: ...Note The dial cannot be customized in mode Control ring on RF lenses and mount adapters 953 ...
Page 1007: ...Note Other icons may be displayed temporarily after setting adjustments 1007 ...


