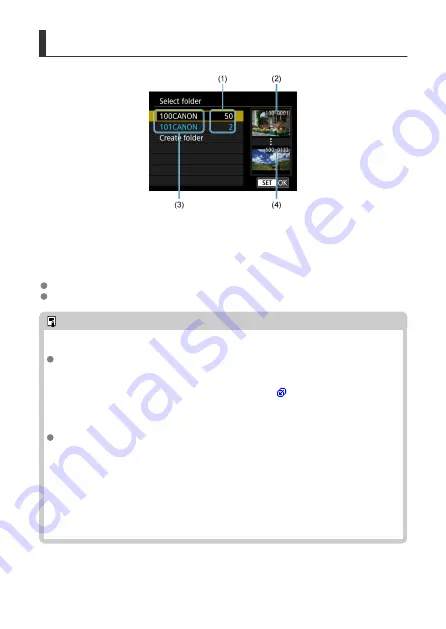
Selecting a Folder
(1) Number of images in folder
(2) Lowest file number
(3) Folder name
(4) Highest file number
Select a folder on the folder selection screen.
Captured images are stored in your selected folder.
Note
Folders
Folders are named as in “
100CANON
,” with a three-digit folder number followed by
five letters or numbers. A folder can contain up to 9999 images (file number 0001–
9999). When a folder becomes full, a new folder with the folder number increased
by one is created automatically. Also, if manual reset (
will be created automatically. Folders numbered from 100 to 999 can be created.
Creating folders with a computer
With the card open on the screen, create a new folder with “
DCIM
” as the name.
Open the DCIM folder and create as many folders as necessary to save and
organize your images. “
100ABC_D
” is the required format for folder names, and
the first three digits must be a folder number in the range 100–999. The last five
characters can be any combination of upper- and lower-case letters from A to Z,
numerals, and the underscore “_”. The space cannot be used. Also note that two
folder names cannot share the same three-digit folder number (for example,
“100ABC_D” and “100W_XYZ”) even if the remaining five characters in each name
are different.
766
Summary of Contents for EOS R10
Page 1: ...Advanced User Guide E CT2 D186 A CANON INC 2022 ...
Page 32: ... 1 2 5 9 10 16 15 14 13 12 22 20 21 19 18 17 8 7 11 6 4 3 32 ...
Page 55: ...Changing the Interface Language To change the interface language see Language 55 ...
Page 78: ... AF Start Button Equivalent to pressing the shutter button halfway in Creative Zone modes 78 ...
Page 83: ...Basic Zone Menu Screen In Basic Zone modes some tabs and menu items are not displayed 83 ...
Page 91: ...Dragging Sample screen Menu screen Slide your finger while touching the screen 91 ...
Page 138: ...Note Shutter speed display For example 0 5 indicates 0 5 sec and 15 15 sec 138 ...
Page 188: ...Shooting 5 1 Movie rec size 2 Sound recording 3 Shutter btn function for movies 188 ...
Page 256: ...Note Different creative filter effects are available in movie recording 256 ...
Page 302: ...Note For details on image stabilization for movie recording see Movie Digital IS 302 ...
Page 330: ...Clearing Settings 1 Select Shooting info disp 2 Select Reset 3 Select OK 330 ...
Page 347: ...ISO Speed in Mode ISO speed is set automatically See ISO Speed in Movie Recording 347 ...
Page 363: ...Total Movie Recording Time and File Size Per Minute For details see Movie recording 363 ...
Page 383: ...11 Read the message Read the message and select OK 383 ...
Page 522: ...Magnified view Note You can also magnify display by double tapping with one finger 522 ...
Page 532: ...532 ...
Page 553: ...4 Erase the images Select OK 553 ...
Page 555: ...4 Erase the images Select OK 555 ...
Page 594: ...Adding Images to Process 1 Select Add images to process 594 ...
Page 638: ... Wireless Communication Status 638 ...
Page 662: ...4 Set Size to send 5 Take the picture 662 ...
Page 665: ... 2 Sending multiple selected images 1 Press the button 2 Select Send selected 665 ...
Page 670: ... 4 Sending all images on the card 1 Press the button 2 Select Send all card 670 ...
Page 687: ...Steps on the camera 3 10 Establish a Wi Fi connection Select OK 687 ...
Page 704: ...3 Select Connect 4 Select OK 5 Scan the QR code with the dedicated app Select OK 704 ...
Page 728: ...4 Select OK 728 ...
Page 765: ...3 Select OK 765 ...
Page 781: ...Language 1 Select Language 2 Set the desired language 781 ...
Page 784: ...Example Multi function lock 784 ...
Page 785: ...Changing the Help Text Size 1 Select Help text size 2 Select an option 785 ...
Page 890: ...Note Other icons may be displayed temporarily after setting adjustments 890 ...


