91
Onscreen Markers, Zebra Patterns and False Color
Onscreen Markers, Zebra Patterns and False Color
In CAMERA mode, using onscreen markers allows you to make sure your subject is correctly framed and is
within the appropriate safe area. Zebra patterns help you identify areas that are overexposed. The false color
overlay allows you to check if the exposure is correct. You can display the assistance overlays independently on
the LCD screen, an optional viewfinder or external monitors. The assistance overlays will not affect your
recordings.
Displaying Onscreen Markers
The camera offers several onscreen markers. You can display multiple onscreen markers simultaneously and
select their color individually.
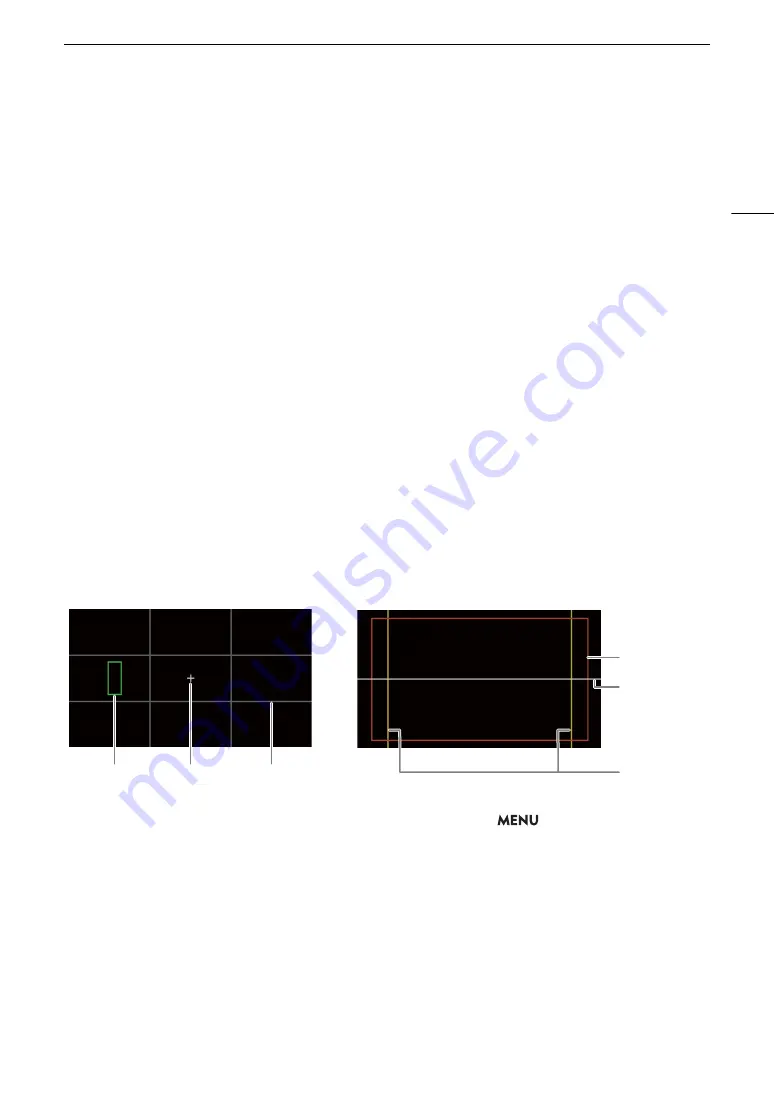
[Center Marker]: Displays a small marker that indicates the center of the screen. You can select the shape of the
center marker.
[Horizontal Marker]: Displays a horizontal line to help you compose level shots.
[Grid Marker]: Displays a grid that allows you to frame your shots correctly (horizontally and vertically).
[Aspect Marker]: Indicates various aspect ratios by displaying border lines or by masking the image outside the
selected aspect ratio. Available options include standard aspect ratios ([4:3], [1.66:1], etc.), a vertical aspect ratio
[9:16], and [Custom], a free aspect ratio set by the user.
[Safe Area Marker]: Displays a margin from the edges of the image to indicate the action safe area, text safe
area, etc. You can select the core area used as the basis for calculating the safe area and a percentage, relative
to the side length or area.
[User Marker 1], [User Marker 2]: Displays up to two rectangular frames whose size and position you can set
freely and independently of each other.
1 To display the markers overlay on individual video outputs, select
> [
A
Assistance
Functions] > [Markers: VIDEO Term.] (LCD screen), [Markers: EVF-V50] (optional viewfinder),
[Markers: MON./HDMI] or [Markers: SDI OUT] (external monitors) > [On].
• If the respective setting is set to [Off], onscreen markers will not be displayed on the corresponding video
outputs even if individual markers are configured.
2 Select the marker(s) you wish to display and configure them with the following procedures.
• You can display multiple markers simultaneously.
Aspect guide 4:3
Center marker
([Cross 1] type)
Grid
Horizontal
marker
Safe area 88%
by side length
User marker
(100, 250)
Summary of Contents for EOS C300 Mark III
Page 1: ...Digital Cinema Camera Instruction Manual PUB DIE 0549 000B Firmware ver 1 0 1 1 ver 1 0 3 1 ...
Page 4: ...4 ...
Page 24: ...4K and Higher Resolutions Workflow Overview 24 ...
Page 50: ...Adjusting the Black Balance 50 ...
Page 122: ...Using the Optional RC V100 Remote Controller 122 ...
Page 136: ...Saving and Loading Menu Settings 136 ...
Page 146: ...Clip Photo Operations 146 ...


