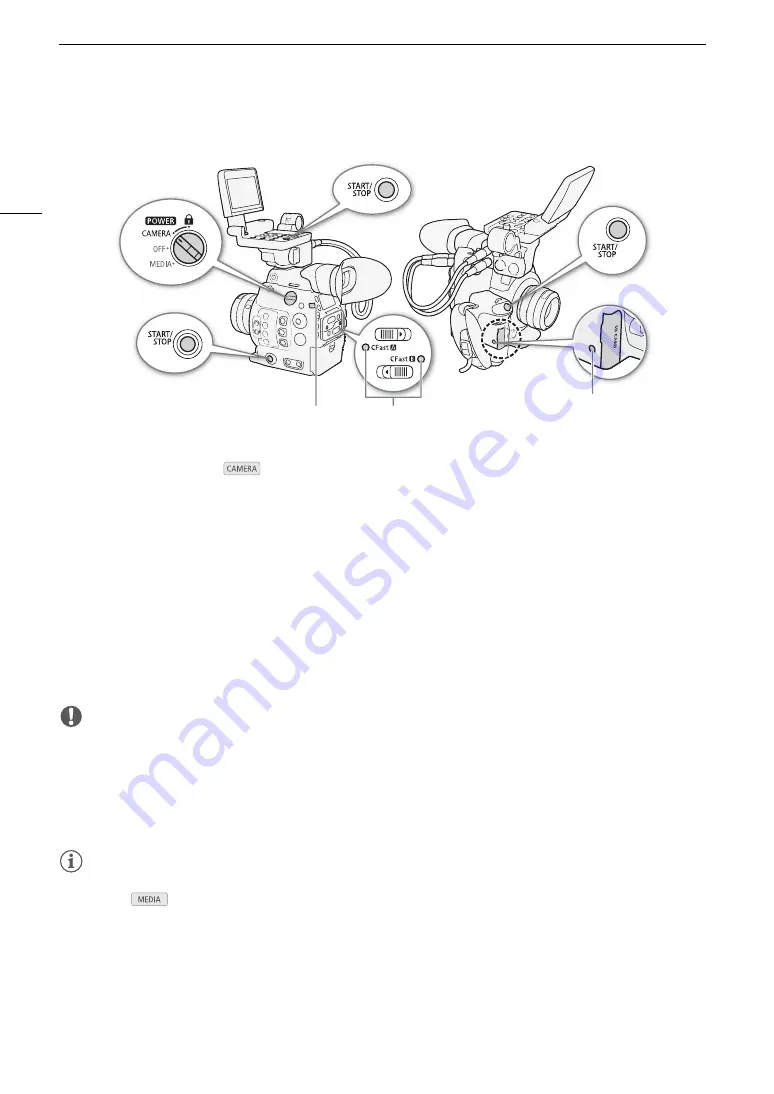
Recording Video
54
Recording
1 Set the
Q
switch to CAMERA.
• The camera turns on in
mode and enters record standby mode.
• The access indicators of card slots with a card inserted will illuminate momentarily in red. Then, the access
indicator of the CFast card slot selected for recording will change to green.
2 Press the START/STOP button to begin recording.
• Recording starts. The tally lamp illuminates and the recording indicator [
Ü
REC] appears at the top of the
screen.
• You can use the START/STOP button on the camera’s body (left side), the grip unit or the monitor unit.
• You can also perform this function remotely using Browser Remote on a connected Wi-Fi device (
A
• For details about recording proxy clips, refer to
Simultaneous Recording of Proxy Clips
(
A
3 Press the START/STOP button to stop recording.
• The clip is recorded to the CFast card and the camera enters record standby mode. The tally lamp will also
go out.
IMPORTANT
• Observe the following precautions while an access indicator is illuminated in red. Failure to do so may result in
permanent data loss.
- Do not open the card slot cover of the card being accessed and do not remove the card.
- Do not disconnect the power source or turn off the camera.
• Be sure to save your recordings regularly (
A
170), especially after making important recordings. Canon shall
not be liable for any loss or corruption of data.
NOTES
NOTES
• You can use the review function (
A
110) to play back part or all of the last clip recorded without having to
switch to
mode.
• If you record using the custom picture and metadata settings, those settings will be recorded with the clip. For
more details, refer to
Custom Picture Settings
(
A
Using Metadata
(
A
• If the camera switches to the other CFast card while recording video due to the relay recording function
(
A
50), the two parts (before/after the switch) will be recorded as separate clips.
• If you set an assignable button to [Add Shot Mark 1] or [Add Shot Mark 2] (
A
131), you can press the button
to add a shot mark to a clip while it is being recorded. If you set an assignable button to [Add
$
Mark] or
[Add
%
Mark] (
A
131), you can press the button to add an
$
mark or
%
mark to the last clip recorded.
CFast card access indicators
Tally lamp
SD card access
indicator
Summary of Contents for EOS C300 Mark II
Page 1: ...PUB DIE 0477 000B Instruction Manual Digital Cinema Camera ...
Page 130: ...Browser Remote Controlling the Camera via Wi Fi 130 ...
Page 160: ...Clip Operations 160 ...
Page 174: ...Developing RAW Clips 174 ...
Page 180: ...Deleting Photos 180 ...


