Preparing the Camcorder
34
Configuring the Modular Units
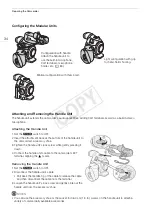
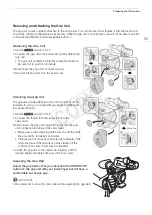
Attaching and Removing the Handle Unit
The handle unit extends the camcorder’s audio capabilities, adding XLR terminals as well as a built-in stereo
microphone.
Attaching the Handle Unit
1 Set the
Q
switch to OFF.
2 Insert the attachment base at the bottom of the handle unit to
the camcorder’s accessory shoe.
3 Tighten the handle unit’s lock screw while gently pressing it
down.
4 Connect the handle unit’s cable to the camcorder’s EXT
terminal, aligning the
Í
marks.
Removing the Handle Unit
1 Set the
Q
switch to OFF.
2 Disconnect the handle unit's cable.
• Pull back the metallic tip of the cable to release the cable
and then disconnect the cable from the terminal.
3 Loosen the handle unit's lock screw and gently slide out the
handle unit from the accessory shoe.
NOTES
• You can use the accessory shoe or the socket for 0.64 cm (1/4 in.) screws on the handle unit to attach a
variety of commercially available accessories.
Configuration with handle:
Attach the handle unit to
use the built-in microphone,
XLR terminals, microphone
holder, etc. (
A
Light configuration with grip
for hand-held shooting.
Minimal configuration with thumb rest.
COP
Y
Summary of Contents for EOS C100 Mark II
Page 1: ...Instruction Manual HD Camcorder PUB DIE 0463 000 COPY ...
Page 12: ...12 COPY ...
Page 46: ...Adjusting the Black Balance 46 COPY ...
Page 106: ...Using Accessories 106 COPY ...
Page 124: ...Saving and Loading Camera Settings 124 COPY ...
Page 144: ...Saving Clips to a Computer 144 COPY ...
Page 162: ...Playback via Browser 162 COPY ...
Page 168: ...Photo Operations 168 COPY ...


