background image

ArcSoft VideoImpression

 Quick Start Guide 


- 5 - 

ADDING MEDIA TO THE STORYBOARD 


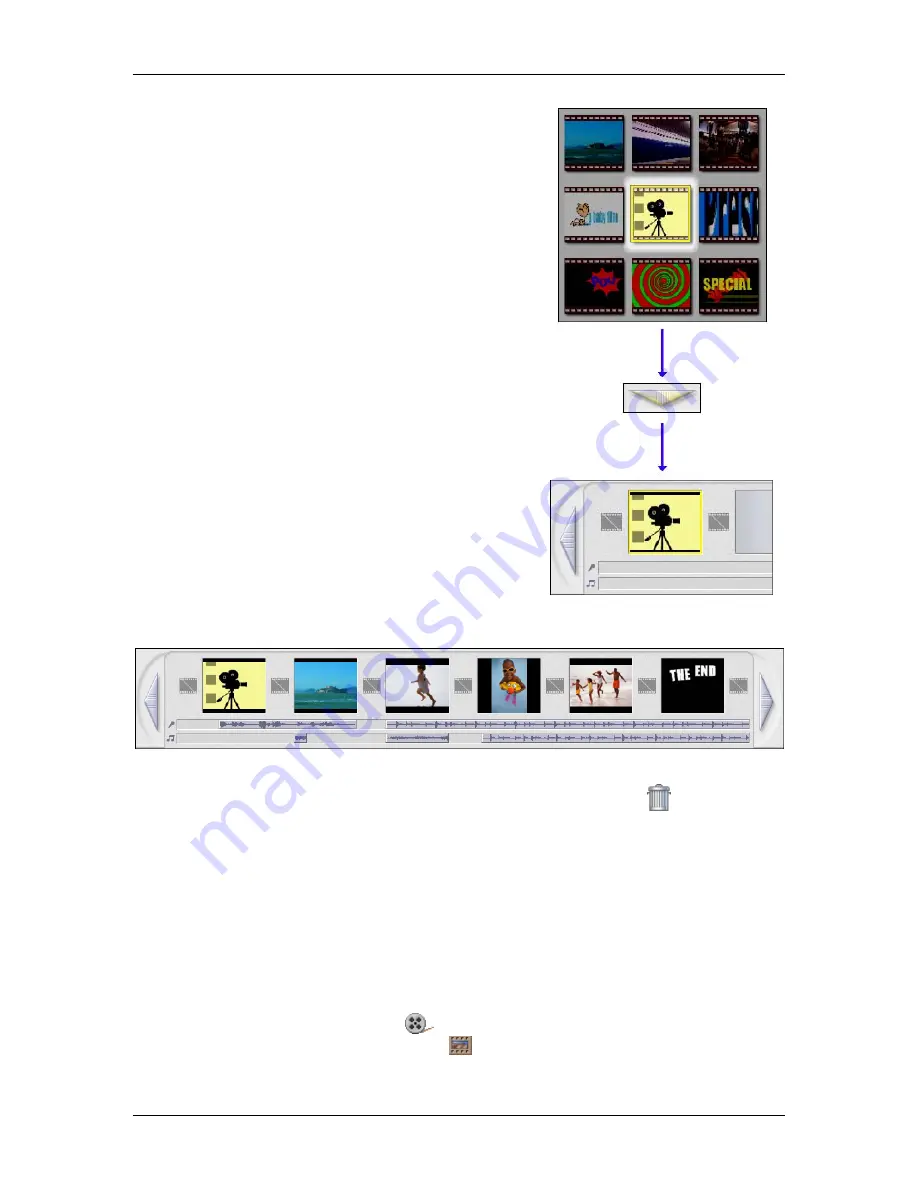
To add media to the Storyboard: 
1.  Double-click the component within the album. 


Or: 


1.  Single-click the component within the album. 

2.  Click the Apply button (it’s the arrow beneath the 

album). 


Don’t worry too much about adding your files in a 

particular order.  You can click and drag them on the 

Storyboard at any time to swap positions. 

 
Don’t forget that you can add audio to two different audio 

tracks!  You can overlap simultaneous sound clips and 

adjust their volumes to create the perfect blend.  If you 

need to record audio, you can do so at a later step. 


After adding your media, your Storyboard should look something like this: 


REMOVING MEDIA FROM THE STORYBOARD 

To remove a media component from the Storyboard, click the trashcan icon (

) after 

highlighting (clicking) the component you want to remove. 


THE PLAYER 

Now’s a good time to talk about the Player.  The Player is the video screen on the right side of 

the display.  It lets you preview each component on the Storyboard, as well as your entire movie. 


The Player has standard playback controls.  The slider beneath the preview window shows you 
the progress of the video.  There are two times listed; the first lists the total time of the clip, 

while the second lists the time at the current position. 


If you want to preview your entire movie (all of the components on the Storyboard played 
together), click the Entire Movie button (

).  If you want to preview only a specific component 

on the Storyboard, click the Active Clip button (

).  If you choose the latter, single-click the 

component you want to preview on the Storyboard, then press the Play button. 

Summary of Contents for Digital ELPH 300

Page 1: ... enclosed CD ROM before connecting the camera to your computer with this cable STOPl Veillez ainstaller Ie pilote apartir du CD fourni avant de brancher Ie cable de connexion de i appareil photo numerique aI ordinateur iATENCIONi Asegurese de haber instalado el driver que contiene el CD ROM antes de conectar la camara al ordenador con esie cable ...

Page 2: ......

Page 3: ......

Page 4: ......

Page 5: ...ons S1 Click Start Image Download J ll1 Select the image downloading method in the IICameraWindow Download Image s 1I window If the event dialog does not appear U click the Start menu then select Programs or All Programs followed by Canon Utilities CameraWindow and CameraWindow Set Auto Launch Et Select Canon CameraWindow and click OK 7 Downloading Images to a Computer Thumbnail Downloaded images ...

Page 6: ...ays by linking it with other software II Printing Images with Different Layouts With PhotoRecord Windows ImageBrowser Macintosh you can layout images as desired and then print them II Stitching Panoramic Images With PhotoStitch you can connect or I stitch II multiple images together into a seamless panoramic view What you can do with ZoomBrowser EX Windows IlmageBroV lser Macintosh II Downloading ...

Page 7: ...ot Jl I US 500 DIGITAL EL H 71 werShot S 410 DIGITAL EL H DIGITAL 1 US430 t PictBridge DiG C tJ BUBBLE JET DIREO DIREO PRINT Please read the Read This First section p 7 Please also read the Software Starter Guide and the Direct Print User Guide l j DPOF Camera User Guide ...

Page 8: ...of genuine Canon accessories is recommended This product is designed to perform optimally when used with genuine Canon accessories Canon shall not be liable for any damage to this product and or accidents such as fire etc caused by the malfunction of non genuine Canon accessories e g a leakage and or explosion of abattery pack Please note that this warranty does not apply to repairs arising out of...

Page 9: ...deo Format Please set the camera s video signal format to the one used in your region before using it with aTV monitor p 127 Charging the Date Time Battery The camera has a built in rechargeable lithium battery that maintains the date time and other camera settings This battery recharges when the main battery pack is inserted into the camera When you first purchase the camera place acharged batter...

Page 10: ...es additional topics that complement the basic Ljj operating procedures Question Look Here First What settings are available under each function Will my settings remain in effect even after I ve turned the camera off 2 What can be accomplished with each function What do the icons listed in the Camera User Guide mean tf i1tl lP 4 fl J iM 1Z teii I JI ell 1 ee SeJi9 el1uIP 1a See My Qamera MfmU p 51...

Page 11: ...3 ...

Page 12: ... Playback 32 Using the LCD Monitor 33 Information Displayed on the LCD Monitor 35 Using the Viewfinder 39 Using the Zoom 40 Pressing the Shutter Button 41 Selecting Menus and Settings 43 Menu Settings and Factory Defaults 47 Resetting Settings to Their Default Values 52 Shooting 01 Shooting in Auto Mode 53 Reviewing an Image Right after Shooting 54 Changing Resolution Compression Settings 55 Quick...

Page 13: ...7 Playback Displaying Images Individually 89 Q Magnifying Images 90 Viewing Images in Sets of Nine Index Playback 91 Viewing Movies 93 Editing Movies 95 Rotating Images in the Display 97 Attaching Sound Memos to Images 98 Automated Playback Slide Shows 100 Protecting Images 104 Erasing lfur Erasing Single Images 105 Erasing All Images 106 Formatting CF Cards 107 Printing About Printing 108 Setting...

Page 14: ...Registering My Camera Settings 131 List of Messages 134 Troubleshooting 136 Appendix Using an AC Adapter Kit Sold Separately 140 Using aCar Battery Charger Sold Separately 141 Camera Care and Maintenance 142 Specifications 143 Photo Tips and Information Tip for Using the Self timer 153 How to adjust the exposure 153 ISO Speed 154 Advanced Technique for the Macro mode 154 Index 155 trFunctions Avai...

Page 15: ...are intended for personal use and should never be used in a manner that infringes upon or contravenes international or domestic copyright laws and regulations Please be advised that in certain cases the copying of images from performances exhibitions or commercial properties by means of a camera or other device may contravene copyright or other legal rights even if the image was shot for personal ...

Page 16: ...articular remain at least one meter 39 inches away from infants when using the flash Store this equipment out of the reach of children and infants Accidental damage to the camera or batteries by achild could result in serious injury In addition placement of the strap around the child s neck could result in asphyxiation Do not attempt to disassemble or alter any part of the equipment that is not ex...

Page 17: ...a power off and remove the camera battery or unplug the power cable from the power outlet Continued use of the equipment may result in fire or electrical shock Please consult your camera distributor or the closest Canon Customer Support Help Desk _ _ Do not use substances containing alcohol benzene thinners or other flammable substances to clean Dr maintain the equipment The use of these substance...

Page 18: ... not short circuit the battery terminals with metallic objects such as key holders It could lead to overheating burns and other injuries Use the supplied terminal cover to transport or store the battery pack Before you discard a battery cover the terminals with tape or other insulators to prevent direct contact with other objects Contact with the metallic components of other materials in waste con...

Page 19: ...sive use with your camera Do not use them with other products or batteries There is a risk of fire and other hazards Caution about magnetic fields Keep objects that are sensitive to magnetic fields such as credit cards away from the speaker of the camera p 14 Such items may lose data or stop working 11 ...

Page 20: ...ash with your fingers or clothing when shooting The flash may be damaged and emit smoke or noise In addition do not touch the surface of the flash after taking several pictures in rapid succession Either action could result in burns Do not operate the flash with dirt dust or other items stuck to its lens The resulting heat build up could damage the flash Ensure that the battery charger is plugged ...

Page 21: ... before removing it from the bag If Condensation Forms Inside the Camera Stop using the camera immediately if you detect condensation Continued use may damage the equipment Remove the CF card battery pack or compact power adapter from the camera and wait until the moisture evaporates completely before resuming use Extended Storage When not using the camera for extended periods of time remove the b...

Page 22: ...58 Self timer lamp p 64 Microphone p 98 Speaker 1 Flash p 58 DIGITAL Terminal p 120 AN Out AudioNideo Out Terminal p 127 Terminal Cover Attaching the Wrist Strap Be careful not to wave the camera about or catch it on other items when dangling it from the wrist strap 14 ...

Page 23: ...inters Interface Cable IFC 400PCU supplied with camera or the Direct Interface Cable DIF 100 supplied with the CP 1 00 CP 1 0 Bubble Jet Printers Bubble Jet Direct Compatible Printers Please refer to your Bubble Jet printer user guide PictBridge Compliant Printers Interface Cable IFC 400PCU supplied with the camera PictBridge Compliant Non Canon Printers Interface Cable IFC 400PCU supplied with th...

Page 24: ... p 105 DISP Display Button p 33 MENU Button SET Button The following operations are accessible through one easy press of the v Print Share button Printing See the Direct Print User Guide separate from this guide Downloading images Windows only See p 118 of this guide and the Software Starter Guide separate from this guide The indicator blinks or lights during a printer or computer connection Blue ...

Page 25: ...F cardlTransmitting data during acomputer connection Orange Ready to shoot flash on Blinking Orange Ready to shoot camera shake warning Lower Indicator Yellow Macro mode I Infinity model AF lock Blinking Yellow Focusing difficulty single beep Although you can still press the shutter button when the indicator blinks yellow you are recommended to shoot using the focus lock or AF lock p 72 17 ...

Page 26: ...the battery securely Battery charger model names and types vary by region For CB 2LS Plug the battery charger into a power outlet For CB 2LSE Attach the power cord to the battery charger and plug it into apower outlet The charge indicator will light red while the battery pack is charging It will change to green when the charge is complete After charging unplug the battery charger and remove the ba...

Page 27: ...use poor contact between the battery pack and camera Palish the terminals with atissue or adry cloth before charging or using the battery pack eDo not rapidly overturn or wave the battery charger around when it contains the battery pack The battery pack could fly out eAt low temperatures battery pack performance may be reduced and the low battery icon may appear earlier than usual Under these cond...

Page 28: ...ge eSince storing afully charged battery pack for long periods of time about 1 year can shorten its life cycle or affect performance you are recommended to use the battery pack in the camera until it is completely discharged and to store it at normal temperature 23 C 73 OF or lower If you do not use the battery pack for long periods of time charge it fully and discharge it fully in the camera at l...

Page 29: ...rst time I Battery Lock Slide the battery cover in the direction of the arrows Press the battery lock while inserting the battery pack all the way in until the lock clicks Insert the battery pack correctly by aligning the arrows on the camera and the battery pack To remove the battery pack press the battery lock and pull the battery pack out Slide the battery cover closed 21 ...

Page 30: ...ved for more than three weeks Please use an AC Adapter Kit ACK500 sold separately for extended use of the camera p 140 Battery Pack Charge The following icons and messages will display when the battery pack charge is low Battery pack charge is low Recharge it as soon as possible before it is required for an extended period When the LCD monitor is off this icon will display when you press any butto...

Page 31: ...card slot cover Insert the CF card with its label facing upward until the CF card eject button fully extends Insert the card firmly into the slot following the diagram on the CF card slot cover Close the CF card slot cover To remove the CF card Push the eject button and pull the CF card out CF Card Eject Button 23 ...

Page 32: ...urn the camera s power off or open the battery cover or CF card slot cover Please note that CF cards formatted with other manufacturers cameras or a computer or formatted or edited with application programs may slow down writing to the CF card or may not operate correctly in the camera You are recommended to use CF cards that have been formatted In your camera p 107 The card supplied with the came...

Page 33: ...ation to form in the card and lead to a malfunction To avoid condensation place the CF card in a sealed plastic bag before moving it into adifferent temperature zone and allow it to adjust slowly to the new temperature elf condensation forms on the CF card store it at room temperature until the water droplets have evaporated naturally Do not use or store CF cards in the following locations Locatio...

Page 34: ...e lithium date time battery charge is low Start from Step 5to set the date and time 26 MENU g SET o Press the ON OFF button until the power lamp lights Press the MENU button The J Rec or g Play menu is displayed Use the or button to select the W Set up menu Use the G or e button to select and press the SET button ...

Page 35: ...te time stamp to appear on images For printing images with the date on them refer to the Direct Print User Guide or Software Starter Guide Charging the Date Time Battery The camera has a built in rechargeable lithium battery for saving settings such as the date and time This battery is recharged by the battery pack while it is in the camera Right after purchasing the camera leave a charged battery...

Page 36: ...display 28 Power Lamp _ ON OFF MENU g SET o Press the ON OFF button until the power lamp lights Press the MENU button The L J Rec or g Play menu is displayed Use the or button to select the W Set up menu Use the G or e button to select B and press the SET button ...

Page 37: ... the MENU button This function cannot be used while a movie clip is played back or a separately sold printer is connected to the camera Press the MENU button The display will return to the Shooting or Playback screen Use the G e or button to select a language and press the SET button MENU g SET CO 29 ...

Page 38: ...the camera power is turned on or whenever the built in rechargeable lithium battery charge is low Reset the date and time when this occurs p 26 If the power saving function activates press the ON OFF button to restore power p 31 You will hear a start up sound and see the start up image when the power is turned on To change the start up sound and image see p 49 51 129 The start up image does not di...

Page 39: ... even if Auto Power Down is set to Off Press any button except the ON OFF button to turn the LCD monitor back on This time can be changed p 49 Playback Mode Powers down approximately 5 minutes after the last control is accessed on the camera Connected to a Printer sold separately Powers down approximately 5 minutes after the last control is accessed on the camera or on a connected printer The powe...

Page 40: ...k Images Playback Mode Slide the mode switch to E When aprinter sold separately is connected images can be printed see the Direct Print User Guide When acamera is connected recorded images can be downloaded to and viewed with acomputer p 119 32 When a printer sold separately is properly connected the icon appears on the LCD monitor or ...

Page 41: ... when the power has been turned off after the Change the battery pack message has displayed while the LCD monitor was on in shooting mode In the c Q or mode the LCD monitor turns on regardless of its On Off setting The LCD monitor can be used to compose images while shooting adjust menu settings and play back recorded images Icons showing the camera s status and setting contents appear on the LCD ...

Page 42: ...witch is set to the LCD monitor will turn on DISP g Press the DISP button The display mode changes as follows with each press Standard 34 Detailed No Information llJ In Index playback mode p 91 the detailed display is not available ...

Page 43: ...r the metering preparations are complete and the camera shake icon appears in the LCD monitor Set the flash to Ell or U or affix the camera to a tripod to shoot Right after a shot is taken the image and Its information appear in the LCD monitor for 2 seconds or for the number of seconds selected if the review time was changed 2 10 sec even if you release the shutter button If the SET button is pre...

Page 44: ...4 9x 6 ix 7 6x 9 3x i2 0x PowerShotS4i0DIGITAL ELPH DIGITAL IXUS430 4 3x 5 3x 6 7x 8 2 ii 0x Spot AE Point Frame OM Mode 0 AF Frame p 76 J Compression p 55 DDIlIa 1 1mM Resolution p 55 1 Camera Shake Warning p 35 nsol nsolliSOHisOl f l JEIl ISO Speed p 85 I1 W Photo Effect p 84 Shots Remaining or Remaining Movie Time Elapsed Time Appears even if the LCD monitor is set to Standard No Information 1 ...

Page 45: ...J C3g White Balance p 81 Histogram 1I m Long Shutter Mode p 79 L J iJrJ Shooting Mode p 53 Exposure Compensation p 78 U Flash p 58 rt1I JW Photo Effect p 84 IIiDJ Imlil mmi ISO Speed p 85 mtM 1 ImlGiffil Resolution Movies p 55 L I Macro Infinity p 60 iilril g Metering Mode p 77 Movie Length Shown on Movie Files p 70 1 ImI is not available with the Power8hot 8410 DIGITAL ELPH DIGITAL IXU8 430 37 ...

Page 46: ...ectly on other cameras and image information recorded by other cameras may not display correctly on this camera Histogram Function The histogram is agraph that allows you to judge the brightness of the shot image The greater the bias toward the left in the graph the darker the image The greater the bias toward the right the brighter the image If the image is too dark adjust the exposure compensati...

Page 47: ... viewfinder and lens especially with close ups If you use the viewfinder to take close up shots portions of the close up subject may not appear in the recorded image Use the LCD monitor when taking close up shots About the Autofocus Function This camera employs AiAF artificial intelligence autofocus technology which uses abroad metering field to calculate the focal distance with high precision It ...

Page 48: ...zoom lever toward ill to zoom out wide angle 40 Digital Zoom When the LCD monitor is on you can shoot with acombined optical and digital zoom up to approximately 12x with the Power8hot 8500 DIGITAL ELPH DIGITAL IXU8 500 and 11x with the Power8hot 8410 DIGITAL ELPHI DIGITAL IXUS 430 p 62 o The digital zoom is unavailable in some modes p 160 j Images become coarser the more they are digitally zoomed...

Page 49: ... shake warning Insufficient exposure Lower Indicator Yellow Macro mode Infinity mode AF lock p 72 Blinking Yellow Focusing difficulty single beep sounds Use the focus lock or AF lock to shoot when the indicator blinks yellow p 72 AF Frame Status LCD Monitor On AiAF On p 76 Green Frame Metering complete focused AF frame No Frame Focusing difficulty single beep sounds AiAF Off p 76 Center AF Frame G...

Page 50: ...am will sometimes emit when the shutter button is pressed halfway to assist focusing in certain conditions i e dark conditions The AF assist Beam can be turned off p 47 For example if animals are your subject turn off the beam when shooting in the dark to avoid startling them However please keep in mind the following facts Turning the AF assist Beam off or shooting in dark places may make it more ...

Page 51: ...1 Rec Press the FUNC button The icons of the items that can be adjusted appear at the LCD monitor s left edge Use the G or e button to select an item See FUNG Menu on the next page for the menu items available Use the CD or button to select an option Some menu items can only be selected after pressing the SET button to display the next menu Press the SET button again to confirm the setting You can...

Page 52: ...1 rs I 1 1 Long Shutter Mode p 79 44 Items in parentheses show default settings The PowerShot S41 0 DIGITAL ELPH DIGITAL IXUS 430 menu is different because it does not feature the 1m option Selecting Menu Settings with the MENU Button Slide the mode switch to 0 Rec or Play ...

Page 53: ...se the G or e button to select an item See Menu Settings and Factory Defaults p 47 for the menu items Use the or button to select an option Menu items followed by an ellipsis can only be selected after pressing the SET button to display the next menu Press the SET button again to confirm the setting Press the MENU button In Shooting mode the menu can be closed by pressing the shutter button halfwa...

Page 54: ... II D G II MENU lB i g g Play Menu 46 Shooting Mode Playback Mode EmMy Camera Menu When the My camera menu is displayed pressing the Q button returns to the Rec Play menu When the Rec Play menu is displayed pressing the CD button displays the My camera menu G e Selects items CD Q Selects options MENU g ...

Page 55: ...he continuous shooting im Cont Shooting mode p 63 im Standard continuous shooting iii High speed continuous shooting Sets the duration of the self timer delay Self timer 1110 seconds p 64 It 2seconds Sets the AF assist Beam to on or off It AF assist Beam On p 42 Off Sets the digital zoom to on or off II Digital Zoom On p 62 Off Sets the duration images display on the LCD 51 Review monitor after th...

Page 56: ... p 100 Selects images and the number of print copies ri Print Order for output to a direct print compatible printer p 110 or photo developing service 51 Transfer Order Specifies settings for images before p 116 downloading to acomputer Set up Menu 48 Menu Item aD Mute Options Sets whether or not abeep sounds when the shutter button is pressed or when amenu operation is performed See How the MuteJo...

Page 57: ...d Adjusts the volume of the sound played when the shutter releases The shutter sound does not play when a movie is recording Adjusts the volume of movie sounds and p 93 sound memos p 98 Adjusts the LCD brightness of the LCD monitor 7toO to 7 Use the CD or Q button to adjust the brightness If you press the G or e button the display returns to the Set up menu You can check the brightness in the LCD ...

Page 58: ...ot images shot with the camera held vertically are automatically mAuto Rotate rotated in the display p 86 On Off Sets the language used in menus and messages on the LCD monitor English Italiano Deutsch Norsk Frangais Svenska t J language Nederlands Espanol p 28 Dansk Chinese Suomi Japanese You can also change the language in playback mode by holding the SET button and pressing the MENU button Sets...

Page 59: ...ets the sound emitted when the camera power is turned on II Operation Sound Sets the sound emitted when any button p 129 other than the shutter button is pressed II Selftimer Sound Sets the sound emitted 2 seconds before the shutter releases in self timer mode Sets the sound emitted when the shutter Shutter Sound button is pressed There is no shutter sound for movies My Camera Menu Contents Ui1 Of...

Page 60: ...age and Video System options in the W Set up menu p 50 White balance data recorded with the custom white balance function p 82 Newly added My Camera settings p 131 52 Power Lamp t ON OFF Press the ONI OFF button until the power lamp lights green Set the mode switch to any position Press and hold the MENU button for more than 5 seconds Use the CD or button to select OK and press the SET button To e...

Page 61: ...tor beside the viewfinder will light green or orange If the LCD monitor is on the AF frame will appear green If the subject is difficult to focus on the lower indicator beside the viewfinder will blink yellow and the beep will sound one time Press the shutter button fully p 42 You will hear the sound of the shutter when the shutter activates The picture appears for two seconds on the LCD monitor S...

Page 62: ...ase the image p 105 Magnify the image in the display When pressing the SET button while the image is displayed p 90 Changing the Review Duration The default review time is 2seconds The review function can be set to Off or changed to any time in the range of 2to 10 seconds in one second increments 54 MENU g inihe Rec jmenu seieciD See Selecting Menus and Settings p 43 Use the CP or button to select...

Page 63: ...0 1m 1600 x1200 pixels mm 6 x 4 in prints Medium 2 Print L size 119 x 89 mm 4 7 x 3 5 in prints II 640 x480 pixels Small Send images as e mail attachments Small Shoot more images Power8hot 8410 DIGITAL ELPH DIGITAL IXU8 430 Resolution Purpose Print larger than A4 size 210 x II 2272 x1704 pixels Large 297 mm 8 3 x 11 7 in prints Large Print largerthan Letter size 216 x 279 mm 8 5 x 11 in prints iii...

Page 64: ...240 pixels ImI 160 x 120 pixels 56 In the FUNC menu select or II See Selecting Menus and Settings p 43 The current setting is displayed Use the or button to select an option Compression Excluding Movies Select m or Resolution Still Images Select II 1m 1m or m Resolution Movies Select rr m M or 1mI You can shoot right after selecting an option The menu displays again after the shot allowing you to ...

Page 65: ...onitor display freezes while the camera is autofocusing Press the FUNC button The display will return to the Shooting screen Use the CD or button to select On and press the MENU button The display will return to the Shooting screen The ij icon will display on the LCD monitor detailed display on when the IIQuick Shot option is set to On Press the DISP button to turn the LCD monitor on Inihe0 Rec me...

Page 66: ... lamp fires each time Reduction the main flash fires U Flash On The flash fires with every shot Flash Off The flash will not fire The flash timing is adjusted to slow shutter speeds This Slow reduces the chance that the background will be dark when i Synchro shots are taken at night or in rooms with artificial lighting The red eye reduction lamp fires with each shot Use of atripod is recommended 0...

Page 67: ...sh is charging The flash fires twice The main flash follows a preparatory pre flash The exposure reading obtained from the subject with the pre flash is used to set the optimal flash intensity for the main flash which is used to capture the image When using the flash be sure to shoot from at least 46 cm 1 5 ft away from your subject for standard photography and at least 30 cm 1 0 ft for macro phot...

Page 68: ...distant objects 0 OM cQ g 0 0 6 0 0 6 0 o Setting available 6 Can be selected for the first image only Press the button to select the macro infinity mode The selected macro infinity mode appears on the LCD monitor 60 To cancel the macro infinity mode Press the button to remove or from the display o Use the LCD monitor to compose close ups in macro mode since images composed with the viewfinder may...

Page 69: ...oto end and the wide angle end l the distance from lens to subject is the same as when the zoom is set to the telephoto end Distance from Lens to Image Area Subject Telephoto End 30 cm 1 0 ft 107 x80 mm 4 2 x3 1 in Wide Angle End 5 em 2 0 in 58 x43 mm 2 3 x1 7 in 61 ...

Page 70: ...Use the or button to select On and press the MENU button The display will return to the Rec screen 62 o j Press the zoom lever toward tJ The combined optical and digital zoom factor appears in the upper right of the LCD monitor When you press the zoom lever toward tJ the zoom stops when the lens reaches the maximum optical telephoto setting Press the zoom lever toward tJ again to activate the digi...

Page 71: ...owing rates ill Approximately 1 5 frames sec B PowerShot S500 DIGITAL ELPH DIGITAL IXU8500 Approximately 2 2 frames sec Power8hot 8410 DIGITAL ELPH DIGITAL IXU8430 Approximately 2 5 frames sec Use this mode to view images on the LCD Standard Continuous monitor as you shoot continuously The Shooting shutter interval is longer in this mode than in B mode Large Fine LCD monitor off mode These figures...

Page 72: ...e the flash s charging requirements With this function images are shot 10 or 2seconds after the shutter button is pressed This is useful when you want to take amemorable photo with everyone including yourself in the picture The self timer can be used in any shooting mode Press the button to display 11 or When the shutter button is pressed fully the self timer will activate and the self timer lamp ...

Page 73: ...ets faster 2 seconds before the shutter activates When is selected the self timer sounds at the same time as the shutter button is pressed The shutter activates in 2 seconds MENU g Changing the Self timer Countdown Time In the J Ree menu select See Selecting Menus and Settings p 43 The self timer sound can be changed with the Selftimer Sound item in the My Camera menu p 51 ...

Page 74: ...ings See Functions Available in Each Shooting Mode p 160 Shoot p 53 If the subject is difficult to focus on when the shutter button is pressed halfway the beep will sound one time and the lower indicator beside the viewfinder will blink yellow The AF frame will also appear yellow If the AiAF option is set to On p 76 the AF frame will not appear ...

Page 75: ...merges them When shooting try to include adistinctive item landmark in the overlapping portions Compose each frame so that it overlaps 30 50 of the adjoining image Try to keep the vertical misalignment to less than 10 of the image height Do not include moving items in the overlap Do not try to stitch images that include both distant and close items These items may appear warped or doubled up in th...

Page 76: ...n two sequences in Stitch Assist Left to right horizontally Right to left horizontally Slide the mode switch to Ree and turn the mode dial to Use the or button to select the sequence direction and press the SET button SET 0 68 Shoot the first frame in the sequence The exposure and white balance are set and tocked with the first image ...

Page 77: ...for additional images A sequence may contain up to 26 images Press the SET button after the last shot o A custom white balance setting cannot be set in Stitch Assist mode To use a custom white balance setting first set it in another shooting mode p 82 The settings for the first image are used to take subsequent images in the sequence It is not possible to display images on the TV when shooting in ...

Page 78: ...shooting the recording time in seconds and ared circle appear on the LCD monitor Press the shutter button fully again to stop recording The maximum length of amovie clip 10 frames sec at 1fjJ 15 frames sec atM 1mnJ is approximately 30 sec at 1mB 3 min at 1m 3min at ImnJ according to Canon s standardized tests Recording time vary by the CF card See CF Cards and Estimated Capacities p 148 The maximu...

Page 79: ...supplied with the camera may be used without further formatting Be careful not to touch the microphone while recording The AE AF white balance and zoom settings remain fixed for subsequent framesat the values selected for the first frame After a clip is shot the upper indicator beside the viewfinder will blink green while the clip is being written to th CF card You cannot shoot again until the bli...

Page 80: ...e glass Subjects with horizontal stripes Shooting with the Focus Lock Aim the camera so that an object at the same focal distance as the main subject is centered in the viewfinder or in the AF frame displayed on the LCD monitor Press the shutter button halfway two beeps will sound The focal distance to the object is locked Re aim the camera to compose the shot as desired and press the shutter butt...

Page 81: ... any shooting mode When shooting with the focus lock or AF lock using the LCD monitor setting the AiAF to Off p 76 is recommended since the camera focuses using the center AF frame only The AF lock is convenient because you can let go of the shutter button to compose the image Moreover the AF lock is still effective after the picture is taken allowing you to capture a second image with the same fo...

Page 82: ...urn the LCD monitor on Focus on the part of the subject on which you wish to lock the exposure setting Press the shutter button halfway two beeps will sound and press the button The exposure setting is locked The II icon will display Re aim the camera to compose the shot as desired and press the shutter button fully 74 The AE lock may be released by pressing the zoom lever MENU button or button or...

Page 83: ...ress the button to set the flash to U Focus on the part of the subje ct on which you wish to lock the flash exposure setting Press the shutter button halfway two beeps will sound and press the 00 button The flash will fire a pre flash and lock the flash exposure to the required intensity to illuminate the subject The 1m icon will display Re aim the camera to compose the shot as desired and press t...

Page 84: ...camera detects the subject and highlights the AF frames from 9available points that it will use to determine the focus o Off The camera focuses using the center AF frame This is convenient for focusing on aspecific part of asubject with greater certainty The 0 symbol represents the AF frames as they appear in the LCD monitor MENU g In the L 1 Rec menu select See Selecting Menus and Settings p 43 U...

Page 85: ...nd the backlighting and adjusts the settings to the correct exposure for the main subject Center Averages the light metered from the entire frame but i Weighted Average gives greater weight to the subject matter at the center Meters the area within the spot AE point at the center i Spot of the LCD monitor Use this setting when you want to set the exposure on the subject in the center of the monito...

Page 86: ...ting is displayed Use the or button to adjust the exposure compensation The settings can be adjusted in 1 3 stops in the range 2 to 2 You can confirm the effect of the setting in the LCD monitor when it is on You can shoot right after selecting an option The menu displays again after the shot allowing you to change the settings easily FUNC g Press the FUNC button The display will return to the Sho...

Page 87: ...l return to the Shooting screen MENU CO In the FUNC menu select E l and press the SET button See Selecting Menus and Settings p 43 The current setting is displayed Use the or button to select a shutter speed The higher the value the brighter the image and the lower the value the darker the image You can shoot right after selecting avalue The menu displays again after the shot allowing you to chang...

Page 88: ...amount of processing time may be required before the next image can be shot Use the LCD monitor to confirm that the image was recor ded at the desired brightness Please note that camera shake becomes a factor at low shutter speeds If the camera shake warning i appears on the LCD monitor secure the camera to a tripod before shooting Use of the flash may result in an over exposed image If that occur...

Page 89: ...te 3 wavelength fluorescent lighting Em Fluorescent H For recording under daylight fluorescent or daylight fluorescent type 3 wavelength fluorescent lighting g Custom For setting acustom value with awhite sheet of paper etc to obtain the optimal white balance for the conditions In the FUNC menu select See Selecting Menus and Settings p 43 The current setting is displayed Use the Q or button to sel...

Page 90: ... piece of white paper or cloth or aphoto quality gray card that you wish to establish as the standard white color Especially in the following cases as the white balance may not be adjusted in f j Auto shoot after reading the white balance data in g Custom Shooting close ups Shooting subjects of monotone color such as sky sea or forest Shooting with apeculiar source of light such as amercury vapor ...

Page 91: ...o O before setting a custom white balance The correct white balance may not be obtained when the exposure setting is incorrect image appears completely black or white Shoot with the same settings as when reading the white balance data If the settings differ the optimal white balance may not be set Especially the following should not be changed Flash Setting the flash to on or off is recommended If...

Page 92: ... Sharpening Records subjects with softened outlines Sepia Records in sepia tones II B W Records in black and white In the FUNC menu select See Selecting Menus and Settings p 43 The current setting is displayed 84 FUNC g Use the CD or button to select an effect You can confirm the photo effect in the LCD monitor You can shoot right after selecting an option The menu displays again after the shot al...

Page 93: ...t a speed You can shoot right after selecting an option The menu displays again after the shot allowing you to change the settings easily Press the FUNC button The display will return to the Shooting screen o Higher ISO speeds increase image noise To take clean images use as Iowan ISO speed as possible The AUTO setting selects the optimal ISO speed It will automatically raise the speed when the li...

Page 94: ... 86 This function may not operate correctly when the camera is pointed straight up or down Check that the arrow M is pointing in the right direction and if it is not then set the Auto Rotate function to Off Even if the Auto Rotate function is set to On the orientation of images downloaded to a computer will depend upon the software used to download the images When the camera is held vertically to ...

Page 95: ... the next number Set up menu select See Selecting Menus and Settings p 43 Use the CD or button to select On or Off and press the MENU button The display will return to the Shooting screen MENU g The file number is reset to the start 100 0001 each time anew CF card is inserted New images recorded on CF cards with existing files are assigned the next available number On Off Setting the File No Reset...

Page 96: ...h folder usually contains up to 100 images However since images shot in continuous shooting and stitch assist are always saved into the same folder a folder may contain more than 100 images The number of images may also exceed 100 if a folder contains images copied from a computer or images shot with other cameras Please note however that the images in folders containing 2001 or more images cannot...

Page 97: ...en the images Use the Q button to move to the previous image and the Q button to move the next image Holding the button down advances the images more rapidly but the images will not appear as clearly o You may not be able to play back images that have been shot with another camera or edited on a computer with other software applications 89 ...

Page 98: ...ting from approximately 2 5 times to approximately 5 and 10 times Hold the SET button down and press the zoom lever toward to cycle back through the levels of magnification from approximately 5times to 2 5 times and the standard view Use the G e CD or button to move around the image 90 To cancel the magnified display Press the zoom lever toward o Movie frames and index playback images cannot be ma...

Page 99: ...om lever toward up to nine images can be viewed at once in index playback Selected Image Movie Use the G e or button to change the image selection To return to single image playback Press the zoom lever toward Q 91 ...

Page 100: ...r toward while in index playback The jump bar will display Use the or button to move to the previous set or the next set Hold the SET button down and press the CD or Q button to jump to the first or last set 92 To return to index playback Press the zoom lever toward Q ...

Page 101: ...nel will display Use the G or e button to adjust the sound volume 93 icon are movies Images with a Use the or button to select a Play and press the SET button The movie and sound will play When playback ends the movie stops at the last frame displayed Press the SET button to display the movie control panel Press the SET button again to play from the beginning SET o SET o ...

Page 102: ... Play IT First Frame 11 Previous Frame Rewinds if the SET button is held down Ill Next Frame Fast Forwards if the SET button is held down Last Frame es Edit Switches to movie editing mode p 95 You may experience frame dropping and audio breakup when playing back a movie on a computer with insufficient system resources Movies shot with other cameras may not play back on this camera See List of Mess...

Page 103: ... SET 0 Movie Editing Panel Movie Editing Bar Use the or button to select a movie and press the SET button Switch to the movie editing mode See Operating the movie control panel p 94 The movie editing panel and the movie editing bar will display Use the G or e button to select til or I1J and the CD or Q button to set the portion to which the cut is applied eEl Cut Beginning i1JJ Cut End Cursor ...

Page 104: ...under a new file name The pre edit data is left unchanged Overwrite saves the edited movie with its original file name The pre edit data is lost When the CF card lacks sufficient space to create anew file only Overwrite can be selected 96 The minimum duration of an edited movie is 1 second It may take approximately 3 minutes to save an edited movie If the battery pack runs out of charge partway th...

Page 105: ...y will return to the Play menu Pressing the MENU button again returns to the Playback screen Movies cannot be rotated When images are downloaded to a computer the orientation of images rotated by the camera will depend upon the software used to download the images Images can be magnified when rotated p 90 Images taken vertically with Auto Image Rotate p 86 set to On will automatically be rotated t...

Page 106: ...os Press the MENU button Use the CD or button to select an image and press the SET button The sound memo control panel will display Use the CD or button to select Record and press the SET button The recording starts and the elapsed time is displayed Speak towards the microphone of the camera Press the SET button again to stop recording To resume recording press the SET button again Up to 60 second...

Page 107: ...nd memos attached have the D n symbols displayed on them The sound memo control panel will display To return the playback to the beginning select 0 Pause while stopped and press the SET button o You cannot attach sound memos to movies The Memory card full message will display when the CF card is full and you will be unable to record sound memos to that card If an incompatible sound memo is attache...

Page 108: ...es selected for each slide show in order p 101 In the Play menu select and press the SET button See Selecting Menus and Settings p 43 The Slide Show menu will display Use the G or e button to select Program and the CD or Q button to select All Images Show 1 Show 2 or Show 3 See p 1 02 from step 3 for selecting the playback images in slide shows 1 3 Use the G or e button to select Start and press t...

Page 109: ... Fast Forwarding Rewinding a Slide Show SET CO Press the SET button The slide show pauses Press the SET button again to restart it Press the or button The previous or next image displays Hold down the button to advance through the images more rapidly Stopping a Slide Show MENU g Press the MENU button The slide show stops and the Slide Show menu reappears Selecting Images for Slide Shows You can ma...

Page 110: ...n to move between images and the G or e button to select or deselect them Selected images display a number corresponding to their selection order and awhite checkmark You can press the zoom lever toward to switch to the index mode 3 images and use the same procedures to select images While in index playback pressing the SET button displays the menu for selecting or deselecting all images Use the G...

Page 111: ...nu See Starting a Slide Show p 100 Use the or button to select Set up and press the SET button Use the G or e button to select or ril and the CD or 1 button to select an option Play Time Select a play time ril Repeat Select On or Off Press the MENU button The set up menu will close Pressing the MENU button again returns to the Play menu Press it again to go back to the Playback screen The display ...

Page 112: ...can make the selection of images easier by toggling between single image playback and index playback by pressing the zoom lever toward Q or Protection Icon SET o MENU g Press the MENU button The Play menu displays again Press it again to return to the Playback screen To cancel protection After step 1 select an image to remove protection from and press the SET button o Please note that formatting i...

Page 113: ...sfied with one by one o Please note that erased images cannot be recovered Exercise adequate caution before erasing a file Protected images cannot be erased with this function Use the Q or button to select an image for deletion and press the 16if button ...

Page 114: ... o Please note that erased images cannot be recovered Exercise adequate caution before erasing a file Protected images cannot be erased with this function SET 0 In the Play menu select and press the SET button See Selecting Menus and Settings p 43 106 ...

Page 115: ...ed after formatting will be less than the rated capacity of the CF card This is not a malfunction of the CF card or camera SET o When the camera is malfunctioning a corrupted CF card might be the cause Reformatting the CF card may solve the problem When a non Canon brand CF card is malfunctioning reformatting it may solve the problem CF cards formatted in other cameras computers or peripheral devi...

Page 116: ...a before sending the images CF card to a photo developing center 1 This camera complies with the PictBridge standard which allows you to print with non Canon PictBridge compliant printers as well 2 Digital Print Order Format This guide explains DPOF print settings For information on how to print images refer to the Direct Print User Guide supplied with the camera Also refer to your printer s manua...

Page 117: ... various print settings except DPOF print settings Print For details see the Direct Print User Guide separate from this guide p 110 T Set the number of print copies p 111 T See Setting the Print Style p 113 Standard Index Both Date On Off File Numbers On Off For details see the Direct Print User Guide separate from this guide to acomputer p 116 109 ...

Page 118: ...oping service or for printing on adirect print function compatible printer See the Direct Print User Guide for instructions on how to print Selecting Images for Printing There are two ways to select images Singly All images on aCF card the number of print copies is set to one per image SET o In the Play menu select and press the SET button See Selecting Menus and Settings p 43 110 ...

Page 119: ...f print copies up to maximum of 99 1m Index Use the CD or Q button to move to an image and the G or e button to select or deselect it Acheckmark displays on selected images You can press the zoom lever toward to switch to the index mode 3 images and use the same procedures to select images Press the MENU button The Print Order menu will reappear Pressing the MENU button again returns to the Play m...

Page 120: ...n 112 The A icon may display for a CF card that has had print settings set by a different DPOF compliant camera These settings will be overwritten by those set by your camera The output of some printers or photo developing services may not reflect the specified print settings Print settings cannot be set for movie images Images are printed in order from oldest to newest by the shooting date A maxi...

Page 121: ...e selected images together at a Print Type reduced size in an index format Il Both Prints the images in both the standard and index formats Date Adds the date to the print II File No Adds the file number to the print In the g Play menu select and press the SET button See Selecting Menus and Settings p 43 Use the CD or button to select Set up and press the SET button SET CO 113 ...

Page 122: ...ing the MENU button again returns to the Play menu Press it again to go back to the Playback screen MENU g Print Type I Date I i d o When Print Type is set to Index the Date and File No cannot be set to On at the same time With CP printers if Print Type is set to Both both Date and File No can be set to On however only the file number is printed for the index print llJ The date prints in the forma...

Page 123: ...ET button To exit without resetting select Cancel SET 0 SET 0 SET 0 Resetting the Print Settings The print settings can all be removed at once The print type resets to Standard and the Date and File No options to Off in ii1 e gj P j ay m enu se leci and press the SET button See Selecting Menus and Settings p 43 ...

Page 124: ... used on the camera comply with the Digital Print Order Format DPOF standards o The A icon may display for a CF card that has had print settings set by a different DPOF compliant camera These settings will be overwritten by those set by your camera SET 0 In the Play menu select i1 and press the SET button See Selecting Menus and Settings p 43 Use the or button to select Order and press the SET but...

Page 125: ...ected images You can press the zoom lever toward to switch to the index mode 3 images and use the same procedures to select images While in index playback pressing the SET button displays the menu for selecting or deselecting all images Use the G or e button to select Mark all or Clear all and press the SET button MENU g 0G e Selected for Transfer o Images are transferred in order from oldest to n...

Page 126: ...perations after you have installed the appropriate software the computer settings only need to be adjusted for the first download See Connecting the Camera to aComputer p 119 and Downloading Images by Direct Transfer p 123 With this method you download images using computer commands without installing any software See Connecting the Camera to a Computer p 119 Software Installation Not Required and...

Page 127: ...ovies USB C1 o J s l U 5 c c CD n Dl 3 Dl o Dl n o 3 0 s CD Display Free Hard Disk Canon Utilities Space ZoomBrowser EX 200 MB or more Including the PhotoRecord printing program PhotoStitch 40 MB or more Canon Camera TWAIN Driver 25 MB or more Canon Camera WIA Driver 25 MB or more Display s o ci x 600 pixelsl High Color 16 b it or better is required 1 024 x 768 pixels or better is recommended Maci...

Page 128: ...d to use a fully charged battery pack or AC Adapter Kit ACK500 sold separately to power the camera when connecting to a computer pp 18 140 All procedures performed with a connection to a USB 2 0 compliant board are not guaranteed Install the driver and the software applications bundled on the Canon Digital Camera Solution Disk Please see the Software Starter Guide for the installation procedures U...

Page 129: ...re Starter Guide and download images Select Canon CameraWindow in the event dialog that appears on the computer and click OK first time only Camera connected or this action 61INaysusethisprOgra Q OK 9 Cancel o If the event dialog fails to appear click the Start menu followed by Programs or All Programs Canon Utilities CameraWindow and CameraWindow Set Auto Launch 121 ...

Page 130: ... when you connect this camera to thecompuler lYou can change this setting later You can download images using the Dired Transfer menu for Canon XXXXXXXXXXX Start Image Download Using the software and computer to download images See the Software Starter Guide Using the Camera to Download Images Direct Transfer Function See Downloading Images by Direct Transfer next page ...

Page 131: ...w and select them The transferred images display on the computer desktop I New Images Ii All Images Transfers and saves all images to the computer Transfers and saves to the computer only the images that have not been previously transferred Wallpaper All Images New Images DPOF Trans Images Use the G or e button to select Ii I or and press the Print Share button To cancel the transfer press the SET...

Page 132: ...124 Only JPEG format images can be downloaded as wallpaper for the computer The option selected with the button is retained even when the camera s power is turned off previous setting will be in effect the next time the Direct Transfer menu is displayed The image selection screen will appear directly when the Select Transfer or the Wallpaper option was last selected ...

Page 133: ...is is useful for downloading images to a computer in which the software is not installed However please note that there are certain limitations to downloading with this method For more details please refer to the supplied For Windows XP and Mac OS XUsers leaflet Use the supplied interface cable to connect the computer s USB port to the camera s DIGITAL terminal See steps 2 4 and onward on p 120 Fo...

Page 134: ... Refer to your card adapter s or card reader s manual for information regarding the connection between the computer and card adapter or card reader Double click the icon of the drive containing the CF card Depending on the operating system the drive containing the CF card may display automatically Copy the CF card s images to the desired folder on the hard disk The images are contained in the xxxC...

Page 135: ...button to turn the camera off Also turn the television off Connect the AV cable to the camera s AN Out terminal Slip your fingernail under the upper edge of the terminal cover to open it and insert the cable securely Plug the other ends of the AV cable to the VIDEO IN and AUDIO IN jacks on the TV Turn on the TV and switch it to Video mode Slide the mode switch to Shooting or E Playback ...

Page 136: ...connected to a TV If the TV is a stereo model you can plug the audio plug into either the left or right Audio In jack Please refer to the TV s manual for details The video output signal can be switched NTSC or PAL to accommodate different regional standards p 50 The default setting varies between regions NTSC Japan U S A Canada Taiwan etc PAL Europe Asia excluding Taiwan Oceania etc If the video s...

Page 137: ...sounds Each menu item has three choices Example Start up Image The moption features science fiction related images and sounds The EM option features animals Select the My Camera menu See Selecting Menus and Settings p 43 Use the G or e button to select an item Use the CD or button to select an option ...

Page 138: ...essing the shutter button halfway MENU g Theme in Step 2 you can select a consistent theme for of the My Camera settings If the Mute option in the m Set up menu is set to On the beep will not sound even if each sound item is individually set to n m or EM On in the My Camera menu p 48 130 ...

Page 139: ...the supplied software to upload your computer s images and sounds to the camera Use the G or e button to select an item Select the Em My Camera menu See Selecting Menus and Settings p 43 Use the or button to select morm The icon will display Press the DISP button DISP g Registering CF Card Images and Sounds Slide the mode switch to Playback ...

Page 140: ...ecording will start and automatically stop when the time is exceeded After recording use the CD or Q button to select Register Sound and press the SET button Select Exit to return to the My Camera Menu without registering Select CI Play to play the recorded sound SET 0 co OJ l V _ SET 0 o Sounds recorded with the movie and sound memo functions cannot be added as My Camera settings The prior settin...

Page 141: ... 0 sec or less 1 3 sec or less II Operation Sound 0 3 sec or less 0 4 sec or less II Selftimer Sound 2 0 sec or less 2 0 sec or less Shutter Sound 0 3 sec or less 0 4 sec or less Any file formats other than those described above cannot be used with this camera An example of this function is to record Say Cheese as aself timer sound so that the camera will replay this sound 2 seconds before the pho...

Page 142: ...t be created because there is a file with the same name as the directory that the camera is attempting to create or the highest possible file number has already been reached In the Rec Menu set the File Reset option to On Save all the images you wish to retain onto a computer then reformat the CF card Please note that formatting will erase all the existing images and other data Battery charge is i...

Page 143: ...is image since the format of the existing sound memo is incorrect Cannot register this image You attempted to add a start up image that was created with another camera or a movie clip Protected You attempted to erase a protected image or a protected movie clip Too many marks Too many images have been marked with print settings or transfer settings Cannot process any more Unselectable image You att...

Page 144: ...e shutter button I when e_indicator li9h CF car d is f ul I I Insert a new CF card If required download the images I I to a computer and erase them from the CF card to make space If i rect II ea r in CF c ar dS 1 107 I i If reformatting does not work the CF I card logic circuits may be damaged I e consUI t the nearest Canon custom er I j Support Help Desk __ J Ca nnotplay baCk Yo u a ttempted to p...

Page 145: ...Eiplac e t h e battery pack with ci charge exceeded new one Poor contact Insert battery pack securely into between battery I battery charger pack and battery Ensure that battery charger plug charger is securely plugged into the power outlet Camera mov e d L Be careful not to move the camera while pressing the shutter button Be careful not to block the AF i assist Beam with fingers or other items i...

Page 146: ...t to the background Subject is too far away for flash to reach i Subject in recorded I image is too bright Subject is too close I When using the flash stay at I making the flash too least 46 cm 1 5 ft from the strong subject I Subject is bright in Set the exposure compensation contrast to the to anegative setting or use the I background spot metering function Light is shining Chan ge the shooting ...

Page 147: ... card takes along i 107 L iLight from the flash has reflected off dust particles or Iinsects in the air This is especially I noticeable when shooting at wide Iangle I I Flash oes not fire I Flash is set to off Set the flash to on Image not showingll ncorrect video Set the vide o system to the Ion TV monitor I system setting appropriate setting NTSC or PAL I I for your TV p 50 _ I Shootin g i n st ...

Page 148: ...tery Lock Connect the power cord to the compact power adapter first and then plug the other end into the power outlet Open the battery cover then insert the DC coupler until it is locked Insert the DC coupler while pressing the battery lock as the arrow shows Slide the battery cover closed Open the DC coupler terminal cover and attach the cord to the DC terminal After you have finished using the c...

Page 149: ...s running again to plug the car battery cable into the cigarette lighter socket The car battery charger can only be used in a negative ground car It cannot be used in a positive ground car With the engine running plug the car battery cable into the cigarette lighter socket and the battery charger Insert the battery pack aII the way into the battery charger as shown Align the battery pack according...

Page 150: ...e dust and dirt then remove any remaining dirt by wiping the lens lightly with a soft cloth __ Never use synthetic cleansers on the camera body or lens If dirt remains contact the closest Canon Customer Support Help Desk as listed on the separate Canon Customer Support leaflet Viewfinder and LCD Monitor Use a lens blower brush to remove dust and dirt If necessary gently wipe with asoft cloth or an...

Page 151: ...n Lens Shooting Distance From the front of the lens Shutter Optical Viewfinder LCD Monitor 7 4 W 22 2 T mm 35 mm film equivalent 36 W 108 T mm f 2 8 W f 4 9 T _ _ Digital Zoom PowerShot S500 DIGITAL ELPH DIGITAL IXUS 500 Approx 4 1x Up to approx 12x in combination with the optical zoom PowerShot S410 DIGITAL ELPH DIGITAL IXUS 430 Approx 3 6x Up to approx 11x in combination with the optical zoom _ ...

Page 152: ...0 sec 15 1 sec possible in long shutter mode Slow shutter speeds of 1 3 sec or slower operate with noise reduction 144 __ _ Built in Flash Flash Range Self timer Recording Media File Format Image Recording Format Compression ...

Page 153: ...he maximum movie length per shooting 1im 10 frames sec ImIImI J 15 frames sec Single histogram displayable Index 9 thumbnail images Magnified approx 10x max in LCD monitor Sound memos up to 60 sec_ or Slide show Canon Direct Print and Bubble Jet Direct compatible and PictBridge compliant Display Languages 12 languages available for menus and messages English German French Dutch Danish Finnish Ital...

Page 154: ...7 8 mm 3 4 x 2 2 x 1 1 in excluding protrusions 146 Weight Approx 185 9 6 5 oz camera body only 1 This digital camera supports Exit 2 2 also called Exit Print Exit Print is a standard for enhancing the communication between digital cameras and printers By connecting to an Exit Print compliant printer the camera s image data at the time ot shooting is used and optimized yielding extremely high qual...

Page 155: ...on may appear earlier than usual Under these conditions resuscitate the battery pack by warming it in apocket immediately before use Test Criteria Shooting Normal temperature 230 C 73 F alternating between wide angle and telephoto every 20 seconds flash used once in four shots power turned off and on again after every eighth shot LCD monitor set to default brightness Playback Normal temperature 23...

Page 156: ...r 21 43 88 177 i l 43 88 176 355 m 18 38 76 154 48 x1536 pixels iti _ _ _ r 33 68 137 276 r _ r l 67 136 274 548 1 1m 30 61 122 246 00 x1200 PiXeIS 54 109 219 440 _ l 108 217 435 868 1 _ _ m 120 241 I 482 962 1 Ox 480 pixels 196 393 I 788 1563 i 3 f f 3 17 l 337 676 1355 1m i 640 x480 pixels 46 sec 92 sec 186 sec 1 vie 91 sec 183 sec 368 sec 735 sec 145 320 x240 pixels _ mIDI 242 sec 486 sec 973 s...

Page 157: ...80 pixels 196 393 788 1563 3122 337 676 1355 2720 5203 1m 91 sec 183 sec 368 sec 735 sec 1451 sec_ 320 x240 pixels 486 3 sec 1954seo e 1flillI 242 sec 3902 sec 160 x 120 pixels II 640 II 227 1m 102 1m 160 The maximum movie clip length is approximately 1Jm 30 sec Im 3 min or mIDI 3 min The times shown are the maximum continuous recording times When using the 64MB or higher capacity CF card I II Lar...

Page 158: ...x 4 80 I Bj 150 KB u 1 84 KB J lim 64 0 x4 8 0 6_6_0_KB_ s_ec_ _ Movies _ W I 320 x 240 330 KB sec I 160 x 120 120 KB sec _ _ _ _ _ _L _ _ PowerShot S410 DIGITAL ElPH DlGITAlIXUS 430 Compression fiI J 2002 KB 1116 KB i 556 KB t 1002 KB 558 KB 278 KB I 570 KB 320 KB I I 249 1 c Resolution II 2272 x 1704 n II 1600 x 1200 if 1024 x 768 II 640 480 KB I 50 KB 8 Movies ImJ 320 x 2 Ff _0 OKB sec __ mIDI ...

Page 159: ...Battery Charger CB 2LS CB 2LSE 100 240 V AC 50 60 Hz 0 075 A 100 V 0 045 A 240 V 4 2 V DC O S A Rated Input Rated Output Charging Time Approx 130 minutes Operating Temperatures 0 40 C 32 104 OF Dimensions 90 4 x 56 0 x 28 0 mm 3 6 x 2 2 x 1 1 in Weight Approx 78 g 2 8 oz When charging Battery Pack NB 1 LH Rated Input Compact Power Adapter CA PS500 Included with the optional AC Adapter Kit ACK500 1...

Page 160: ... Rated Output 4 2 V DC 0_55 A _ _ _ _ _ _ Charging Time Approx 130 minutes _ Operating Temperatures 0 40 DC 32 104 OF Dimensions 90 4 x 56 0 x 28 0 mm 3 6 x 2 2 x 1 1 in _ _ _ _ __ _ _ L _ _ _ _ _ _ _ _ _ _ _ _ _ _ Weight Approx 106 g 3 7 oz When charging Battery Pack NB 1 LH 152 ...

Page 161: ...image to be underexposed Adjust the exposure compensation towards the end Optimal Exposure Overexposure The whole recorded image is bright which makes black elements of the image appear gray Shooting dark subjects or in dark places may cause the image to be overexposed Adjust the exposure compensation towards the end Normally the camera shakes alittle when you press the shutter button Setting the ...

Page 162: ...aphy is prohibited The ISO speed setting makes full use of the available light resulting in images that convey the feel of the place they were shot ISO 50 equivalent ISO 400 equivalent Macro mode can make unique images when used with the zoom function For example shooting aflower at maximum wide angle in Macro mode allows the camera to bring both the flower and the background into focus However sh...

Page 163: ...lTime 26 DIGITAL Terminal 14 120 Digital Zoom 62 Direct Interface Cable 15 Direct Transfer 123 DPOF Print Order 110 Print Style 113 Resetting 115 Selecting Images 110 DPOF Transfer Order 116 E Erasing 105 All Images 106 Single Images 105 Exposu re 78 F FE Lock 75 File Number 87 Flash 58 Focus Lock 72 FUNC menu 44 H Histogram 38 I Image File Sizes 150 Index Playback 91 Indicator 17 Infinity 60 Inte...

Page 164: ...saving 31 Print Share Button 16 Printing 108 ProtecL 104 Q Quick Shot 57 R Rec Menu 47 Red eye Reduction Function 59 156 Resolution 55 Review Duration 54 Rotate 97 S Self Timer 64 Set up Menu 48 Shooting Mode Auto 53 Functions Available in Each Shooting Mode 160 Manual 66 Movie 70 Stitch Assist 67 Shutter Button 41 Pressing Fully 42 Pressing Halfway 41 Shutter Speed 79 Single Image Playback 89 Sli...

Page 165: ...MEMO 157 ...

Page 166: ...d QuickTime are trademarks of Apple Computer Inc registered in the United States and other countries Microsoft Windows and Windows NT are either registered trademarks or trademarks of Microsoft Corporation in the United States and or other countries Other names and products not mentioned above may be registered trademarks or trademarks of their respective companies Copyright 2004 Canon Inc All rig...

Page 167: ...turning the equipment off and on the user is encouraged to try to correct the interference by one or more of the following measures Reorient or relocate the receiving antenna Increase the separation between the equipment and receiver Connect the equipment into an outlet on acircuit different from that to which the receiver is connected Consult the dealer Dr an experienced radiolTV technician for h...

Page 168: ...ii Movie 8jJ l i i liq ii Superfine I X Compression Fine l i f i i ii R p 55 Normal J Auto 1I i ii i Red eye Reduction Auto m Flash On U X 6 p 58 Off 0 6 Slow Synchro I Iii 6 Quick Shot f j p 57 Macro Mode 0 0 6 0 p 60 Infinity Mode 0 6 0 AF Lock 11 0 p 72 AE Lock II 0 p 74 FE Lock II 0 p 75 Single iii 0 0 6 0 Standard Continuous rim 0 Shooting shooting p 63 Method High speed continuous m 0 shooti...

Page 169: ...uto Rotate 0 p 86 Default setting oSetting available 6 Setting can only be selected for the first image Shaded Area Setting is memorized even when the camera power is shut off 1 mis not available with the PowerShot S41 0 DIGITAL ELPH DIGITAL IXUS 430 2 The ISO speed is automatically set With the exception of the DatelTime Language and Video System settings all the other menu settings and changes m...

Page 170: ...Canon CDI E117 02B 0204CH80 2004 CANON INC PRINTED IN JAPAN ...

Page 171: ...n Guide d utilisation de I impression directe Imprimer au moyen d une connexion directe appareil photo imprimante Guia del usuario de impresi6n directa Impresi6n mediante una conexi6n directa entre una camara y una impresora 1 rJ PictBridge Ex fMnt p6 DIREG BUBBLE JET PRim DIREG ...

Page 172: ...Canon Direct Print User Guide Printing Using a Direct Camera Printer Connection ...

Page 173: ... Canon PictBridge Compliant camera please refer to the camera s user guide 2 CP 100 CP 10 Direct Interface Cable DIF 100 Supplied with the printer 3 Please also refer to the user guide that came with your printer PictBridge Compliance This camera complies with the industry standard PictBridge This allows you to also connect your camera to non Canon PictBridg e compliant printers and print images w...

Page 174: ... the camera raPrinting with Bubble Jet Printers Printing with Bubble Jet Printers raPrinting with Non Canon Printers Printing Selected Images with DPOF Settings This option allows you to select images for printing and specify print settings such as the number of copies with the camera DPOF print settings This is very convenient when you want to print several images at once or have them printed at ...

Page 175: ...or Bubble Jet Direct Compatible Printers 31 rzJ Printing with Non Canon Printers Only for PictBridge Compliant Printers 33 Settings that Can Be Set with the Camera 34 Trademark Acknowledgements Canon and PowerShot are trademarks of Canon Inc Other names and products not mentioned above may be registered trademarks or trademarks of their respective companies Copyright 2004 Canon Inc All rights rese...

Page 176: ...he Printer Please refer to page 6 to correctly connect your camera For details regarding the printer connection settlngs refer to the user guide that came with it D Printing Use the camera controls to select settings and start printing Some printers may be equipped with an operation panel but prInting cannot be performed from the panel Printing operations may vary depending on your printer model P...

Page 177: ...printer Refer to the printer s user guide Confirm which connection cable should be used see page 2 Turn the printer s power on This illustration shows the PowerShot S500 DIGITAL ELPHI PowerShot S410 DIGITAL ELPH DIGITAL IXUS 500 430 as an example Set the camera to Playback mode and turn the power on 1 j or D appears on the upper left corner of the LCD monitor You can now print Camera Connect the c...

Page 178: ...e playback Language settings that use the SET button and the MENU button Disconnecting the Camera and the Printer 1 Detach the cable from the printer 2 Turn the camera s power off 3 Detach the cable from the camera When you detach the cable hold the plug and do not pull by the cable 7 ...

Page 179: ... V button If you wish to change the print settings see Print after Changing the Print Settings below Print after Changing the Print Settings You can change the print settings before printing Make sure that displays in the upper left corner of the LCD monitor Display the images you wish to print and press the SET button The print order screen appears Setting the Print Style p 10 Selecting the Numbe...

Page 180: ...an one image you can cancel the rest of the printing by pressing the SET button Once the current print is finished a confirmation dialog appears Select OK and press the SET button Printing Errors An error message appears if an error occurs for some reason during the printing process Select Stop or Resume and press the SET button See List of Messages p 19 for details The Resume option may not appea...

Page 181: ...ne image per page 1 eMultiple 2 Prints eight copies of the same Image image on one page 010 Photo Prints a specified print size p 14 e Borders Borderless Prints right to the edges of the page Bordered Prints with a border On Adds the date to the print Date Off Prints without the date 1 Icon varies depending on the image to be printed 2 This option can only be selected when printing on card size pa...

Page 182: ...f you have not specified a trimming setting a frame will appear around the area of the image that will be printed allowing you to check the portion that will be cropped When printing multiple prints the borders and the date cannot be set Images are printed without any date or borders Practically all of the image area displayed on the LCD monitor is printed on bordered prints 11 ...

Page 183: ...lected portion The trimming setting screen differs depending on the camera model Ensure that the screen appears before selecting settings Trim the image Changing the Size of the Trimming Frame Press the zoom lever or the zoom button to adjust the size of the trimming frame The trimming frame can be changed to a minimum selection of approximately half the displayed image in width and height or a ma...

Page 184: ...rimming settings for another image When you close the Print mode when you turn the camera power off change the camera mode or detach the connection cable The date or part of the date in images shot in Date Stamp mode with a camera that has the Postcard Print mode may not be printed properly depending on the trimming setting The selected image paper and border settings determine the shape of the tr...

Page 185: ... administration requiring the photo o 14 The print size can be specified for only L Large resolution images in the camera connected to the printer In the print order screen select Style and press the SET button Select Image then select 10 Photo Specify the print size by selecting the length of the long side first then the short side then press the SET button See the table below for the selectable ...

Page 186: ...one image The print size setting is canceled with the following operations When you set the print size settings for another image When you set the trimming settings for another image When you close the Print mode when you turn the camera power off change the camera mode or detach the connection cable The shape of the trimming frame varies depending on the specified paper size Use the LCD monitor t...

Page 187: ...the 1tV button instead of the SET button movie print begins However you cannot select the Onl Off setting on the caption If necessary set rI Caption to On or Off If you set Caption to On you can print the file number and the elapsed time of the frame at the same time The number of printed movie frames per sheet of paper is determined by the paper size shown as follows Credit card size 20 frames L ...

Page 188: ... Print Style p 10 A print style cannot be set if the print type on the screen in step 2 is set to Index Select OK and press the SET button The image will start to print and when it is completely finished the display will revert to the standard playback mode To print the date set the Date setting in the print order menu in Step 2 to On You cannot set the date to print with the Style menu in Step 3 ...

Page 189: ... which the print settings were set has been deleted before restarting If there was very little free space on the memory card when the printing was canceled If these circumstances apply you can select OK in the print order menu and reprint starting from the first image If printing is canceled because the camera battery is depleted you are recommended to power the camera with a compact power adapter...

Page 190: ...ridge has not been inserted or has run out of ink Wrong paper size is loaded in the printer Wrong ink cassette size is loaded in the printer The ink cassette is experiencing a problem The paper and ink are from different sets The paper jammed during printing Paper was changed after the print menu was displayed The printer s battery pack is depleted The printer is experiencing a data transmission e...

Page 191: ...corner of the LCD monitor Display the images you wish to print and press the 1t V button If you with to change the print settings see Print after Changing the Print Settings Print after Changing the Print Settings You can change the print settings before printing Make sure that displays in the upper left corner of the LCD monitor If I l appears on the LCD monitor please refer to I l Printing with ...

Page 192: ...cel Printing To cancel printing between images press the SET button A confirmation dialog will display Select OK and press the SET button The printer will stop printing the current image and eject the paper Printing Errors An error message appears if an error occurs for some reason during the printing process Select Stop or Continue and press the SET button Depending on the type of error printing ...

Page 193: ...er Default Setting The Default option is a fixed setting of the Bubble Jet printer The Date Print Effect paper setting Paper Size Paper Type and Layout options are available When Default is selected images are printed with the Bubble Jet printer s settings The setting contents of the Default option differ depending on the Bubble Jet printer model For details please refer to the Bubble Jet printer ...

Page 194: ...prints Off Prints without any effects VIVID Prints more vibrant colors such as the green of trees or the blue of the sea or sky than the On option NR Prints with a noise reduction effect VIVID NR Prints using both the VIVID and NR options Default Print settings differ according to your Bubble Jet printer model el and choose a print effect option Setting the Number of Copies Select 1and set the num...

Page 195: ...ra model Ensure that the screen appears before selecting settings Trim the image Changing the Size of the Trimming Frame Press the zoom lever or the zoom button to adjust the size of the trimming frame The trimming frame can be changed to a minimum selection of approximately half the displayed image or a maximum selection that is virtually the same size as the image Expanding the trimming frame be...

Page 196: ...camera that has the Postcard Print mode may not be printed properly depending on the trimming setting The selected image paper size and border settings determine the shape of the trimming frame Please use the LCD monitor to set the trimming settings The trimming frame may not display correctly on a TV screen Selecting the Paper Settings Select Paper Settings and press the SET button The paper size...

Page 197: ...t The following print effects can be selected Borderless Prints right to the edges of the page Bordered Prints with a border Default Print settings differ according to your Bubble Jet printer model Select a layout and press the button This ends the paper settings operations The display returns to the print order screen With Bubble Jet printers equipped with an operation panel when Plain Paper is s...

Page 198: ...int settings In the g Play menu select Print Order and press the SET button the print effect and paper settings as required Setting the Print Effect p 23 Selecting the Paper Settings p 25 Page Layout cannot be set in the Paper Settings when Index is selected in the Set up option in Step 2 Select Print and press the SET button The image will start to print and when it is completely finished the dis...

Page 199: ...en deleted before restarting If there was very little free space on the memory card when the printing was canceled If these circumstances apply you can select OK in the print order menu and reprint starting from the first image If printing is canceled because the camera battery is depleted you are recommended to power the camera with a compact power adapter sold separately If you are using a batte...

Page 200: ...t of ink or there is no ink tank in the printer The ink tank needs to be replaced soon Prepare a new ink tank If you select Continue in the error screen you can restart printing You can restart printing by pressing the RESUMEI CANCEL button on Bubble Jet Printer Please request replacement of the waste tank waste ink absorber from the shop where you purchased the printer or your nearest Canon Custo...

Page 201: ...size than the specified paper size is set to the printer Select Continue on the error screen to display the paper size setting screen Correct the paper size using the screen only the selectable paper sizes appear on the screen Check that the correct paper size is selected If this error message appears even when the correct paper size is set turn off the printer then turn it on again If the error p...

Page 202: ...recorded in the RAW format Cancel Printing To cancel printing between images printed press the SET button Once the current print is finished a confirmation dialog appears Select OK and press the SET button The printer will stop printing the current image and eject the paper Printing Errors An error message appears if an error occurs for some reason during the printing process Select Stop or Contin...

Page 203: ...ht to the edges of the page t il Bordered Pri nts with a border On Adds the date to the print Date Off Prints without the date __ The 10 photo print function cannot be used See page 17 To print the date set the Date setting in the print order menu in Step 2 to On You cannot set the date to print with the Style menu in Step 3 When the print type is set to Index both the date and file number cannot ...

Page 204: ...rinting with Bubble Jet Printers For PictBridge Compliant Printers p 20 to print your images However please note that some menus and precautions differ as listed below See page 23 Setting the Print Effect VIVID NR and VIVID NR are not available See page 25 Selecting the Paper Settings A3 13 x 19 and 5 x 7 or 13 x 18cm are not available Eil Please also refer to the user guide that came with your pr...

Page 205: ...LCD monitor during a connection Print Options Selectable with the Camera CP Printers Bubble Jet Printers Number of Prints 1 to 99 0 0 1 image 0 Image Multiple 0 ID Photo 0 Card 1 Card 2 Style Paper Card 3 Letter LTR 0 or A4 Bordered 0 0 Borders Borderless 0 0 Date 0 0 Trimming 0 0 The paper size is set with the printer 34 ...

Page 206: ...e Jet printers Print Options Selectable with the Camera Off Date On Default Off On Default Print Effect VIVID NR VIVID NR Number of Prints 1 to 99 Trimming 4 x 6 5 x 7 or 13 x 18 em 8 5 x 11 or A4 Paper Size A3 13 x 19 orA3 Default Paper Settings Photo Paper Type Default Fast Photo Borderless Layout Bordered Default Paper sizes vary according to region 35 ...

Page 207: ...Canon CDI M128 02B 0204CH200 2004 CANON INC PRINTED IN JAPAN ...

Page 208: ...ting the camera to the computer f2 Connect the camera to the computer I II I O ilf a J Windows p 10 Macintosh p 47 1 Install the software This guide explains how to install the software programs and briefly introduces their functions and operating procedures Please read the software license agreement in this guide before using the software By using the software you agree to be bound by the terms o...

Page 209: ...trademarks of Canon Inc ArcSoft the ArcSoft logo ArcSoft Photolmpression and ArcSoft Videolmpression are trademarks or registered trademarks of ArcSoft Inc Adobe is a trademark of Adobe Systems Incorporated CompactFlash is a trademark of SanDisk Corporation iBook and iMac are trademarks of Apple Computer Inc Macintosh PowerBook Power Macintosh and QuickTime are trademarks of Apple Computer Inc reg...

Page 210: ...f the SOFTWARE IS a violation of this Agreement You must reproduce and include the copyright notice on the back up copy 3 SUPPORT AND UPDATES Neither Canon nor its subsidiaries dealers or distributors will be responsible for providing maintenance or support for use of the SOFTWARE No updates fixes or support will be made available for the SOFTWARE 4 LIMITED WARRANTY AND LIMITATION OF LIABILITY It ...

Page 211: ...e null and void with respect to the jurisdiction of that court or tribunal and all the remaining provisions of this Agreement shall remain in full force and effect 9 CONTROLLING LAW The terms of this Agreement as it relates to purchases of the Software in the United States of America shall be governed and construed In all respects in accordance with the laws and regulations of the State of New Yor...

Page 212: ...e Windows Platform Advanced Techniques 24 The ZoomBrowser EX Windows 24 Checking Images before Downloading 26 Replaying Movies 28 Editing Movies 29 Searching Images 30 Converting RAW Images 33 Operating the Shutter Remotely 36 Merging Panoramic Images PhotoStitch 40 Saving Images on CD R RW Disks Windows XP Only 41 Enjoy Customizing Your Camera with the My Camera Settings 42 Using the Software on ...

Page 213: ...Common to All Models 92 PowerShot Pro 1 94 PowerShot S1 IS 95 Power5hot S500 DIGITAL ELPH D IGITAL IXUS 500 96 Power5hot 5410 DIGITAL ELPH DIGITAL IXUS 430 97 PowerShot SD110 DIGITAL ELPH DIGITAL IXUS II s 98 PowerShot A75 99 PowerShot A31 0 100 Index 101 the PDF Manuals The following PDF format manuals hereafter PDF manuals are provided to explain the features and procedures for using ZoomBrowser...

Page 214: ...re About this Guide The explanations in this guide are based on Windows XP and Mac as xv1 0 2 If you are using another version of these operating systems the actual screen contents and procedures may vary slightly from those shown This guide uses the following notations on the right to represent the items on the left Mac OS X v1 0 1 vl 0 2 Mac as X Mac as 9 0 9 2 Mac as 9 CF Card SD Card PC Card M...

Page 215: ...ght at Harne Like a Pro It s SO Simple Make Prints Right at Home Like a Pro Shoot the images lib See your Camera User Guide for shooting instructions Install the software on the computer Just install the software once at the beginning ...

Page 216: ...Connect the camera to the computer Download images to the computer Print the images ...

Page 217: ...iverse layouts available in PhotoRecord Windows and lmageBrowser Macintosh The examples shown are from PhotoRecord Windows Summer Vacation Make your own photo album of precious moments Confirm all your images in one glance with index contact sheet printing Stitch a Panorama Together Create a panoramic image from a series of images with PhotoStitch ...

Page 218: ...computer Edit a Movie You can create and edit movies link movies and stills that have been downloaded to your computer add background music superimpose titles and other text and apply various effects to the movies Convert a RAW Format Image RAW images are extremely high quality images that are free of the resolution loss associated with compression processing However since RAW images are created w...

Page 219: ...sor Windows XP Pentium 300 MHz or higher processor For all of the above OSs Pentium 500 MHz or higher processor is recommended for editing movies Windows 98 Windows MeIWindows 2000 64 MB or more Windows XP 128 MB or more For all of the above OSs 128 MB or more is recommended for editing movies USB Canon Utilities Zoom Browser EX 200 MB or more Inc uding the PhotoRecord printing program PhotoStitch...

Page 220: ...geBrowser PhotoStitch Mac as 9 0 9 2 64 MB or more of application memory Mac as x vl O l vl 0 2 128 MB or more USB 800 x 600 pixels 32 000 Colors or better is required 1 024 x 768 pixels or better is recommended The above as should be pre installed on computers with built in USB ports Macintosh ...

Page 221: ...Driver Start by installing the software from the Canon Digital Camera Solution Disk Your camera and computer Canon Digital Camera Solution Disk Interface cable supplied with the camera 1 Confirm that the camera is NOT connected to the computer If it is disconnect the cable The software cannot be properly installed if the camera is connected to the computer at the start 2 Close any programs that ar...

Page 222: ...rt menu 2 Right click the CD ROM icon and select Open 3 Double click the Setup exe icon Windows 2000 Windows Me Windows 98 1 Double click the My Computer icon on the desktop 2 Right click the CD ROM icon and select Open 3 Double click the Setup exe icon Some computers may not display the exe file name extension as shown above 4 Click the Digital Camera Software Install button DIGITAL CAMERA Instal...

Page 223: ...the setup type and click Next Select Custom Installation to select programs individually for installation 121 Installing the Software and USB Driver 5 Click Next PhotoStilch ZoomBrowser EX PhotoRecord Start Copying Files Review settings before copying files Read the software license agreement and click Yes if you consent to all the conditions Review the installation settings and click Next Follow ...

Page 224: ... Remove the disk from the CD ROM drive when your normal desktop screen appears after restarting This concludes the software installation Continue by connecting the camera to the computer so that the USB driver can be utilized lil See Uninstalling the Software p 79 to delete the installed programs ...

Page 225: ...all Windows 2000 Windows Me Windows 98 A window such as the Add New Hardware Wizard will appear after a moment Restart the computer according to the instructions if you are prompted to do so by a message A dialog allowing you to set the default settings will display after installation See Using the Software on the Windows Platform The Basics p 15 for the subsequent procedures See USB driver instal...

Page 226: ...r camera model supports the Direct Transfer function You can change the settings for the images to be downloaded and the downloading destination by clicking the Camera menu in ZoomBrowser EX s main window and selecting Auto download setting You can also display an index of the camera or memory card images to check them before downloading or download them selectively For instructions see Checking I...

Page 227: ...t your model name or Canon Camera is displayed and click OK We recommend setting the image capture software to CameraWindow when you connect this camera to the computer fYou can change this setting later J 2 Click Set You must repeat Steps 1 and 2 above the next time you connect when you select the Don t Set option Do not display this dialog box again 2 Download the images Use the computer or came...

Page 228: ...mation about Your Camera p 92 to confirm whether your camera model supports the Direct Transfer function Set the Direct Transfer settings with the camera See the Camera User Guide for instructions regarding Direct Transfer settings and procedures You cannot use the camera s Print Share button to download when it is not lighted The camera images download to the computer The downloaded images are sa...

Page 229: ...oomBrowser EX 3 Click Camera Memory Card followed by Browse Download Images A selection dialog will appear if multiple memory card readers loaded with memory cards are connected or if a camera and memory card reader are connected Select one device and click OK 4 Click Start Image Download when the Download image window opens A memory card or Canon Camera is connected to the computer You can confir...

Page 230: ...ogram s Help menu for more details Movies cannot be printed With images shot by Exif 2 2 called Exif Print compatible cameras shooting information such as the shooting settings and mode can be included with the images This data is then used to correct the images to obtain better prints PhotoRecord automatically carries out image correction as a default setting with both images shot with Exif 2 2 c...

Page 231: ...to an image select it in ZoomBrowser EX and click Properties PhotoRecord will start displaying the selected image and the information selected in Step 3 in the Album window In addition the steps that will take you through the printing process will display on the left side Follow the steps in order to proceed Album Window The selected images display here printing procedures display here The next st...

Page 232: ...to Per Page 2 Click 3 Select paper and select the paper size and orientation 3 Click 4 Print confirm the number of copies and other printing settings and click Print This will initiate printing To close PhotoRecord after printing is complete click Click Yes to save the album or No to close it without saving The ZoomBrowser EX window will reappear when the save procedure is complete ...

Page 233: ... be bound Simple Album creates equal margins on both sides You can also change the margins by clicking Margins 2 Click 3 Select paper and select the paper size and orientation 3 Click Decorate Album and change the design of the image background and border as required Click the Themes Backgrounds Photo Frames Text Frames or Clipart button to switch between selections Perform the procedures accordin...

Page 234: ...heet If you click Print in the main window p 19 and select Contact Sheet Print instead of Layout PrintL you can print image thumbnails along with the Exif data shooting information There is a difference between the shooting information shown in ZoomBrowser EX and the Exif information that can be printed with PhotoRecord This chapter explained the ZoomBrowser EX basics Once you have mastered them r...

Page 235: ...ndow and the Camera Window This window can be used for more than just organizing downloaded images For example you can use it to print images or attach them to e mail messages Folders Area You can view folder contents here just like in Windows Explorer Function Buttons These buttons apply functions to images selected in the Browser Area Task Buttons These buttons select the task to carry out Brows...

Page 236: ...ons to images selected in the Camera Window ZoomBrowser EX comes with a function that rotates downloads and displays images shot vertically or horizontally in their correct viewing orientation Rotating images does not affect image quality Only the rotated image is saved to the computer with the following camera and image settings When JPEG images are shot with the camera s Auto Rotate function set...

Page 237: ... 3 in the Memory Card Connection section p 18 2 Click List Images The window may appear slightly different with some camera models You cannot use the DiredTransfer menu for Canon XXXXXXXXXXX at this time The Camera Window shows thumbnails tiny versions of the camera or memory card images RAW will appear beneath the thumbnails of RAW format images The movie icon displays on movie thumbnails Thumbna...

Page 238: ...destination folder for the image s You can change the destination folder by clicking Browse and selecting a new destination Select Create new folder to create a new folder within the one specified above and select a naming option The downloaded images will appear in the main window ...

Page 239: ...d other procedures However there are some inconveniences and limitations to this downloading method See the For Windows XP and Mac as x Users leaflet for details Windows Me with the USB driver installed It is easy to download images using the Scanners and Cameras Wizard or Windows Explorer All you need do is connect the camera to the computer with an interface cable See the Windows Help system for...

Page 240: ...nscreen instructions to proceed with the installation Editing Movies You can create and edit movies link movies and stills that have been downloaded to your computer add background music superimpose titles and other text and apply various effects to the movies j Movies are saved as AVI files in the Motion JPEG MPEG format 1 Click View Modify in ZoomBrowser EX s main window followed by Edit Movie 2...

Page 241: ... being edited Storyboard Area Displays thumbnails of the selected images Links images in order from left to right Searching Images You can search for images marked as your Favorites or by such parameters as the modification date shooting date or keywords The procedures for marking images as Favorites and adding keywords to them are explained in the following pages 1 Select a folder to search in th...

Page 242: ...ased on the date they were shot i J 0 Modification Date Find images based onthe date they were last modified 4 Click Next after setting the search parameters 5 If the search results are satisfactory click the Finish button To change the parameters and execute another search click Back and repeat steps 3 4 Images satisfying the search parameters This concludes the search process The images that met...

Page 243: ...as your favorites 1 Select the image in the Browser Area and click The Properties window will display 2 Click the Favorite Photo box to add a check mark and close the Properties window This concludes the process for marking an image as one of your favorites Favorites Symbol Adding Keywords to Images Add searchable keywords to images 1 Select the image in the Browser Area and click 2 Click View Mod...

Page 244: ...re not subject to any deterioration due to compression processing Since they are recorded with a special file format they cannot be opened by many image editing programs It is necessary to convert them to standard image file formats such as TIFF or JPEG See Information about Your Camera p 92 to determine whether your camera model supports this function See the Camera User Guide for information abo...

Page 245: ... select Show Navigator or Show Image Quality Adjustment Window 3 Adjust the image quality as required in the Image Quality Adjustment Window This window is explained in the Functions of the Image Quality Adjustment Window section 4 Click the 2 Save tab set the file format and destination and then click Save Select All Images or Checked Images images checked in the main window to apply the common c...

Page 246: ... white balance according IT to the light source and color temperature This section adjusts the digital exposure photo effect contrast sharpness and saturation The effect of the settings above can be viewed immediately if you place a check mark here Restores all settings to the settings stored in the camera at the time of shooting You can change the coloration of the image to your preferred setting...

Page 247: ...hat ZoomBrowser EX is displaying its main window Procedures for attaching the camera to the computer and placing it in LjJ the correct mode for connecting vary between camera models See Information about Your Camera p 92 2 Open the lens cover or remove the lens cap on models equipped with them Proceed to the next step if your model does not have one 3 Click Cancel if the Events dialog appears 4 In...

Page 248: ... images are captured _ Rotation Settings _ I i l 1 L _ i HU Sets the rotation i parameters for images after they are captured Release Button Releases the shutter Slide this to zoom the camera in or out Start Stop Viewfinder Button Starts or stops the viewfinder display Refresh Button Resets the exposure focus and white balance Set the basic camera settings here The settings available in the Remote...

Page 249: ... the image will automatically be rotated and appear in the correct viewing orientation in the RemoteCapture Task window 3 Click the Release button The recorded image is saved to the folder that was displayed in the window when the remote shooting procedures were initiated You can release the shutter by pressing the camera s shutter button or the keyboard s space key The zoom controls and other cam...

Page 250: ...n the RemoteCapture Task window and select Preferences 2 Select a file settings option and click OK Selecting Computer only in the Save Images On category allows you L IJ to shoot when there is no memory card in the camera or when the camera s memory card is full Displaying the Subiect in the Camera1s LCD Monitor You can view the subject you are shooting in the camera s LCD monitor I 2 3 Click the...

Page 251: ...instructions in the guidance panel at the top of the PhotoStitch window eQuickTime 3 0 or a later version is required to save the merged image in the QuickTime VR format QuickTime is supplied on the Canon Digital Camera Solution Disk elmages shot in Stitch Assist mode with a wide converter teleconverter or close up lens cannot be merged accurately It is easy to merge images shot with the camera s ...

Page 252: ...to close it if a dialog like that on the right appears indows can perform the same action each time you insert a disk or connect a device with this kind of file Blank CD I hat do you v lant indo Ns to do 41 D 6 1ways do the selected action DK 3 4 Click View Modify in the ZoomBrowser EX main window and click Backup to CD Follow the instructions at the left of the display to proceed The disk will au...

Page 253: ...owser EX already contains several pre recorded My Camera Settings items You can check these items with the My Camera window Delete Button Deletes a settings file from the camera _ Displays the settings in the camera i il Save to Camera Button Saves a computer settings file onto the camera Tabs Click here to switch between adjusting the settings individually or in themed sets Play Button _ _ __ Pla...

Page 254: ...save to the camera from the My Computer list 3 Select the setting from the Camera list that you would like to change and click Save to Camera This concludes the process of saving the My Camera settings to the camera The Camera list setting will change to the selected file If a setting for this category has previously been saved to the camera it will be overwritten Repeat steps 1 3 as required To u...

Page 255: ...I23 SI01JPG lFUN24 SI01 JPG lGAKKI21 SI01JPG JGAME21 SI01JPG jGAME22 SI01 JPG g tfi S lj GG lHORSERAC21 SI01JPG I s T O Ol 1GJPG iK So JPG 2 Select the file you created and click Open This concludes the process for adding new data You can save the newly created data to the camera using the procedures described in the Saving the My Camera Settings to the Camera section p 43 Create an Original Sound...

Page 256: ...nd finishing switches can be erased by clicking the Cut button Finishing position of r __ _ f lr r sound red switch Volume Control Vi Starting position of sound blue switch Play Stop Rewind 7 Click the Save tab confirm that the sound file was created input a file name and then save it a Click the Save button add a file name and save it Repeats steps 2 8 as required to create sound files for the sh...

Page 257: ...nd in the WAV format The following chart shows standard time lengths for My Camera Sounds Duration in Seconds Type 11 025 kHz 8 000 kHz Start Up Sound 1 0 sec or less 1 3 sec or less Shutter Sound 0 3 sec or less 0 4 sec or less Operation Sound 0 3 sec or less 0 4 sec or less Self Timer Sound 2 0 sec or less 2 0 sec or less ...

Page 258: ...amera Solution Disk Interface cable supplied with the camera In_allalion IIroEeB e I Close any programs that are running 2 Place the Canon Digital Camera Solution Disk in the computer s CD ROM drive 3 Double click the CD ROM icon followed by the Mac as X and Canon Digital Camera Installer icons With Mac OS 9 double click the CD ROM icon followed by the Mac OS 9 and Canon Digital Camera Installer I...

Page 259: ...h s oplion for users famiharwiththeinslallation 6 7 Read the software license agreement and click Agree if you consent to all the conditions Review the installation settings and click Next Installation w ll begin using the settings listed below Click Next to srart copying files Follow the onscreen instructions to proceed 8 When the installation is over click OK installation has finished 9 Remove t...

Page 260: ... See Uninstalling the Software p 81 to delete the software installed L IJ with these procedures Continue by downloading images to the computer p 50 ...

Page 261: ...a to the computer and placing it in l lJ the correct mode for connecting vary between camera models See Information about Your Camera p 92 iPhoto or Image Capture will automatically start when the camera and computer are ready to connect If either of these programs does not start proceed to Step 3 2 Click at the upper left of the iPhoto or Image Capture window to close it 3 Double click the Canon ...

Page 262: ... Camera are selected as the detected camera Click Set iPhoto or Image Capture may automatically start up at the same time as the Camera Window Step 6 is not required when neither program starts up automatically 6 Click the icon at the top left of the iPhoto or Image Capture window to close the program 7 Confirm that the images from the camera are displayed as thumbnails tiny versions in the Camera...

Page 263: ...owser in the program selection window 4 Close Image Capture ImageBrowser will start automatically from the next connection onward Mac as xv10 1 1 Start Image Capture and select Other from the Hot Plug Action list box Hot Plug Actio v Image Capture Application I None No cameras are connected j H d i8t D 2 Select lmageBrowser in the program selection window 3 Close Image Capture ALLJ V L will start ...

Page 264: ...mmunication Settings dialog will display This dialog only appears the first time the camera is connected 3 Confirm that USB port is selected as the port option and that your camera model name or Canon Camera are selected as the detected camera Click Set Detected Camera The Camera Window will open and display Camera Window the camera s images as thumbnails tiny versions Thumbnail In the ImageBrowse...

Page 265: ...and click OK How to Set ImageBrowser to Not Start Automatically 1 Click the Apple menu and select Control Panels and Canon ImageBrowser Auto Launch The Settings for USB Connection dialog will display 2 Click The application program below will start to clear the check mark 3 Click the close box j at the upper left to close the window Click hereto closethewindow iJ The application program below will...

Page 266: ...fi 2 Double click the Canon ImageBrowser icon on the desktop I55 Mac as x CiWKm m jIJe8rowser Mac as 9 If the icon does not appear on the desktop double click the folder in which you installed the program followed by the Canon Utilities and lmageBrowser folders and the lmageBrowser file 3 Double click the DCIM folder in the Explorer View Section P iP Y I 1 t Explorer View Section The images from t...

Page 267: ...edures 1 Click the window labeled Browser Window and bring it to the foreground 2 Select the Users folder and the subfolder labeled with the user name under which you are logged in on the startup disk Mac as 9 users should select Macintosh HD in the Explorer View section Explorer View Section _ o__ 3 Click the File menu and select New Folder This will create a folder labeled Untitled 4 Input a new...

Page 268: ...oaded Images 1 Click the Camera Window to bring it to the forefront 2 Click the images to download A blue frame appears around selected images The movie icon displays on movie thumbnails RAW will appear beneath the thumbnails of RAW format images You can select multiple images by holding the shift key while clicking images ...

Page 269: ...ping them on the Browser Area or the Explorer View Section To close the connection to the camera click the close box Mac as 9 or the red close box Mac as X at the top left of the Camera Window Your camera uses a standard image transfer protocol called the Picture Transfer Protocol PTP With the PTP protocol and Mac as X you can easily download images by connecting the camera to the computer with an...

Page 270: ... next steps differ according to whether you select Full Page Print one image per page or Layout and Print multiple images arranged on one page IIIII I III This option prints one image per page 1 Confirm that Tiled photo printing is selected in the Layout Options dialog and click Next 2 Once you have set the paper size and other settings select 1 1 x 1 in the No of images category and click OK 3 Cl...

Page 271: ...n in the Print window This will display the Print dialog S Click Print to start printing eYou can print an index print by selecting Index printing in the Layout Options dialog elmages shot with Exif 2 2 compliant cameras Exif Print incorporate information about the shooting settings such as the camera modes and settings Better prints can be made by using this information to correct the image You c...

Page 272: ...s the Print dialog Vertically and horizontally lines up images in the window Add Text Open the Edit menu and select Add Text Add Captions to Images Change the default t Click the image and number of images then the Edit menu printed per page and select Edit Caption Rotate the selected __ image This chapter explained the ImageBrowser basics Once you have mastered them read the following chapter to ...

Page 273: ...es Proceed to this chapter once you have mastered the basic ImageBrowser procedures in the Using the Software on the Macintosh Platform The Basics chapter Replaying Movies 1 Double click an image with a movie icon in ImageBrowser s Browser Area QuickTime Player will start 2 Click the play button Player in QuickTime ...

Page 274: ...of the window to edit the movie and save it Follow these steps to proceed Click this button for detailed operational instructions Transition Effect Box Appears between adjacent images and displays the symbols of the transition effects linking images Guidance Storyboard Area Displays thumbnails of the selected images Links images in order from left to right range images 1 To arrange images select t...

Page 275: ...shooting RAW images Procedures for Converting RAW Images 1 Select a RAW image in ImageBrowser s Browser Area 2 Click the File menu and select RAW Image Processing The main window the Navigator window and the Image Quality Adjustment Window will display Use the buttons here to switch between images and display modes rotate images and set the conversion parameters Thumbnail Check Mark Main Window If...

Page 276: ...ewed immediately if you place a check mark here Restores all settings to the settings stored in the camera at the time of shooting Tone Curve Tab You can set the levels for the RGB channels separately or together Advanced Adjustments Tab You can set the settings for adaptive noise control false color filter and the color space for the output Click the arrow to display the tab If you cannot set the...

Page 277: ... to the computer and that ImageBrowser is displaying its Browser Window Close the Camera Window if it appears Procedures for attaching the camera to the computer and placing it in LII the correct mode for connecting vary between camera models See Information about Your Camera p 92 2 Open the lens cover or remove the lens cap on models equipped with them Proceed to the next step if your model does ...

Page 278: ...mage appearing in the camera s viewfinder Rotation Settings Sets the rotation parameters for images after they are fFli5U captured Release Button Releases the shutter Ii Slide this to zoom the camera in or out Start Stop Viewfinder Button Starts or stops the viewfinder display Refresh Button Resets the exposure focus and white balance Set the basic camera settings here The settings available in th...

Page 279: ... On the image will automatically be rotated and appear in the correct viewing orientation in the RemoteCapture Task window 3 Click the Release button The recorded image is saved to the folder that was displayed in the window when the remote shooting procedures were initiated You can release the shutter by pressing the camera s shutter button or the keyboard s space key The zoom controls and other ...

Page 280: ... Click the RemoteCapture Task menu and select Preferences For Mac as 9 click the File menu and select Preferences 2 Select a file settings option and click OK Selecting Computer only in the IISave Images On ll category allows you to shoot when there is no memory card in the camera or when the camera s memory card is full Displaying the Subiect in the Camera1s LCD Monitor You can view the subject y...

Page 281: ...nd select PhotoStitch 3 Merge the images following the instructions in the guidance panel at the top of the PhotoStitch window f5rl Images shot in Stitch Assist mode with a wide converter teleconverter or close up lens cannot be merged accurately Imlgss Bllot ill Itit hlssis ode It is easy to merge images shot with the camera s Stitch Assist mode since PhotoStitch automatically arranges them in th...

Page 282: ... can add your favorite images and sounds from your computer to the My Camera Settings This topic explains how to upload the My Camera Settings saved onto your computer to the camera and vice versa 1 Connect the camera to the computer start ImageBrowser and display the Camera Window For starting instructions for ImageBrowser see Starting ImageBrowser p 50 2 Click Setup Options in the Camera Window ...

Page 283: ...st of settings files saved onto the computer Add Button _ Adds the settings file to the list Play Button Plays the audio from the selected settings file You can add new files as My Camera Settings to the My Camera window See Adding New Data to the My Camera Window p 73 My Camera Settings can be selected and saved in either of two ways to the camera individually or in theme sets The IIAnimal theme ...

Page 284: ...ng in the Camera list that you wish to save to the computer 3 Click the button 4 Input a file name to the selected setting and click the OK button This concludes the process of saving the My Camera Settings to the computer Repeat steps 1 4 as required Create a new image or sound file and add it to the My Camera window Create an Original Start up Image File and then Add It Start by using an image e...

Page 285: ...File and then Add It With Mac OS 9 you can use the standard issue SimpleSound program to record a sound file Record the sound as an 11 025 kHz or 8 000 kHz 8 bit mono sound in the WAV format The following chart shows standard time lengths for My Camera Sounds Duration in Seconds Type 11 025 kHz 8 000 kHz Start Up Sound 1 0 sec or less 1 3 sec or less Shutter Sound 0 3 sec or less 0 4 sec or less O...

Page 286: ...grams may be supplied with your camera This topic explains the program features and installation procedures for the programs on these CD ROMs The CD ROMs supplied with the cameras differ by model See Information LjJ about Your Camera p 92 This CD ROM contains the following programs Compatible Operating System Program Windows Macintosh 98 Me 2000 XP 059 05X ArcSoft PhotoStudio ArcSoft Videolmpressi...

Page 287: ...dlo and Videolmpression If the message does not appear automatically click the Windows Start menu select My Computer and double click the ARCSOFT and Setup exe icons Windows 2000 Windows Me and Windows 98 users should double click the My Computer icon on the desktop followed by the ARCSOFT and Setup exe icons Macintosh Installing ArcSoft PhotoStudio 1 Close all programs that are running 2 Place th...

Page 288: ...ostcards and calendars Programs for Editing Stills and Movies eArcSoft Videolmpression This program provides simple procedures for compiling a movie from multiple movie clips or stills and for editing out unwanted frames from movies Installing ArcSoft Camera Suite 1 3 Windows 1 Close all programs that are running 2 Place the ArcSoft Camera Suite CD ROM in the drive Follow the onscreen messages to ...

Page 289: ...ter you select an image to edit click View Modify in the main window followed by Edit Image in the next menu Set the following settings if the ArcSoft Camera Suite software did not start 1 Click the Tools menu in the ZoomBrowser EX main window and select Preferences 2 Click the Image Editor tab in the Preferences dialog and select the program you wish to start For Macintosh 1 After you select an i...

Page 290: ...ll start and remove ZoomBrowser EX You can remove other programs with the same procedures PhotoRecord can be uninstalled by clicking the Windows Start menu and selecting Programs or All Programs followed by Canon PhotoRecord and PhotoRecord Uninstall Uninstalling the Other Supplied Programs ArcSoft Camera Suite 2 1 ArcSoft Camera Suite 1 3 Uninstall the program by clicking the Start menu and selec...

Page 291: ...to select which application program to start will display 2 Click the Cancel button If ZoomBrowser EX is started close it 3 Click the Start menu and select Settings followed by Control Panel 4 Double click the Scanners and Cameras icon or folder 5 Delete your camera model name or Canon Camera in the Scanners and Cameras Properties dialog Windows Me users should delete their camera model or Canon C...

Page 292: ...rs in place of the x x Windows 2000 Windows 98 Perform Step 6 with no substitutions Windows Me Substitute the following for the underlined portions of Step 6 Camera WIA Driver x xL Uninstall WIA Driver The un install process will start To connect the camera to the computer and download after this point use the following procedures 1 Reinstall the driver 2 Connect the camera to the computer with th...

Page 293: ...mode images MVI_xxxx AVI Movies MV1_xxxx THM SND_xxxx WAV Sound annotation MISC The folder that holds the settings files for images in the DCIM folder CANONMSC The folder created when DPOF settings are set It holds the DPOF settings files Files with the THM extension are the thumbnail image files for the camera s index replay mode The xxxx in file names represent four digit numbers Each successive...

Page 294: ...e camera correctly connected to the computer i See Information about Your Camera pp 92 100 for the correct connection procedures Also check to ensure that you are using the correct cable and that it is securely attached at both ends Is the camera set to the playback mode some models only Some models require the camera to be set to the playback mode to transfer data See Information about Your Camer...

Page 295: ...omputer when camera is connected to the computer via an interface cable Cause 1 There is a problem with one of the items in the Start by Checking This section p 83 Solution Resolve the problem Cause 2 The USB driver is not installed only Solution Install it with the procedures in Installing the Software and USB Driver p 10 Cause 3 The USB driver is not correctly installed Windows only Uninstall th...

Page 296: ...ow 1 Check to see if the camera is being recognized as an other device 2 Delete the driver and the setup information files if it is being recognized as an other device 3 Reinstall the driver This section explains the specific steps for each operating system Windows XP and Windows 2000 Check to see if the camera is being recognized as an other device and delete the driver if it is 1 Windows XP Clic...

Page 297: ...categories 6 Close the System Properties window j Step 7 and above are not required for Windows XP Delete the setup information files 7 Double click the My Computer icon on the desktop followed by the C drive Winnt folder and Inf folder If the lnf Folder Is Not Visible in the Winnt Folder Use the following procedures to show all files and folders 1 Open the Winnt folder 2 Click the Tools menu and ...

Page 298: ...first line Note down the names of these files 10 Delete the Oem file set Delete the Oem inf and Oem pnf file for Canon digital cameras that you noted down in Step 9 Reinstall the driver 11 Reinstall the driver with the procedures in Installing the Software and USB Driver p 10 Windows Me Windows 98 Check to see if the camera is being recognized as an other device and delete the driver if it is 1 Cl...

Page 299: ... Canon Camera does not appear Proceed to Step 6 temporarily quit the procedures and investigate the other potential causes 4 Select your camera model name or Canon Camera and click Remove 5 Click OK in the confirmation dialog Delete all instances of your camera model name or Canon Camera if it appears in one or more places in the Other devices or Imaging devices categories 6 Click OK to close the ...

Page 300: ...ow all files Windows Me Set the Hidden files and folders section to Show hidden files and folders 4 Click OK to close the dialog This will make the hidden files and folders visible 8 Find and delete the Drvdata bin and Drvidx bin files 9 In the Inf folder double click the Other folder to open it 10 Find and delete the Canon lncCAP_xxx lnf file The xxx represents numerals f 1 I I You do not need to...

Page 301: ...uter display s Hardware acceleration setting to a lower setting 1 Click the Windows Start menu followed by Control Panel and Appearance and Themes With Windows 2000 Windows Me or Windows 98 click the Start menu and select Settings followed by Control Panel 2 Click the Display icon followed by the Settings tab Advanced button and Troubleshoot tab With Windows 2000 click the Display icon followed by...

Page 302: ...point and click the Start button e g C Program Files Canon ZoomBrowser EX Database My Database zbd This will display the titles and comments input in the earlier versions in the comments section of ZoomBrowser EX 4 If You Had Images in a Folder Below the Program Files Folder Image files in the Program Files folder or a subfolder cannot be displayed in ZoomBrowser EX 4 from that location To display...

Page 303: ... section to confirm the capabilities of your camera model Information Common to All Models See the respective page for your camera model for information specific to that model pp 94 100 The CD ROM labeled Canon Digital Camera Solution Disk is provided with all models It contains the following programs Compatible Operating System Program ZoomBrowser EX ImageBrowser TWAIN Driver WIA Driver PhotoReco...

Page 304: ...ended to power the camera from a household power source AC adapter when connecting to a computer if available for your camera model Ensure that you use fully charged batteries if you will not be using a household power source See the page pp 94 100 for your specific model for information about connecting the camera to the computer ...

Page 305: ...a Solution Disk ArcSoft Camera Suite 2 1 See ArcSoft Camera Suite 2 7 CD ROM p 75 for information about the features and installation procedures for the programs on the disk Does not support with the Direct Transfer function Images Recorded in the Adobe RGB Color Space The images will appear desaturated when displayed in ZoomBrowser EXilmageBrowser The image printouts will appear desaturated when ...

Page 306: ...mbol up and insert it all the way The camera and computer will automatically set themselves to the correct mode for communicating when they are connected Canon Digital Camera Solution Disk ArcSoft Camera Suite 2 1 See ArcSoft Camera Suite 2 1 CD ROM p 75 for information about the features and installation procedures for the programs on the disk Non Supported Programs ancl Features Does not support...

Page 307: ...rnail under the terminal cover and lift to open 2 Insert it all the way until it clicks 2 Set the mode switch to the playback mode and turn the camera s power on This will prepare the camera to exchange data with the computer CD ROMs in the Rockage Canon Digital Camera Solution Disk ArcSoft Camera Suite 1 3 See ArcSoft Camera Suite 1 3 CD ROM p 77 for information about the features and installatio...

Page 308: ...e terminal cover and Iift to open 2 Insert it all the way until it clicks 2 Set the mode switch to the playback mode and turn the camera s power on This will prepare the camera to exchange data with the computer Canon Digital Camera Solution Disk ArcSoft Camera Suite 1 3 See ArcSoft Camera Suite 7 3 CO ROM p 77 for information about the features and installation procedures for the programs on the ...

Page 309: ...ernail under the terminal cover and lift to open 2 Insert it all the way until it clicks 2 Set the mode switch to the playback mode and turn the camera s power on This will prepare the camera to exchange data with the computer CD ROMs in the Package Canon Digital Camera Solution Disk ArcSoft Camera Suite 1 3 See ArcSoft Camera Suite 1 3 CD ROM p 77 for information about the features and installati...

Page 310: ...left edge 2 Insert it all the way until it clicks 2 Set the mode switch to the playback mode and turn the camera s power on This will prepare the camera to exchange data with the computer Canon Digital Camera Solution Disk ArcSoft Camera Suite 1 3 See ArcSoft Camera Suite 7 3 CD ROM p 77 for information about the features and installation procedures for the programs on the disk The camera does not...

Page 311: ...roove and lifting 2 Insert it all the way until it clicks 2 Press the I ON button This will prepare the camera to exchange data with the computer D ROMs in tfie PueRage Canon Digital Camera Solution Disk ArcSoft Camera Suite 1 3 See ArcSoft Camera Suite 7 3 CD ROM p 77 for information about the features and installation procedures for the programs on the disk Non Supported Programs and Features Th...

Page 312: ... Windows 15 E E mail 7 Events Dialog 16 84 Exif 2 2 Exif Print Macintosh 60 Windows 19 Explorer View 50 55 56 F Folder New 56 Folders Area 24 Full Page Print Macintosh 59 Windows 21 Function Buttons 24 25 ImageBrowser 6 7 92 Auto Start 52 Automation Wizard Dialog 53 Starting 50 Information about Your Camera 92 Installer Panel Macintosh 47 Windows 11 Installing Software Macintosh 47 USB Driver 10 W...

Page 313: ...with the date 20 Programs and Compatible Operating Systems 92 PTP Picture Transfer Protocol Macintosh 58 Windows 28 Q QuickTime Windows 29 40 44 QuickTime Player Macintosh 62 Windows 28 R iiJ 1iJ JiiJiij Remote Shooting Macintosh 66 Windows 36 s tM 4 g Save Folder for Images 27 Saving Images on CD RlRW Disks 41 Scanners and Cameras Wizard 28 Searching Images 30 Setting Image Parameters for Future ...

Page 314: ... Limited Warranty supplied with your camera ArcSoft Customer Support North America 46601 Fremont Blvd Fremont CA 94538 Tel 510 440 9901 Mon Fri 8 30 AM 5 30 PM PST E mail support arcsoft com Other Regions Please see the ArcSoft web site http www arcsoft com maininternational html ...

Page 315: ...CDI E116 02B 0204CH247 5 Canon 2004 CANON INC PRINTED IN JAPAN ...

Page 316: ......

Page 317: ...edia collections in the easiest way possible Windows 98 Me 2000 XP ArcSoft VideoImpression Create multimedia presentations by combining photos and video clips with audio text and scene transitions Windows 98SE Me 2000 XP TM ArcSoft PhotoBase Mobile Edition Manage edit and share your photos wherever you go Currently available for Palm OS and Pocket PC users Installs from Windows 98 Me 2000 XP TM Ar...

Page 318: ...and is protected by United States copyright laws international treaty provisions and all other applicable national laws The software must be treated like all other copyrighted materials e g books and musical recordings This license does not allow the software to be rented or leased and the written materials accompanying the software if any may not be copied Limited Warranty ArcSoft Inc warrants th...

Page 319: ...pression 5 Quick Start Guide 1 TABLE OF CONTENTS SYSTEM REQUIREMENTS 2 INTRODUCTION 3 VIEWING PHOTOS 4 ENHANCING PHOTOS 6 CREATIVE OPTIONS 9 PHOTO PROJECTS 11 PRINTING PHOTOS 12 SHARING PHOTOS 13 TECHNICAL SUPPORT 14 ...

Page 320: ...dows 98SE Me 2000 XP Pentium III 450 processor or equivalent 500 MB free hard disk space 128 MB RAM 16 bit or higher color display at 800 x 600 Macintosh Macintosh OS 9 X Power PC G3 or equivalent 400 MB free hard disk space 96 MB RAM 16 bit or higher color display at 800 x 600 ...

Page 321: ...ultiple photos in a variety of ways Send Share your photos with friends and family Don t forget about the built in Help file You can access it from the Help menu along the top of the program screen It will explain each button and option This tutorial will show you how to perform the most common operations and may not cover every individual command Use the tutorial and Help files together and you l...

Page 322: ...to centric devices THE MINI BROWSER Navigation is fairly simple Use the Mini Browser on the left side to choose a folder or album use the pull down at the top to choose you can also choose to acquire a photo from a camera scanner The photos within the selected folder or album will appear VIEW SINGLE OR MULTIPLE PHOTOS To the right are the View Mode buttons Here you can view photos in a number of w...

Page 323: ...5 Quick Start Guide 5 PHOTO VIEW OPTIONS When viewing a single photo use the set of tools along the top of the screen to zoom in out skip to other photos stored in the same location and rotate the current picture left or right ...

Page 324: ...f ways You can also save and delete a photo by clicking on the respective icon CROPPING A PHOTO FREEHAND CROP To crop a photo 1 Click the Crop button in the upper right corner 2 Click and drag on the photo to draw a crop box that encloses the area you want to keep If you make a mistake simply single click anywhere outside the crop box and start over 3 Keep the Apply to all layers box checked 4 Whe...

Page 325: ...s until your photo looks vivid and crisp You may also want to fiddle with the Hue Saturation and Sharpen Blur options to further touch up your picture REMOVING RED EYE You can choose between Auto Detect and Manual When using Auto Detect simply move the mouse over the red part of the eye and click The manual option lets you define the size of the affected area by moving a slider ...

Page 326: ...mply enter in the pixel values that you want It may be easier to change by percentage instead of pixels For example if you enter in 50 the photo will be resized to half the original size Leave the Keep Aspect Ratio box checked to prevent distorted photos When you re ready click Apply ...

Page 327: ...on You can also duplicate objects To clone 1 Choose the Clone tool from the Paint section 2 Move your mouse over the area you want to clone Hold the Shift key and then single click This sets the clone source 3 Move your mouse to the area that you want to paint over Click and drag don t let go of the mouse button As you paint you will see the paint from the clone source appear ADDING CLIP ART An en...

Page 328: ...otes or catchphrases to your pictures All of the text editing options are consistent with most word processors You can change the font size style alignment and color You can even add multiple text layers click New Text Text can be modified just like clip art you can resize move and rotate ...

Page 329: ...ar 1 First choose the type of calendar you want to create 2 Set the month if applicable and year 3 Choose your calendar template design 4 You can click drag your photo to move resize and rotate it within the calendar CREATING PHOTOBOOKS A wizard walks you through the setup of a PhotoBook Simply follow the instructions and you ll be fine Once the design and template have been set all you need to do...

Page 330: ...10 Choose Custom Printing to alter the number of photos printed per page as well as the spacing between the various photos Keep the Auto Crop Photos box checked to have the program automatically crop and size your photos so that they fit optimally within the print template Some of your photos may have a low resolution and may not print very clearly When applicable check the Resize All Photos for B...

Page 331: ...ur email application from the pull down 2 Select the photo size If you re sending a photo that s only going to be seen on a computer choose Small Today megapixel cameras are common and almost everyone can take high quality pictures However these pictures are often very large and only need to be so when you re printing them So if you re sending pictures through email you ll probably want to always ...

Page 332: ...10 6849 1367 Email tech arcsoft com cn Latin America Tel Brazil 00817 200 0709 Tel Chili 800 202 797 Email latinsupport arcsoft com Europe Unit 14 Shannon Industrial Estate Shannon Co Clare Ireland Tel 353 0 61 702087 Fax 353 0 61 702001 Email eurosupport arcsoft com Japan ArcSoft Japan 9F 1 21 9 Higashi Gotanda Shinagawa ku Tokyo 141 0022 Japan Tel 81 3 5795 1392 Fax 81 3 5795 1397 Web www arcsof...

Page 333: ...660ft Version 2 Windows 98SEfMel2000JXP f jJ ...

Page 334: ...edia collections in the easiest way possible Windows 98 Me 2000 XP ArcSoft VideoImpression Create multimedia presentations by combining photos and video clips with audio text and scene transitions Windows 98SE Me 2000 XP TM ArcSoft PhotoBase Mobile Edition Manage edit and share your photos wherever you go Currently available for Palm OS and Pocket PC users Installs from Windows 98 Me 2000 XP TM Ar...

Page 335: ...and is protected by United States copyright laws international treaty provisions and all other applicable national laws The software must be treated like all other copyrighted materials e g books and musical recordings This license does not allow the software to be rented or leased and the written materials accompanying the software if any may not be copied Limited Warranty ArcSoft Inc warrants th...

Page 336: ...ArcSoft VideoImpression Quick Start Guide TABLE OF CONTENTS SYSTEM REQUIREMENTS 1 INTRODUCTION 2 CREATING A VIDEO 3 CREATING A SLIDE SHOW 10 TIPS TRICKS 12 ...

Page 337: ...UIREMENTS Windows 98SE ME 2000 XP Pentium II 450 processor or equivalent Pentium II 700 recommended 200 MB free hard disk space 1 GB recommended 64 MB RAM 128 MB recommended 16 bit color display at 800 x 600 DirectX 8 1 or above Apple QuickTime recommended ...

Page 338: ...m is designed specifically for general consumers like yourself If you re the type that likes to dive right into things by all means go for it Playing around with the various buttons and commands is one of the best ways to learn how programs work However if you want to take it slow take some time to go through this quick start guide Also don t forget to use the Help file that s built into the progr...

Page 339: ...yboard Confused Don t worry We ll talk more about the Storyboard later It ll all come together GETTING STARTED When you first run the program a window will appear that lets you choose the type of project you want to make you can also open previously saved projects Choose Create a New Video A new window will appear It will contain multiple options for gathering your video content For this walk thou...

Page 340: ...cks The smaller squares between the still image video clip components are for transitions You ll learn more about transitions later The top left area of the program contains your albums Use the pull down to choose the one you want To create a new album choose New Album from the pull down Click the Add button to browse your system for files to add to it You can create multiple albums to keep track ...

Page 341: ...YBOARD To remove a media component from the Storyboard click the trashcan icon after highlighting clicking the component you want to remove THE PLAYER Now s a good time to talk about the Player The Player is the video screen on the right side of the display It lets you preview each component on the Storyboard as well as your entire movie The Player has standard playback controls The slider beneath...

Page 342: ...dify your movie components Different editing options are available depending on the component type MODIFYING IMAGE AND VIDEO BRIGHTNESS CONTRAST 1 Single click the desired still image or video clip on the Storyboard 2 Click and drag the sliders to your liking You can preview the effect within the Player ...

Page 343: ... will display for the set amount of time before proceeding to the next component TRIMMING VIDEOS AND AUDIO 1 Select the desired video or audio clip on the Storyboard 2 Drag the Starting Mark to the spot where you would like the clip to begin playback 3 Drag the Ending Mark to the spot where you would like the clip to end ADJUSTING AUDIO VOLUME 1 Select the desired video or audio clip on the Storyb...

Page 344: ...ey all have a specific motif Choose the theme you want then click the Apply button To remove a theme or all transitions on the Storyboard click the Delete All Effects button STEP 4 TEXT This step lets you add text over any still image or video component on the Storyboard Click on the component you want then type in your text You can modify all the standard parameters such as font size style alignm...

Page 345: ...k the Start button and begin your narration Press the Stop button to stop recording 5 Click the Add button to add the recorded audio to the Storyboard STEP 6 PRODUCE The final step lets you save your movie in a variety of ways Consult the Help file for details on the specifics of each case For this guide we ll save a movie as a VCD When you do this you can pop the CD into most commercial DVD playe...

Page 346: ...oject you can instead acquire an image from a connected TWAIN device for your slide show STEP 1 MEDIA This step is basically the same as the first step when creating a video Choose the media that you want to include in your slide show and add it to the Storyboard The components on the Storyboard will look nearly identical to the way they look for a video project The main difference that you ll not...

Page 347: ...apply them to the Storyboard The Soundtrack option is a bit different It offers you the ability to fit your slide show to the time of any added audio Check the Fit Slide Show to Soundtrack box if you would like the current audio tracks to establish the length of your slide show The display time for still images will automatically be set so that the slide show will end at the same time as the audio...

Page 348: ...ou ll be making movies and slide shows in no time 4 Preview your project Click the Entire Movie button when previewing your project within the Player Always know how your work is coming along so you can make changes as you go along each step 5 Use this guide along with the Help file It s a tad lengthy for a quick start guide but these pages walk you right through the gist of the program Consult th...

Page 349: ... 6849 1367 Email tech arcsoft com cn Latin America Tel Brazil 00817 200 0709 Tel Chili 800 202 797 Email latinsupport arcsoft com Europe Unit 14 Shannon Industrial Estate Shannon Co Clare Ireland Tel 353 0 61 702087 Fax 353 0 61 702001 Email eurosupport arcsoft com Japan ArcSoft Japan 9F 1 21 9 Higashi Gotanda Shinagawa ku Tokyo 141 0022 Japan Tel 81 3 5795 1392 Fax 81 3 5795 1397 Web www arcsoft ...

Page 350: ...se utiliza con accesorios originales de Canon Canon no sera responsable de ningun dano en el producto ni accidentes como fuego etc provocados por un funcionamiento incorrecto de accesorios que no sean originales de Canon por ejemplo fugas y o explosiones de la bateria Tenga en cuenta que esta garantfa no se aplica a reparaciones como consecuencia de un funcionamiento incorrecto de accesorios que n...

Page 351: ...esen Zettel sicher auf da wichtige Information enthalten sind m J La garantia del producto 0 productos es valida s610 en el pais que aparece escrito en su certificado de garantia Guarde este impreso en lugar segura ya que contiene informacion importante IiZm I La garantie de ce ou ces produits n est valide que dans Ie pays indique sur votre certificat de garantie Veuillez conserver cette feuille c...

Page 352: ...orge as Tlf 22629321 Faks 22620615 E mail helpdesk canon no Finland Canon OY Puhelin 010 54420 Fax 010 544 4571 Help Desk 0600022606 14 80 mklmin pvm Help Desk 0600022666 enint 40mklpuhelu pvm Siihk6posti helpdesk canon fi Canon Schweiz AG Tel 01 835 6161 Fax 01 835 6526 Hotline 0900 57 55 20 Canon Svenska AB Helpdesk 08 7448620 Austria Canon GmbH Zetschegasse 11 A 1230 Wien Vienna HelpdeskTel 01 ...

Page 353: ...duct Enregistrez votre produit en ligne a www canon ca product_registrati n et 1 III Recevez les mises aniveau de microprogrammation et de logiciels Canon Canada met ajour la microprogrammation et les logiciels de ses produits de photographie numerique Vous serez parmi les premieres personnes arecevoir les notifications correspondantes Recevez les renseignements les plus recents sur les produits e...

Page 354: ...s to receive the notifications Protect your product We will keep the model number and date of purchase of your new Canon product on file to help you refer to this information in the event of an insurance claim such as loss or theft Receive information on new products and promotions Upon your request we will send you information on Canon new products and promotions CDX M003 01 F 0104CH150 2003 CANO...

Page 355: ...Cauou IrA DIREG f FjjJ PRINT PictBridge ...

Page 356: ...True Borderless Printing i475D i i860 Wi960 Support a wide variety of memory cards Bubble Jet Direct p inti g witI select Canon PowerShot digital ca neras and camco ders only he availability of particular p oducts acd services r1ay vary by region Please check with the Canon dealer nearest yOJ CDX E012 2003 CANON U S A INC For more information www usa canon com consumer USA www canon ca digitalphot...

Page 357: ...wnload images If Service Pack 1 is not installed RAW images 3 cannot be downloaded Also other images of different formats may not be downloadable if the camera contains RAW format images With Windows Explorer RAW images display as BMP files but they cannot be opened or downloaded RAW Images with sounds do not display Movies exceeding 210 MB cannot be downloaded Mac OS X Mac OS X v10 1 v10 2 Movies...

Page 358: ...cSoft Camera Suite Disk Canon Digita Camera SOfution Disk AV Cab e AVC DC300 1 AC Cabie Battery Pack NB 1lH 1 Waterproof Case WP DCaOO over for Battery Pack PJrist Strap 1 fS 300 AC Adapter Kit ACKSOO 0204CH142 b 2004 CANON INC PRINTED iN JAPAN ...

Page 359: ...00 L size paper cassette Paper Cassette PCC CP100 Credit card size paper cassette required to print with the CP 200 Connection Accessories These connection accessories can be used with computers equipped with the following as Windows Systems running preinstalled Windows 98 including Second Edition Windows Me Windows 2000 or Windows XP Macintosh Mac 059 0 9 2 Mac as x v1 0 11 v10 2 Only systems equ...

Page 360: ...ITAL CAMERA Solution Disk ver 17 1 For Macintosh Canon Utilities Canon Utilities f ImageBrowser 3 6 ZoomBrowser EX 4 6 PhotoStitch 3 1 PhotoRecord 2 0 i PhotoStitch 3 1 i i Camera TWAIN Driver 6 4 i q Camera W A Driver 6 2 S Apple QuickTime g 9 J I IWD 111111111111II1II Qu c me o Q IY C84 1237 o o l1 trQQle q o ksOrtradernar ithef OIJ rs e s ks ofMicrosoft Corporation In 0 ...

Page 361: ...orized PowerShot Digital Camera service provider Without limiting the foregoing water damage sand corrosion damage battery leakage dropping the PowerShot Digital Camera scratches abrasions or damage to the PowerShot Digital Camera body lenses or LCD display or damage to accessories mentioned in the llrst paragraph above will be presumed to have resulted from misuse abuse or failure to operate the ...

Page 362: ... Care Center at 1 800 828 4040 or Canon Canada Customer Information Centre at 1 BOO OK CANON 1 800 652 2666 It is your responsibility to properly package and send the defective PowerShot Digital Camera together with a copy of your dated proof of purchase a dated bill of sale is sufficient a complete explanation of the problem and a return address to the authorized PowerShot Digital Camera service ...

Page 363: ... OF SALE MUST BE PRESENTED FOR WARRANTY SERVICE CEnE CARTE DE GARANTIE ET VOTRE PREUVE D ACHAT DOIVENT ETRE PRESENTES POUR RECEVOIR LE SERVICE SOUS GARANTIE I DEALER S NAME ADDRESS MARCHAND NOM ADRESSE PROVINCE BODY NO BOITIER NO POSTAL CODE CODE POSTAL 8321300616 H WM Oi O Vi F CDW M002 Vi F ii03CH250 PURCHASE DATE DATE D ACHAT Printed in JAPAN Imprime au JAPON ...

Reviews: