background image

4

4

4-5

4-5

Parts Replacement and Cleaning Procedure > Main Units/Parts (Reader) > Removing the CCD Unit

Parts Replacement and Cleaning Procedure > Main Units/Parts (Reader) > Removing the CCD Unit

Main Units/Parts (Reader)

Removing the CCD Unit

1) When replacing with a new CCD unit, enter the following service mode to output a 

P-PRINT.
COPYER> FUNCTION> MISC-P> P-PRINT

2) Open the platen cover (ADF/platen board cover).
3) Remove the reader right cover.(

"Removing the Reader Right Cover"(page 4-3).)

4) Remove the right glass retainer.
5) Remove the platen glass.(

"Removing the Platen Glass"(page 4-8).

)

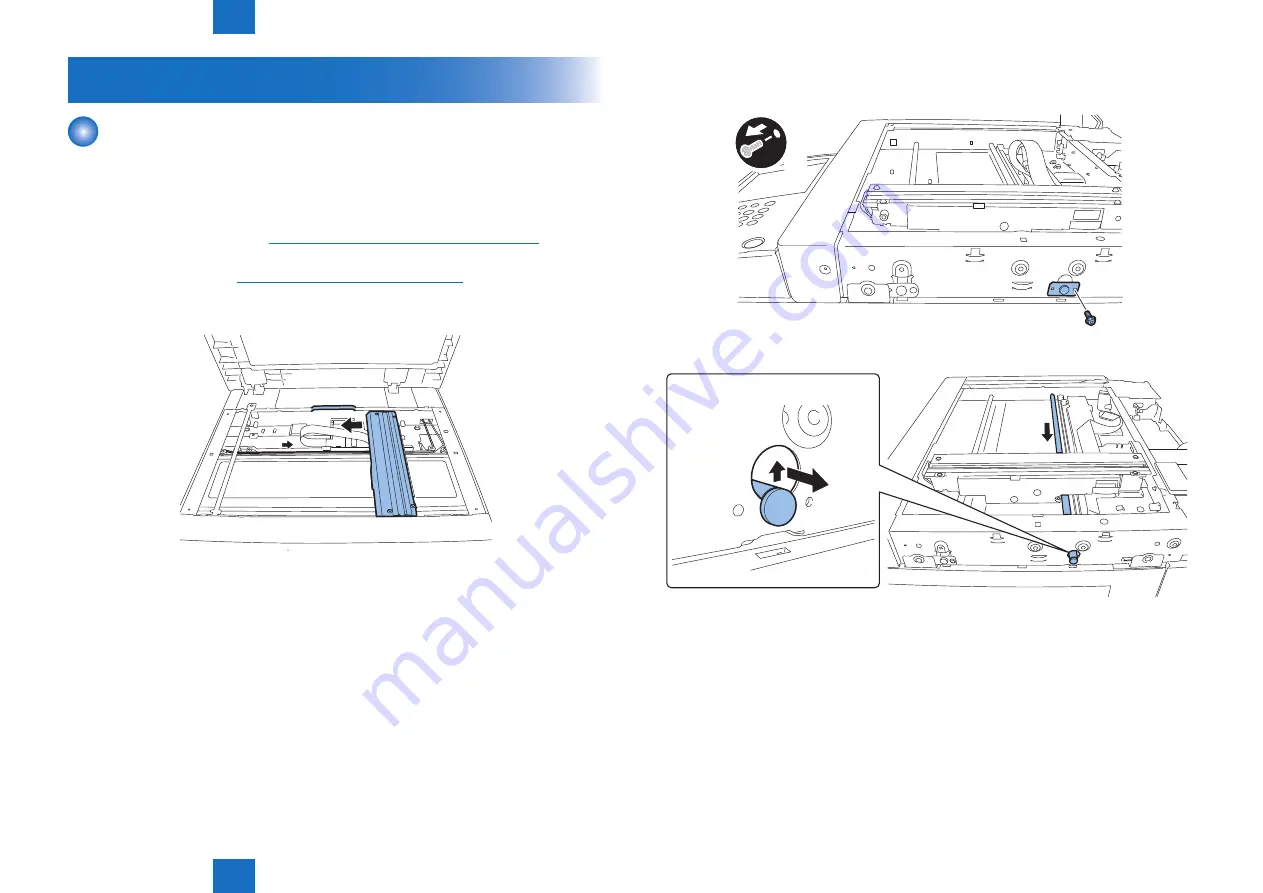
6Move the belt in the direction of the arrow and move the CCD unit to the position of the 

groove in the frame.

F-4-9

7) Remove the shaft retaining blade.
•  1 screw

x1

8) Remove the shaft.

F-4-10

F-4-11

Summary of Contents for D2

Page 1: ...6 5 4 3 2 1 Color Image Reader Unit D1 D2 SERVICE MANUAL Rev4 Product Outline Technology Periodic Servicing Parts Replacement and Cleaning Procedure Adjustment Installation Appendix ...

Page 2: ...rmation as the need arises In the event of major changes in the contents of this manual over a long or short period Canon will issue a new edition of this manual The following paragraph does not apply to any countries where such provisions are inconsistent with local law Trademarks The product names and company names used in this manual are the registered trademarks of the individual companies Cop...

Page 3: ...switch closing the front door and closing the delivery unit door which results in supplying the machine with power 2 In the digital circuits 1 is used to indicate that the voltage level of a given signal is High while 0 is used to indicate Low The voltage value however differs from circuit to circuit In addition the asterisk as in DRMD indicates that the DRMD signal goes on when 0 In practically a...

Page 4: ...Blank Page ...

Page 5: ...ic Configuration DADF 2 13 Component Configuration 2 13 Outline of Electric Circuits 2 13 Sensor Layout 2 14 Drive Configuration 2 14 Outline of Operation Modes 2 15 Outline 2 15 Forward Pickup Delivery Operation 2 15 Forward Pickup Reverse Delivery Operation 2 16 Controls DADF 2 18 Document Detection 2 18 Outline 2 18 Initial Document Size Detection 2 19 Detecting Jams 2 19 Power Supply 2 20 Fan ...

Page 6: ...M2 4 19 Removing the Pressurization Solenoid SL1 4 20 Pickup Clutch Registration Clutch CL1 CL2 4 20 Removing the ADF Driver PCB 4 21 Removing the LED PCB 4 22 Removing the Fan 4 22 Removing the Sensor SR1 SR2 SR3 4 23 Removing the Timing Sensor SR4 4 27 Removing the Document Set Sensor SR5 4 27 Removing the Cover Open Closed Sensor SR6 4 27 Removing the Last Document Detection Sensor SR7 4 27 Rem...

Page 7: ...Contents 6 4 Installation Procedure 6 5 Operation Check 6 16 Appendix Service Tools ii Solvents and Oils ii Special Tools ii General Circuit Diagram DADF iii General Circuit Diagram iii General Circuit Diagram Reader iv General Circuit Diagram iv Signal Name List Reader v Signal Name List DADF vi Signal Name List vi ...

Page 8: ...Safety Precautions Notes Before it Works Serving ...

Page 9: ... Notes Before it Works Serving Caution At servicing be sure to turn off the power source according to the specified steps and disconnect the power plug Caution Do not turn off the power switch when downloading is under way Turning off the main power switch while downloading is under way can disable the machine ...

Page 10: ...1 1 Product Outline Product Outline Features Reader Specifications Reader Names of Parts Reader Features DADF Specifications DADF Names of Parts DADF ...

Page 11: ...e Stream reading with CCD fixed Maximum original size 297mm x 432mm In book mode Read resolution 600 dpi main scanning x 600 dpi sub scanning Gradation 256 gradation Carriage position detection CCD HP sensor SR1 Magnification 25 to 400 Main scanning direction Image is processed on main controller PCB 2 Sub scanning direction Image is processed on main controller PCB 2 Lens Gauss lens CCD Number of...

Page 12: ...ernal View 1 Reader Front Cover 2 Reader Front Sub Cover 3 Reader Left Cover 7 Reader Right Cover 5 Reader PCB Cover 4 Reader Rear Cover 10 Stream Read Glass 9 Copyboard Glass 6 Rear Small Cover Reader PCB Cover Reader Right Cover Connector Cover Reader Rear Cover F 1 1 F 1 2 Cross Section Stream reading glass Copyboard glass CCD unit F 1 3 ...

Page 13: ...tion with the copy board cover at 5 and 25 deg Original Size Sensor 0 SR4 Helps identify original size AB INCH AB A Original Size Sensor 1 SR5 Helps identify original size INCH AB INCH A CCD unit Indirect exposure by LED LED photoconductive body Reader Heater Option H5 Prevents condensation on the copyboard glass Reader relay PCB PCB1 The part of the image processing F 1 4 T 1 2 Reader Relay PCB T...

Page 14: ...ne sheetFeed 60 90g m2 Document size AB type B6 A5 B5 A4 B5R A5R A4R B4 A3 B6 Cross feed only INCH type STMT LTR LTRR LGL 11 17 STMT Cross feed only Others 8K 16K Document width 148 297mm Document length longitudinal 128 432mm 630mm is held by the operator Document tray capacity 50 sheets 80g m2 Document processing mode Single sided document processing Double sided document processing Document siz...

Page 15: ...Slide guide F 1 6 Cross Section 13 12 3 5 4 6 7 8 9 10 15 14 1 2 11 No Part name 1 Lower registration roller 2 Upper registration roller 3 Feed roller 4 Separation pad unit 5 Pickup roller 6 Document supply tray 7 Upper delivery reversal roller 8 Lower delivery reversal roller 9 Read roller 2 lower 10 Read roller 2 upper 11 Platen roller 12 White sheet 13 Read roller 14 Read roller 1 lower 15 Read...

Page 16: ...2 2 Technology Technology Technology Reader Controls Reader Basic Configuration DADF Controls DADF ...

Page 17: ...ection control LED CCD HP sensor Footnote F Scanner motor moves forward toward right B Scanner motor moves backward toward left Light ON LED on CCD unit lights on ON When CCD HP sensor photo interrupter type detects F 2 1 F 2 2 Basic Sequence at Start Key ON ADF mode 1 original Copy start Dust detection control In stream reading End B F F F B F B B F F F F Scanner motor Light ON ON Shading correct...

Page 18: ...he motor and controls its direction speed of rotation CCD HP sensor SR1 detection signal Checks if CCD is at home position Copyboard cover open closed sensor front SR2 rear SR3 detection signal Detects the open close status of the copyboard cover F 2 4 Scanner Motor Control Scanner motor driver turns on off the motor and controls its direction speed of rotation according to the signals from CPU Ma...

Page 19: ...ce the image end is reached 2 Backward movement after scanning an image After scanning an image CCD moves backward to CCD shading position at a specific speed 260 mm sec F 2 6 CCD Overview The machine uses the CCD to expose and read an image and the image is read on a line by line basis CCD features 4 lines R G B B W and B W line is used in B W copy and R G B lines are used at color scan CCD overv...

Page 20: ...2 mirror No 3 mirror No 1 mirror No 5 Lens Green G line Blue B line Black White B W line Items Description CCD Receives the reflected light that has gone through the lens and converts it into electric signal to output it Lens Collects the light reflected by an original LED light source Light source to expose an original to laser mirror No 1 5 Return the light F 2 7 F 2 8 T 2 1 ...

Page 21: ... the sensor output The original size is identified by the combination of these output result Control Details For main scanning direction the machine moves the CCD unit to the following CCD original detection positions according to the location of original to measure the CCD level of each detection position For sub scanning direction the machine uses the original sensor 0 1 to identify sizes Origin...

Page 22: ...se that the AB type A4R size is set CCD unit shading position LED OFF Original sensor OFF CCDoriginal detection position CCD unit Original sensor Reader unit ADF Position of detection 1 Position of detection 2 Position of detection 3 Position of detection 4 Copyboard glass 2 ADF opened CCD unit moves to original detection position LED OFF Original sensor OFF External light 3 ADF closed CCD unit in...

Page 23: ... Original sensor OFF F 2 14 F 2 15 F 2 16 F 2 17 Dirt Sensor Control Overview The machine changes the original read point or executes image correction depending on the presence absence of dust on the stream reading glass or the platen roller of the ADF to prevent the dust from showing up in the output These operations are carried out only when the ADF is in use and in addition is closed Control ti...

Page 24: ...a job dust bypass Presence of dust is detected at points A B and C in this order in the same manner as at the end of the job Read will take place at the point where least dust is detected A B C F 2 19 Between sheets The machine does not move CCD It reads the original using the position determined at the end or start of a job however if the presence of dust is still detected at the position the mac...

Page 25: ...ler PCB 2 CCD PCB Digital image signal EEP ROM SRAM CPU Shading correction adjustment ASIC EEP ROM F 2 21 CCD Drive The machine s CCD sensor is a 4 line linear image sensor consisting of 7500 pixels After completion of photoelectric conversion in the light receiving block the signals are output to the analog front end PCB unit on CCD PCB in parallel for each channel R G B B W of the CCD array Ligh...

Page 26: ... shading coefficient The difference between the two will be held as the shading correction value for use in correcting variation among CCD pixels when scanning the original thus evening out the density levels of the image CCD output Original density Standard white plate Features before correction Target value Measurement value Features after correction White F 2 23 PASCAL Control image gradation C...

Page 27: ... F 2 24 Reader Heater Control The reader heater is installed the to prevent dew condensation in the reader unit Reader heater ON timing If the environmental switch is turned ON the reader heater is always ON regardless of states such as power supply ON OFF of the machine the sleep ...

Page 28: ...its of this machine are controlled by the main controller PCB2 The main controller PCB2 detect the input signals from sensors to output the signals that drive DC loads such as motors solenoids clutches and fans at the predetermined timings The ADF driver PCB does not have a memory area data such as the data used in the service mode is stored in main controller PCB2 ADF driver PCB Clutch Reader rel...

Page 29: ... sensor PS1 Document width sensor2 PS2 Document width sensor1 F 2 26 T 2 4 Drive Configuration CL2 CL1 M1 SL1 SL2 M2 No Part name Content M1 ADF motor Feeds documents M2 Release motor Prevents a document from swaying SL1 Pressurization solenoid Shifts the delivery lower roller after reversal of the dual sided document etc SL2 Stamp solenoid Drives the stamp mechanism CL1 Pickup clutch Drives the p...

Page 30: ...de Forward pickup delivery Picks up reads and then delivers a document Single sided document Simplex printing Single sided document Duplex printing Forward feed reverse delivery Picks up reads reverses and delivers a document Double sided document Duplex printing Double sided document Simplex printing T 2 6 Forward Pickup Delivery Operation Simplex read operation when two document sheets are place...

Page 31: ...f second document sheet Start of reading of second document sheet End ob job F 2 29 Forward Pickup Reverse Delivery Operation Duplex read operation when two document sheets are placed NOTE This operation is performed for all double sided documents irrespective of whether document widths are the same or different Document To next Pickup and formation of loop of first document sheet Waiting for read...

Page 32: ...sal position Idle feed of first document sheet Removal of idle registration loop of first document sheet and release of re pickup and delivery roller End of reading of reverse side of first document sheet and pressurization of delivery roller F 2 31 To next Start of separation of second document sheet and pressurization of delivery roller Start of reading of top side of second document sheet End o...

Page 33: ...presence absence detection Detects whether there is a document on the Detects whether there is a document on the Document set sensor SR5 Last document detection Detects whether the document being picked up is the last one Last document detection sensor SR7 Initial document sizeabsence detection Longitudinal direction Detects the length of the document placed on the document pickup tray Document le...

Page 34: ...cument widths and initial document sizes type Sensor name Document width sensor 1 PS2 Document width sensor 2 PS1 Document length sensor 1 SR9 Document length sensor 2 SR8 AB type A3 ON ON ON ON B4 OFF ON ON ON A4R OFF OFF OFF ON B5R ON OFF OFF ON A4R ON ON OFF OFF A5R ON OFF OFF OFF B5R OFF ON OFF OFF A5R OFF OFF OFF OFF B6 ON OFF OFF OFF Inch type LDR OFF ON ON ON LGL OFF OFF ON ON LTRR OFF OFF ...

Page 35: ...ensor SR11 01 0090 ADF OP Copyboard cover open closed sensor Reader 01 0091 ADF OP Copyboard cover open closed sensor Reader 01 0092 COVER OP Cover open closed sensor SR6 01 0093 COVER OP Cover open closed sensor SR6 01 0094 RESIDUAL Registration sensor Read sensor Delivery reversal sensor SR1 SR2 SR3 01 0095 PICKUP NG T 2 10 Power Supply The power supply lines are shown below This machine is powe...

Page 36: ...3 3 Periodic Servicing Periodic Servicing Work of Service Reader Work of service DADF List of Work for Scheduled Servicing DADF ...

Page 37: ... in the CCD unit 5 CL Open the CCD upper cover 4 Screws Creaning tool for No 5 Mirror is in the Reader Unit Part No FL3 3207 Stream reading glass Copyboard glass T 3 1 F 3 1 Scanner shaft Scanner shaft Scanner rail Scanner rail Action to take when replacing parts Part name Action Reference CCD unit The values input of P PRINT Service mode Platen board cover white level automatic adjustment ADF whi...

Page 38: ... 7 White level position adjustment Platen roller Refer to page 5 8 Caution Carry out all the above adjustments after removing the DADF from the reader unit T 3 3 Periodic Servicing When the parts are reaching the expected service life perform the parts replacement or cleaning etc if needed Item Part name Expected service life Operation Reference Periodically replaced parts No Durables parts Pickup...

Page 39: ...pper registration roller 1 CL 4 Lower registration roller 1 CL 5 Feed guide dust collection tape FL3 2942 1 CR Refer to page 4 18 6 Upper delivery reversal roller 1 CL 7 Lower delivery reversal roller 1 CL Stamp FB5 9410 1 CR 7 000 times User Maintenance Refer to page 4 17 White plate pressure plate 1 CL Platen roller 1 CL White sheet 1 CL Various rollers driven rollers CL Various scrapers CL DADF...

Page 40: ...4 4 Parts Replacement and Cleaning Procedure Parts Replacement and Cleaning Procedure List of Parts Reader List of Parts DADF Consumable Parts Requiring Periodic Replacement and Cleaning Points DADF ...

Page 41: ...d Glass FL3 3206 Refer to page 4 9 List of Clutchs Solenoids Motors Fans PCBs No Name Part No Refer to M1 Scanner motor PCB1 Relay Board List of Sensors No Name Part No Refer to SR1 CCD HP Sensor SR2 Copyboard Cover Open Closed Sensor rear SR3 Copyboard Cover Open Closed Sensor Front SR4 Original Size Sensor 0 SR5 Original Size Sensor 1 T 4 1 T 4 2 T 4 3 T 4 4 1 Reader Front Cover 2 Reader Front S...

Page 42: ...vers Reader Removing the Reader Left Cover 1 Remove the reader left cover 2 screws RS tightening M3 x2 Removing the Reader Front Cover 1 Open the platen cover ADF platen board cover 2 Remove the reader front cover 2 screws RS tightening M3 x2 F 4 3 F 4 4 Removing the Reader Right Cover 1 Remove the reader right cover by removing four screws and then remove one screw from the reader front cover x2 ...

Page 43: ...ure External Covers Reader Removing the Reader Rear Cover Removing the Reader Rear Cover 1 Open the platen cover ADF platen board cover 2 Remove the reader rear small cover 2 claws x2 3 Remove the ADF power cable 3 connectors 1 screw RS tightening M3 x3 x1 F 4 6 F 4 7 4 Remove the reader rear cover 4 screws RS tightening M3 1 claw x4 Claw F 4 8 ...

Page 44: ...ollowing service mode to output a P PRINT COPYER FUNCTION MISC P P PRINT 2 Open the platen cover ADF platen board cover 3 Remove the reader right cover Removing the Reader Right Cover page 4 3 4 Remove the right glass retainer 5 Remove the platen glass Removing the Platen Glass page 4 8 6Move the belt in the direction of the arrow and move the CCD unit to the position of the groove in the frame F ...

Page 45: ...cement and Cleaning Procedure Main Units Parts Reader Removing the CCD Unit 9 Loosen the screw and then loosen the belt 10 Remove the belt from the hook at the back of the CCD unit CAUTION Do not touch the LED on the CCD unit F 4 12 F 4 13 11 Remove the CCD unit Cable retainer CCD flexible cable Core x1 F 4 14 ...

Page 46: ...k mode is read Checking the transparency of the glass for the book mode COPIER FUNCTION CCD DFWLV1 for color 4 2 Place a sheet of paper which the user usually uses on the DF tray and execute the following service mode As the result the white level in the DF stream reading mode is read Both sides of the sheet are scanned Checking the transparency of the glass for the stream reading COPIER FUNCTION ...

Page 47: ...ER ADJUST CCD W PLT X Y Z Input of standard white plate data 2 Enter the service mode and then select the following D1 Only COPIER FUNCTION CCD DF WLVL1 2 3 4 DF white level adjustment 1 Place a sheet of paper that the user usually uses on the platen glass enter the service mode and then select COPIER FUNCTION CCD DFWLVL1 Read the white level in the BOOK mode Check the transparency of the glass fo...

Page 48: ...th alcohol Be sure to install the ADF scan glass with its seat facing front left F 4 18 Action to Take after Replacing the ADF Scan Glass 1 Enter the service mode and then select the following D1 Only COPIER FUNCTION CCD DF WLVL1 2 3 4 DF white level adjustment 1 Place a sheet of paper that the user usually uses on the platen glass enter the service mode and then select COPIER FUNCTION CCD DFWLVL1...

Page 49: ...oving the ADF Scan Glass Action to Take after Replacing the ADF Scan Glass Read the white level in the BOOK mode Check the transparency of the glass for BOOK mode 4 Place a sheet of paper that the user usually uses on the DF enter the service mode and then select COPIER FUNCTION CCD DF WLVL4 Read the white level in the DF mode stream reading Check the transparency of the glass for stream reading R...

Page 50: ...ers Rear cover Front cover Feeder cover No Part name Part number Reference 1 Front cover Refer to page 4 13 2 Rear cover Refer to page 4 13 3 Feeder cover Refer to page 4 14 F 4 19 T 4 6 Consumable Parts Requiring Periodic Replacement and Cleaning Points 4 1 3 2 No Part name Part number Reference 1 Pickup roller unit FM3 6892 Refer to page 4 16 2 Separation pad FL3 5538 Refer to page 4 17 3 Stamp ...

Page 51: ...er to page 4 29 PCB3 LED PCB Refer to page 4 22 FM1 Fan Refer to page 4 22 F 4 21 T 4 8 List of Sensors SR7 SR9 SR8 PS1 PCB2 PS2 PCB2 SR1 SR11 SR2 SR3 SR4 SR5 SR6 No Part name Part number Reference SR1 Registration sensor Refer to page 4 23 SR2 Read sensor Refer to page 4 23 SR3 Delivery reversal sensor Refer to page 4 23 SR4 Timing sensor Refer to page 4 27 SR5 Document set sensor Refer to page 4...

Page 52: ...e Rear Cover External Covers DADF Removing the Front Cover 1 Open the feeder cover 2 Remove the screw x1 3 Open the DADF F 4 23 F 4 24 4 Detach the front cover Screw 2 pcs x2 Removing the Rear Cover 1 Open the feeder cover 2 Move to the back of the host machine and detach the rear cover Screw 2 pcs x2 Caution Remove the rear cover with the two claws released F 4 25 F 4 26 ...

Page 53: ...er Parts Replacement and Cleaning Procedure External Covers DADF Removing the Feeder Cover Removing the Feeder Cover 1 Open the feeder cover 2 Open the DADF 3 Detach the front cover Removing the Front Cover page 4 13 4 Close the DADF 5 Remove the feeder cover Screw 1 pc Positioning pin 1 pc x1 F 4 27 ...

Page 54: ...er Cover page 4 14 5 Remove the tray holder Refer to page 4 23 6 Remove the rear cover Removing the Rear Cover page 4 13 7 Disconnect the nine connectors from the ADF driver PCB Removing the ADF Driver PCB page 4 21 8 Remove the document tray Refer to page 4 23 9 Remove the ADF motor Removing the ADF Motor M1 page 4 19 10 Remove the left hinge Screw 5 pcs x5 F 4 28 11 Remove the harness guide Conn...

Page 55: ...g Procedure Consumable Parts Requiring Periodic Replacement and Cleaning Points DADF Removing the Pickup Roller Unit Consumable Parts Requiring Periodic Replacement and Cleaning Points DADF Removing the Pickup Roller Unit 1 Open the feeder cover 2 Remove the inner cover from the feeder cover Hook 2 pcs x2 F 4 31 F 4 32 3 Remove the pickup roller unit Resin ring 2 pcs Bearing 2 pcs F 4 33 ...

Page 56: ...he Stamp Removing the Separation Pad 1 Open the feeder cover 2 Remove two hooks to remove the separation pad x2 F 4 34 F 4 35 Replacing the Stamp 1 Open the feeder cover and separation guide 2 Using tweezers remove the stamp 3 Using tweezers or the like attach a new stamp Be sure to attach the new stamp with the stamp face up 4 Close the feeder cover and separation guide Caution If the stamp is fl...

Page 57: ...ller Guide Parts Replacement and Cleaning Procedure Consumable Parts Requiring Periodic Replacement and Cleaning Points DADF Exchanging the Feed Roller Guide Exchanging the Feed Roller Guide 1 Open the DADF 2 Remove the feed roller guide Screw 2 pcs x2 3 Pell off the release paper of the new feed roller guide 4 Attach the new feed roller guide F 4 37 ...

Page 58: ...ving the ADF Motor M1 1 Open the feeder cover 2 Remove the rear cover Removing the Rear Cover page 4 13 3 Remove the ADF motor unit Connector 1 pc Tension spring 1 pc Screw 2 pcs x2 F 4 38 Removing the Release Motor M2 1 Open the feeder cover 2 Open the DADF 3 Detach the front cover Removing the Front Cover page 4 13 4 Close the DADF 5 Remove the release motor support plate Connector 2 pcs Screw 5...

Page 59: ...egistration Clutch CL1 CL2 Removing the Pressurization Solenoid SL1 1 Open the feeder cover 2 Remove the rear cover Removing the Rear Cover page 4 13 3 Remove the pressurization solenoid Connector 1 pc Screw 2 pcs x2 x1 F 4 41 Pickup Clutch Registration Clutch CL1 CL2 1 Open the feeder cover 2 Remove the rear cover Removing the Rear Cover page 4 13 3 Remove the clutch support plate Connector 2 pcs...

Page 60: ...pc Bearing 1 pc White Black W B CL1 CL2 Caution Install the pickup clutch with the clutch gear white aligned with the mark W white on the clutch support plate Install the registration clutch with the gear black aligned with the mark B black on the clutch support plate F 4 43 Removing the ADF Driver PCB 1 Open the feeder cover 2 Remove the rear cover Removing the Rear Cover page 4 13 3 Remove the A...

Page 61: ...g the LED PCB 1 Open the feeder cover 2 Open the DADF 3 Detach the front cover Removing the Front Cover page 4 13 4 Close the DADF 5 Remove the LED PCB Screw 1 pc Connector 1 pc x1 x1 F 4 45 Removing the Fan 1 Open the feeder cover 2 Remove the rear cover Removing the Rear Cover page 4 13 3 Remove the fan Screw 1 pc Connector 1 pc x1 x1 Caution Install the fan with the arrow oriented as shown F 4 ...

Page 62: ...cover 3 Detach the front cover Removing the Front Cover page 4 13 4 Remove the feeder cover Removing the Rear Cover page 4 13 5 Remove the tray holder Screw 1 pc x1 6 Remove the rear cover Removing the Rear Cover page 4 13 7 Disconnect the nine connectors from the ADF driver PCB x9 F 4 48 F 4 49 8 Remove the document tray Connector 1 pc Screw 1 pc x1 x1 9 Remove the ADF motor Removing the ADF Moto...

Page 63: ... Removing the Sensor SR1 SR2 SR3 12 Remove the pickup clutch registration clutch support base Pickup Clutch Registration Clutch CL1 CL2 page 4 20 13 Remove the feed unit Removing the Feed Unit page 4 15 14 Remove the metal plate Screw 3 pcs x3 15 Remove the two timing belts F 4 52 F 4 53 16 Remove the resin ring pulley gear E ring and bearing 17 Remove the gear gear gear and bearing F 4 54 F 4 55 ...

Page 64: ...ng the Sensor SR1 SR2 SR3 Parts Replacement and Cleaning Procedure Clutch Solenoid Motor Fan PCB DADF Removing the Sensor SR1 SR2 SR3 18 While pushing the hook in the direction of the arrow remove the platen roller unit in the direction of the arrow F 4 56 19 Detach the cover Screw 2 pcs x2 F 4 57 ...

Page 65: ...lacement and Cleaning Procedure Clutch Solenoid Motor Fan PCB DADF Removing the Sensor SR1 SR2 SR3 20 Remove the read roller 2 Resin ring 1 pc Pulley 1 pc Gear 2 pcs E ring 1 pc Bearing 3 pcs F 4 58 21 Remove the sensor mount Hook 2 pcs Screw 2 pcs x2 Hook 22 Remove the sensor SR1 SR2 SR3 Connector 1 pc SR1 SR2 SR3 x1 F 4 59 F 4 60 ...

Page 66: ...Cover page 4 13 3 Remove the timing sensor Connector 1 pc x1 Removing the Document Set Sensor SR5 1 Open the feeder cover 2 Remove the rear cover Removing the Rear Cover page 4 13 3 Remove the document set sensor Connector 1 pc x1 F 4 61 F 4 62 Removing the Cover Open Closed Sensor SR6 1 Open the feeder cover 2 Remove the rear cover Removing the Rear Cover page 4 13 3 Remove the cover open closed ...

Page 67: ... document detection sensor Connector 1 pc SR7 x1 Removing the Document Length Sensor SR8 SR9 1 Detach the cover on the reverse side of the document tray Refer to page 4 27 2 Remove the document length sensor Connector 1 pc SR8 SR9 x1 F 4 65 F 4 66 Removing the Release Motor HP Sensor SR11 1 Open the feeder cover 2 Open the DADF 3 Detach the front cover Removing the Front Cover page 4 13 4 Close th...

Page 68: ...tor Fan PCB DADF Removing the Release Motor HP Sensor SR11 Removing the Document Width Sensor PS1 PS2 1 Detach the cover on the reverse side of the document tray Refer to page 4 27 2 Remove the Tray PCB Fook 2 pcs Connector 2 pcs x2 Fook NOTE Because the exchange of the manuscript width discovery sensor PS1 PS2 simple substance is not possible change Tray PCB at the time of exchange F 4 68 ...

Page 69: ...5 5 Adjustment Adjustment Image position adjustment Reader Overview DADF Adjustment Method DADF ...

Page 70: ...em in this adjustment enter the changed value in the service label Leading Edge Non Image Width Service mode COPIER ADJUST ADJ XY ADJ X 2 5 4 6 8 1012141618 20 0 1st side of copy 2 5 1 5mm Image leading edge Decrease the value a decrease of 10 will decrease the non image width by 1 mm Increase the value an increase of 10 will increase the non image width by 1 mm F 5 1 Left Non Image Width Service ...

Page 71: ...ment Platen roller Caution Carry out all the above adjustments after removing the DADF from the reader unit T 5 1 Adjustment Method DADF Adjusting the Height Pre check Check whether the front and rear document glass spacers provided under the bottom of the DADF are in close contact with the document glass when the DADF is closed If visual check is difficult perform the check with reference to the ...

Page 72: ... instructed it does not interfere the soundproofing sheet stuck on the bottom of the DADF when closing it Protrusions Sheet Document reader Paper Protrusions Document reader Sheet 2 Pulling out the set paper Pull out the paper in the direction of the arrow to check that you feel slight resistance F 5 4 F 5 5 3 Checking the front left height of the DADF Set paper against the protrusions of the stre...

Page 73: ...cer is floating turn the adjusting screw clockwise to bring the spacer closer to the glass If only the rear spacer or both front and rear spacers are floating turn the adjusting screw counterclockwise to bring the rear spacer closer to the glass Hinge height adjusting screw Lock nut F 5 8 Check the height of the right hinge 1 When the DADF is closed the document hold sheet must be in contact with ...

Page 74: ...e this manual Copy it or clip it out 2 Check the perpendicularity at the leading edges of the test chart and copy Measure dimensions A and B on the test chart and dimensions A and B on the copy If it is not A B A B go through steps 3 and later B A feed direction Test chart B A Copy feed direction F 5 10 3 Loosen the screw securing the right hinge A B Slide the hinge of the DADF forward B A Slide t...

Page 75: ...aced to the rear increase the setting unit of adjustment 0 1 mm Adjusting the Trailing Edge Registration 1 Place the Test Chart in the DADF and make a copy 2 Compare the copy against the Test Chart for the trailing edge registration as necessary make the following adjustments 3 On the Service Mode screen touch the following notations to bring up the Adjustment screen 1 COPIER 2 FEEDER 3 ADJUST 4 D...

Page 76: ... used by the user on the copyboard glass and close the DADF 3 Press DF WLVL1 to highlight 4 Press OK Automatic adjustment starts if it ends successfully the screen shows OK 5 Remove the paper from the copyboard glass and place it on the original tray of the DADF 6 Press DF WLVL2 on the touch panel to highlight 7 Press OK The machine executes auto adjustment duplex stream reading When the adjustmen...

Page 77: ...6 6 Installation Installation How to Utilize This Installation Proceduer Caution During Installation Turning OFF the Host Machine Power Checking the Contents Installation Procedure Operation Check ...

Page 78: ...n the Shipping Carton After unpacking confirm the parts contained in the package by referring to the illustration of Bundled Components described in this procedure The below symbol appears on the illustration of some steps when the parts contained in the shipping carton are to be used Mind this symbol to be aware the parts contained in the shipping carton are to be used F 6 1 Symbols in the Illust...

Page 79: ...tly as it might cause frame deformation Put the reader unit on the top of the packaging box be careful not to get your fingers caught NOTE When installing the USB Device Port unit at the same time perform it after step 18 The installation of the USB Device Port unit refers to its installation procedure manual Turning OFF the Host Machine Power CAUTION Before installing the reader unit be sure to p...

Page 80: ... a copyrighted item is not permitted without the permission of the copyright owner YOU MAY BE COMMITTING A CRIMINAL OFFENCE FOR WHICH YOU MAY BE PROSECUTED This list is a guide only and is not a complete listing You should take legal advice if in any doubt FU7 8228 Bonds or other certificates of indebteness Internal Revenue Stamps cancelled or uncancelled Cheques or drafts drawn by Governmental ag...

Page 81: ...ure Installation Installation Procedure Installation Procedure 1 Remove packing materials and tapes from the reader unit 2 Remove the rear right upper cover 2 screws x2 F 6 3 3 Open the waste toner box and remove the rear cover 2 screws x2 F 6 4 ...

Page 82: ...the HDD model disconnect 2 connectors from the controller PCB x2 F 6 5 5 Remove the controller cover by sliding it to the right 1 screw x1 CAUTION The HDD is attached to the controller cover for the HDD model Do not cause an impact on it when removing or attaching the controller cover F 6 6 ...

Page 83: ...Set the left stay with the bosses aligned Bump the projection of the reader unit against rear right stay of the host machine After tightening 1 screw in the order of 1 as shown in the illustration thghten other 5 screws x6 CAUTION Be careful to prevent your finger from being caught in the left stay of the host machine when attaching the reader on the host machine F 6 7 ...

Page 84: ...2 fixing screws of the scanner unit x2 NOTE As the fixing screws of the scanner unit will be needed when moving the machine be sure to keep them F 6 8 8 Remove the connector cover by releasing the hook with the flat head screwdriver F 6 9 9 Attach the grounding plate 3 screws TP M3X6 x3 F 6 10 ...

Page 85: ... 10 Connect the included 2 flexible cables to the reader controller PCB x2 F 6 11 11 Connect 2 flexible cables to the controller PCB of the host machine x2 F 6 12 12 Connect 2 connectors of the reader to the host machine x2 F 6 13 13 Attach the connector cover removed in step 8 F 6 14 ...

Page 86: ...r platen cover 15 Remove the reader front cover 2 screws x2 F 6 15 16 Attach the fixation plate right included in the host machine 2 screws TP M4X6 included in the host machine x2 F 6 16 17 Attach the fixation plate left included in the host machine 4 screws TP M4X6 included in the host machine x4 F 6 17 ...

Page 87: ... 18 When 3 Way Unit has been not installed Open the right lower cover then remove 2 screws to remove the right upper cover of the host machine x2 F 6 19 19 Remove the cover from back side of the operation panel with the flat head screwdriver F 6 20 20 Connect 2 connectors extended from the host machine to the back side of the operation panel then secure them with wire saddles x2 x2 F 6 21 ...

Page 88: ...12 Installation Installation Procedure Installation Installation Procedure 21 Attach the cover removed in step 19 F 6 22 22 Attach the operation panel using 4 screws TP M4X6 included in the host machine x4 F 6 23 ...

Page 89: ...k x2 F 6 24 24 Attach the reader right cover 2 screws RS tight M3X8 x2 NOTE Put three claws of the cover on hooks of the reader unit F 6 25 25 Attach the reader left cover 2 screws RS tight M3X8 x2 NOTE Put three claws of the cover on hooks of the reader unit F 6 26 26 Affix the included glass cleaning lamp caution label written in your language F 6 27 ...

Page 90: ... language on the same label already pasted as needed F 6 28 28 D1 Only Affix the included finger pinch caution label 2 written in your language CAUTION To avoid injury do not place your hands or fingers in this space F 6 29 29 Close the ADF or platen cover 30 D1 Only Affix the included finger pinch caution label 1 written in your language F 6 30 ...

Page 91: ...inge covers F 6 31 32 Attach the covers of the host machine removed in previous steps Attach the controller cover removed in step 5 If disconnecting connectors in step 4 connect it Attach the rear cover of the host machine removed in step 3 Attach the rear right upper cover of the host machine removed in step 2 ...

Page 92: ...Installation Operation Check Operation Check 1 Connect the power plug of the host machine to the outlet 2 Turn ON the main power switch 3 Check the operation such as paper feed to make sure that problems such as a jam or malfunction do not occur ...

Page 93: ...Appendix Service Tools General Circuit Diagram Reader General Circuit Diagram DADF Signal Name List Reader Signal Name List DADF ...

Page 94: ...me Uses Composition Remarks 1 Vic Clean Cleaning e g glass plastic rubber parts external covers Hydrocarbon fluorine family Alcohol Surface activating agent Water Do not bring near fire Procure locally Isopropyl alcohol may be substituted Special Tools None T 7 1 ...

Page 95: ...7 J9 MT1 MT11 1 2 3 4 5 6 7 8 9 10111213141516171819202122232425 J504 2 3 1 J503 10 9 8 2 3 4 5 6 1 7 J509 J89H 1 2 3 4 J88 1 2 3 4 J7 2 1 J11 J84H 1 2 J84 1 2 J85 MT5 MT4 1 2 J6 3 4 5 6 1 2 J4 1 2 3 J8 1 2 3 4 5 J12 9 8 2 3 4 5 6 1 7 J2 10 9 8 2 3 4 5 6 1 7 J1 1 2 3 4 5 6 7 8 J3 1 2 3 4 5 6 7 J50 1 2 3 4 5 6 7 8 9 10 11 12 13 14 15 16 17 18 19 20 21 22 23 24 25 J10 6 5 4 3 2 1 M1 3 2 1 FM1 MT2 1 ...

Page 96: ...OUT1 TXOUT1 TXOUT2 TXOUT2 TXCLK TXCLK GND GND 50 49 24 38 36 34 32 30 28 26 20 18 16 1 2 3 4 5 6 7 8 9 10 11 13 15 17 19 21 23 25 27 29 31 33 35 37 12 14 22 40 39 41 43 45 47 42 44 46 48 J1 50 49 24 38 36 34 32 30 28 26 20 18 16 1 2 3 4 5 6 7 8 9 10 11 13 15 17 19 21 23 25 27 29 31 33 35 37 12 14 22 40 39 41 43 45 47 42 44 46 48 J508 COR1 FFC1 2 3 4 5 1 J601 2 1 J602 2 1 J603 3 2 1 SR3 3 2 1 SR1 3...

Page 97: ... GND GND 13 12V 12V 14 GND GND 15 GND GND 16 5V 5V 17 5V 5V 18 GND GND 19 GND GND 20 EEP_RXD EEP_RXD 21 EEP_TXD EEP_TXD 22 EEP_CLK EEP_CLK 23 EEP_CS EEP_CS 24 GND GND 25 SCI_DI SCI_Input T 7 2 Jack No Pin No Abbreviated Signal Name Signal Name J508 26 SCI_DO SCI_Output 27 SCI_CS SCI_CS 28 SCI_CLK SCI Clock 29 SH_R SH_R 30 GND GND 31 GND GND 32 GND GND 33 TXOUT0 TXOUT0 34 TXOUT0 TXOUT0 35 GND GND 3...

Page 98: ...oid signal J7 1 24V 2 PICK CL Pickup clutch signal 3 24V 4 REG CL Registration clutch signal J8 1 24V 2 GND 3 FAN LOCK FAN lock signal J9 1 5V 2 GND 3 RKMOT HP SENS Release motor HP sensor signal 4 COVER SENS Cover open closed sensor signal 5 EMPTY SENS Document set sensor signal 6 XEIT SENS Delivery reversal sensor signal 7 TIMING SENS Timing sensor signal 8 REG SENS Registration sensor signal 9 ...

Page 99: ... W1 SENS Document width sensor 1 signal 2 SIZE W2 SENS Document width sensor 2 signal 3 LAST SENS Last document detection sensor signal 4 SIZE L2 SENS Document length sensor 2 signal 5 SIZE L1 SENS Document length sensor 1 signal 6 GND 7 5V J51 1 5V 2 GND 3 LAST SENS Last document detection sensor signal 4 5V 5 GND 6 SIZE L2 SENS Document length sensor 2 signal 7 5V 8 GND 9 SIZE L1 SENS Document l...

Reviews: