


Chapter 16
16-15
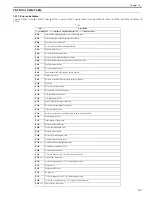
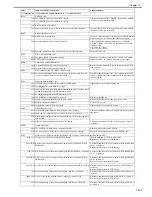
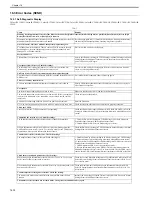
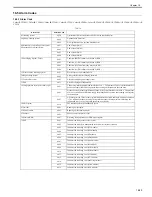
16.2.2 E602 in Detail
0014-6885
Color iR C3380G / Color iR C2880G / Color iR C3380i / Color iR C3380 / Color iR C2880i / Color iR C2880 / iR C3480 / iR C3480i / iR C3080 / iR C3080i / iR
C2550
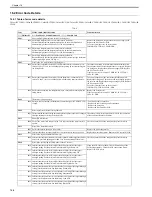
E602-XXYY
- if XX='00'
T-16-3
T-16-4
XX
YY
Description
Remedial action
00
01
The HDD is not recognized. The boot
partition (BOOTDEV) is not found at
time of start-up.
1. Turn off the main switch, and check the HDD cable. Thereafter, turn on the main switch.
2. Check to see if the HDD rotates at power-up. Check to see if 5V/12V power is being supplied.
3. If the foregoing fails to correct the fault, replace the HDD and reinstall the system software. If the fault
still persists, replace the main board.
02
There is no system software for the main
CPU.
1. Start up in safe mode; then, execute full formatting using the SST, reinstall the system software (System,
Lang, RUI), and turn off and then on the main switch.
2. If the foregoing fails, suspect a fault on the HDD. Replace the HDD, and reinstall the system software.
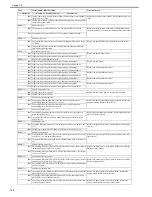
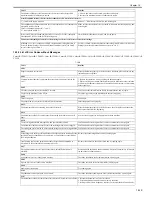
03
WriteAbort has been detected in
BootDevice.
1. Locate the sector that shows WriteAbort, and repair it.
<in the case of black-and-white E code>
1-1 Go through the following, as service mode cannot be started:
1-2 Turn off the power; then, while holding down the 1 and 9 keys, turn on the power so that the WriteAbort
sector repair routine will start automatically, causing the screen to go solid black.
1-3 Allow for some time (40 to 50 min). A progress indictor will appear. When the screen turns solid white,
the repair is over.
<in the case of spanner icon indication>
1-1 Set CHK-TYPE=0, and execute HD-CHECK (40 to 50 min); then, turn off the main switch.
2. If the foregoing fails, start up in safe mode, and execute full formatting using the SST and reinstall the
system software (System, Lang, RUI); then, turn off and then on the main switch.
3. If the fault still persists, suspect a fault on the HDD, and replace the HDD and reinstall the system
software.
06
The system software of the sub CPU is
missing.
1. Start up in safe mode, and execute full formatting using the SST and reinstall the system software
(System, Lang, RUI); then, turn off and then on the main switch.
2. If the foregoing fails, suspect a fault on the HDD, and replace the HDD and reinstall the system software.
07
ICCProfile is missing.
1. Start up in safe mode, and execute full formatting using the SST and reinstall the system software
(System, Lang, RUI); then, turn off and then on the main switch.
2. If the foregoing fails, suspect a fault on the HDD, and replace the HDD and reinstall the system software.
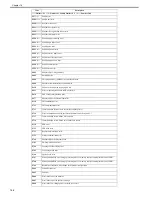
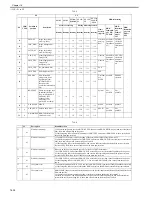
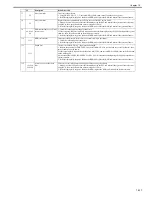
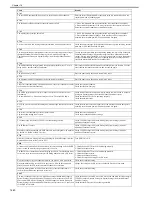
XX
YY
XX
CHK-
TYPE
Partition in
question
Description
YY=03
YY=05
YY=00,0
1,02,04
YY=11,2
1
YY=13,2
5
YY=10,1
2,14,22,2
3,24
At time of start-up
During normal operation
Remedy
Remedy
Remedy
Remedy
Remedy
Remedy
01
1
FSTDEV
image data storage area (e.g., Box)
*1
*5
*9
*10
*11
*12
02
IMG_MNG
image management data
*1
*5
*9
*10
*11
*12
03
FSTCDEV
image data storage area (for Chasing)
*1
*5
*9
*10
*11
*12
04
2
APL_GEN
general-purpose data storage area
*1
*5
*9
*10
*11
*12
05
TMP_GEN
general-purpose data storage area (temporary file)
*1
*5
*9
*10
*11
*12
06
TMP_FAX
fax (temporary file)
*1
*5
*9
*10
*11
*12
07
TMP_PSS
PSS (temporary file)
*1
*5
*9
*10
*11
*12
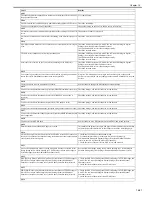
08
3
PDLDEV
PDL-related file storage area (font, registration form,
ICCProfile PDL function color correction information
file)
*1
*5
*9
*10
*11
*12
09
4
BOOTDEV
Firmware storage area (Booktable, MEAP, Key,
certificate, PDF dictionary, RUI content, voice
dictionary (ICC profile, PS test data))
*3
*8
*9
*10
*11
*12
10
5
APL_MEAP
MEAP
*1
*5
*9
*10
*11
*12
11
6
APL_SEND
address book, filter
*2
*5
*9
*10
*11
*12
FF
0
Not identified
HDD full fault check and recovery
*4
*7
*9
*10
*11
*12
Summary of Contents for CiRC2550
Page 2: ......
Page 27: ...Chapter 1 Introduction ...
Page 28: ......
Page 47: ...Chapter 1 1 18 F 1 14 ON OFF ON OFF ...
Page 70: ...Chapter 1 1 41 5 Turn on the main power switch ...
Page 79: ...Chapter 2 Installation ...
Page 80: ......
Page 85: ...Chapter 2 2 3 Not available in some regions ...
Page 134: ...Chapter 3 Basic Operation ...
Page 135: ......
Page 137: ......
Page 143: ...Chapter 4 Main Controller ...
Page 144: ......
Page 152: ...Chapter 4 4 6 F 4 6 CPU HDD ROM access to the program at time of execution ...
Page 171: ...Chapter 5 Original Exposure System ...
Page 172: ......
Page 203: ...Chapter 6 Laser Exposure ...
Page 204: ......
Page 206: ......
Page 220: ...Chapter 7 Image Formation ...
Page 221: ......
Page 277: ...Chapter 8 Pickup Feeding System ...
Page 278: ......
Page 282: ......
Page 336: ...Chapter 9 Fixing System ...
Page 337: ......
Page 339: ......
Page 357: ...Chapter 10 Externals and Controls ...
Page 358: ......
Page 362: ......
Page 366: ...Chapter 10 10 4 F 10 2 F 10 3 FM1 FM2 FM5 FM8 FM11 FM4 FM3 FM6 FM7 FM9 FM10 ...
Page 375: ...Chapter 10 10 13 F 10 10 2 Remove the check mark from SNMP Status Enabled ...
Page 376: ...Chapter 10 10 14 F 10 11 ...
Page 402: ...Chapter 11 MEAP ...
Page 403: ......
Page 405: ......
Page 452: ...Chapter 12 RDS ...
Page 453: ......
Page 455: ......
Page 464: ...Chapter 13 Maintenance and Inspection ...
Page 465: ......
Page 467: ......
Page 469: ...Chapter 13 13 2 F 13 1 8 9 1 2 3 3 5 6 7 10 11 12 13 14 4 ...
Page 474: ...Chapter 14 Standards and Adjustments ...
Page 475: ......
Page 477: ......
Page 485: ......
Page 486: ...Chapter 15 Correcting Faulty Images ...
Page 487: ......
Page 495: ...Chapter 15 15 4 F 15 2 COLOR M 1 COLOR Y C K 0 ...
Page 569: ...Chapter 15 15 78 F 15 82 J102 J107 J103 J108 J101 J109 J106 J112 J115 J113 J114 J104 J105 ...
Page 570: ...Chapter 16 Self Diagnosis ...
Page 571: ......
Page 573: ......
Page 600: ...Chapter 17 Service Mode ...
Page 601: ......
Page 603: ......
Page 712: ...Chapter 18 Upgrading ...
Page 713: ......
Page 715: ......
Page 746: ...Chapter 19 Service Tools ...
Page 747: ......
Page 749: ......
Page 752: ...APPENDIX ...
Page 774: ......


