background image

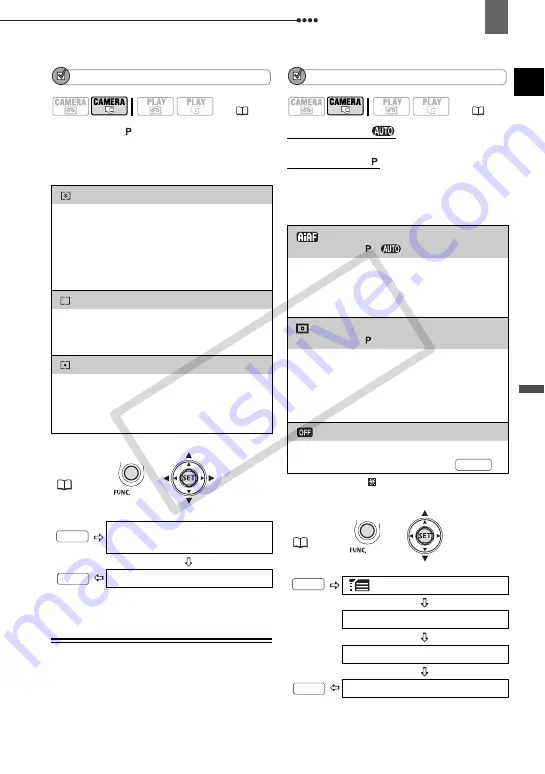
 Still Image Recording Options

Advanced Functions

59

POINTS TO CHECK

Mode switch:   (except for the Special 
Scene recording programs)

Options



 Default value

Automatic Focus Priority

When the focus priority is activated, the 
camcorder records a still image only after 
the focus has been adjusted 
automatically. 

POINTS TO CHECK

Mode switch at 

: The focus priority 

cannot be turned off.
Mode switch at  : You can turn off the 
focus priority and you can also select the 
AF (autofocus) mode to be used.

Options



 Default value

* Except for the [

FIREWORKS] recording 

program.

(

12)

[

EVALUATIVE]



Appropriate for standard shooting 
conditions, including backlit scenes. The 
camcorder divides the picture into several 
areas and the light is measured in all of 
them to achieve the optimal exposure for 
the subject.
[

CENT.WEIGHT.AVERAGE]

Averages the light metered from the entire 
screen, giving more weight to the subject 
in the center.
[

SPOT]

Meters only the area within the spot AE 
point frame. Use this setting to adjust the 
exposure to match the subject in the center 
of the screen.

FUNC.

(

25)

Icon of the currently selected 

Light Metering Mode

Desired option

FUNC.

FUNC.

(

12)

[

ON:AiAF]



(Mode switch:  *,

)

Depending on the shooting conditions, one 
or more AF frames out of the nine frames 
available are automatically selected and 
the focus is fixed on them.
[

ON:CENTER]

(Mode switch:  *)
In this mode, a single focusing frame 
appears in the center of the screen and the 
focus is automatically fixed on it. This is 
convenient for making sure the focus is 
exactly where you want it.
[

 OFF]

Select this option if you wish to record a 
still image as soon as you press 

.

FUNC.

(

25)

 MENU

CAMERA SETUP

FOCUS PRI.

Desired option

PHOTO

FUNC.

FUNC.

CO

PY

Summary of Contents for 3686B001

Page 1: ...ile For further details refer to the installation guide Veuillez lire aussi le manuel d instruction suivant version électronique sur fichier PDF Pour d autres détails référez vous au guide d installation Lea también el siguiente manual de instrucciones versión electrónica en archivo PDF Para mayores detalles refiérase a la guía de instalación Digital Video Software English Digital Video Software V...

Page 2: ...ence will not occur in a particular installation If this equipment does cause harmful interference to radio or television reception which can be determined by turning the equipment off and on the user is encouraged to try to correct the interference by one or more of the following measures Reorient or relocate the receiving antenna Increase the separation between the equipment and receiver Connect...

Page 3: ...h arrowhead symbol within an equilateral triangle is intended to alert the user to the presence of uninsulated dangerous voltage within the product s enclosure that may be of sufficient magnitude to constitute a risk of electric shock to persons The exclamation point within an equilateral triangle is intended to alert the user to the presence of important operating and maintenance servicing instru...

Page 4: ...rating instructions should be adhered to 16 Follow Instructions All operating and maintenance instructions should be followed 17 Cleaning Unplug this product from the wall outlet before cleaning Do not use liquid or aerosol cleaners The product should be cleaned only as recommended in this manual 18 Accessories Do not use accessories not recommended in this manual as they may be hazardous 19 Avoid...

Page 5: ...t from the wall outlet and all power sources including battery and refer servicing to qualified service personnel under the following conditions a When the power supply cord or plug is damaged b If any liquid has been spilled onto or objects have fallen into the product c If the product has been exposed to rain or water d If the product does not operate normally even if you follow the operating in...

Page 6: ...pply between 100 and 240 V AC For areas where 120 V AC power is not used you will need a special plug adapter Contact your nearest Canon Service Center for further information This Class B digital apparatus complies with Canadian ICES 003 COPY ...

Page 7: ...lines and approximately 4 times the number of pixels in standard definition TV broadcasts resulting in eye catching colors and richly detailed video recordings How to play back your HDV recordings On a high definition TV HDTV 72 HDV recordings will be played back in their original high quality On standard definition TVs 73 HDV recordings will be down converted to match the resolution of the TV set...

Page 8: ...guage 26 Changing the Time Zone 26 Setting the Date and Time 27 Basic Functions Recording Recording Movies 28 Recording Still Images 29 Zooming 30 Playback Playing Back Movies 31 Adjusting the Volume Speaker and Headphones 32 Returning to a Pre marked Position 33 Locating the End of the Last Scene 34 Locating Scenes by Recording Date 34 Viewing Still Images 35 Magnifying the Playback Image 36 Adva...

Page 9: ...imer 64 Audio Recording Level 65 Digital Effects 67 Editing Functions Still Image Options Erasing Still Images 69 Protecting Still Images 69 Initializing the Memory Card 70 External Connections Connecting to a TV or VCR Connection Diagrams 71 Playback on a TV Screen 74 Recording to a VCR or Digital Video Recorder 75 Analog Line In Recording 76 Digital Video Dubbing 77 Analog Digital Conversion 78 ...

Page 10: ...and other countries is a trademark HDV and the HDV logo are trademarks of Sony Corporation and Victor Company of Japan Ltd JVC HDMI the HDMI logo and High Definition Multimedia Interface are trademarks or registered trademarks of HDMI Licensing LLC Other names and products not mentioned above may be trademarks or registered trademarks of their respective companies ANY USE OF THIS PRODUCT OTHER THA...

Page 11: ...to open the setup menus 3 Select DATE TIME SETUP and press 4 Select DATE TIME and press The first field of the date will be indicated with blinking up down arrows 5 Change each field of the date and time and move to the next field 6 Press to start the clock 7 Press to close the menu IMPORTANT If you do not use the camcorder for about 3 months the built in rechargeable lithium battery may discharge...

Page 12: ...hown and indicates that the function is not available When no operating mode icons are given the function is available in all operating modes Operating Mode Switch Switch Icon Display Operation CAMERA Tape Recording movies on the tape 28 Memory card Recording still images on the memory card 29 PLAY Tape Playing movies from the tape 31 Memory card Viewing still images from the memory card 35 Push t...

Page 13: ...USA Customers only Register your product online at www registercanon com 9 Protect your product We will keep the model number and date of purchase of your new Canon product on file to help you refer to this information in the event of an insurance claim such as loss or theft 9 Receive information on new products and promotions Upon your request we will send you information on Canon new products an...

Page 14: ... button 53 Speaker DISP display button 61 LCD backlight button long press 24 LIGHT button 64 print share button 82 85 USB terminal 80 CARD access indicator 29 CHARGE indicator 20 Memory card slot 22 tape card switch 12 Mode switch 48 Terminal cover MIC microphone terminal 66 AV terminal 71 headphones terminal 32 COMPONENT OUT terminal 71 Grip belt 23 Instant AF sensor 39 Flash 63 Mini video light ...

Page 15: ...r label is located on the back surface of the battery attachment unit Remove the battery pack to find it DC IN terminal 20 HDV DV terminal 71 80 rewind button 31 Zoom out W wide angle button 30 fast forward button 31 Zoom in T telephoto button 30 play pause button 31 START STOP button 28 stop button 31 MAGNIFY button 53 HDMI OUT terminal 71 74 OPEN EJECT switch 22 Stereo microphone Cassette compar...

Page 16: ...STOP PAUSE SLOW DISP TV SCREEN ZERO SET MEMORY START STOP button 28 CARD buttons 35 DATE SEARCH buttons 34 REW button 31 button 31 PAUSE button 31 SLOW button 31 ZERO SET MEMORY button 33 DISP on screen display button 61 PHOTO button 29 Zoom buttons 30 PLAY button 31 FF button 31 STOP button 31 button 31 button 31 TV SCREEN button 45 COPY ...

Page 17: ...cklight correction 52 Function assigned to the CUSTOM key 61 Recording Still Images Focus assist functions 45 Level marker 45 Condensation warning 99 Mini video light 64 Remote sensor off 46 Audio level indicator microphone 65 Zoom 30 Exposure 52 Light metering mode 58 Drive mode 60 Still image quality size 56 Number of still images available on the memory card Recording program 48 AF frame 59 Whi...

Page 18: ...ining tape time may not appear Depending on the type of the tape the remaining time displayed may not be correct In any case you will be able to record on the tape the number of minutes that appears on the videocassette s label for example 85 minutes Remaining battery charge When starts flashing in red replace the battery pack with a fully charged one When you attach an empty battery pack the powe...

Page 19: ...ARCH 34 Quality size for capturing still images 58 Audio level indicator 65 Viewing Still Images Image number 42 Current image Total number of images Histogram 62 Image protection mark 69 Still image quality size Date and time of recording Recording program 48 Manual focus 53 Light metering mode 58 Manual exposure 52 Image effect 55 Image size 56 File size Aperture value 49 Shutter speed 49 White ...

Page 20: ...hed its power will not be consumed ONCE THE BATTERY PACK IS FULLY CHARGED 1 Disconnect the compact power adapter from the camcorder 2 Unplug the power cord from the power outlet and the compact power adapter TO REMOVE THE BATTERY PACK Slide in the direction of the arrow and hold it pressed down Slide the battery pack down and then pull it out IMPORTANT You may hear some noise from the compact powe...

Page 21: ...e this battery Charging Recording and Playback Times The times given in the table below are approximate and vary depending on the actual charging recording or playback conditions Approximate times for recording with repeated operations such as start stop zooming power on off Battery Pack NB 2LH BP 2L13 BP 2L14 BP 2L24H Charging Time 130 min 200 min 225 min 370 min Maximum Recording Time Viewfinder...

Page 22: ...he cassette compartment while it is opening or closing automatically or attempt to close the cover before the cassette compartment has fully retracted Be careful not to get your fingers caught in the cassette compartment cover NOTES If the camcorder is connected to a power source cassettes can be inserted removed even if the switch is set to CHG Inserting and Removing a Memory Card Use only commer...

Page 23: ...r as necessary 3 Fasten the grip belt Adjust the grip belt so that you can reach the zoom lever with your index finger and the START STOP button with your thumb The Wireless Controller Inserting the Battery Lithium Button Battery CR2025 1 Press the tab in the direction of the arrow and pull out the battery holder 2 Place the lithium button battery with the side facing up 3 Insert the battery holde...

Page 24: ...o include yourself when recording with the self timer LCD Backlight You can set the brightness of the LCD screen to normal or bright Hold pressed down for more than 2 seconds Repeat this action to toggle between the normal and bright settings NOTES This setting does not affect the brightness of the recording or the viewfinder screen Using the bright setting will shorten the effective usage time of...

Page 25: ...and make further selections Follow the additional operation guides that will appear on the screen such as the icon small arrows etc Selecting an Option from the Setup Menus 1 Press 2 Select the icon and press to open the setup menus You can also hold pressed down for more than 1 second to open directly the setup menus screen 3 Select the desired menu from the left side column and press The title o...

Page 26: ...e selected Changing the Time Zone Default value 1 Press 2 Select the icon and press to open the setup menus 3 Select DATE TIME SETUP and press 4 Select T ZONE DST and press The time zone setting appears The default setting is New York 5 Select your time zone and press To adjust for daylight saving time select the time zone with the mark next to the area 6 Press to close the menu Time Zones Once yo...

Page 27: ...eld of the date and time and move to the next field 6 Press to start the clock 7 Press to close the menu IMPORTANT If you do not use the camcorder for about 3 months the built in rechargeable lithium battery may discharge completely and the date and time setting may be lost In such case recharge the built in lithium battery 98 and set the time zone date and time again You can also change the date ...

Page 28: ...de If the currently selected recording standard is different from that of the last recording the picture may not be played back correctly WHEN YOU HAVE FINISHED RECORDING 1 Close the LCD panel 2 Turn off the camcorder 3 Remove the tape 4 Disconnect the power source and remove the battery pack NOTES Previous recordings overwritten by a new recording cannot be recovered Before you start recording se...

Page 29: ...centration of the light by the lens Do not use tripods with fastening screws longer than 5 5 mm 0 2 in Doing so may damage the camcorder When recording movies try to get a calm stable picture Excessive camcorder movement while shooting and extensive use of fast zooms and panning can result in jittery scenes In extreme cases the playback of such scenes may result in visually induced motion sickness...

Page 30: ...10x optical zoom the 200x digital zoom is also available 39 10x Optical Zoom Move the zoom lever toward W to zoom out wide angle Move it toward T to zoom in telephoto You can also change the zoom speed 39 You can select one of three fixed zoom speeds or a variable speed that depends on how you operate the zoom lever Press gently for a slow zoom press harder for faster zooms NOTES You can also use ...

Page 31: ...deo problems blocky video artifacts banding etc in the playback picture During playback you may notice some video problems at the point where the standard of the recording HDV DV changes Playback 12 Special Playback Modes To enter most special playback modes you need to operate the buttons on the wireless controller 16 There is no sound during the special playback modes Special playback mode Initi...

Page 32: ...io level while recording Adjusting the Volume of the Speaker 1 If the joystick guide does not appear on screen press to display it 2 Push the joystick toward or to adjust the volume To turn off the volume completely keep pressing until the volume icon changes to You can press again to hide the joystick guide during playback Using Headphones The headphones are connected to the AV terminal which is ...

Page 33: ... a 3 5 mm minijack When you turn off the camcorder the AV PHONES setting in mode will return to AV The volume of the headphones cannot be adjusted while recording Returning to a Pre marked Position If you wish to return to a particular scene later mark the point with the zero set memory and the tape will stop at that point when you rewind fast forward the tape 1 While recording or during playback ...

Page 34: ...ette If there are blank sections between recordings or sections recorded in different standards HDV DV on the same tape the end search may not work correctly Locating Scenes by Recording Date You can locate the change of the date time zone with the date search function Press or on the wireless controller Press more than once to search for further date changes up to 10 times To cancel the search pr...

Page 35: ...permanent data loss Do not open the memory card slot cover and do not remove the memory card Do not disconnect the power source or turn off the camcorder Do not change the position of the switch or the operating mode The following may not be displayed correctly Images not recorded with this camcorder Images edited on or uploaded from a computer Images whose file names have been changed Image Jump ...

Page 36: ...om lever toward W to extend the green selection frame to the whole page and move through index pages Move the zoom lever toward T to return to moving between single images 3 Move the zoom lever toward T The index screen closes and the selected image is displayed Magnifying the Playback Image During playback movies and still images can be magnified up to 5 times You can also select the area to be m...

Page 37: ...OTLIGHT FIREWORKS only Mode switch EVALUATIVE CENT WEIGHT AVERAGE SPOT Mode switch AUTO DAYLIGHT SHADE CLOUDY TUNGSTEN FLUORESCENT FLUORESCENT H SET Mode switch IMAGE EFFECT OFF VIVID NEUTRAL LOW SHARPENING SOFT SKIN DETAIL CUSTOM Mode switch SINGLE CONT SHOOT HISPEED CONT SHOOT AEB Mode switch D EFFECT OFF FADE T WIPE BLK WHT SEPIA ART Mode switch D EFFECT OFF BLK WHT SEPIA Menu Options Lists Rec...

Page 38: ...s made in DV WIDE SW S FINE 848x480 SW FINE 848x480 SW NORMAL 848x480 Recordings made in DV NORMAL S S FINE 640x480 S FINE 640x480 S NORMAL 640x480 CANCEL START Press to enter the image selection screen From that screen you can continue to select the still images you want to protect Press to enter the image selection screen From that screen you can continue to select the still images for which you...

Page 39: ...you zoom in The digital zoom indicator will appear in light blue from 10x up to 40x and dark blue from 40x up to 200x The digital zoom cannot be used with the NIGHT recording program A still image cannot be recorded simultaneously on the memory card while recording movies using the digital zoom VARIABLE SPEED 3 SPEED 2 SPEED 1 When set to VARIABLE the zoom speed depends on how you operate the zoom...

Page 40: ... at 1080i specifications for recording with a progressive frame rate of 30 fps You can use this setting to easily edit your recordings for example to post them on the Web HDV PF24 High definition video at 1080i specifications for recording with a progressive frame rate of 24 fps HDV 24F High definition video at 1080i specifications for recording with a native progressive frame rate of 24 fps Video...

Page 41: ...ommend using the SP mode for important recordings If you make recordings in both SP and LP modes on the same tape during playback you may notice some video problems in the picture at the point where the recording mode changes When playing back in this camcorder tapes recorded in LP mode with other devices or vice versa you may notice some problems in the playback picture or the sound may stop brie...

Page 42: ...age numbers will continue from the number following that of the last image recorded with the camcorder If the memory card you insert already contains an image with a larger number a new image will be assigned a number one higher than that of the last image on the memory card We recommend using the CONTINUOUS setting CARD OPERATIONS NO YES NO YES NO YES CANCEL INITIALIZE COMPL INIT PLAY OUT SETUP I...

Page 43: ...X VAR You can select the audio track to use during the playback of a tape with audio dubbed over the recording STEREO1 Original sound only STEREO2 Dubbed audio only MIX FIXED Mixed audio with the original sound and dubbed audio at the same level MIX VAR Mixed audio where the balance between the original sound and the dubbed audio can be adjusted When AUDIO OUT is set to MIX VAR adjust the sound ba...

Page 44: ...V terminal HDV DV Switch automatically between standards to match the original standard of the recordings DV LOCKED All video output will be in DV standard recordings made in HDV will be down converted Select the PLAYBACK STD and DV OUTPUT settings according to the specifications you want to use for playback on a high definition TV Refer to the table below DV OUTPUT Settings for Video Output from ...

Page 45: ... white or gray Use the markers as a reference to make sure your subject is framed correctly vertically and or horizontally Using the markers will not affect the recordings on the tape or memory card This function can also be activated with the CUSTOM key 61 Mode switch OFF ZEBRA 70 ZEBRA 100 PEAKING You can use the assist functions to make sure you adjust the focus and exposure correctly ZEBRA A s...

Page 46: ...FF Allows the camcorder to be operated with the wireless controller HIGH VOLUME LOW VOLUME OFF A beep will accompany some operations like turning on the camcorder the self timer countdown etc It also serves as a warning beep under unusual conditions ON OFF In order to save power when the camcorder is powered by a battery pack it will automatically shut off if left without any operation for 5 minut...

Page 47: ...f the camcorder s firmware This menu option is usually grayed out DATE TIME SETUP Y M D 2009 1 1 AM 12 00 M D Y JAN 1 2009 12 00 AM D M Y 1 JAN 2009 12 00 AM Changes the date format for on screen displays and for date printing FIRMWARE T ZONE DST 26 DATE TIME 27 DATE FORMAT COPY ...

Page 48: ... being underexposed CINE MODE Give a cinematic look to your recordings only SPORTS Use this mode to record sports scenes such as tennis or golf BEACH Use this mode to record on a sunny beach It prevents the subject from being underexposed SPOTLIGHT Use this mode to record spotlit scenes NIGHT Use this mode to record in low light conditions SUNSET Use this mode to record sunsets in vibrant colors F...

Page 49: ...CINE MODE recording program and the HDV PF24 or HDV 24F frame rate to achieve the 24p Cinema Mode which will enhance the cinematic look of your recordings POINTS TO CHECK Mode switch Set the recording program to CINE MODE as described in the previous section NOTES Do not move the mode switch to during the actual recording of a scene the brightness of the picture may change abruptly Flexible Record...

Page 50: ... Use a high shutter speed to record fast moving subjects or a slow shutter speed to add motion blur emphasizing the feel of movement APERTURE PRIO AE Set the aperture value The camcorder automatically sets the appropriate shutter speed Use low aperture values larger lens opening to softly blur the background in a portrait or high aperture values smaller lens opening to get a wider depth of field g...

Page 51: ...g Programs to Match Special Conditions Recording in a very bright ski resort or capturing the full colors of a sunset or a fireworks display becomes as easy as selecting a Special Scene recording program POINTS TO CHECK Mode switch NOTES Do not change the position of the mode switch while recording as the brightness of the image may change abruptly PORTRAIT SPORTS BEACH SNOW The picture may not ap...

Page 52: ...ck guide in the illustration above appears Pushing the joystick toward again will end the backlight correction mode NOTES This function can also be activated with the CUSTOM key 61 Manual Exposure Adjustment POINTS TO CHECK Mode switch except for the FIREWORKS recording program 1 If the joystick guide does not appear on screen press to display it 2 Push the joystick toward EXP If EXP does not appe...

Page 53: ...e so you can focus more easily 61 Pressing again will return the camcorder to autofocus NOTES The camcorder will automatically return to autofocus when you set the mode switch to Infinity Focus Use this function when you wish to focus on faraway subjects such as mountains or fireworks 1 Adjust the zoom 2 In autofocus mode keep pressed down for more than 2 seconds appears Pressing again will return...

Page 54: ...for the Special Scene recording programs Options Default value When you select SET do not press and continue instead with the procedure below 12 12 MAGNIFY MAGNIFY START STOP AUTO Settings are automatically set by the camcorder Use this setting for outdoor scenes DAYLIGHT For recording outdoors on a bright day SHADE For recording in shaded places CLOUDY For recording on a cloudy day TUNGSTEN For r...

Page 55: ... of fluorescent lights Depending on the type of fluorescent light optimal color balance may not be obtained with FLUORESCENT or FLUORESCENT H If the color looks unnatural adjust it using AUTO or SET Image Effects You can use the image effects to change the color saturation and contrast of your recordings POINTS TO CHECK Mode switch except for the Special Scene recording programs Options Default va...

Page 56: ...As a general rule select a larger image size for higher quality Options Approximate number of still images that can be recorded on different sizes of memory cards with the following quality settings SUPER FINE FINE NORMAL On a 128 MB memory card On a 512 MB memory card FUNC Still Image Recording Options 12 Image Size LW 1920x1080 90 135 265 L 2048x1536 60 85 180 M 1440x1080 120 180 350 SW 848x480 ...

Page 57: ... use the following guidelines as a reference for selecting the print size Capturing a Still Image while Recording Movies You can record still images on the memory card even while the camcorder is set to mode You can also capture simultaneously as a still image on the memory card the same picture you are recording as video on the tape The size and quality of the still image can be selected POINTS T...

Page 58: ...end on the recording standard of the tape being played back POINTS TO CHECK Set TV TYPE to WIDE TV before using this function 43 TO CAPTURE THE STILL IMAGE 1 Pause the playback when the scene you want to capture as a still image appears You can also use the frame by frame playback to find the exact picture you want to capture 2 Press NOTES The data code of the still image will reflect the date and...

Page 59: ...chieve the optimal exposure for the subject CENT WEIGHT AVERAGE Averages the light metered from the entire screen giving more weight to the subject in the center SPOT Meters only the area within the spot AE point frame Use this setting to adjust the exposure to match the subject in the center of the screen FUNC 25 Icon of the currently selected Light Metering Mode Desired option FUNC FUNC 12 ON Ai...

Page 60: ... recorded on the memory card NOTES The speed and maximum number of continuous shots is as follows CONT SHOOT Approx 3 images second HISPEED CONT SHOOT Approx 5 images second Continuous Shooting with flash Approx 2 1 images second Maximum number of shots 60 still images These figures are approximate and vary with the recording conditions and subjects The actual number of images per second will be l...

Page 61: ...lect the data to be displayed Turning the On Screen Displays On Off Repeatedly press to turn the on screen displays on off in the following sequence All displays on Æ Only tape related displays1 Other Functions 12 OFF No function is assigned ASST FUNC Mode switch Repeatedly press to turn on off the assist functions 45 which make sure you adjust the focus and exposure correctly MARKERS You can acti...

Page 62: ...fault value Reading the Histogram Display When viewing still images you can display the histogram and the icons of all the functions used at the time of recording Use the histogram as a reference to verify the correct exposure of the still image The area to the right of the histogram represents highlights and the left side represents shadows A still image whose histogram skews to the right is rela...

Page 63: ... is approx 1 to 2 m 3 3 to 6 6 ft The practical range with the VFL 1 Video Flash Light attached is approx 1 to 4 m 3 3 to 13 1 ft In any case the actual range will depend on the recording conditions The range of the flash decreases in continuous shooting mode For the red eye reduction function to be effective the subject needs to look at the assist lamp The degree of reduction depends on the dista...

Page 64: ...e do not recommend using the mini video light while the optional Wide converter is attached its shadow can appear on the screen The built in mini video light will be disabled automatically when you attach the optional VL 3 Video Light To use the built in mini video light set the switch on the VL 3 to OFF and then press Self Timer POINTS TO CHECK Set the camcorder in record pause mode appears Press...

Page 65: ...en the 0 dB mark turns red the sound may be distorted 4 Press to save the setting and hide the joystick guide TO USE THE MICROPHONE ATTENUATOR If the audio level is too high and the sound gets distorted activate the microphone attenuator by setting MIC ATT to ON 41 NOTES The audio recording level can be adjusted only while the green adjustment bar appears under the audio level indicator To avoid c...

Page 66: ...essory shoe For details refer to the instruction manual of the microphone When a video accessory is attached to the advanced accessory shoe will appear on the screen OTHER MICROPHONES You can also use commercially available microphones not compatible with the advanced accessory shoe by connecting the external microphone to the MIC terminal Use commercially available condenser microphones with thei...

Page 67: ...creen press to display it 2 Push the joystick toward If does not appear on the joystick guide repeatedly push the joystick toward NEXT to display the joystick guide in the illustration above The icon of the selected effect turns green Push the joystick toward again to deactivate the fader effect 12 D EFFECT OFF Select this setting when you do not intend to use the digital effects FADE T fade trigg...

Page 68: ...O FADE OUT Push the joystick toward while recording then press to fade out and pause the recording during playback then press to fade out and pause the playback TO ACTIVATE AN EFFECT Push the joystick toward while recording or in record pause mode during playback and then press first halfway to activate the autofocus and then fully to record the still image START STOP START STOP PHOTO COPY ...

Page 69: ... recorded still image while reviewing it within the time set for the REVIEW option or immediately after recording it if REVIEW is set to OFF While reviewing the image immediately after recording 1 Push the joystick toward 2 Select ERASE and press Erasing All Images Protected images will not be deleted even if you erase all images Protecting Still Images You can protect still images from accidental...

Page 70: ...ly erase the stored data If you need to completely erase all the data select instead the complete initialization option COMPL INIT IMPORTANT Initializing the memory card will erase all still images even the protected ones The original still images cannot be recovered When you feel the time it takes to record on or read from the memory card has become too long we recommend you select the complete i...

Page 71: ...ver to access AV Terminal COMPONENT OUT Terminal The component video terminal is for video only When you use connection type do not forget the audio connections using the AV terminal HDV DV Terminal Check the type and orientation of the terminal and make sure you connect the DV cable properly HDMI OUT Terminal The HDMI OUT terminal offers a high quality digital connection that combines audio and v...

Page 72: ...ied STV 250N Stereo Video Cable Supplied 2 Output connection Signal Flow to an HDTV with a DV IEEE1394 terminal Input connection Signal Flow from a TV or other digital video source with a DV IEEE1394 output DV Cable Commercially available 4 pin 6 pin Be careful to correctly insert the 6 pin plug into the DV terminal Inserting it in the wrong direction can result in damage to the camcorder 3 Output...

Page 73: ...ther digital video source with a DV IEEE1394 output DV Cable Commercially available 4 pin 6 pin Be careful to correctly insert the 6 pin plug into the DV terminal Inserting it in the wrong direction can result in damage to the camcorder 4 VIDEO AUDIO R L Output connection Signal Flow to a TV or VCR with AV Terminals Input connection Signal Flow from a TV VCR or other analog video source with AV te...

Page 74: ...connection connection type you can enjoy the full resolution of high definition TV About the HDMI connection The HDMI High Definition Multimedia Interface connection connection type is a convenient all digital connection using a single cable for both video and audio When you connect the camcorder to an HDTV equipped with an HDMI terminal you can enjoy video and audio playback at the highest qualit...

Page 75: ...rresponding explanation of each setting in the PLAY OUT SETUP menu option list 42 PLAYBACK STD to select the output video standard DV OUTPUT to select the standard of the output video when using connection type Note that the video standard of the recorded copy depends also on the standards supported by the external digital device Refer to the table below Set AV PHONES to AV when using connection t...

Page 76: ... lower than that of the original When recording to a digital video recorder using the HDV DV terminal connection type 71 If the picture does not appear disconnect the DV cable and restore the connection after a short while or turn the camcorder off and then on again Proper operation cannot be guaranteed for all digital devices equipped with a DV terminal If the operation does not work use the AV t...

Page 77: ...deo devices and record the input video on the tape in the camcorder Video input will be recorded on the tape in the same standard of the original HDV or DV POINTS TO CHECK Set PLAYBACK STD to AUTO 42 before making the connections Connecting Connect the camcorder to the video input source using the digital connection connection type 71 shown in the previous section Connection Diagrams Dubbing 1 Loa...

Page 78: ...such tapes via the HDV DV terminal COPYRIGHT PROTECTED DUBBING RESTRICTED appears and you will not be able to record the contents of the tape Analog Digital Conversion Using the camcorder you can convert analog video signals for example from a VCR to digital signals DV standard only and output them to a digital recording device Connecting Connect the camcorder to the video input source using an an...

Page 79: ...log video recordings to a computer as digital video The required equipment and operation is the same as described in Transferring Video Recordings 81 except in this case you need to set AV DV to ON before connecting the camcorder to the computer Note that the analog digital conversion may not work correctly depending on the software and the specifications settings of the computer COPY ...

Page 80: ...inal on the Camcorder Connecting Cable Terminal on the Connected Device 1 Output connection Signal Flow to a PC or PictBridge compatible printer with a USB port USB Cable Supplied 2 Output connection Signal Flow to a computer with a DV IEEE1394 terminal or a DV capture board DV Cable Commercially available 4 pin 6 pin Be careful to correctly insert the 6 pin plug into the DV terminal Inserting it ...

Page 81: ...e set to ON Connecting 1 Start the computer 2 Set the camcorder to mode 3 Connect the camcorder to the computer using the digital connection connection type 80 shown in the previous section PC Connection Diagrams When the connection is recognized HDV DV will be displayed 4 Start the video editing software Refer to the instruction manual of the editing software IMPORTANT The video transfer may not ...

Page 82: ... up IMPORTANT When the CARD access indicator is on or flashing do not perform the following actions Doing so may result in permanent data loss Do not open the memory card slot cover and do not remove the memory card Do not disconnect the USB cable Do not turn off the camcorder or the computer Do not change the position of the switch or the operating mode Operation may not work correctly depending ...

Page 83: ...her image WALLPAPER The selected image is transferred to the computer and displayed as the desktop s background The button will flash while the images are being transferred Press to return to the transfer menu NOTES You can press to transfer the images instead of With the automatic transfer options a confirmation message appears Select OK and press When the camcorder is connected to the computer a...

Page 84: ...nters marked with the PictBridge logo Connecting the Camcorder to the Printer 1 Insert the memory card containing the still images you want to print 2 Turn on the printer 3 Connect the camcorder to the printer using the USB connection connection type 80 shown in the previous section PC Connection Diagrams appears and changes to The print share button lights up and the current print settings will b...

Page 85: ...r size paper type and page layout Trimming settings 87 Date printing Print effect Number of copies Paper settings PAPER PAPER SIZE Available paper sizes vary depending on the printer model PAPER TYPE Select PHOTO FAST PHOTO or DEFAULT PAGE LAYOUT Select DEFAULT or one of the following available page layouts BORDERED Prints the whole image area almost exactly as the recorded still image BORDERLESS ...

Page 86: ...ress and retry printing Refer also to the printer s instruction manual for details If the error still persists and printing does not restart disconnect the USB cable and turn off the camcorder and the printer After a short while turn them on again set the camcorder to mode and restore the connection WHEN YOU HAVE FINISHED PRINTING Disconnect the cable from the camcorder and printer and turn off th...

Page 87: ...ame disappears 3 Move the trimming frame 4 After setting the trimming frame press to return to the print menu NOTES About the color of the trimming frame White No trimming settings Green Recommended trimming size The size of the trimming frame may differ depending on the image size paper size or borders settings The trimming setting applies only to one image The trimming setting is canceled in the...

Page 88: ...t PRINT and press The print setting menu appears The error message SET PRINT ORDER appears if you connect a printer with direct print function and select PRINT without having set any print orders beforehand 4 Make sure that PRINT is selected and press Printing starts The print setting menu disappears when the printing is completed NOTES Depending on the connected printer you can change some print ...

Page 89: ... range the CHARGE indicator will flash irregularly The charging will start once the battery pack temperature is below 40 C 104 F The battery pack is damaged Use a different battery pack Problem Solution Buttons will not work Turn on the camcorder Load a cassette 22 Abnormal characters appear on the screen The camcorder does not operate properly Disconnect the power source and reconnect it after a ...

Page 90: ...tly warped Problem Solution Image will not appear on the screen Set the camcorder to 28 SET THE TIME ZONE DATE AND TIME appears on the screen Set the time zone date and time 26 Recharge the built in lithium battery and set the time zone date and time 98 Pressing the START STOP button will not start recording Set the camcorder to 28 Load a cassette 22 Tape reached the end END appears on the screen ...

Page 91: ...OUT setting 44 There is no sound from the TV When connecting the camcorder to an HDTV using the CTC 100 S Component Cable make sure to connect also the audio connections using the white and red plugs of the STV 250N Stereo Video Cable 71 Text displays do not appear on the TV If you connected the camcorder to the TV using the video component connection set DV OUTPUT to HDV DV 44 Tape is running but...

Page 92: ...ard error occurred Turn off the camcorder Remove and reinsert the memory card Initialize the memory card if flashing persists 70 Problem Solution The printer is not operating even though the camcorder and printer are correctly connected Disconnect the USB cable and turn off the camcorder and the printer After a short while turn them on again set the camcorder to mode and restore the connection Pro...

Page 93: ...he end Rewind the tape or replace the cassette INCORRECT TAPE SPECIFICATION You attempted to play back a tape recorded in a different television system PAL or SECAM or in a recording standard not supported by this camcorder INPUT SIGNAL NOT SUPPORTED The digital device connected with the DV cable is incompatible with the camcorder PLAYBACK STD LOCKED INCOMPATIBLE VIDEO INPUT Current camcorder sett...

Page 94: ...ose it and then restore the connection COPYRIGHT PROTECTED PLAYBACK IS RESTRICTED You attempted to play back a copyright protected tape 78 COPYRIGHT PROTECTED DUBBING RESTRICTED You attempted to dub a copyright protected tape May also appear when an anomalous signal is received during analog line in recording 78 Message Explanation Solution PAPER ERROR There is a problem with the paper The paper i...

Page 95: ...urn it back on COMMUNICATION ERROR The printer is experiencing a data transfer error Cancel printing Disconnect the USB cable and turn off the camcorder and the printer After a short while turn them on again set the camcorder to mode and restore the connection When you are printing using the button check the print settings Or you attempted to print from a memory card that contains a large number o...

Page 96: ...e day before to ensure a full charge Attach the terminal cover whenever a battery pack is not in use Contact with metallic objects may cause a short circuit and damage the battery pack Dirty terminals may cause a poor contact between the battery pack and the camcorder Wipe the terminals with a soft cloth Since storing a charged battery pack for a long time about 1 year can shorten its lifecycle or...

Page 97: ...vere impact as this may damage the cassettes With cassettes equipped with a memory function metal plated terminals may become dirty with use Clean the terminals with a cotton swab after about 10 times of removing and reinserting the cassette The memory function is not supported by the camcorder Protecting Tapes from Accidental Erasure To protect your recordings from accidental erasure slide the ta...

Page 98: ...hium battery to keep the date time and other settings The built in lithium battery is recharged while you use the camcorder however it will become totally discharged if you do not use the camcorder for about 3 months To recharge the built in lithium battery Connect the compact power adapter to the camcorder and leave it connected for 24 hours with the switch set to CHG WARNING The battery used in ...

Page 99: ...th to clean the camcorder body Never use chemically treated cloth or volatile solvents such as paint thinner Lens and Viewfinder If the lens surface is dirty the autofocus may not work properly Remove any dust or dirt particles using a non aerosol type blower brush Use a clean soft lens cleaning cloth to gently wipe the lens or viewfinder Never use tissue paper LCD Screen and I AF sensor Clean the...

Page 100: ...d RESUMING USE The precise time required for water droplets to evaporate will vary depending on the location and weather conditions After the condensation warning stops flashing wait for 1 more hour before resuming use Using the Camcorder Abroad Power Sources You can use the compact power adapter to operate the camcorder and to charge battery packs in any country with power supply between 100 and ...

Page 101: ...ter VCR MiniDVVideo cassette WL D87 Wireless Controller miniSD Card Adapter Card Reader Writer PictBridge Compatible Printers IFC 300PCU USB Cable DVD Recorder Digital Device with DV Terminal CTC 100 Component Cable DV Cable WD H43 Wide converter TL H43 Tele converter TV HDTV DTC 100 D Terminal Cable HDMI Cable FS 43U II Filter Set VFL 1 Video Flash Light VL 3 Video Light DM 50 Directional Stereo ...

Page 102: ...when the Tele converter is attached The minimum focusing distance with the TL H43 is 3 m 9 8 ft 3 cm 1 2 in at maximum wide angle When the Tele converter is attached a shadow may appear in the picture when you record with flash or assist lamp Optional Accessories Use of genuine Canon accessories is recommended This product is designed to achieve excellent performance when used with genuine Canon a...

Page 103: ...es to the camcorder s advanced accessory shoe for cable free operation VL 3 Video Light This video light enables you to record brightly in color even in dark places It attaches to the camcorder s advanced accessory shoe for cable free operation DM 50 Directional Stereo Microphone This highly sensitive super directional microphone attaches to the camcorder s advanced accessory shoe It can be used a...

Page 104: ... of the strap WS 20 Wrist Strap Use this for extra additional protection for active shooting SC 2000 Soft Carrying Case A handy camcorder bag with padded compartments and plenty of space for accessories This mark identifies genuine Canon video accessories When you use Canon video equipment we recommend Canon brand accessories or products bearing the same mark COPY ...

Page 105: ...BP 2L14 Battery Pack 9582A002AA BP 2L24H Battery Pack 2383B002AA CB 2LW Battery Charger 0763B001AA TL H43 Tele converter 2071B001AA WD H43 Wide converter 2072B001AA FS 43U II Filter Set 7150A004AA VFL 1 Video Flash Light 8834A001AA VL 3 Video Light 3175A002AA DM 50 Directional Stereo Microphone 3176A002AA CTC 100 Component Cable 1719B001AA WS 20 Wrist Strap 1729B001AA SC 2000 Soft Carrying Case 93...

Page 106: ...color approx 123 000 dots Microphone Stereo electret condenser microphone Lens f 6 1 61 mm F 1 8 3 0 10x power zoom 35 mm equivalent Movies 16 9 43 6 436 mm Movies 4 3 53 0 530 mm Still images LW 43 6 436 mm Still images L M S 40 0 400 mm Lens Configuration 11 elements in 9 groups Filter Diameter 43 mm AF system Autofocus TTL external distance sensor when set to INSTANT AF manual focus available M...

Page 107: ...minijack dual purpose terminal also for headphones stereo output Video 1 Vp p 75 ohms unbalanced Audio output 10 dBV 47 kohms load 3 kohms or less input 10 dBV 40 kohms or more USB Terminal mini B HDV DV Terminal 4 pin IEEE1394 standard input output COMPONENT OUT Terminal Luminance Y 1 Vp p 75 ohms Chrominance PB PR CB CR 350 mVp p 1080i D3 480i D1 compatible HDMI Terminal HDMI type A connector 19...

Page 108: ...pted The information in this manual is verified as of February 2009 Subject to change without notice Battery type Rechargeable Lithium Ion Battery Rated voltage 7 4 V DC Operating temperature 0 40 C 32 104 F Battery capacity 1 200 mAh Dimensions 33 3 x 25 8 x 45 2 mm 1 3 x 1 0 x 1 8 in Weight 60 g 2 1 oz COPY ...

Page 109: ...cording program 48 49 Compact power adapter 20 COMPONENT OUT terminal 71 Component video 43 72 Condensation 99 Connection to a computer 80 Connection to a High Definition TV HDTV 72 Connection to a TV VCR 71 Continuous shooting 60 CUSTOM key 61 D Data code 61 Date and time 27 Date search 34 Daylight saving time 26 Digital effects 67 Digital video input DV dubbing 77 Digital zoom 39 Direct print 84...

Page 110: ...mages 29 Recording data 62 Recording programs 48 Recording reminder 18 Remaining tape indicator 18 Remote sensor 23 RESET 89 Reviewing Movies Record review 28 Reviewing Still images 41 S Screen displays 17 Screen markers 45 Selecting the on screen displays 61 Self timer 64 Serial number 14 Setup menus 25 39 Shoulder strap 104 Shutter speed 50 Simultaneous recording tape memory card 57 Slideshow 36...

Page 111: ...General Information 111 Additional Information W White balance 54 Wide angle 30 Wide TV 16 9 43 Wind screen 41 Wireless controller 23 Z Zero set memory 33 Zoom 30 Zoom speed 39 COPY ...

Page 112: ...handling accident improper maintenance or failure to follow operating instructions B If the Equipment is defective as a result of leaking batteries sand dirt or water damage C If defects or damages are caused by the use of unauthorized parts or by service other than by Canon USA s factory service centers or authorized service facilities D If the Equipment is used for commercial or industrial use T...

Page 113: ...s it apply to Equipment purchased outside Canada If the Equipment contains a hard disk drive Canon Canada recommends that data stored on that drive be duplicated or backed up to prevent its loss in the event of a failure or other malfunction of such drive TO OBTAIN WARRANTY SERVICE Ship your Equipment in its original carton box or equivalent properly packed fully insured with shipping charges prep...

Page 114: ...TREAL 8801 Route Transcanadienne Saint Laurent QC H4S 1Z6 Q If you have any questions call the Canon Canada Information Center toll free in Canada only at 1 800 OK CANON 1 800 652 2666 Q Si vous avez des questions veuillez téléphoner 1 800 OK CANON 1 800 652 2666 sans frais au Canada seulement MÉXICO CANON MEXICANA S DE RL DE CV Blvd Manuel Ávila Camacho No 138 Piso 17 Col Lomas de Chapultepec C P...

Reviews: